eQ-3 MAX! Operating Manual
Wireless wall thermostat
Hide thumbs
Also See for MAX!:
- Operating manual (100 pages) ,
- Operating manual (32 pages) ,
- Operating manual (48 pages)

Related Manuals for eQ-3 MAX!


Summary of Contents for eQ-3 MAX!
- Page 1 Bedienungsanleitung Operating Manual MAX! Wandthermostat + Funk-Wandthermostat (S. 2) MAX! Wireless wall thermostat (p. 30)
-
Page 2: Table Of Contents
21. Technische Daten ............29 Lesen Sie diese Anleitung sorgfältig, bevor Sie das Gerät in Be- trieb nehmen. Bewahren Sie die Anleitung zum späteren Nach- schlagen auf. 1. Ausgabe Deutsch 07/2012 Dokumentation © 2012 eQ-3 Ltd., Hong Kong. Alle Rechte vorbehalten. BC-TC-C-WM-2, V1.0, 105685... -
Page 3: Bestimmungsgemäßer Einsatz
1. Bestimmungsgemäßer Einsatz Mit dem MAX! Wandthermostat + können bis zu 8 MAX! Heizkörperthermostate in einem Raum komfortabel re- guliert werden. Für den Einsatz des MAX! Heizungssteuerungssystems gibt es zwei Alternativen: Die MAX! Einzelraumlösung und die MAX! Hauslösung. Eine MAX! Einzelraumlösung besteht aus einem MAX! Wandthermostat + , mit dem bis zu 8 MAX! Heizkörper- thermostate und 8 MAX! Fensterkontakte in einem Raum komfortabel reguliert werden können. -
Page 4: Übersicht
2. Übersicht (A) Montageplatte (B) Wechselrahmen (C) Wandthermostat... -
Page 5: Bedienung Und Display
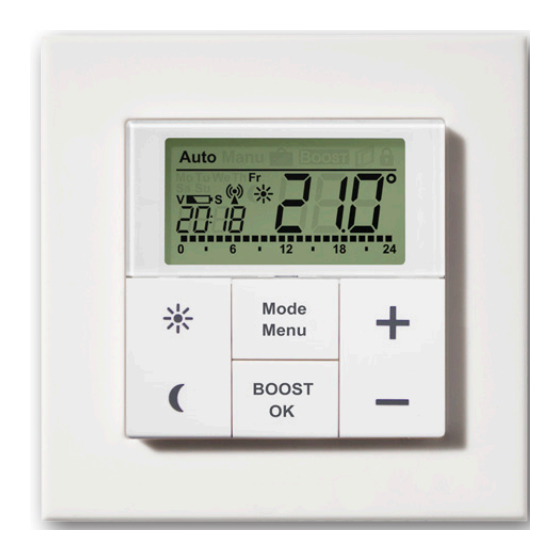
3. Bedienung und Display Automatikbetrieb (Auto), Manueller Betrieb (Manu), Urlaubsfunktion ), Boost-Funktion ( ), Fenster-auf-Symbol ( ), Bedien- BOOST sperre-Symbol ( Wochentag, Batterie-leer-Symbol ( ), Funksynchronität ( ), Kom- fort-/Absenktemperatur ( ), Uhrzeit/Datum Eingestellte Zeiträume im Wochenprogramm Komfort-Taste ( ): zum Wechseln auf die Komforttemperatur Absenk-Taste ( ): zum Wechseln auf die Absenktemperatur Mode-/Menu-Taste: Zum Wechseln des Betriebsmodus und zum Öffnen... -
Page 6: Sicherheitshinweise
4. Sicherheitshinweise Das Gerät ist kein Spielzeug, erlauben Sie Kindern nicht damit zu spielen. Verpackungsmaterial bitte nicht achtlos liegen lassen, dies kann für Kinder zu einem gefährlichen Spielzeug werden. Öffnen Sie das Gerät nicht, es enthält keine durch den Anwender zu wartenden Teile. Im Fehler- fall schicken Sie das Gerät an den Service. -
Page 7: Datum Und Uhrzeit Einstellen (Dat)
2. Montierter Zustand Im montierten Zustand lässt sich der Wandthermostat (C) einfach aus dem Rahmen und von der Montageplat- te ziehen. • Ziehen Sie den Wandthermostat (C) samt Rahmen (B) von der Wand ab, indem Sie seitlich am Rahmen ziehen. Batterien wechseln •... - Page 8 matisch Datum und Uhrzeit abgefragt. Mit Hilfe der (+) und (-) Tasten können die Eingaben geändert und mit der OK- Taste bestätigt werden. • Stellen Sie Jahr, Monat und Tag ein und bestätigen Sie die Eingaben mit der OK-Taste. Jahr: Monat und Tag: •...
-
Page 9: Montage
8. Montage Sie können den MAX! Wandthermostat + entweder im bei- liegenden Rahmen an eine Wand schrauben/kleben oder in eine bestehende Schalterserie integrieren (Näheres zur Kompatibilität finden Sie in Kapitel 9). Klebestreifen-Montage: • Wählen Sie einen beliebigen Ort zur Befestigung aus. Der Untergrund muss sauber, trocken und fettfrei sein. - Page 10 • Halten Sie die Montageplatte an die gewünschte Mon- tageposition. Achten Sie darauf, dass der Pfeil auf der Vorderseite der Montageplatte nach oben zeigt. • Zeichnen Sie zwei der Bohrlöcher A anhand der Monta- geplatte (diagonal gegenüberliegend) mit einem Stift an der Wand an.
-
Page 11: Montage In Bestehende Schalterserien
9. Montage in bestehende Schalterserien Sie können den MAX! Wandthermostat + sowohl mit dem mitgelieferten Rahmen, als auch mit Rahmen anderer Hersteller verwenden oder den Wandthermostat in einen Mehrfachrahmen integrieren. In beiden Fällen ist sowohl eine Klebestreifen-, als auch eine Schraub-Montage mög- lich. - Page 12 10.1 Anlernen an das MAX! System mit dem MAX! Cube In Verbindung mit dem MAX! Cube wird der MAX! Wand- thermostat + über die lokale MAX! Software angelernt und konfiguriert. Die in Kapitel 17. beschriebenen Funktionen sind dann durch die MAX! Software verfügbar. Das Kon- figurationsmenü...
- Page 13 10.2 Anlernen von MAX! Komponenten an den MAX! Wandthermostaten (ohne MAX! Cube) Mit dem MAX! Wandthermostat + können Sie eine Einzel- raumlösung mit bis zu 8 MAX! Heizkörperthermostaten und bis zu 8 Fensterkontakten aufbauen. Diese Lösung kann ohne den MAX! Cube betrieben werden. Hierfür ler- nen Sie die Geräte direkt an den MAX! Wandthermosta- ten + an.Diese übernehmen dann die Einstellungen des MAX! Wandthermostaten (z.B.
-
Page 14: Ablernen Von Max! Komponenten (Unl)
11. Ablernen von MAX! Komponenten (UnL) Beim Betrieb mit dem MAX! Cube erfolgt das Ablernen des MAX! Wandthermostats + und der anderen Geräte über die MAX! Software im jeweiligen Raum. Beim Betrieb ohne MAX! Cube nutzen Sie die Funktion „UnL“ im Menü, um an den MAX! Wandthermostat + an- gelernte Geräte (z.B. -
Page 15: Betriebs-Modi (Auto / Manu / Urlaubsfunktion)
13. Betriebs-Modi (Auto / Manu / Urlaubsfunktion / Boost) Sie haben die Möglichkeit, zwischen den Betriebs-Mo- di Auto, Manu, Urlaubsfunktion und Boost zu wechseln: Auto: Wochenprogramm - automatische Temperatur- regelung gemäß hinterlegtem Wochenprogramm. Manu: Manueller Betrieb - die Temperatur wird manuell über die (+) und (-) Tasten eingestellt. -
Page 16: Heizungspause Einstellen (On)
15. Heizungspause einstellen (ON) Ist die Heizung im Sommer abgeschaltet, können die Bat- terien der MAX! Heizkörperthermostate geschont werden. Dazu werden die Ventile ganz geöffnet. Der Verkalkungs- schutz wird weiter durchgeführt. • Betätigen Sie die (+) Taste im manuellen Betrieb (Manu) so lange, bis im Display „ON“... - Page 17 Die nachfolgenden Schritte erläutern, wie das Einstellen dieser Funktionen im Betrieb ohne MAX! Cube durchgeführt wird. In Verbindung mit dem MAX! Cube sind diese Funktionen am MAX! Wandthermostat + deaktiviert. Im Konfigurationsmenü lassen sich Einstellungen beim Einsatz ohne MAX! Cube ändern. Das Menü lässt sich über einen langen Tastendruck (länger als 3 Sekunden) der Mode-Taste aufrufen.
-
Page 18: Wochenprogramm Einstellen (Pro)
AEr: Einstellen der Fenster-auf-Temperatur für die automatische Temperaturabsenkung beim Lüf- ten (Abschnitt 17.8) tOF: Einstellen des Temperatur-Offsets (Abschnitt 17.9) rES: Werkseinstellungen wieder herstellen (Abschnitt 18.) 17.1 Wochenprogramm einstellen (Pro) Im Wochenprogramm lassen sich für jeden Wochentag se- parat bis zu 6 Heizphasen (13 Schaltzeitpunkte) einstellen. Die Programmierung erfolgt für die ausgewählten Tage, wobei für einen Zeitraum von 00:00 bis 23:59 Temperatu- ren hinterlegt werden müssen. - Page 19 • Wiederholen Sie diesen Vorgang, bis für den Zeitraum von 0:00 bis 23:59 Temperaturen hinterlegt sind. Im Auto-Modus kann das eingestellte Wochenprogramm automatisch von angelernten MAX! Heizkörperthermosta- ten übernommen und die Temperatur über die (+) - und (-) -Taste bzw. Komfort ( )- und Absenktaste ( ) jederzeit verändert werden.
-
Page 20: Anzeige Uhrzeit/Datum Einstellen (T-D)
Im Display werden Balken für Heizphasen immer dann angezeigt, wenn die eingestellte Temperatur für den Zeitraum größer als die eingestellte Absenktempe- ratur ist. Soll ein Raum (z.B. Badezimmer) auch zur Mittagszeit beheizt werden, kann eine Programmierung wie folgt aussehen: Montag bis Sonntag: ab 00:00 bis 06:00 15.0°C ab 06:00 bis 09:00... -
Page 21: Umschalten Von Soll- Und Ist-Temperatur (S-A)
17.3 Umschalten von Soll- und Ist-Temperatur (S-A) Werkseitig wird im Display die Soll-Temperatur angezeigt. Über das Menü können Sie sich anstatt der Soll- die Ist- Temperatur anzeigen lassen. • Öffnen Sie durch langen Tastendruck der Mode-Taste das Konfigurationsmenü. • Wählen Sie den Menüpunkt „S-A“ mit den (+) und (-) Tas- ten aus und bestätigen Sie mit der OK-Taste. -
Page 22: Boost-Funktion
• Im Display erscheint das jeweilige Symbol und die ent- sprechende Komfort-/ bzw. Absenktemperatur. • Verändern Sie die Temperatur mit den (+) und (-) Tasten. • Bestätigen Sie mit der OK-Taste. Auch im Auto-Modus kann die Temperatur über die Tasten jederzeit geändert werden. -
Page 23: Die Urlaubsfunktion Einstellen ( )
• Wählen Sie mit den (+) und (-) Tasten den Menüpunkt „bOS“ aus. • Bestätigen Sie die Auswahl mit der OK-Taste. • Stellen Sie mit den (+) und (-) Tasten die Boost-Dauer von 0 bis 60 Min ein (0, 5, 10, 15, 20, 25, 30, 60 Min). Die Auswahl 0 deaktiviert die Funktion. -
Page 24: Entkalkungsfahrt Einstellen (Dec)
• Stellen Sie die Uhrzeit ein, bis zu der die Temperatur ge- halten werden soll. • Bestätigen Sie die Auswahl mit der OK-Taste. • Stellen Sie das Datum ein, bis zu dem die Urlaubsfunk- tion aktiv sein soll. • Bestätigen Sie die Auswahl mit der OK-Taste. •... -
Page 25: Fenster-Auf-Funktion / Lüften ( , Aer) Einstellen 25 17.9 Offset-Temperatur Einstellen (Tof)
17.8 Fenster-auf-Funktion / Lüften ( , AEr) einstellen Der MAX! Wandthermostat + regelt beim Lüften im Raum die Temperatur automatisch herunter, um Heizkosten zu sparen. Dabei wird im Display des Wandthermostats und aller angelernten Geräte das Fenster-auf-Symbol ( angezeigt. In Verbindung mit einem MAX! Fensterkontakt wird das Öff- nen und Schließen eines Fensters zeitgenau erkannt. -
Page 26: Zurücksetzen In Den Auslieferungszustand/Reset (Res)
• Bestätigen Sie die Auswahl mit der OK-Taste. • Stellen Sie die Temperatur mit den (+) und (-) Tasten ein. • Bestätigen Sie die Auswahl mit der OK-Taste. 18. Zurücksetzen in den Auslieferungszustand/ Reset (rES) Der Auslieferungszustand des MAX! Wandthermostats + kann manuell wieder hergestellt werden, um z. -
Page 27: Hinweise Zum Funkbetrieb
ßer der Sendeleistung und den Empfangseigenschaften der Empfänger spielen Umwelteinflüsse wie Luftfeuchtig- keit neben baulichen Gegebenheiten eine wichtige Rolle. Hiermit erklärt die eQ-3 Entwicklung GmbH, dass sich dieses Gerät in Übereinstimmung mit den grundlegenden Anforder-ungen und den anderen relevanten Vorschriften der Richtlinie 1999/5/EG befindet. -
Page 28: Fehlerbehebung
20. Fehlerbehebung Fehlercode Problem Behebung im Display Batterie- Batteriespan- Batterien austau- symbol nung zu gering schen Bereits ein Stellen Sie sicher, MAX! Cube dass das Gerät nicht angelernt mehr am Cube (in der Software) angelernt ist und führen Sie ei- nen Reset durch. -
Page 29: Technische Daten
21. Technische Daten Technische Änderungen, die zur Verbesserung die- nen, sind vorbehalten. Versorgungsspannung: Max. Stromaufnahme: 30 mA Batterien: 2 x LR03 (Micro/AAA) Batterielebensdauer: ca. 2 Jahre Display: LC-Display Funkfrequenz: 868,3 MHz Reichweite im Freifeld: 100 m Empfängerklasse: SRD Class 2 Wirkungsweise: Typ 1 Anlernbare Komponenten:... - Page 30 Read this manual carefully before starting to use the device. Keep the manual so you can refer to it at a later date should you need to. 1st English edition 07/2012 Documentation © 2012 eQ-3 Ltd., Hong Kong. All rights reserved. BC-TC-C-WM-2, V1.0, 105685...
-
Page 31: Intended Use
1. Intended use With the MAX! wall thermostat up to 8 MAX! radiator ther- mostats can be conveniently regulated in a room. There are two alternative ways to use the MAX! heating control system: the MAX! single room solution and the MAX! house solution. -
Page 32: Overview
2. Overview (A) Mounting plate (B) Attachment frame (C) Wall Thermostat... -
Page 33: Operation And Display
3. Operation and display Automatic operation (Auto), Manual operation (Manu), Holiday function ), Boost function ( ), Open Window symbol ( ), Opera- BOOST ting lock symbol ( Weekday, Empty battery symbol ( ), Radio activity ( ), comfort/ reduced temperature ( ), time/date Bar chart of the programmed heating phases of the current day Comfort temperature button (... -
Page 34: Safety Instructions
4. Safety instructions This device is not a toy; do not allow children to play with it. Do not leave packaging material lying around, as it can be dangerous in the hands of a child. Do not open the de- vice: it does not contain any components that need to be serviced by the user. -
Page 35: Setting Date And Time (Dat)
2. Installed condition Once mounted, the MAX! wall thermos- tat can easily be pulled out of the frame. • Pull the wall thermostat (C) off the wall together with the frame by pulling side- ways at the frame. Change batteries •... -
Page 36: Mounting
• Set the year, month and date and confirm each setting with the OK button. Year: Month and day: • Now set the time and confirm settings with the OK button. Hours: Minutes: Once the time and date were entered, the MAX! wall ther- mostat switches to normal operation. -
Page 37: Screw Mounting
Adhesive strip mounting: • Choose a site for installation. The surface on which you are mounting the MAX! Wall Thermostat + must be clean, dry and greaseless. • For mounting of the assembled MAX! Wall Thermostat + , attach the adhesive strips to the back side of the moun- ting plate. - Page 38 • Use a pen to mark the positions of 2 bore holes A (dia- gonally opposite) in the mounting plate on the wall. The bore holes B can be used for installation with a flush- mounting box. • If you are working with a stone wall, drill the marked two 5 mm holes and insert the plugs supplied.
-
Page 39: Installation In Multiple Combinations
9. Installation in multiple combinations You can mount the MAX! Wall Thermostat + with the at- tachment frame provided or use it with frames of other manufacturers as well as integrate the electronic unit into a multi-gang frame. In both cases, mounting with adhesi- ve strips and screws is possible. -
Page 40: Teaching-In Of Max! Components
10. Teaching-in of MAX! components In order to use the MAX! Wall Thermostat + in your installa- tion, you must teach it in to the MAX! system. You can use the MAX! Wall Thermostat + both in conjunction with the MAX! Cube or without using the MAX! Cube. - Page 41 If you add a MAX! Cube to your system later, you must reset all devices including the MAX! Wall Ther- mostat + to the initial state prior to teach-in to the MAX! cube. All settings including your weekly profi- les are deleted in this process. 10.2.
-
Page 42: Teaching-Out Of Wireless Components (Unl)
11. Teaching-out of wireless components (UnL) During operation with the MAX! Cube, the MAX! Wall Ther- mostat end the other devices are taught out via the local MAX! Software in the respective room. During operation without the MAX! Cube you use the „UnL“ function in the menu in order to unteach devices that have been taught in at the MAX! Wall Thermostat + (e.g. -
Page 43: Operating Modes (Auto / Manu / Holiday Function)
13. Operating modes (Auto / Manu / Holiday function / Boost) You can choose between the operating modes auto, manu and holiday function: Auto: Week programme – automatic temperature control according to stored week programme. Manu: Manual operation – the temperature is set manu- ally with the (+) and (-) buttons. -
Page 44: Setting Heat Pause (On)
• Once activated, the operating lock symbol ( ) is shown on the display. 15. Setting heat pause (ON) Battery life can be prolonged by switching the heating off in summer. To achieve this, the valve is opened fully and the calcification protection function continues to run. -
Page 45: Configuration Menu (Menu) (Operation Without The Max! Cube)
17. Configuration menu (Menu) (Operation without the MAX! Cube) If you operate your MAX! system with a MAX! Cube, you can conveniently set the functions described in the following chapters in the MAX! Software in each room. The following steps explain how these functions are set when operating without MAX! Cube. -
Page 46: Setting The Week Programmes(Pro)
Set holiday function (sec. 17.6) dEC: Set valve protection function (sec. 17.7) AEr: Set “Open window temperature” for automatic temperature decrease during airing (sec. 17.8) tOF: Set temperature offset (sec. 17.9) rES: Reset factory settings (sec. 18.) 17.1 Setting the week programmes(Pro) In the week programme, for each weekday up to 6 heating phases (13 change settings) can be set separately. - Page 47 • Repeat this procedure until temperatures are stored for the entire period between 0:00 and 23:59. In Auto mode the selected week programme will be automa- tically adopted by all taught-in MAX! Radiator Thermostats. In Auto mode the temperature can be changed at any time with the (+) and (-) buttons or comfort ( ) and redu- ced temperature ( ) buttons.
-
Page 48: Switching Time/Day (T-D) Display
In the display, bars for heating phases are displayed whenever the set temperature for the period is high- er than the set reduction temperature. If you want a room (e.g. the bathroom) to also be heated during lunchtime the programming could look as follows: Monday - Sunday: from 00:00 to 06:00 15.0°C... -
Page 49: Comfort And Reduced Temperature ( )
the display setting from nominal to acutal temperature. • Open the configuration menu by pressing the menu button. • Select the (S-A) menu item with the (+) and (-) buttons and confirm with the OK button. • Now set the format you want to show on the display („SEt“ for the nominal temperature and „ACt“... -
Page 50: Set Boost Function
Even in Auto mode the temperature can be changed with this button at any time. However, the change will only be maintained until the next phase the timer programme starts. 17.5 Set boost function ( , bOS) BOOST The Boost function can create the sensation of a rise in room temperature to the human body. -
Page 51: Setting The Holiday Function ( )
• Confirm the setting with the OK button. • Subsequently set the valve opening between 0 and 100% in 5% increments with the (+) and (-) buttons. The larger the valve opening, the higher will be the heat emitted by the radiator. •... -
Page 52: Setting Valve Protection Function (Dec)
The set temperature will remain until the set end time. Afterwards the MAX! wall thermostat will switch to Auto mode. Radio control commands like those from a window contact or the weekly de-scaling run will still be performed. 17.7 Setting valve protection function (dEC) To prevent the build-up of lime scale in the valve a so called “de-scaling run”... -
Page 53: Setting The Offset Temperature (Tof)
12° C while the window is opened. Once the MAX! Window Sensor registers the closing of the window, all components installed in the room will be reset to the previous mode. To change the reduced temperature setting proceed as follows: •... - Page 54 tion about taught-in devices. Before you reset the MAX! wall thermostat to the fac- tory settings, first delete the device from the MAX! software when operating with the MAX! Cube. Before you teach-in a single room solution with a MAX! Wall Thermostat + to a MAX! Cube, you must reset all devices to the initial state.
-
Page 55: Information About Radio Operation
Entwicklung GmbH hereby decla- res that this device complies with the essential requirements and other relevant regulations of Directive 1999/5/EC. You can find the full declaration of conformity at www.eQ-3.de. -
Page 56: Remedy
20. Remedy Error code Problem Solution on the dis- play Battery Battery voltage Replace batteries symbol too low MAX! Cube al- Make sure the device ready taught-in is no longer taught- in to the Cube (in the software) and perform a reset. -
Page 57: Technical Data
21. Technical data Supply voltage: Max. current consump- 100 mA tion: Batteries: 2x LR6 batteries Battery life: 2 years approx. Display: Receiver frequency: 868.3 MHz Typical open air range: 100 m Receiver class: SRD Class 2 Method of operation: Type 1 Degree of protection: IP20 Components that can...
Need help?
Do you have a question about the MAX! and is the answer not in the manual?
Questions and answers