Table of Contents
Advertisement
Advertisement
Table of Contents

Related Manuals for Cognex Checker 3G Series


Summary of Contents for Cognex Checker 3G Series
- Page 1 COGNEX ® Checker 3G Series ® User’s Guide...
-
Page 2: Table Of Contents
What is Checker 3G and what does it do? Table of Contents Checker 3G Products and Accessories Checker 3G is a programmable vision sensor that verifies the presence and Dimensions and Features appearance of objects Getting Started You configure Checker 3G by creating Verify Checker is Working -- Teach Pendant one or more Jobs using a SensorView Verify Checker is Working -- PC... -
Page 3: Checker 3G Products And Accessories
Checker 3G Products and Accessories Flying Lead Cable (C3G-CBL-001) Connects Checker directly to your equipment (5m) Checker 3G Series Systems Part Detection √ M12 USB Cable (CKR-200-CBL-USB) Trigger Input Line √ Discrete Outputs Provides an IP67-compliant USB connection from Checker to... -
Page 4: Dimensions And Features
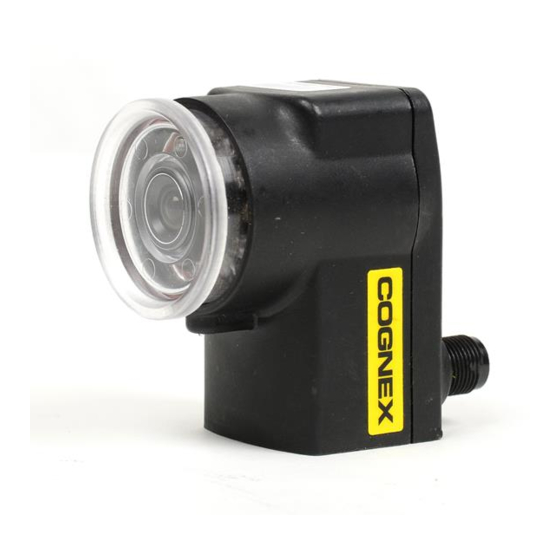
Dimensions and Features 67 (2.64) 67 (2.64) 22 (0.87) 22 (0.87) Mounting holes (M4 x 4 mm) 39 (1.54) 39 (1.54) Focus lock (M3, use 2 5 mm hex key) 60 (2.36) Lens cover/focus ring 60 (2.36) Status LED (GREEN): •... -
Page 5: Getting Started
5 Select Personality Verify that SensorView Teach Pendant is displaying the Select • Start the Checker software (select Cognex->Checker Vision Sensors->Checker from Personality screen Select Presence if you are using this the Windows Start menu) sensor to check presence/absence or appearance Select •... -
Page 6: Verify Checker Is Working -- Pc
Verify Checker is Working -- Teach Pendant Verify Checker is Working -- PC SensorView should display the Setup mode home screen, as COGNEX shown here The PC software should automatically connect to Checker 3G and display an image... -
Page 7: Checker User Interface -- Teach Pendant
Setup mode home screen Each of the four steps at the left includes substeps to let you create and modify Checker 3G jobs COGNEX Navigation keys. Use these keys to select which item is active on the Checker 3G screen If a full-screen view is shown, the navigation keys let you select individual... -
Page 8: Checker User Interface -- Pc
Checker User Interface -- PC The Checker User Interface is PC software that lets you control Checker You use this program to view Checker images, create and modify Checker Jobs, and to monitor running Checkers Menu bar and status pane The menu bar lets you open and save jobs and manage Checker personalities and system settings The status pane shows which Checker is connected, the Job name and if it has been saved, along with results for the most recent image... -
Page 9: Checker Part Triggers
Checker Part Triggers Choosing a Trigger Type A part trigger tells Checker that a part is ready to be inspected Checker supports three trigger You set the trigger type in the Start ►Select Trigger step on SensorView Teach Pendant or the types Select Part Trigger step on the PC In most cases, it is simplest to use the Internal Part Trigger, since no external equipment is required You create a Part Finding Sensor in the Set Up Sensors ►Find My Part step on... -
Page 10: Part Finding Sensor
Part Finding Sensor Part Finding Sensors and Trigger Types A Part Finding Sensor detects and locates your part in the image You create a Part Finding Part Finding Sensors are used differently for different trigger types Sensor by drawing a box around a feature of part that is present on both good and bad parts •... -
Page 11: Presence Sensors
Presence Sensors Sensor Threshold Presence Sensors evaluate part of a Checker image to determine if a feature is present or not The sensor threshold slider sets the level below which a sensor fails and above which a sensor passes In many cases, the default value works well If you adjust the slider, set it so that it is Presence sensors support one-click setup;... -
Page 12: Measurement Sensors
Measurement Sensors How to use the Measurement Sensor Controls Measurement Sensors evaluate part of a Checker image to determine if a feature is within a In most cases, there is no need to change the one-click setup sensor Features that are too specified size range. -
Page 13: Advanced Measurement Sensor Features
Advanced Measurement Sensor Features Adjusting Edge Sensitivity The sensitivity control for measurement sensors controls how many edges the sensor Selecting the Edge Search Rule evaluates when measuring your feature As you move the sensitivity slider, the sensor displays the edges that it finds as yellow lines. Normally, width and height sensors measure the edges that are closest to the caliper blades while diameter sensors measure the strongest edges You can select a different rule for edge selection using the Search For rule... -
Page 14: Job Control
Job Control The example below shows how to load the Job in slot 5: Checker 3G has eight Job slots You can assign saved Checker Jobs to Job slots, then load them Raise JOB SELECT 0 and while Checker is running by sending Job Select and Job Change signals to Checker through its JOB SELECT 2 lines (101 input lines binary = 5 decimal) -
Page 15: External Retrain
External Retrain This example shows Part Finding Sensor being retrained: You can configure both Part Finding Sensors and Pattern Sensors to be retrainable by checking External Retrain in the sensor control panel Whenever Checker receives a signal on the RETRAIN line, Checker retrains any retrainable Part Finding Sensors and Pattern Sensors using the part of most recently acquired image that lies within the retrain region 24 VDC+ POWER IN (RED) -
Page 16: Run Time Display
Run Time Display Run Time Recording Run Time Display lets you control what images, if any, are displayed by Checker in Run mode Run Time Recording lets Checker record and save specific images while it is running, even when not connected to SensorView Teach Pendant or a PC You can choose from among any You configure Run Time Display from the Main Menu ►Display and Record screen on of the current Checker results SensorView Teach Pendant or the Display and Record step on the PC... -
Page 17: Filmstrip Control -- Sensorview
Filmstrip Control -- SensorView The Filmstrip Control lets you record and play back Checker images Image source selector: Controls source of images in Setup mode Click to add one or more images to the Filmstrip Filmstrip display Click on an image to view it Blue bars separate images of a single detected part (in Internal Part Trigger mode) Filmstrip clear, load, and save controls... -
Page 18: Filmstrip Control -- Pc
Filmstrip Control -- PC The Filmstrip Control lets you record and play back Checker images Filmstrip Mode Selector Filmstrip mode selector The Filmstrip mode selector controls whether the Filmstrip is recording or playing back images, Record button Click (or press F5) to add an image to the Filmstrip and if it is recording, when images are recorded to the Filmstrip Recording rate How many images per second are added to the Filmstrip Filmstrip display Click on an image to view it Blue bars separate images of a single... -
Page 19: Input/Output Wiring
Input/Output Wiring Circuit Diagrams (Typical) The leads in the flying lead cable (C3G-CBL-001) are color-coded to indicate which signal is carried on which line The corresponding pins on the M12 connector are provided as well Power 24 VDC+ POWER IN (RED) Lead Color Signal M12 Pin... -
Page 20: Input/Output Wiring Examples
Input/Output Wiring Examples Trigger from PLC (Checker sources current) and Ouput to PLC (Checker sinks current) DC OUT DC IN 24 VDC+ POWER IN (RED) 24 VDC+ POWER IN (RED) 24 VDC − 24 VDC − GROUND (BLACK) GROUND (BLACK) DC + DC common DC OIN... -
Page 21: Working Distance And Field Of View
Working Distance and Field of View Adjusting Focus The distance from Checker’s lens cover to your part is the working distance; the field of view is Adjust focus using the clear ring on Checker Using the supplied 2 5 mm hex key, you can lock what Checker can see at that distance As the working distance increases, so does the size of the the focus adjustment by tightening the focus lock field of view. -
Page 22: Changing Lenses
Changing Lenses To install the Checker lens, follow the steps listed below To remove the Checker lens, follow the Note: Failure to follow these steps listed below instructions can cause damage to your Checker Note: Failure to follow these instructions can cause damage to your Screw lens into Checker at Checker least five full rotations. -
Page 23: Mounting Checker
Mounting Checker The optional Checker mounting bracket lets you easily position and adjust Checker on your line Caution: Do not use a mounting screw with an exposed thread depth of greater than 5mm. Allowing the mounting screw to bottom in the mounting hole can damage Checker. Caution: The maximum torque for a mounting screw is 1.8 nM (16 inch-pounds). Exceeding this torque value can damage Checker. Mounting Checker at a slight angle can reduce reflections from your part’s surfaces, improving performance Adjust the mounting angle to provide the clearest image of the part features you are checking 1/4-20 UNC 19 (0.75) -
Page 24: Specifications
Certification Copyright © 2009 Cognex Corporation All Rights Reserved This document may not be copied in whole or in part, nor transferred to any other media or language, without the written permission of Cognex Corporation Cognex, the Cognex logo, Checker, and the... - Page 25 COGNEX ® 590-7096...
Need help?
Do you have a question about the Checker 3G Series and is the answer not in the manual?
Questions and answers