Table of Contents
Advertisement
Quick Links
Advertisement
Table of Contents

Related Manuals for TC-Helicon Voicelive 2


Summary of Contents for TC-Helicon Voicelive 2
- Page 1 USER’S MANUAL Ver. 1.2...
- Page 2 WARNING To reduce the risk of fire or electric shock, do not expose this appliance to rain or moisture. CAUTION This equipment has been tested and found to comply with the limits for a Class B digital device pursuant to Part 15 of FCC Rules. Operation is subject to the following two conditions: (1) This device may not cause harmful interference, and (2) this device must accept any interference received, including interference that may cause undesired operation.
-
Page 3: Table Of Contents
Changing The Mix ............ 22 Step 3: Outputs ............16 Basic Editing Concepts ..........23 Step 4: Set Mic Level ..........17 VoiceLive 2 for the Guitarist/Singer ....24 Step 5: Quick Start Settings ........17 Overview..............24 Acoustic Guitar ............24 First Impressions ........... - Page 4 Table of Contents: Basics Section The USB Connection..........32 VoiceLive 2 for the MIDI keyboardist/Singer ..26 Overview..............26 The VoiceSupport Application ........32 MIDI Hookup And Channel Selection ....... 26 VoiceLive 2 And Digital Audio ........33 MIDI IN And USB ............. 26 USB Audio And ASIO Applications ......
- Page 5 Table of Contents: Details Section The EQ Tab .............. 51 The Tone Button ............. 38 The Tone Tab ............38 The Compress Tab........... 52 The Adaptive Check Boxes ........39 The Edit Menu Overview ........53 The Shape Control ........... 39 The μMod Tab ............
-
Page 6: Table Of Contents: Details Section
Table of Contents: Details Section The System Tab ............88 The Expression Tab ..........89 The Store Menu ............. 91 FAQ and Troubleshooting ........92 MIDI Implementation ..........96 Factory Preset List ..........99 Effects Path Diagram ........... 101 Warranty ..............102 Specifications ............ -
Page 7: Introduction
Control harmonies with guitar, MIDI or MP3 input effects pedals and rack mount units. The significance for you, the singer using VoiceLive 2, is being able to benefit o Up to 8 voices of new NaturalPlay harmonies from a wave of innovation that makes production of o New reverb, delay, μMod, and double... -
Page 8: About This Manual
Introduction About TC-Helicon About This Manual At TC-Helicon we truly believe that the voice is the You’ve no doubt noticed that the Table of Contents has world’s most beautiful instrument. We don’t mean to two sections: the Basics section and the Details section. -
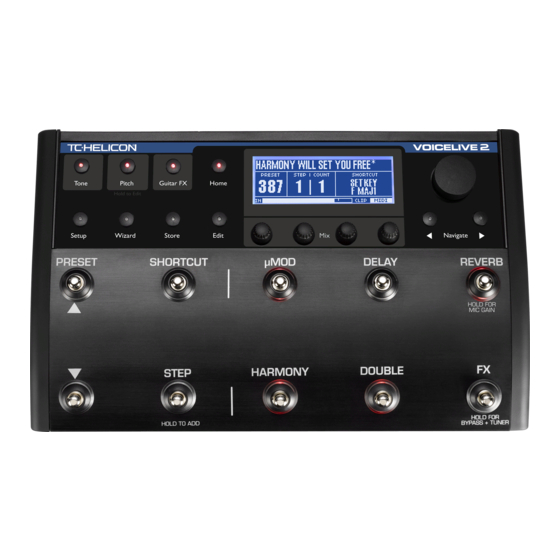
Page 9: Front Panel
Front Panel Page Head... - Page 10 Front Panel 1. GLOBAL GROUP - When activated, these three destination and commit edited presets to memory. To effects stay on independent of preset changes. Press any cancel and exit, press HOME. to activate or hold to enter a specific edit menu. TONE 7.
- Page 11 Preset Up/Down, Shortcut and Step This can include TEMPO,HARMONY HOLD and more. footswitches to set a fixed key and scale. See Using A Fixed Key in VoiceLive 2 for the Lead Singer section for 12. μMOD ON/OFF - Press to enable or disable more detail on using fixed key to guide harmonies.
-
Page 12: Back Panel
Back Panel 10 11 1. MIC and LINE inputs - Connect your microphone or 4. HEADPHONE Out - The main output is mirrored line level audio device’s output here. Only one should here to drive headphones. Adjust the headphone be connected at a time. Hold the REVERB footswitch and main output volume with the OUTPUT setting to set gain when changing back and forth between MIC controlled by turning the MIX knobs. - Page 13 7. PEDAL Input - A standard expression pedal can be connected here to control the level of the Harmony and 11. POWER Switch - Press to turn VoiceLive 2 on and Doubling voices. Calibration is done in the EXPRESSION off.
-
Page 14: Quick Start
Assemble the gear you need to get started. For now, performance setting with a microphone. You will learn leave your VoiceLive 2 and PA system turned off. how to connect external devices and how to set the 1. Vocal microphone microphone gain properly. -
Page 15: Step 2: Inputs
MIDI IN or AUX input, most of the harmony presets in Next, connect the instrument or device you will VoiceLive 2 will default to global Scale mode in the Key use to control harmony. On power-up, VoiceLive 2 of A Major (for this, see the section entitled VoiceLive 2... -
Page 16: Step 3: Outputs
The typical setup for monitoring the output of VoiceLive 2 is to connect two 1/4” cables to a stereo channel in a PA mixer. VoiceLive 2 can be set to output in mono if preferred in the I/O tab of the SETUP menu. -
Page 17: Step 4: Set Mic Level
Page Head Step 4: Set Mic Level Step 5: Quick Start Settings This step informs VoiceLive 2 how loud you plan to Ensure that the HOME and TONE buttons on the front sing with your particular mic. We’ll use VoiceLive 2’s panel are lit. -
Page 18: First Impressions
First Impressions How To Audition Presets Using Harmony Presets The best way to s ample VoiceLive 2’s effects is to Most presets that have the HARMONY footswitch lit start with preset #1, sing, and then tap the PRESET up require that you play your guitar, keyboard or music footswitch to audition the next preset. -
Page 19: Using The Effect On/Off Switches
First Impressions Page Head Using The Effect On/Off Switches The SHORTCUT Footswitch The Effect On/Off footswitches give you the option This footswitch extends the capabilities of the current to modify the sound without changing to another preset. Depending on the preset, it could allow you to preset. -
Page 20: The Step Footswitch
First Impressions The STEP Footswitch Programming Your Own Steps The Step feature allows you to create a series of up to 1. Select a preset as the starting effect in your chain. 10 linked effect changes associated with a preset. In a 2. -
Page 21: Tone, Pitch And Guitar Fx Buttons
First Impressions To delete any single step, locate the step you want Press the PITCH button to add subtle Auto Chromatic to remove then enter Step programming mode. Tap pitch correction which helps you sing more in tune. SHORTCUT to delete the current step. If you have a guitar connected to the GUITAR IN jack, To speed Step programming, all insertions and deletions pressing the GUITAR FX button will apply effects to... -
Page 22: Activating Bypass + Tuner Mode
AUX IN, you can do so with the AUX LEVEL setting in the SETUP menu under the I/O tab. The effects balance in VoiceLive 2 is adjusted at the factory to suit many situations. The Mix/Edit knobs... -
Page 23: Basic Editing Concepts
Edit button to explore VoiceLive 2’s editing tabs. Each of the effect You can also vary the level of each effect in the edit footswitches has a related tab you can access with the tabs. -
Page 24: Voicelive 2 For The Guitarist/Singer
VoiceLive 2 for the Guitarist/Singer Overview level of your guitar. Guitarists have bonus features in VoiceLive 2. In addition Press the GUITAR FX button if it is not already lit. This to sensing the guitar chords to guide harmony, VoiceLive will add the default effects to your guitar. -
Page 25: Tuning Your Guitar
VoiceLive 2 for the Guitarist/Singer the PA VoiceLive 2 is connected to, press the GND LIFT of a song, it’s important to briefly play a chord first. A (ground lift) button to silence it. recognized chord will show “NP” in the LCD display. -
Page 26: Voicelive 2 For The Midi Keyboardist/Singer
MIDI out and VoiceLive 2’s MIDI IN. When you want to restore computer control of Play a note on your keyboard and check VoiceLive 2’s VoiceLive 2 over USB, or you want to access the display to see if the MIDI indicator lights. If it doesn’t, VoiceSupport application’s features, you can turn the... -
Page 27: Midi Performance Tips
MIDI Performance Tips chapter entitled VoiceLive 2 for the Lead Singer. In chords without a clear third, VoiceLive 2 will assume a major chord, so when you play in a minor key, and as a general rule, you should always include a third when changing chords. -
Page 28: Voicelive 2 For The Lead Singer
MIDI keyboard or guitar. You are still able to successfully in the original VoiceLive processor. Briefly, experience VoiceLive 2’s vocal harmony effects with all of the chords in an entire song and your melody can these methods: belong to a single “Key”. -
Page 29: Singing To Music Playback
For example G Major is a valid Key, Gm7b5 is not. VoiceLive 2 can derive musical information from fully mixed music tracks. For this alternative you’ll need: Hold the HARMONY footswitch to enter Key Set mode then use the PRESET up and down footswitches to o Music source device. -
Page 30: Borrowing" From Another Player
Alternatively, you can run a MIDI cable from your keyboardist’s controller to your VoiceLive 2. This has no effect on the keyboard sound and cable runs are not a problem. -
Page 31: General Usage Tips
Most harmony presets have a slight amount VoiceLive 2’s pitch detection and result in poor sounding of pitch correction (known as Smoothing) on the harmony voices as well as bring on feedback. -
Page 32: Connecting Voicelive 2 To A Computer
Connecting VoiceLive 2 To A Computer The USB Connection VoiceLive 2 does not need to be USB-connected in order to access the tutorials, news and other downloads. Connecting the supplied USB cable between VoiceLive Also, you may view videos and other media from the 2 and your Mac or PC computer offers the following included CD without connecting to the internet. -
Page 33: Voicelive 2 And Digital Audio
Connect your mic and headphones to VoiceLive2 and version shown on the TC-Helicon website. If a newer pick a preset you like. VoiceLive 2 will send the fully version is available, you can download it from our processed sound to your DAW and you’ll be able to website. - Page 34 2. DIGITAL OUT: VOCAL & GUITAR Method #2 - Processing vocals from your DAW: Connect your mic and a guitar to VoiceLive 2 and your headphones to the headphone out. Even though you’ll To use VoiceLive 2 as an effects insert, set the I/O...
-
Page 35: Usb Audio And Asio Applications
Connecting VoiceLive 2 To A Computer USB And MIDI Control is set to AUX INPUT. To use VoiceLive 2’s MIDI IN jack for harmony, preset Digital Output Notes: change or realtime control while USB is connected, USB audio output will not function when either of the enter the I/O tab in the SETUP menu and set USB SPDIF: options is chosen for the DIGITAL IN parameter. - Page 37 Details Section In this part of the manual we shed light on the individual editing parameters in VoiceLive 2. This section discusses: The Global controls: Tone, Pitch and Guitar FX The Edit menu including all effect-specific tabs The Setup menu and its 4 tabs...
-
Page 38: The Tone Button
ADAPTIVE=X(On), SHAPE=50% times of your performance just like a professional audio engineer will. All EQ and compression enhancements o COMPRESS applied here will affect the overall sound of VoiceLive 2 ADAPTIVE=X(On), COMPRESS=50% including Harmony, Doubling, Reverb etc. o DE-ESS The suite of effects that make up Tone are:... -
Page 39: The Adaptive Check Boxes
The Global Controls: Tone Adaptive effects and hearing the effect as the algorithm while increasing brightness to a useful range for your re-assesses your voice input. voice. Turning from 50% up to 100% adds more brightness. The ADAPTIVE Check Boxes Reducing Mud These show... -
Page 40: The Compress Control
The adaptive Shape feature of With the ADAPTIVE control activated, the COMPRESS VoiceLive 2 listens continually to your voice through control reduces the amount of range between louder your mic and adjusts to make your voice sound like it is and softer singing to produce more even-sounding professionally produced and balanced. -
Page 41: The De-Ess Control
” compression that they can become piercing. At acoustic singing levels with no, or very quiet VoiceLive 2’s DE-ESS control monitors the level of instrumentation, this would sound fine. When amplified sibilance and, when it is detected, will quickly and however, the loud words become strident and even transparently reduce it. -
Page 42: The Gate Control
The Global Controls: Tone There is only the single DE-ESS control; no other manual The Adaptive Gate in VoiceLive 2 works automatically adjustment settings are required. The factory setting of with your singing style to provide the optimum balance 50% gently reduces sibilance without becoming obvious. -
Page 43: The Eq Tab With Adaptive Off
The Global Controls: Tone EQ Tab With ADAPTIVE Off SHAPE AMOUNT Turning ADAPTIVE off presents manual parametric WARMTH ON/OFF EQ controls for users who understand this type of ADAPTIVE ON/OFF equalization. There are 3 bands of control: This activates the automatic EQ algorithm and changes Low band shelving the control set for the EQ tab. -
Page 44: The Compress Tab
The Global Controls: Tone PARA GAIN voice as well. Boosts or cuts the band of frequencies centered at the The 3 GAIN controls allow +/- 12 dB of adjustment. setting of the PARA FREQ control and its associated The 3 FREQ controls range from 20 Hz to 20 kHz. WIDTH. -
Page 45: The Compress Tab With Adaptive On
RATIO control will occur. The range is 0 dB to -30 setting of the THRESHOLD. dB: 0 dB being the loudest input signal VoiceLive 2 can accept without distortion and -30 dB being a very quiet signal. If you sing consistently more quietly than the... -
Page 46: The Gate Tab
The Global Controls: Tone Also note that automatic makeup gain occurs depending (attenuated) when your voice falls below the Gate on your combination of THRESHOLD and RATIO. A threshold and the Gate closes. This setting applies side effect of compression is that it can reduce apparent whether the GATE is set to ADAPTIVE or MANUAL. - Page 47 The Global Controls: Tone THRESHOLD (MANUAL Gate Only) This parameter becomes visible when the GATE has been switched to MANUAL. The THRESHOLD defines the minimum singing level you need to reach in order for the Gate to open and let your voice sound. The factory default setting of -40 dB is very sensitive to allow a wide range of singing levels but it may also allow more nearby instrumental sounds through when you are not singing.
-
Page 48: The Pitch Button
The Global Controls: Pitch The Pitch Button noticeable when you slide from note to note. This is the effect of faster transition speed between your input Pressing the Pitch button activates auto chromatic note and the closest scale tone as well as the fact that pitch correction. -
Page 49: The Guitar Fx Button
Mix screen. You Pressing the Guitar FX button will apply default settings can adjust the level of the guitar in VoiceLive 2’s overall for the Reverb, μMod, EQ and Compress processors to mix in either menu. The range of this control is -30 dB your guitar. - Page 50 UMOD STYLE VoiceLive 2. Return to standing position and adjust your Scroll down to this row and use the Mix/Edit knob to guitar volume to the level that caused the feedback. If change μMod (Micromod) style for the guitar.
-
Page 51: The Eq Tab
The Global Controls: Guitar FX The EQ Tab The 3 GAIN controls allow +/- 12 dB of adjustment. The 3 FREQ controls range from 20 Hz to 20 kHz. Use the Navigate arrows to tab over to the EQ tab from the GUITAR tab. -
Page 52: The Compress Tab
The Global Controls: Guitar FX PARA GAIN control will occur. The range is 0 dB (not compressing any peaks) to -60 dB (compressing everything you play) Boosts or cuts the band of frequencies centered at the with the default being -6 dB. setting of the PARA FREQ control and its associated WIDTH. -
Page 53: The Edit Menu Overview
The Edit Menu Overview currently are in the menu. Basic editing, menu navigation and concepts are briefly To exit the Edit menu, press Home. discussed on page 23. This Edit Menu section discusses Saving Changes the actual parameters in detail for those that want to go beyond merely loading a new style in order to make You can quickly store at the current preset location changes to their sound. -
Page 54: The Μmod Tab
The Edit Menu: μMOD Tab Overview DETUNE LEFT / DETUNE RIGHT Applies a small amount of pitch shift to the left or right μMod is short for micro-modulation (“μ” is the scientific sides independently. This setting is shown in cents and symbol for micro). - Page 55 The Edit Menu: μMOD Tab WAVE mono. LEFT puts the left side out of phase with the right which is normal phase and vice versa for the RIGHT This lets you choose the modulation waveform from value. BOTH puts both sides out of phase with their Square,Triangle or Sine to vary the periodic nature of respective sides’...
- Page 56 The Edit Menu: μMOD Tab HARM TO UMOD Sets the amount of harmony level sent into the μMod block. The HARMONY footswitch must be on to feed this send. LEAD LEVEL Controls the lead (dry + Tone) voice level when the individual effect is turned on with its respective footswitch.
-
Page 57: The Delay Tab
The Edit Menu: DELAY Tab Overview STYLE Use the soft knob assigned to this parameter to choose The delay effect is a configurable echo. You can control a pre-programmed delay style you like. how far apart the echoes occur (Delay Time), and whether the echoes fade out quickly or slowly or build LEVEL on themselves. - Page 58 The Edit Menu: DELAY Tab MIDI: The unit can be set to derive its delay times from quarter notes) or syncopated sub-beats (e.g. 1/4 triplets, incoming MIDI clock signal. 1/4 dotted notes) for the left and right delays. TEMPO TIME L / TIME R This is where you can manually set the tempo in beats These parameters are used to display the exact delay per minute (bpm) that is used to derive delay times for...
- Page 59 The Edit Menu: DELAY Tab DUCKING AMOUNT LEAD LEVEL This sets how much attenuation (gain reduction) is Controls the lead (dry + Tone) voice level when applied to the delayed signal when a vocal is present. the individual effect is turned on with its respective For ducking to not be too obvious, a slight reduction of footswitch.
-
Page 60: The Reverb Tab
The Edit Menu: REVERB Tab Overview LEVEL Sets the mix level for the Reverb effect. Reverb is the arguably the most common vocal effect. It can add a spaciousness that softens the abrupt WIDTH beginnings and endings of lyric phrases. Many reverb Sets the stereo imaging of the Reverb effect. - Page 61 The Edit Menu: REVERB Tab HI FACTOR DIFFUSE This allows you to raise or lower the level of the high Also known as Diffusion, this is a very subtle parameter band of the Reverb tail independently. used to simulate and control the density of the reflections inherent in real acoustic spaces.
- Page 62 The Edit Menu: REVERB Tab DUCKING AMOUNT LEAD LEVEL This sets how much attenuation (gain reduction) is Controls the lead (dry + Tone) voice level when applied to the reverb signal when a vocal is present. For the individual effect is turned on with its respective ducking to not be too obvious, a slight reduction of -6 footswitch.
-
Page 63: The Harmony Tab
Overview Sets the level for the overall Harmony effect in the current preset. The Harmony block in VoiceLive 2 produces up to 8 harmony voices and is the home of the Choir effect. V1 to V4 VOICING Here you set the pitch shift intervals of voices 1 through IMPORTANT NOTE: The parameters available on the 4 relative to your input pitch. - Page 64 The Edit Menu: HARMONY Tab lend a more feminine or thinner effect. The Choir effect strives to emulate the detuning, timing and chorusing that occurs when human voices sing V1 to V4 PAN together in choral performances and recordings. The Each voice may have a unique pan position.
- Page 65 The Edit Menu: HARMONY Tab HUMANIZE AMOUNT The various Humanization styles consist of various amounts of the following modifiers: You can vary the amount of humanization for the harmony voices. All the styles except for the last one: o Onset pitch events - This is also known as TIME &...
- Page 66 The Edit Menu: HARMONY Tab GUITAR CHORDS designed to be useful at middle values but you can add or remove vibrato as you like. This parameter changes the harmony note response to DOM7 guitar chords only. At the default setting; V1 to V4 PORTA ACCEPT DOM7, whenever you play a dominant 7th Each voice has its own Portamento time.
- Page 67 When your harmonies are set to this The Harmony EQ settings are separate from the Global mode, the harmony notes produced by VoiceLive 2 will TONE control. This allows customizing of the EQ of the sound exactly in tune with the Equal-tuned instruments Harmony and Double voices separately from the lead.
- Page 68 MIDI sequencer and guitar PRESET tab must be set to PRE in order for any signal to into VoiceLive 2, this will cause it to ignore the get to the effect block when LEAD LEVEL is set to OFF.
- Page 69 The Edit Menu: HARMONY Tab Non-NATURALPLAY Parameter definition and as such, require no musical input from you. Changes o MIDI NOTES - Allows you to specify exact Below are descriptions of parameters that are different melodies and chords as harmony pitches from a when set to the NATURALPLAY modes other than MIDI keyboard or sequencer.
- Page 70 The Edit Menu: HARMONY Tab NATURALPLAY = SHIFT Mode they are displayed in scale degree terminology. They are organized lowest to highest, relative to the input note. V1 to V4 VOICING MAP IN SOURCE / MAP IN NOTE The voicings for Shift mode have no musical intelligence and as such will produce harmony a fixed, unmoving These allow to customize individual harmony note interval away from your lead voice.
- Page 71 This feature is most useful when singing to a commercial MIDI file that is controlling the harmony voices in VoiceLive 2. Often the MIDI notes used to control harmony cut off where the singer might prefer to hold the notes longer and this makes for a more...
-
Page 72: The Double Tab
The Edit Menu: DOUBLE Tab Overview HUMANIZE STYLE These apply small pitch and time variations to simulate The Double effect uses the same type of Humanization natural variation in human singing. For more information technology as in the Harmony effect to create up to see HUMANIZE STYLE in the HARMONY Tab section four overdubbed versions of your voice. - Page 73 The Edit Menu: DOUBLE Tab LEAD LEVEL delayed response to the pitch movement of your singing voice. It is also referred to as “Glide” in synthesizers. Controls the lead (dry + Tone) voice level when The range of values equals approximately how long the the individual effect is turned on with its respective upwards or downwards slide will take to reach each new footswitch.
-
Page 74: The Fx Tab
The Edit Menu: FX Tab Overview o LEAD - Transducer is inserted on the Lead voice only. Harmonies and Doubling are unaffected. The FX tab contains the edit settings for a combination o HARMONY - Transducer is inserted on the of two effects: Harmony path only. - Page 75 The Edit Menu: FX Tab LOW CUT and HIGH CUT The AMOUNT parameter adjusts the amount of distortion for the current distortion style. This is not the Sets the cut-off frequency for these very steep low and same as the IN and OUT GAIN controls which work high shelving filters.
- Page 76 MIDI performance to yield narrow mid peak. GAIN adjusts the amount of boost correction. VoiceLive 2 goes one further and allows you or attenuation while FREQ sets the center frequency to play your guitar or MIDI keyboard normally and get of the filter.
- Page 77 The Edit Menu: FX Tab HARDTUNE effect. This allows a different scale to scale note will you be corrected. The maximum value is be used for the HardTune effect independent of the 200 cents which, in a Major scale having no more than Harmony effect.
- Page 78 The Edit Menu: FX Tab o Minor-Nat (natural minor) o Minor-Asc (ascending melodic minor) o Chromatic (no key or scale required) NOTE / ENABLED These are applicable when you wish to edit a custom scale for HARDTUNE. A custom scale is indicated by a series of dashes and circles: “-”...
-
Page 79: The Rhythmic Tab
The Edit Menu: RHYTHMIC Tab Overview the DELAY button in your tempo. 3. Sing a sustained note or a legato melody. Using the Rhythmic features, tap tempo can control effects on the lead voice, harmonies and doubling voices 4. Press the SHORTCUT button while continuing to in time with your music. - Page 80 The Edit Menu: RHYTHMIC Tab DEPTH 1/8 DOT 1/8 TRIP 1/16 DOT 1/16 1/16 TRIP Sets the intensity that the Rhythmic settings have on 1/32 DOT 1/32 1/32 TRIP the Target. TYPE TARGET Defines the rhythm. At the beginning of the list are the Determines what Rhythmic modifies.
- Page 81 The Edit Menu: RHYTHMIC Tab your singing with the rhythmic effects. 1/8 DOT 1/8 TRIP 1/16 DOT 1/16 1/16 TRIP COWBELL 1/32 DOT 1/32 1/32 TRIP Turning this feature on produces a metronome-type SAMPLE LOOP CAPTURE cowbell sound to give an audible indication of the When set to START, you must press the Shortcut current tempo.
-
Page 82: The Preset Tab
LEAD LEVEL SHORTCUT This allows the overall lead (dry with Tone) voice Each preset in VoiceLive 2 can have a unique Shortcut level to be reduced for the current preset. There are which can extend your control of effect features. -
Page 83: The Setup Menu
In MONO mode, the Left output is the summed mono function by pushing and holding the REVERB footswitch mix of VoiceLive 2 including effects. The Right output is and following the prompts. When any digital input is dry with only Tone applied to the MIC or LINE input selected (USB or SPDIF) the IN GAIN does not control signal. - Page 84 VoiceLive 2 or is being fed by an aux send from a mixer either Digital input will set the sample rate.
- Page 85 The Setup Menu: I/O Tab OUTPUT LEVEL RANGE Configures the maximum stereo analog output (XLR, Sets the stereo position of the dry guitar signal. ¼” and headphone) level. Set this value to MIC or LINE MIC/LINE PHASE when connecting to mic or line level inputs on a mixer Selects between NORMAL and INVERTED to help respectively.
-
Page 86: The Midi Tab
The Setup Menu: MIDI Tab CHANNEL or BELOW the split point are used to control MIDI NOTES presets only. Sets the MIDI channel that VoiceLive 2 uses for presets and MIDI harmony control. When a NATURALPLAY SPLITNOTE preset is set to MIDI NOTES... - Page 87 The Setup Menu: MIDI Tab PBRANGE (Pitchbend Range) Sets the range in semitones that MIDI pitch bend information will alter voice pitch shifts.
- Page 88 The Setup Menu: SYSTEM Tab LCD CONTRAST without having to change Key every time. In this mode, Key and Scale settings are not saved with a STORE action. Sets the contrast level of the LCD display. Useful for When set to OFF, key and scale is configurable per preset. better viewing at different angles and light conditions.
-
Page 89: The Expression Tab
To Amp) jack of the volume pedal to the PEDAL input minimum and maximum extents of your pedal. on the back of VoiceLive 2. It’s not necessary to make When successful, the display will show the values of the a connection to the Input of your volume pedal. - Page 90 The Setup Menu: EXPRESSION Tab Assigning The Expression Pedal In the PRESET tab, turn the knob below the EXPR-PEDAL parameter to assign any of the parameter options to the The pedal can now be set to control any of the following expression pedal in that preset.
-
Page 91: The Store Menu
Select the preset then set CONFIRM to YES using the 4th Mix/Edit knob, then push STORE. CLEAN PRESET BANK (UP TO 2 MINUTES) This function will run automatically on VoiceLive 2 when a large number of preset stores have been executed. -
Page 92: Faq And Troubleshooting
Reverb and Delay Edit Remove any guitar effect pedals between your guitar menus. and VoiceLive 2’s input. How do I talk to my audience with no FX on? Ensure that you are playing guitar chords made up of at Hold FX footswitch to enter Bypass + Tuner mode. - Page 93 The most important notes of your chord, as far as power switch is in the on position. VoiceLive 2 is concerned, are the chord root and the Check the display meter when you sing to confirm the third, so make sure these notes are clearly voiced. Your...
- Page 94 1. Check the top level mix screen and make sure the produce harmonies. DELAY/REVERB level is turned up. I don’t hear any audio from VoiceLive 2 when 2. Confirm that the REVERB and/or DELAY footswitch using MIC in is turned on as indicated by its footswitch light.
- Page 95 OFF, VoiceSupport will not be able to connect to you have created. VoiceLive 2 and upgrade your software. When it’s set to ON, you will be able to upgrade software but not be To return all System settings to factory defaults, apply...
-
Page 96: Midi Implementation
MIDI Implementation Parameter Range Comments Footswitch On/Off Harmony 0-63 off 64-127 on Double “ “ Reverb “ “ HardTune “ “ FX button must be active first Step 0 to the # of steps in preset 0=Step 1, 1=Step 2 etc. μMod 0-63 off 64-127 on Delay... - Page 97 MIDI Implementation Parameter Range Comments Level Voice2 “ “ Level Voice3 “ “ Level Voice4 maps to 127 Gender Voice1 “ “ Gender Voice2 “ “ Gender Voice3 “ “ Gender Voice4 “ “ Human Style Human Lvl maps to 127 Vib Style Vib Amt maps to 127...
- Page 98 MIDI Implementation Parameter Range Comments Delay/Reverb Lvl “ “ Dry Pan “ “ 127 MIDI values map to 201 pan values, Center = 64 Output Level “ “ Bypass 0-63 off 64-127 on Bypass only, no tuner mode. FX button is not lit in this Bypass Harmony Hold “...
-
Page 99: Factory Preset List
Factory Preset List SIXTH ENCORE 26 SIMPLE SLAP 51 JAZZ CLOSEUP 2 76 SING WITH RADIO CLOSE UP 3RD 27 LONGVERB DUCKED 52 JAZZ CLOSEUP 3 77 THICK 2 ABOVE TUNED UP+DOWN 28 ARENA CHANT 53 LIGHT FLANGE 78 BEACH BOY RADIO KANYE LOCKDOWN 29 AMATEUR KIDS 54 LOWER DUO... - Page 100 Factory Preset List 101 DELAYED UPPERS 128 LOOSE DOUBLE 155 BANDPASS VERB 182 BOLLYWOOD 102 DELAYED HARMONY 129 OCTAVE CHILD 156 DEEP DUCKED FX 183 NOW HEAR THIS! 103 LIFE IN THE F L 130 BON J-U GIVE LV 157 T- ROOM 184 BASIC NOTES 8V 104 TONE DRONE UNI 131 OCT DOWN DOUBLE...
-
Page 101: Effects Path Diagram
Effects Path Diagram To Guitar Thru Jack Guitar Mute Guitar Input Guitar µMod Comp Reverb HardTune Lead Mute On/Off HardTune Tone Button Pitch Button Voices Comp Pitch Harmony De-Ess Gate µMod Doubling Output Mic & Line Input µMod Delay/ Delay Reverb Reverb Choir... -
Page 102: Warranty
Warranty All products manufactured by TC-Helicon are warranted Liability is expressly excluded in respect of any third against failure arising through faulty workmanship and party or consequential loss or damage (direct or materials for a period of one year from date of purchase. -
Page 103: Specifications
Specifications Analog Inputs Digital Inputs and Outputs Connectors, balanced Mic.: XLR, Line: 1/4” phone jack, Connectors RCA Phono (S/PDIF) Guitar: 1/4” phone jack, Aux: 1/8” Formats S/PDIF (24 bit), EIAJ CP-340, stereo mini jack IEC 958 Input Impedance: Bal./Unbal. Mic.: 2.14/1.07 kOhm, Sample Rates 44.1 kHz, 48 kHz,88.2kHz, 96kHz Line: 13/6.5 kOhm...
Need help?
Do you have a question about the Voicelive 2 and is the answer not in the manual?
Questions and answers