Table of Contents
Advertisement
Advertisement
Table of Contents

Related Manuals for TC-Helicon Harmony GXT


Summary of Contents for TC-Helicon Harmony GXT
- Page 1 harmonyG . XT PRODUCT MANUAL ENGLISH VERSION...
- Page 2 WARNING To reduce the risk of fire or electric shock, do not expose this appliance to rain or moisture. CAUTION This equipment has been tested and found to comply with the limits for a Class B digital device pursuant to Part 15 of FCC Rules. Operation is subject to the following two conditions: (1) This device may not cause harmful interference, and (2) this device must accept any interference received, including interference that may cause undesired operation.
-
Page 3: Table Of Contents
Table of Contents Introduction ....... 4 For Advanced Users ..... . .19 Advanced FX Style Select . -
Page 4: Introduction
Introduction Welcome to VoiceTone Harmony-G XT Features: Harmony-G XT is designed for the singer who wants o Adds one or two harmony voices directed by your the highest quality and most interesting live vocal guitar playing production possible. It puts a complete vocal production center into your hands including harmony singers that o Overdub-style vocal doubling feature adds richness follow your singing and guitar playing. - Page 5 Introduction About TC-Helicon At TC-Helicon we truly believe that the voice is the vocalist. Our products focus on removing barriers and world's most beautiful instrument. We don't mean to inspiring creativity in performance. That's why our products range from near-field personal vocal monitors degrade other beautiful instruments, but the singing to floor-based vocal multi-effects pedals.
-
Page 6: Quickstart
Quick Start Step 1: Step 2: Connect your microphone to a mic cable Connect your mic cable to the Mic Input NOTE: Make sure Harmony-G XT is not powered at this time. -
Page 7: Quick Start
Quick Start Step 3: Step 4: While you’re connecting and setting up, lower the fader Connect a 1/4” guitar cable from your electric or on your mixer channel to off. Connect a mic cable from acoustic guitar to the INST IN. For now, we won’t use the Left/(mono) Out to a mic input on your sound the THRU so the guitar sound will be mixed with your system. - Page 8 Quick Start Step 5: Step 6: Set the Input Knob fully left then set the Guitar, FX and Connect Harmony-G XT's power adapter to main Harmony knobs to the 12 O’Clock position. power and to the Power input on Harmony-G XT.There is no power switch so plugging it in automatically turns it on.
- Page 9 Quick Start Step 7: Step 8: While singing through your microphone, raise the Input In preparation for your first listen, check that the LEDs Knob until the Input Light turns green, sometimes conform to the status shown in the boxes below. You orange on louder parts, but never red.
- Page 10 Quick Start Step 9: You can now experiment with all of Harmony-G XT’s Slowly raise the fader on your mixer channel as you sing features starting by pressing the Preset button to load into your mic. Once you’ve reached a comfortable the different presets and then pressing the A/B listening level you should hear your voice clearly with footswitch to hear each preset’s A and B settings.
-
Page 11: Typical Setups
Typical Setups Electric Guitar Setup Acoustic Guitar Setup The dotted line indicates optional stereo operation... -
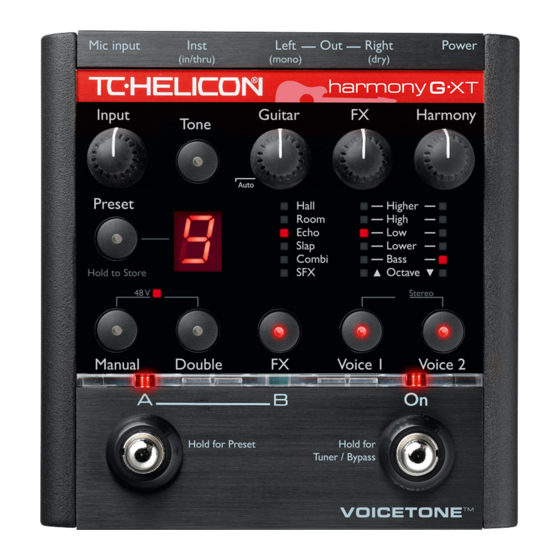
Page 12: Front Panel Diagram
Front Panel 2. Auto-Chromatic Pitch Correction which gently corrects your pitch without the need to set key and scale. Double clicking the Tone button activates or de-activates Inst Pitch Correction independently of the Live Engineer Effects. Input Guitar Harmony The Tone button indication modes are as follows: Tone Only Tone active:Tone LED glows solidly. - Page 13 Front Panel your voice. Immediately above the Auto position is an 6. Preset Select Button and Preset Display “off band” where the guitar is muted. Proceeding Press to cycle through the 5 presets numbered 1 to 5 shown clockwise from there allows manual control of guitar mix in the Preset display.
- Page 14 Front Panel 11. Stereo Select Button 13. LED Indicator Bar Press and hold the Voice 1 and Voice 2 buttons for 2 This translucent bar indicates the A or B selection of seconds to toggle between stereo and mono output. each preset and status of the On footswitch.
-
Page 15: Back Panel Diagram
Back Panel XT in stereo (default) or mono. For more information on mono operation see “External Mixing with Mono and Dry Outputs” in the “For Advanced Users” section. Instrument Connections Plug a 1/4” cable directly from your guitar into the IN jack. -
Page 16: Getting To Know Harmony-G Xt
Getting to Know Harmony-G XT Loading Presets When you activate the Live Engineer Effects with a single click of the Tone button, your voice will sound Press the Preset button to load the next preset and smoother and brighter.There are three high quality change the sound. -
Page 17: Adjusting The Harmony Level
Getting to Know Harmony-G XT how much guitar, vocal harmony and FX are added to never lost in the mix. Just above the Auto position is an your lead voice.The balance you create will be the same “off band” which you can use to mute the guitar for all presets. -
Page 18: What Do The Voice 1&2 Buttons Do
Getting to Know Harmony-G XT associated buttons. Pressing the Preset button will cancel 3-4 semitones above your voice your edits and load the next preset.The Manual button o Low - Generally a minor or major 3rd interval or is an advanced feature detailed in the “For Advanced 3-4 semitones below your voice Users”... -
Page 19: Changing The Fx
Getting to Know Harmony-G XT Changing the FX Press the FX button to change the reverb and delay style in the preset you are currently on. If you prefer this Hall Higher Room High setting, it can be stored with the preset. Echo Slap Lower... -
Page 20: For Advanced Users
For Advanced Users Advanced FX Style Select To set the accessible number of presets, power up holding the Preset button. After a moment, the number Each effect style (Hall, Room etc.) has additional selections. “5“ will show the default number of presets. Tap the To browse additional Hall sounds, for example, first cycle Preset button to extend the limit to up to ten (shown the FX button to the Hall style, then hold the FX button. -
Page 21: How To Use Alternate Tone Settings
For Advanced Users of your song.This can be set before or during Understanding the Manual key display: performance of your song. The key in Harmony-G XT is shown in 3 sequential flashes. For example, an E might flash, then a dash “-”, 2. -
Page 22: Guitar Reverb And Detune
For Advanced Users d. Default setting. Best for most situations. (Hold the FX button) and then press the Double button 1. Best if you have a very bright sounding PA. so its LED lights. After you’ve exited Advanced FX Select Reduces brightness a little. -
Page 23: Performing A Factory Reset
For Advanced Users will send the “wet” effects and the Right (Dry) output place your microphone near the instrument you want to will send your dry voice.These can be adjusted by your tune to and play any single note from it. Press any button sound engineer. -
Page 24: Using The Voicesupport Application
Using the VoiceSupport Application Overview to download the latest version. 2. The CD will run the setup program automatically. Harmony-G XT ships complete with a CD containing If it doesn’t, browse the CD and run Setup.exe. the VoiceSupport application. Once installed on your 3. -
Page 25: The Download Tab
Using the VoiceSupport Application you’ve read an item. As of this writing, news items are The BACKUP Tab permanently displayed in VoiceSupport. If you have edited the presets on your Harmony-G XT, you may want to back them up on your computer for Once you’ve browsed the news items, please take a safekeeping. -
Page 26: Faq And Troubleshooting
FAQ and Troubleshooting My guitar doesn’t change the harmonies.What’s My FX level is up but the sound is still dry wrong? o You’re likely set to the Off FX style. Press the FX button to activate and cycle through the FX styles. o Turn up the volume control on your guitar. - Page 27 FAQ and Troubleshooting at the beginning of your song, it’s important to play a Your guitar can be tuned to alternate tunings as long as chord if you want to sing right at the beginning. you are in tune with the onboard tuner. Your guitar should be well-tuned to the onboard tuner Why isn’t VoiceSupport connecting to or an external one set to A=440 Hz.
-
Page 28: Fx And Doubling Alternates Listing
FX and Doubling Alternates Listing 1. St. Joseph Church 4.2s decay, extra wet Hall 2. Multitap delay, 515 ms right, 815 ms left w/feedback 1. Broadway Hall 2.6s decay 3. Heavy flanger, high feedback 2. Smooth Plate 4.7s decay 3. Arena 6.0s decay Note: when the guitar is routed through the outputs of Room Harmony-G XT, it will share the vocal reverb settings... -
Page 29: Specifications
Specifications Analog Inputs Conversion Characteristics Mic Connector: Balanced XLR, Input Impedance 1kOhm Sample Rate: 48 kHz, Converter AKM AK4620B Mic Input Sensitivity @ 0dBFS: -44dBu to +2dBu AD / DA Conversion: 24 bit, 128x oversampling bitstream Mic Input Sensitivity @ 12dB headroom: -56dBu to -10dBu EMC &...
Need help?
Do you have a question about the Harmony GXT and is the answer not in the manual?
Questions and answers
what voltage supply is required for TCHELICON HARMONY GXT.
The TC-Helicon Harmony G-XT requires a 12V power supply.
This answer is automatically generated