
Related Manuals for Hotpoint BD52 BD62


Summary of Contents for Hotpoint BD52 BD62
- Page 1 FULL INSTRUCTIONS FOR INSTALLING AND OPERATING YOUR HOTPOINT DOUBLE OVEN MODEL BD52 BD62...
-
Page 2: Before You Operate Your New Hotpoint Double Oven
We recommend that a minimum of 4mm cable conforming to B.S. 6004. WARNING: CHILDREN SHOULD NOT BE ALLOWED TO PLAY WITH THE APPLIANCE OR TAMPER WITH THE CONTROLS. Hotpoint Double Oven PVC insulated twin and earth... -
Page 3: Table Of Contents
PLEASE READ THIS BOOKLET CAREFULLY. Contents Before you operate your new Hotpoint Double Oven Electrical Requirements Installation Instructions For Your Safety - Always Never The main parts of your Double Oven The cooking systems in your Double Oven Before using your Oven for the first time... -
Page 4: Installation Instructions
DO NOT LIFT OVEN BY THE DOOR HANDLES. This equipment is designed specifically for domestic purposes and Hotpoint Limited cannot accept responsibility if used for any other type of application. All electrical installations must be carried out by a NICEIC registered installer. - Page 5 Installation Instructions d. The oven unit should now be lifted (by 2 adults) into the cabinet and pushed fully home. e. Finally the oven unit must be secured to the cabinet by means of the four pozi wash head screws, two through each side trim.
- Page 6 Installation Instructions (cont'd)
-
Page 8: For Your Safety, Always
For Your Safety, Always ... Please read through before operating your appliance. ALWAYS Have your appliance installed by a competent engineer or electrical contractor. ALWAYS Ensure the appliance has been properly earthed. ALWAYS Remove all transportation packing from inside the oven/grill before switching on for the first time. -
Page 9: Never
For Your Safety, Never ... NEVER Leave children playing unsupervised where the oven is installed and in use. NEVER Attempt to grill with the grill/oven oven door closed. NEVER Allow children to sit or stand on any part of the appliance. -
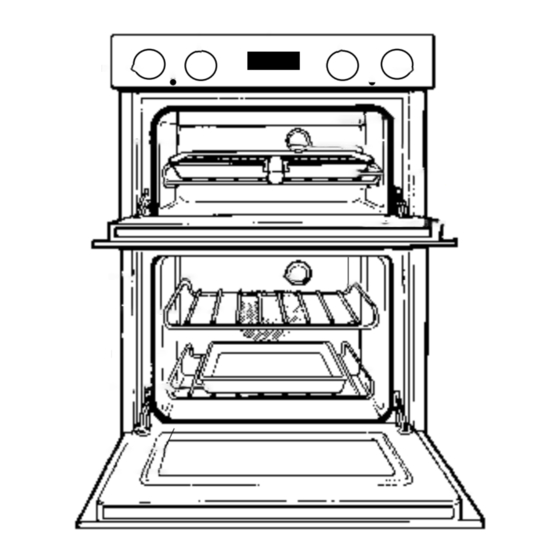
Page 10: The Main Parts Of Your Double Oven
The main parts of your Double Oven WARNING: DO NOT TOUCH THE GLASS DOORS WHEN THE OVEN IS IN USE AS THESE AREAS CAN BECOME HOT. Grill Control Stay clean Liner Shelf Oven Light Oven Stay clean Liner Meat pan, Anti-splash tray and Roasting rack Rating Plate Inner Door... -
Page 11: The Cooking Systems In Your Double Oven
The Cooking Systems in your Double Oven It should be noted that at the end of a cooking period there may be a momentary puff of steam when the oven door is opened. This will disperse in a few seconds and is a perfectly normal characteristic of an oven with a good door seal. -
Page 12: Before Using Your Oven For The First Time
Before Using the Oven for the First Time Make sure the electricity supply is switched ON. Please note that when the double oven is used for the first time a slight odour may be emitted due to the ‘burning off’ of any temporary finish on oven fittings and elements and the removal of moisture absorbed by the lagging. -
Page 13: Controls
The Controls Top Oven Pilot Grill Temperature Control / Control IMPORTANT Before using your oven in the ordinary way, ALWAYS make sure that the timer has been set to MANUAL operation. Unless this is done, the main oven cannot heat up. Before seeking assistance, make sure this is done (refer to oven timer operation). -
Page 14: Controls
Multifunction Selector Switch The Multifunction selector switch is used when operating the main oven. With the exception of the O position the main oven light will remain on when this selector switch is used. With the selector in this position the main oven will not heat up. -
Page 15: Oven Timer Operation
Oven Timer Operation The oven timer offers you the following features: 1. Time of Day 2. Automatic Cooking 3. Minute Minder Automatic Cooking The ovens can be controlled automatically. Guidance on automatic cooking 1. Select foods which will take the same time to cook. -
Page 16: Know Your Timer
Know your Timer CLOCKFACE The timer incorporates a 24 hour clock. Ensure the correct time of day is always set, before using your cooker. SYMBOLS A ‘bell’ symbol will light up when you select a Minute Minder Period and will remain lit for the period set. -
Page 17: Setting The Time Of Day
Electronic Clock & Automatic Oven Timer Operation SETTING THE TIME OF DAY Step 1 Make sure all oven controls are turned Off. Step 2 Check the electricity supply to the cooker is turned on. Step 3 When switched on the display will show 0.00 and the Auto symbol, Step 4 Press &... - Page 18 Electronic Clock & Automatic Oven Timer Operation AUTO COOKING PROGRAMMES There are two Auto Cooking programmes that can be selected using your timer:– (a) To set the timer to switch the oven(s) On and Off Automatically (b) To set timer to switch on immediately and OFF automatically after a set cook period. a) TO SET THE TIMER TO SWITCH THE OVEN(S) ON AND OFF AUTOMATICALLY This allows you to cook at a specified time for a chosen period before the oven switches off Automatically.
- Page 19 Electronic Clock & Automatic Oven Timer Operation Note 1 When cooking automatically the Cook Period can be checked at any time by simply pressing the Cook Period button. Note 2 When cooking automatically the End Time can be checked at any time by simply pressing the End Time button.
- Page 20 Electronic Clock & Automatic Oven Timer Operation TO CANCEL AN AUTO COOKING PROGRAMME BEFORE THE COOK PERIOD HAS FINISHED. Step 1 Turn the oven control(s) to the OFF position. Step 2 Press the Manual button to return the oven(s) to “Manual” operation. Note 1 When cooking automatically the Cook Period can be checked at any time by simply pressing the Cook Period button.
-
Page 21: Grilling In The Top Oven
Grilling in the Top Oven Keep young children away from the appliance when the grill is in use as the surfaces get extremely hot. Grilling should NOT be undertaken with the Grill/Top Oven door closed. (See below) Never: Line the grill pan with aluminium foil. -
Page 22: Grill Chart
Grill Chart Pre-heat for one minute Food Toasting of Bread Setting 6 Products Small cuts of meat None – Sausages, Bacon Chops, etc. None Gammon Steaks Fish Whole None Fillets None Fingers None Pre-cooked Potato None Products Pizzas None Browning of Food Setting 6 eg. -
Page 23: Top Oven - Conventional Cooking
Cooking in the Top Oven – Conventional Cooking The Top Oven can be used to cook small quantities of food or used in conjunction with the Main Oven to provide additional cooking space so often necessary when entertaining. The oven is designed so that the grill element operates at a reduced heat output (element will not glow), combined with a heating element... -
Page 26: Main Oven - Fan Grilling
Main Oven – Fan Grilling Fan grilling is a combination of heat from the grill element and the oven fan circulating the hot air around the food. Joints of meat and poultry will be browned as if they were cooked on a rotisserie or spit but more economically as the door left closed. -
Page 27: Main Oven - Fan Grilling Roasting Chart
Main Oven - Fan Grilling Roasting Chart Shelf positions are counted from the base upwards ie: lowest shelf position is 1. Type of Meat Weight or Poultry PORK Pork Chop - thick Gammon Steaks Pork - any type of joint over 2.5 LAMB Lamb chop - thick... -
Page 28: Main Oven - Fan Only
Main Oven - Fan Only The oven has a fan only position, which can be used to assist defrosting by circulating unheated air around the food. Time to defrost will depend on type and size of the food and the room temperature. -
Page 29: Main Oven - Conventional And Fan Oven
Main Oven - Conventional Oven Important NEVER line the shelves, the floor or the sides of the oven with aluminium foil as overheating and damage may result. The oven is heated by elements at the top of the oven and underneath the floor of the oven. -
Page 30: Main Oven - Fan Oven Cookery Notes
Main Oven - Fan Oven Cookery Notes Since a fan oven heats up more quickly, and generally cooks food at a lower temperature than a conventional oven, pre-heating the oven is often unnecessary. However, foods such as bread, scones Yorkshire pudding, do benefit from being placed in a pre- heated oven. -
Page 31: Main Oven - Fan Oven Cookery Notes
Main Oven - Fan Oven Cookery Notes Temperature and Time The oven is provided with two shelves. A third is available as an optional extra, contact Genuine Parts & Accessories Hotline (see back page) for further information. If three shelves are used to cook large quantities of food for home freezing or parties, it may be necessary to increase the cooking times given in the charts... -
Page 34: Main Oven - Circulaire Roasting
Main Oven - Circulaire Roasting CIRCULAIRE ROASTING Circulaire roasting - food is placed on the roasting rack, this allows the oven fan to circulate the hot air around the food, making it suitable for thin foods, such as chops, steaks, sausages as well as meat joints and poultry, as it will cook both sides at the same time. -
Page 35: Circulaire Roasting Chart
Circulaire Roasting Chart Type of Meat & Poultry BEEF Beef - any type of joint PORK Pork - any type of joint Pork - chops LAMB Lamb - any type of joint Lamb - chops CHICKEN / TURKEY Up to 4kg (8lb) STEAKS GAMMON STEAKS SAUSAGES... -
Page 36: The Slow Cook Setting
The Slow Cook Setting Your Multifunction oven has a ‘slow cooking’ facility. This is used for slow cooking, keeping food warm and warming plates for short periods. Some Advantages of Slow Cooking are:- The oven stays cleaner because there is less splashing. - Page 37 Using The Slow Cook Setting Points to bear in mind when preparing food:- 1. Make sure all dishes will fit into the oven before preparing the food. 2. All dishes cooked by the Slow Cook setting should be cooked for a minimum of 6 hours.
-
Page 38: Main Oven Grilling
Main Oven Grilling DO NOT allow young children near the appliance when the grill is in use as the surfaces can get extremely hot. GRILLING SHOULD NEVER BE UNDERTAKEN WITH THE DOOR CLOSED. Do Not line the grill pan with aluminium foil. -
Page 39: Care And Cleaning
Care and Cleaning TURN OFF THE MAIN SWITCH BEFORE CLEANING. Before switching on again, ensure that all controls are in the OFF position. Cleaning the Exterior The outside of both ovens can be cleaned, when cooled down, using a cloth which has been rinsed in warm soapy water. - Page 40 Replacement oven liners arE available should you require them, from your nearest Hotpoint Service Centre (see back page). Replacement of Oven Lamp WARNING: ISOLATE THE COOKER FROM THE SUPPLY BEFORE REPLACING THE LAMP, TO AVOID ELECTRIC SHOCK.
-
Page 41: Care And Cleaning
Care and Cleaning Take particular care not to damage the inner surface of the door inner glass that is coated with a heat reflective layer. Do not use scouring pads, or abrasive powder, which will scratch the glass. Ensure that the glass panel is not subjected to any sharp mechanical blows. -
Page 42: If Something Goes Wrong
If something goes wrong... Before calling a Service Engineer, please check through the following lists. Slight odour or small amount of smoke when grill / oven used first time Nothing Works Timer Display shows "0:00" with "Auto" Flashing Main oven and Top ovens do not work, but the grill works Top oven and grill do not... -
Page 43: If Something Goes Wrong
If something goes wrong... Grilling is uneven Oven lamp does not work Condensation on the wall at the rear of the cooker. Steam / Condensation in the oven after use. If you have been through the above list and there is still a problem, DISPOSAL OF YOUR PRODUCT To minimise the risk of injury to children please dispose of your product carefully and safely. -
Page 44: Hotpoint Service Cover
Hotpoint gives you a unique ‘Satisfaction Guaranteed’ promise – valid for ninety days after you have purchased your Hotpoint product. If there is a technical problem with your Hotpoint appliance, just call Hotpoint Service (see back page). If necessary we will arrange for an engineer to call. -
Page 48: Repair Service
Republic of Ireland: (01) 842 6836 08701 506070 For further product information All Hotpoint Services are offered as an extra benefit and do not affect your statutory rights. General Domestic Appliances Limited, Morley Way, Peterborough, PE2 9JB PRINTED BY SIMLEX . FOUR ASHES, WOLVERHAMPTON.
Need help?
Do you have a question about the BD52 BD62 and is the answer not in the manual?
Questions and answers