EVGA Z97 Stinger User Manual
Specs & initial installation
Hide thumbs
Also See for Z97 Stinger:
- Brochure & specs (2 pages) ,
- Brochure & specs (2 pages) ,
- Installation manual (21 pages)
Table of Contents
Advertisement
Quick Links
Download this manual
See also:
Installation Manual
Advertisement
Table of Contents

Subscribe to Our Youtube Channel
Related Manuals for EVGA Z97 Stinger


Summary of Contents for EVGA Z97 Stinger
- Page 1 User Guide EVGA Z97 Stinger Specs & Initial Installation (Part 1) - 1 -...
-
Page 2: Table Of Contents
Table of Contents Before you Begin………………………………………………………………………………..3 Parts Not in the kit……………………………………………………………………………...4 Intentions of the kit……………………………………………………………………………..4 Motherboard Specifications ........................5-6 Unpacking and Parts Descriptions ....................... 7 Equipment ............................... 7 Hardware Legend ............................8 PCI-E Slot Breakdown..…………………………………………………………..…....9 Rear I/O Panel legend ...…………………………………………..........10 Preparing the Motherboard .........................11 Installing the CPU ........................... -
Page 3: Before You Begin
BIOS that is focused on functionality, ultra high quality components and robust PCI-E 3.0 and memory trace layout. With these features and more, it is clear that the EVGA Z97 motherboards are engineered to exceed the best. - 3 -... -
Page 4: Parts Not In The Kit
Hard Drive or SSD Keyboard / Mouse Monitor (Optional) Optical Drive EVGA assumes you have purchased all the necessary parts needed to allow for proper system functionality. For a full list of supported CPUs on this motherboard, please visit www.evga.com/support/motherboard... -
Page 5: Motherboard Specifications
EVGA Z97 Motherboard Motherboard Specifications Size: mITX form factor of 6.7 inches x 6.7 inches Microprocessor support: Intel Socket 1150 Processor Operating Systems: Supports Windows 8 / 7 Contains Intel Z97 chipset System Memory support: Supports Dual channel DDR3 up to 2666MHz+. - Page 6 Onboard LAN: 1x Intel i217 Gigabit Ethernet PHY Supports 10/100/1000 Mb/sec Ethernet Onboard Audio: Creative Core3D Quad-Core Audio Processor (CA0132) Supports 6-channel (5.1) audio Supports Optical Output PCI-E 3.0 Support: Low power consumption and power management features Power Functions: Supports ACPI (Advanced Configuration and Power Interface) Supports S0 (normal), S1 (power on suspend), S3 (suspend to RAM), S4 (Suspend to disk - depends on OS), and S5 (soft - off) Expansion Slots:...
-
Page 7: Unpacking And Parts Descriptions
Unpacking and Parts Descriptions Equipment The following accessories are included with the EVGA Z97 Stinger Motherboard: The EVGA Z97 Stinger Motherboard This PCI-E motherboard contains the Intel Z97 chipset. I/O Shield Installs in the system case to block radio frequency transmissions, protect internal components from dust, foreign objects, and aids in proper airflow within the chassis. -
Page 8: Hardware Legend
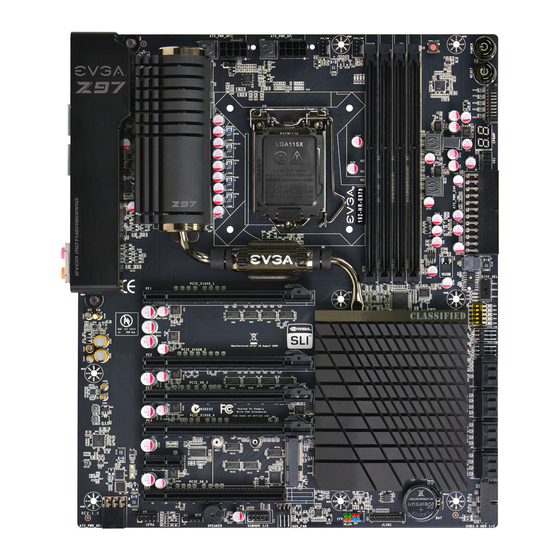
Intel Z97 Stinger Motherboard The EVGA Z97 Stinger Motherboard with the Intel Z97 and PCH Chipset. Figure 1 shows the motherboard and Figure 2 shows the back panel connectors FIGURE 1. Z97 Stinger Motherboard Layout - 8 -... -
Page 9: Pci-E Slot Breakdown
1. CPU Socket 1150 7. Intel SATA 6G/3G Ports 13. Reset Button 2. Intel Z97 Southbridge 8. Front Panel Connectors 14. PCI-E Slot 16x/8x 3. CPU Fan Header (1 amp PWM) 9. Debug LED / CPU Temp Monitor 15. Mini PCI-E/mSATA 4. -
Page 10: Rear I/O Panel Legend
Figure 2. Chassis Rear Panel Connectors 1. USB 2.0 4. eSata 7. HDMI 2. USB 3.0 5. NIC Port 8. Optical Out 3. BIOS/CMOS Reset 6. Display Port 9. Analog Audio Output Jacks Analog Audio Port Breakdown 2/2.1 (Channel) 4.0/4.1 (Channel) 5.1 (6 Channel) Blue Line in... -
Page 11: Preparing The Motherboard
Preparing the Motherboard Installing the CPU Be very careful when handling the CPU. Hold the processor only by the edges and do not touch the bottom of the processor. Note: Use extreme caution when working with the CPU, not to damage any pins in the CPU socket on the motherboard! Use the following procedure to install the CPU onto the motherboard: Remove the plastic protective socket cover by pulling it straight up. -
Page 12: Installing The Cooling Device
Align the notches on the CPU to the notches in the socket. Lower the processor straight down into the socket. Note: Make sure the CPU is fully seated and level in the socket. Lower the load plate so it is resting on the CPU. Carefully lock the lever back into place. -
Page 13: Installing System Memory (Dimms)
Installing System Memory (DIMMs) Your Z97 Stinger has (2) 240-pin slots for DDR3 memory. These slots support 2GB, 4GB and 8GB DDR3 DIMMs. There must be at least one memory slot populated to ensure normal operation. The Intel Z97 chipset supports dual channel memory; supports a maximum of 16GB of DDR3 and up to 2666MHz+ in dual channel configuration. -
Page 14: Compliance Information
Original Purchaser. Upon termination, for any reason, all copies of Software and materials must be immediately returned to EVGA and the Original Purchaser shall be liable to EVGA.com CORP for any and all damages suffered as a result of the violation or default.
Need help?
Do you have a question about the Z97 Stinger and is the answer not in the manual?
Questions and answers