Hercules DJ CONSOLE MK2 User Manual
Hide thumbs
Also See for DJ CONSOLE MK2:
- Configuring (7 pages) ,
- How-to (2 pages) ,
- User manual (24 pages)
Table of Contents
Advertisement
1.
INTRODUCTION.................................................................................................................2
2.
SYSTEM REQUIREMENTS................................................................................................2
3.
INSTALLATION ..................................................................................................................2
3.1. First installation............................................................................................................2
3.2. Connecting and disconnecting the DJ Console Mk2...................................................4
3.3. Power consumption .....................................................................................................4
4.
OVERVIEW .........................................................................................................................5
4.1. The cover .....................................................................................................................5
4.2. The shoulder strap.......................................................................................................5
4.3. The top face.................................................................................................................6
4.4. The connectors ............................................................................................................7
5.
CONNECTING SPEAKERS ...............................................................................................8
5.1. Connecting speakers and/or an external mixer to your DJ Console Mk2 ...................8
6.
USING THE DJ CONSOLE MK2 AT A PARTY .................................................................8
6.1. Overview......................................................................................................................8
6.2. Selecting an audio source ...........................................................................................9
6.3. The DJ Console Mk2 system tray icon ........................................................................9
6.4. Using the DJ Console Mk2 Control Panel .................................................................10
6.5. Previewing with headphones .....................................................................................13
6.6. Speeding up or slowing down a piece .......................................................................14
6.7. Creating loops and cue points ...................................................................................15
6.8. Creating loops............................................................................................................16
6.9. Switching from one piece to another .........................................................................16
6.10. Getting on the microphone ........................................................................................18
6.11. Adding effects onto a piece .......................................................................................19
6.12. Scratching..................................................................................................................19
7.
MIDI STANDARD SUPPORT ...........................................................................................20
8.
FREQUENTLY ASKED QUESTIONS ..............................................................................23
9.
TECHNICAL SUPPORT ...................................................................................................24
9.1. Warranty information .................................................................................................24
9.2. Additional warranty provisions ...................................................................................24
CONTENTS
Advertisement
Table of Contents

Related Manuals for Hercules DJ CONSOLE MK2


Summary of Contents for Hercules DJ CONSOLE MK2
-
Page 1: Table Of Contents
4.3. The top face.........................6 4.4. The connectors ......................7 CONNECTING SPEAKERS ....................8 5.1. Connecting speakers and/or an external mixer to your DJ Console Mk2 ....8 USING THE DJ CONSOLE MK2 AT A PARTY ..............8 6.1. Overview........................8 6.2. Selecting an audio source ...................9 6.3. -
Page 2: Introduction
Your DJ Console Mk2 is a powerful and versatile piece of hardware that offers nearly unlimited possibilities in terms of what you can do with your music. You can use your DJ Console Mk2 on its own or with an external mixer, and you can mix both digital audio files and analog audio sources, including turntables. - Page 3 USB cable provided; or, if it is already connected, disconnect and then reconnect it. We recommend that you connect the DJ Console Mk2 to a USB port on your computer or to a powered USB hub, or use an external power supply (not included). Please see section 3.3.
-
Page 4: Connecting And Disconnecting The Dj Console Mk2
You will be prompted to enter your VirtualDJ serial number, found on the envelope of your DJ Console Mk2 installation CD-ROM. - Enter the serial number and click OK. VirtualDJ is launched automatically. The VirtualDJ icon now appears on your desktop. -
Page 5: Overview
Your DJ Console Mk2 has a cover, allowing you to transport it without any danger of damaging the top face. The cover can also be attached to the underside of the DJ Console Mk2 as an inclined base, allowing you to use your DJ Console Mk2 under optimal conditions. By default, the cover is configured as an inclined base. -
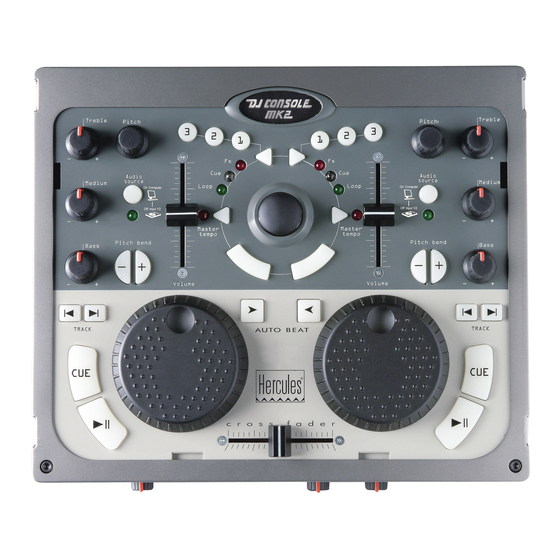
Page 6: The Top Face
Your DJ Console Mk2 has a variety of controls allowing you to interact with DJ software. There are two sets of these controls, as the left and right sections of the DJ Console Mk2 each correspond to a separate deck in DJ software applications. Descriptions of the default function of each control are provided below. -
Page 7: The Connectors
4.4. The connectors Your DJ Console Mk2 features multiple connectors on the front and back faces. With these connectors you can connect multiple devices, as illustrated in the diagrams below: Back face Stereo RCA inputs: Deck A (1/2), Deck B (3/4) -
Page 8: Connecting Speakers
Output 3/4 RCA plugs (plug 3 corresponds to the left speaker, plug 4 to the right speaker) or to the Output 3/4 minijack plug. You can also connect an external mixer to these plugs. Your speakers and/or external mixer are now ready for use with your DJ Console Mk2. 6. USING THE DJ CONSOLE MK2 AT A PARTY 6.1. -
Page 9: Selecting An Audio Source
Control Panel and remove the icon from the system tray, or check for updates for your DJ Console Mk2. Please note that in order to check for updates, you must have an active Internet connection. -
Page 10: Using The Dj Console Mk2 Control Panel
To check for updates for your DJ Console Mk2: - Right-click the DJ Console Mk2 icon in the system tray and select Check for updates. Note: If you are running Windows XP SP2 and have the Windows firewall enabled, a Windows Security Alert will appear, asking whether you want to keep blocking this program (Name: Guillemot Web Updater;... - Page 11 The user can then assign these I/O ports for recording or playback when using an ASIO- compatible software program. Your DJ Console Mk2 is ASIO 2.0 compliant, allowing you to use ASIO 2.0 VST plug-ins and thereby add many exciting effects to your music.
- Page 12 - Launch your mixing software. - If you are using VirtualDJ DJ Console Edition: On your DJ Console Mk2, slide the cross fader completely to the left (to the Deck A side) and set the headphone output selector to Deck B.
-
Page 13: Previewing With Headphones
(markers) to start up at a specific point in a track, create rhythmic loops, adjust Bass, Medium and Treble frequencies, etc. Your DJ Console Mk2 allows you to carry out this kind of headphone preview. You can select what you are listening to on your headphones using the headphone output selector, located on the DJ Console Mk2’s front face. -
Page 14: Speeding Up Or Slowing Down A Piece
The master tempo allows you to modify the number of beats per minute (BPM) in a piece, without modifying its tonality. You can therefore use one of the DJ Console Mk2’s Pitch knobs to modify the pitch of a piece. You can also use the Master tempo buttons to automatically synchronize BPM in VirtualDJ (Beatmatch mode). -
Page 15: Creating Loops And Cue Points
If you wish to set cue points 2 and 3: - Make sure that the DJ Console Mk2’s Cue LED is lit up (if not, press the Triangle). - Press Play/Pause when you get to other rhythmic sections. -
Page 16: Creating Loops
Therefore, button 1 generates a short loop, while button 3 generates a longer loop. - Make sure that the DJ Console Mk2’s Loop LED is lit up (if not, press the Triangle). - During playback of the piece, when you get to a rhythmic section where you want to create a loop, press button 1, 2 or 3 (depending on how long you want the loop to be). - Page 17 Deck A. While the track on Deck B is playing, set the headphone output selector on the DJ Console Mk2’s front face to the Deck A position so that you can monitor Deck A (the left-hand deck) while you are getting your next track ready.
-
Page 18: Getting On The Microphone
The On Air indicator goes dim. Talk-over is no longer enabled. For details on how to record using the microphone, please see section 6.4. Using the DJ Console Mk2 Control Panel. If the Peak indicator lights up while you’re talking: This means that the signal being received is too high: the sound from the microphone will saturate at a certain level, with a resulting loss of sound information. -
Page 19: Adding Effects Onto A Piece
Note: in VirtualDJ, other effects can be set for buttons 1, 2 and 3 by clicking 6.12. Scratching The DJ Console Mk2 allows you to scratch your MP3s and CDs in the same way that a DJ scratches vinyl records. To do this you will use the DJ Console Mk2’s jog wheels, together with the cross fader to boost/interrupt the sound. -
Page 20: Midi Standard Support
7. MIDI STANDARD SUPPORT Your DJ Console Mk2 can function as a MIDI controller: the buttons and potentiometers can send and receive MIDI signals that will then be interpreted by software. In software that accepts MIDI commands, you must select your DJ Console Mk2 as the MIDI controller. - Page 21 00: Mode deselected 7F: Mode selected – Headphone Split B0 23 Value Button - Toggling Output 00: Mode deselected 7F: Mode selected – Headphone Mix B0 24 Value Button - Toggling Output 00: Mode deselected Analog – Coarse Cross Fader B0 31 Value 00 >...
- Page 22 MIDI output commands: DJ Console Mk2 control MIDI message Value description Left Play/Pause B0 08 Value 00: Off – 7F: On Left Play/Pause Blinking B0 00 Value 00: Off – 7F: On Left Cue B0 09 Value 00: Off – 7F: On...
-
Page 23: Frequently Asked Questions
8. FREQUENTLY ASKED QUESTIONS 1. Can I use DJ Console Mk2 with DJ software other than the bundle included in the package? Yes: A variety of DJ software applications are compatible with DJ Console Mk2, including Traktor (www.nativeinstruments.de/index.php?traktor2_us), MixVibes, DJ Decks, with more and more programs integrating compatibility on a continual basis. -
Page 24: Technical Support
Where authorized by applicable law, the full liability of Guillemot and its subsidiaries (including for indirect damages) is limited to the repair or replacement of the Hercules product. The consumer’s legal rights with respect to legislation applicable to the sale of consumer goods are not affected by this warranty. -
Page 25: Declaration Of Conformity
Trademarks Hercules® is a registered trademark of Guillemot Corporation S.A. Intel® and Pentium® are registered trademarks of Intel Corporation. Microsoft® Windows® 98 SE, Me, 2000 and XP are either registered trademarks or trademarks of Microsoft Corporation in the United States and/or other countries. - Page 26 ENVIRONMENTAL PROTECTION RECOMMENDATION At the end of its working life, this product should not be disposed of with standard household waste, but rather dropped off at a collection point for the disposal of Waste Electrical and Electronic Equipment (WEEE) for recycling. This is confirmed by the symbol found on the product, user manual or packaging.
Need help?
Do you have a question about the DJ CONSOLE MK2 and is the answer not in the manual?
Questions and answers