Table of Contents
Advertisement
1.
INTRODUCTION ................................................................................................................ 2
2.
MINIMUM SYSTEM REQUIREMENTS.............................................................................. 2
3.
INSTALLATION ................................................................................................................. 3
3.1. Installing drivers .......................................................................................................... 3
3.1.1.
Installation in Windows Vista .......................................................................... 4
3.1.2.
Installation in Windows XP .............................................................................. 6
3.1.3.
Installation on Mac .......................................................................................... 7
3.2. DJ Control MP3 e2 and your computer's sound card ................................................. 9
4.
OVERVIEW ...................................................................................................................... 10
4.1. The top face .............................................................................................................. 10
4.2. USB connection ........................................................................................................ 11
5.
USING DJ CONTROL MP3 E2 AT A PARTY ................................................................. 12
5.1. Overview ................................................................................................................... 12
5.2. The DJ Control MP3 e2 control panel ....................................................................... 13
5.2.1.
Accessing the control panel in Windows ....................................................... 13
5.2.2.
Accessing the control panel on Mac ............................................................. 13
5.2.3.
Control panel features ................................................................................... 13
5.3. Monitoring with headphones ..................................................................................... 14
5.4. Speeding up or slowing down a track ....................................................................... 16
5.5. Creating cue points ................................................................................................... 16
5.6. Creating loops ........................................................................................................... 17
5.7. Switching from one track to another ......................................................................... 17
5.8. Adding effects to a track ........................................................................................... 20
5.9. Scratching ................................................................................................................. 20
6.
CONFIGURATION IN MIDI MODE .................................................................................. 22
7.
FAQ ................................................................................................................................ 30
8.
TECHNICAL SUPPORT .................................................................................................. 31
8.1. Warranty information ................................................................................................. 32
8.2. Additional warranty provisions .................................................................................. 32
ENVIRONMENTAL PROTECTION RECOMMENDATION ....................................................... 34
CONTENTS
Advertisement
Table of Contents

Related Manuals for Hercules DJ CONTROL MP3 E2


Summary of Contents for Hercules DJ CONTROL MP3 E2
-
Page 1: Table Of Contents
3.1.2. Installation in Windows XP ................6 3.1.3. Installation on Mac ..................7 3.2. DJ Control MP3 e2 and your computer's sound card ..........9 OVERVIEW ........................10 4.1. The top face ......................10 4.2. USB connection ......................11 USING DJ CONTROL MP3 E2 AT A PARTY ..............12 5.1. -
Page 2: Introduction
1. INTRODUCTION DJ Control MP3 e2 is a high-performance DJ controller that opens up the doors to mixing and scratching digital music on your computer. Intuitive and fun to use, DJ Control MP3 e2 lets you put your own mark on your favorite music and share it with your friends to host great parties or make creative mixes. -
Page 3: Installation
- Click on the option to install the DJ Control MP3 e2 drivers and follow the on-screen instructions. We recommend that you connect DJ Control MP3 e2 to a USB 2.0 port directly on your computer in order to enjoy the fastest transfer rates and optimal performance. -
Page 4: Installation In Windows Vista
- Accept to install the software at each of these prompts to proceed with the installation. A dialog box appears, prompting you to connect DJ Control MP3 e2 to your computer's USB port. - Connect DJ Control MP3 e2 to your computer's USB port, then click Next. - Page 5 You are notified when the installation is complete. The DJ Control MP3 e2 icon appears in your Windows taskbar, next to the clock, indicating that your DJ Control MP3 e2 is installed and ready for use: You should now install the VirtualDJ DJC Edition mixing software on your computer: - In the installation menu, click Install VirtualDJ DJC Edition and follow the on-screen instructions.
-
Page 6: Installation In Windows Xp
For more information on configuring your DJ Control MP3 E2, please refer to chapter 5.2. The DJ Control MP3 e2 control panel. 3.1.2. Installation in Windows XP Once files have been copied to your computer, the drivers will be installed. -
Page 7: Installation On Mac
The DJ Control MP3 e2 icon appears in your Windows taskbar, next to the clock, indicating that your DJ Control MP3 e2 is installed and ready for use: You should now install the VirtualDJ DJC Edition mixing software on your computer: - In the installation menu, click Install VirtualDJ DJC Edition and follow the on-screen instructions. - Page 8 Let the installation procedure run its course and follow the on- screen instructions. You are notified when the installation is complete. The DJ Control MP3 e2 icon appears on your desktop, indicating that your DJ Control MP3 e2 is installed and ready for use: 8/34– User Manual...
-
Page 9: Dj Control Mp3 E2 And Your Computer's Sound Card
The DJ Control MP3 e2 software allows you to control the music being outputted from your computer. As the DJ Control MP3 e2 connects to your computer via a USB port, you can connect it or disconnect it at any time, even when your computer is powered on, although not when the VirtualDJ software is in use. -
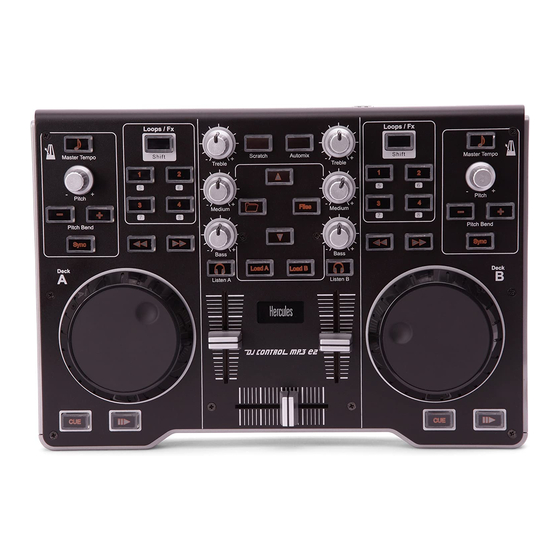
Page 10: Overview
Your DJ Control MP3 e2 features a variety of controls allowing you to interact with DJ software. There are two sets of these controls, as the left and right sections of the DJ Control MP3 e2 each correspond to a separate deck in DJ software applications. Descriptions of the default function of each control are provided below. -
Page 11: Usb Connection
4.2. USB connection DJ Control MP3 e2 has a USB connector on its back face, allowing you to connect it to your computer. As DJ Control MP3 e2 is USB bus-powered, no external power source is required. -
Page 12: Using Dj Control Mp3 E2 At A Party
Once this is done, make sure that you have all the hardware you will need. Got your computer, DJ Control MP3 e2, a pair of speakers – and some headphones, if you have a multi-channel sound card – handy? Perfect, then you’re ready to go! You’re probably asking yourself: and now, how do I get started? By way of introduction, here are... -
Page 13: The Dj Control Mp3 E2 Control Panel
You can access the control panel to configure your DJ Control MP3 e2. 5.2.1. Accessing the control panel in Windows - Access the DJ Control MP3 e2 control panel via the Windows taskbar (in the lower right-hand corner of your screen) by clicking the icon. -
Page 14: Monitoring With Headphones
(markers) to start up at a specific point in a track, create rhythmic loops, adjust Treble, Medium and Bass frequencies, and so on. Your DJ Control MP3 e2 allows you to carry out this kind of headphone monitoring, depending on the hardware and software you have at your disposal. - Page 15 B, and when a track on deck B is being played in the room, you should press the headphone monitoring button on deck A to prepare the next track, and so on. When a monitoring button is lit up on your DJ Control MP3 e2, it indicates that the deck in question is being monitored.
-
Page 16: Speeding Up Or Slowing Down A Track
You can therefore use one of the DJ Control MP3 e2’s Pitch knobs to modify the pitch of a track. VirtualDJ also offers a very useful function to automatically match the BPM of tracks that are playing and synchronize their beats for easy mixing: this function is called beat-matching. -
Page 17: Creating Loops
1, 2, 4 and 8 measures, respectively. Therefore, button 1 generates a short loop, while button 4 generates a longer loop. - Make sure that the Shift button in your DJ Control MP3 e2's Loops/Fx section is not lit up (if it is lit up, press the Shift button to turn it off). - Page 18 While the track on deck A is playing for the audience, press the headphone monitoring button on deck B (the right-hand deck) so that you can hear the track you will be preparing on deck B on your headphones while the audience continues to listen to the track being played on deck A over the speakers in the room (assuming you have a multi-channel sound card that has been configured for use with headphones in VirtualDJ, as described in chapter 5.3 Monitoring with headphones).
- Page 19 Step 4: Mute the EQ controls Step 5: Move the cross fader Step 6: Restore the EQ (Treble, Medium and Bass all the way to deck B. controls (Treble, Medium and knobs) on deck A. Bass knobs) on deck A. Should you notice a slight discrepancy in the tempos of the two tracks, use the Pitch bend - / + buttons.
-
Page 20: Adding Effects To A Track
- Make sure that the Shift button in your DJ Control MP3 e2's Loops/Fx section is lit up (if it is not lit up, press the Shift button to turn it on). - Page 21 Forward Scratch You must do a forward scratch and then quickly lower the volume to its minimum setting before doing a backward scratch to return to the initial position and restore the volume. Only the forward scratch will be audible. Backward Scratch The reverse of the Forward Scratch: you must do a backward scratch and then quickly lower the volume to its minimum setting just before doing the forward scratch, and then restore the volume.
-
Page 22: Configuration In Midi Mode
Many music software applications that incorporate MIDI control feature a “learning mode”: simply click a button, turn a knob or jog wheel or move a slider on your DJ Control MP3 e2 to link that control to a control in the software. Some popular applications to include a MIDI learning mode include: Native Instruments Traktor, Ableton Live, Mixvibes, and Image Line Deckadance. - Page 23 PBP_DA Note On/Note Button-Toggling “127” : Pressed – “0” Output : Released Prev_DA Note On/Note Button-Toggling “127” : Pressed – “0” Output : Released Next_DA Note On/Note Button-Toggling “127” : Pressed – “0” Output : Released Cue_DA Note On/Note Button-Toggling “127”...
- Page 24 Output : Released PBP_DB Note On/Note Button-Toggling “127” : Pressed – “0” Output : Released Prev_DB Note On/Note Button-Toggling “127” : Pressed – “0” Output : Released Next_DB Note On/Note Button-Toggling “127” : Pressed – “0” Output : Released Cue_DB Note On/Note Button-Toggling...
- Page 25 values) Slow > Fast 1 > 63 : CW Slow > Fast PITCH_DA Control Change Incremental – 127 > 64 : CCW Coarse (128 Slow > Fast values) 1 > 63 : CW Slow > Fast PITCH_DB Control Change Incremental –...
- Page 26 MIDI output Control Midi Control Midi Command Type Midi Values Type Command (decimal) (decimal) K1_DA Note On/Note Toggling 0 : OFF – 127: ON Input K2_DA Note On/Note Toggling 0 : OFF – 127: ON Input K3_DA Note On/Note Toggling 0 : OFF –...
- Page 27 K3_DB Note On/Note Toggling 0 : OFF – 127: ON Input K4_DB Note On/Note Toggling 0 : OFF – 127: ON Input SHIFTED_K1_DB Note On/Note Toggling 0 : OFF – 127: ON Input SHIFTED_K2_DB Note On/Note Toggling 0 : OFF – 127: ON Input SHIFTED_K3_DB Note...
- Page 28 Input Blink_K4_DA Note On/Note Toggling 0 : OFF – 127: ON Input Blink_SHIFTED_K1_DA Note On/Note Toggling 0 : OFF – 127: ON Input Blink_SHIFTED_K2_DA Note On/Note Toggling 0 : OFF – 127: ON Input Blink_SHIFTED_K3_DA Note On/Note Toggling 0 : OFF – 127: ON Input Blink_SHIFTED_K4_DA Note...
- Page 29 Blink_SHIFTED_K4_DB Note On/Note Toggling 0 : OFF – 127: ON Input Blink_PBM_DB Note On/Note Toggling 0 : OFF – 127: ON Input Blink_PBP_DB Note On/Note Toggling 0 : OFF – 127: ON Input Blink_Cue_DB Note On/Note Toggling 0 : OFF – 127: ON Input Blink_Play_DB Note...
-
Page 30: Faq
Yes, you can mix audio CDs directly from your CD/DVD-ROM drive in VirtualDJ. Simply load the CD-Audio track in your playlist on a DJ Control MP3 e2 deck, as if it were an audio file, and you can mix it immediately. -
Page 31: Technical Support
8. TECHNICAL SUPPORT If you encounter a problem with your product, please go to http://ts.hercules.com and select your language. From there you will be able to access various utilities (Frequently Asked Questions (FAQ), the latest versions of drivers and software) that may help to resolve your problem. If the problem persists, you can contact the Hercules products technical support service (“Technical... -
Page 32: Warranty Information
Where authorized by applicable law, the full liability of Guillemot and its subsidiaries (including for indirect damages) is limited to the repair or replacement of the Hercules product. The consumer’s legal rights with respect to legislation applicable to the sale of consumer goods are not affected by this warranty. - Page 33 USA COMPLIANCE NOTICE: this equipment has been tested and found to comply with the limits for a Class B digital device, pursuant to Part 15 of the FCC rules. Operation is subject to the following two conditions: (1) This device may not cause harmful interference, and (2) This device must accept any interference received, including interference that may cause undesired operation.
-
Page 34: Environmental Protection Recommendation
ENVIRONMENTAL PROTECTION RECOMMENDATION At the end of its working life, this product should not be disposed of with standard household waste, but rather dropped off at a collection point for the disposal of Waste Electrical and Electronic Equipment (WEEE) for recycling. This is confirmed by the symbol found on the product, user manual or packaging.
Need help?
Do you have a question about the DJ CONTROL MP3 E2 and is the answer not in the manual?
Questions and answers