Q-See QS434 User Manual
H.264 network embedded dvr 4 channel cif/hd1/d1 digital video recorder
Hide thumbs
Also See for QS434:
- User manual (31 pages) ,
- Quick start manual (3 pages) ,
- User manual (30 pages)

Related Manuals for Q-See QS434


Summary of Contents for Q-See QS434
-
Page 1: User Manual
H.264 Network Embedded DVR 4 Channel CIF/HD1/D1 Digital Video Recorder USER MANUAL Model #: QS434 www.q-see.com Rev 5/7/2010... - Page 2 CONTACT US Model Number: QS434 Please contact a Q-See support representative first for any additional information you need help with regarding product features, specifications or setup assistance. Please contact us using the following methods with questions about your Q-See product.
- Page 3 This combo DVR should be installed in a cool, dry place away from direct sunlight and flammable or explosive substances, etc. 6. Accessories Make sure to only use accessories recommended by Q-See. Before installation, check the package to verify that all the components are included. Contact your local retailer ASAP if something is broken in your package.
- Page 4 (3) Damage caused by acts of nature (e.g., earthquake, fire, etc). (4) Equipment damage caused by the maintenance of personnel not authorized by Q-See. (5) Product sold over 12 months ago. In order to fulfill the terms of your warranty, you must complete the registration process after purchasing our product.
-
Page 5: Customer Information Card
Purchase Date Distributor The material in this document is the intellectual property of Q-See. No part of this manual may be reproduced, copied, translated, transmitted, or published in any form or by any means without our company’s expressed written consent. -
Page 6: Table Of Contents
PRODUCT REGISTRATION Model #: QS434 TABLE OF CONTENTS 1 INTRODUCTION ..........................1 1.1 MAIN FEATURES ................................. 1 1.2 PRODUCT FEATURES ..............................1 1.3 PACKAGE CONTENTS ..............................1 2. DVR INSTALLATION GUIDE ......................2 2.1 FRONT PANEL ................................2 2.2 REAR PANEL ................................3 2.3 CONNECTION DIAGRAM ............................ - Page 7 PRODUCT REGISTRATION Model #: QS434 DISPLAY ................................26 VIDEO/AUDIO ..............................27 ADVANCED ............................... 28 ALARM ................................28 SYSTEM INFO ..............................30 MOTION DETECT ............................. 30 MOBILE ................................31 SYSTEM ................................32 PTZ ..................................33 REMOTE ACCESS ............................34 18.1 PORT FORWARDING ........................... 40 4.
-
Page 8: Introduction
INTRODUCTION Model #: QS434 1. INTRODUCTION 1.1 MAIN FEATURES 4 channel CIF/HD1/D1 resolution digital video recorder. It has local recording, playback, supports triple code remote network surveillance, data backup, parameter setting, motion detection and USB mouse. 1.2 PRODUCT FEATURES ... -
Page 9: Dvr Installation Guide
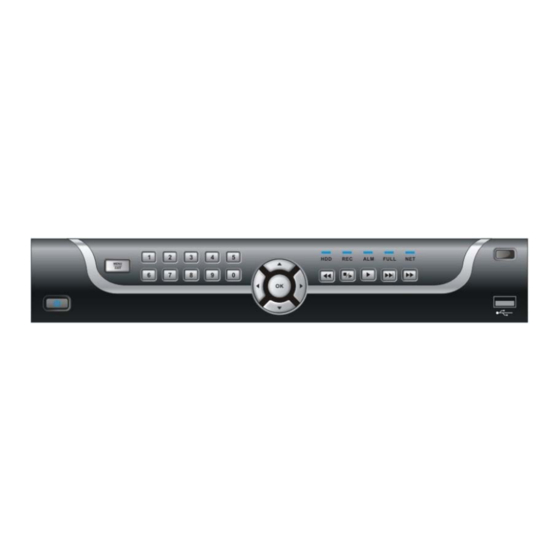
DVR INSTALLATION Model #: QS434 2. DVR INSTALLATION GUIDE 2.1 FRONT PANEL 1. THE FUNCTIONS OF BUTTONS AND CONNECTORS ON FRONT PANEL Item Name/Symbol Description Number STANDBY Press to set the system in standby mode. IR SENSOR IR Receiver for remote control. -
Page 10: Rear Panel
DVR INSTALLATION Model #: QS434 2.2 REAR PANEL 4-CHANNEL MODEL Connectors on Rear Panel Item Physical Connector Connector Description Number DC 19V/3.42A Power Connection VIDEO OUT Video output for connecting TV (BNC) VIDEO IN Video input for connecting analog video signal input (BNC) -
Page 11: Connection Diagram
DVR INSTALLATION Model #: QS434 2.3 CONNECTION DIAGRAM P a g e... -
Page 12: Hard Drive Installation
DVR INSTALLATION Model #: QS434 2.4 HARD DRIVE INSTALLATION Caution: When working with devices such as hard drives or DVRs that are sensitive to static electricity, make sure you use a static-free workstation. Any electrostatic energy coming in contact with the hard drive or DVR can damage it permanently. -
Page 13: Device Operation
DEVICE OPERATION Model #: QS434 3. DEVICE OPERATION 3.1 MOUSE OPERATION The mouse is the primary input device for navigating system menus. NOTE: Unless otherwise noted, all system functions described in this manual are achieved through mouse input. To use a mouse with the system: Connect a USB mouse to the USB MOUSE port on front panel of the DVR. -
Page 14: Remote Control
DEVICE OPERATION Model #: QS434 3.2 REMOTE CONTROL The remote control is the secondary input device For navigating the system’s menus. To use the remote control: 1. STANDBY: Press to turn standby mode ON/OFF. 2. LOGIN/LOCK: If "Security" has been enabled in the Setup menu, press to open the user password login screen. -
Page 15: Using The Sub-Menu
DEVICE OPERATION Model #: QS434 3.3 USING THE SUB-MENU Mouse Only When using the mouse, use the Sub-Menu to access several system options, including the Main Menu and PTZ control. To open the Sub-Menu: 1) Right-click anywhere onscreen. The Sub-Menu opens. -
Page 16: Playback
DEVICE OPERATION Model #: QS434 3.4 PLAYBACK View recorded video on the system through the Search Menu. To begin playback: Figure 3.4.1 1) Right-click anywhere onscreen and select VIDEO SEARCH. The Search Menu opens. NOTE: When you first open the Search Menu, it displays the current month and date. -
Page 17: System Operation
DEVICE OPERATION Model #: QS434 Onscreen Playback Controls To use the onscreen playback controls:3 1) Click the VCR-like controls to play, pause, fast forward, rewind, and slow down playback. 2) Drag the slider to adjust the volume (audio capable camera required for this function, not included). Select the box to mute the audio. - Page 18 DEVICE OPERATION Model #: QS434 Standby Mode The system can also be put into Standby Mode. Power will remain to the system but will not be recording. To start/stop Standby mode: 1) Press and hold the POWER button on the front panel or remote control until the prompt closes. The system enters standby mode.
-
Page 19: Using The Main Menu
DEVICE OPERATION Model #: QS434 3.5.2 USING THE MAIN MENU Figure 3.5.2 SEARCH: Search for recorded video on the system. RECORD: Configure recording parameters (quality, resolution), set record modes, and enable/disable audio recording.* HDD: Display hard drive status and format the internal hard drive of the system. -
Page 20: Search
DEVICE OPERATION Model #: QS434 1. SEARCH Search and playback recorded video on your system. Figure 3.5.3 NOTE: When you first open the Search menu, it will display the current month and date. To perform a Quick Search: Open the Search menu and click PLAY. The last minute of recorded playback begins. - Page 21 DEVICE OPERATION Model #: QS434 FILE LIST Use the File List sub-menu to see a detailed list of all the recorded video on your system. To open the File List: 1) From the Search Menu, click SEARCH to search the system for recorded video.
-
Page 22: Backup
DEVICE OPERATION Model #: QS434 2. BACKUP Use the File List sub-menu to find recorded video on your system and copy it to a USB flash drive (not included). NOTE: The system is compatible with most major brands of USB flash drives, with capacities from 256 MB to 16 GB. - Page 23 DEVICE OPERATION Model #: QS434 Using the Playback Software (included on CD) 1. Copy a backup file to your PC. 2. Open multimedia player and click [File Local File] to find/select the backup file, and then click [open] button (Figure 3.5.7). This will generate a dialog box of all the files on your device or computer (Figure 3.5.8).
- Page 24 DEVICE OPERATION Model #: QS434 Date Multi-Media Player Menu Overview Recorded Timeline 0-60 Minute Time (Figure 3.5.10) Quantum See Figure 1 Below for More Information on 1-18 Figure 3.5.10 • Date is depicted in upper right hand corner as illustrated in Figure 3.5.10. Date represents the date current file selection was recorded.
-
Page 25: Record Mode
DEVICE OPERATION Model #: QS434 Audio Settings: In your Multimedia player interface, go to the Setting menu on your toolbar. From there, go to SettingAudio Channel SettingNormal Video Bar (Figure 3.5.13). This will open up a dialog as illustrated in Figure 3.5.14 allowing you to choose from a drop down list of which audio channels to play. - Page 26 DEVICE OPERATION Model #: QS434 3) Under QUALITY, select BEST, FINE, NORMAL. Setup code rate for recording, CIF: corresponds to 768Kbps and 512Kbps and 384Kbps. HD1: corresponds to 1024Kbps and 768Kbps and 512Kbps. D1: corresponds to 1024Kbps and 768Kbps and 512Kbps.
- Page 27 DEVICE OPERATION Model #: QS434 To set a recording schedule: Open the Main Menu and click RECORD. Under REC. MODE, select TIMER RECORD. Click SCHEDULE. The Schedule menu opens. Under CHANNEL, select specific channels or select ALL. Below the grid, click either ALARM (red), GENERAL (Green), or NO RECORD (Blue) and then click a time block on the desired day.
- Page 28 DEVICE OPERATION Model #: QS434 Mask Field Setup The Mask Field lets you block a specific portion of a channel you do not want recorded or shown on the display screen. This can be useful if you need to conceal a sensitive area being captured by the installed camera.
-
Page 29: Hdd Management
DEVICE OPERATION Model #: QS434 4. HDD MANAGEMENT Displays essential information about the system`s internal hard drive, and lets you format the internal hard drive and external USB flash drive (not included). Figure 3.5.20 The HDD menu displays the following: •... -
Page 30: Basic
DEVICE OPERATION Model #: QS434 5. BASIC Set the system language, date and time, passwords, and configure audio and display options. The Basic Setup menu contains the following sub-menus: Language, Date/Time, Password, Display, and Video/Audio (see Figure 3.5.21). Figure 3.5.21 6. -
Page 31: Date/Time
DEVICE OPERATION Model #: QS434 7. DATE/TIME It is highly recommended to immediately set the date and time when first setting up your system. Figure 3.5.23 To set the date and time (Figure 3.5.23): Click DATE/TIME and configure the following options: •... -
Page 32: Password
DEVICE OPERATION Model #: QS434 • If using the DEFAULT, click APPLY. • If setting a CUSTOM DST, use the drop-down menus to select a week and month for the start and end times. Click APPLY. Click CLOSE in the confirmation window. -
Page 33: Display
DEVICE OPERATION Model #: QS434 To change your Device ID and Password: Click the field beside DEVICE ID and enter a 6-digit numerical Device ID using the Virtual Keyboard (mouse only). For example, change the ID to 000010. Under PASSWORD, select ENABLE. -
Page 34: Video/Audio
DEVICE OPERATION Model #: QS434 Preview Preview channels can be very useful if your display monitor is in public view. Select OFF for preview channel and it will appear black on the display to give the impression that no cameras are connected and the system is not recording. -
Page 35: Advanced
DEVICE OPERATION Model #: QS434 ADVANCED Use the Advanced Setup menu to configure alarm settings, motion detection, mobile surveillance, PTZ settings and network settings. The Advanced Setup menu contains the following sub-menus: Alarm, Info, MD, Mobile, System, PTZ, and Network. - Page 36 DEVICE OPERATION Model #: QS434 To configure alarm settings (Figure 3.5.28): Under I/O CHANNEL, select NO (Normal Open), NC (Normal Closed), or OFF. Click NEXT PAGE to view additional channels (8-channel models only). Apply loss alarms to the following: •...
-
Page 37: System Info
DEVICE OPERATION Model #: QS434 Under SEND EMAIL, enter the sender email address. Under SEND PW, enter the password of your email server. Under RECV EMAIL, enter the email address that will receive the email notification. Click APPLY. Click CLOSE in the confirmation window. -
Page 38: Mobile
DEVICE OPERATION Model #: QS434 Under MD SETUP, click SETUP. The red motion grid appears over the selected channel in full screen. Click the blocks in the grid to enable/disable motion detection. Red=motion detection enabled; Clear=motion detection disabled. Figure 3.5.32 5) Right-click anywhere on the screen to return to the Motion Detection menu. -
Page 39: System
DEVICE OPERATION Model #: QS434 Go to MAIN menu, select ADVANCED, select MOBILE (RED square Figure 3.5.32.1) to display MOBILE setup window (Figure 3.5.32.2) To configure mobile notification settings: Under MOBILE NETWORK, select 3G Under MOBILE PORT, enter your mobile port number. -
Page 40: Ptz
DEVICE OPERATION Model #: QS434 To restart the machine (soft-reset): Click RESTART. Click OK in the prompt. The system will perform a soft-reset and load to a live split-screen view. To upgrade firmware: Copy the firmware file to an empty USB flash drive. The firmware file should not be in a folder. -
Page 41: Remote Access
DEVICE OPERATION Model #: QS434 To configure a PTZ camera (Figure 3.5.34): Connect a PTZ camera to the BNC and 485A (TX, +) and 485B (RX, -) ports and power outlet. Under PROTOCOL, select PELCO-D or PELCO-P for the selected channel. - Page 42 DEVICE OPERATION Model #: QS434 Figure 3.5.35 Figure 3.5.36 UPNP UPnP Forum is an industry initiative designed to enable simple and robust connectivity among consumer electronics, intelligent appliances and mobile devices from many different vendors. As a group, we are dedicated to making the connected home and lifestyle mainstream experiences for consumers - and great opportunities for the industry.
- Page 43 DEVICE OPERATION Model #: QS434 Figure 3.5.37 Figure 3.5.38 For the DVRs IP address you would enter the same first 3 sets of numbers as the gateway and select a fourth set of numbers that is different then any other device attached to the same router. If the IP address of your computer in the ipconfig (BLUE arrow in Figure 3.5.37) is a single or two digit number you should be ok with any three digit number, if...
- Page 44 Before you setup DDNS you must first set up Port Forwarding as directed in Section 18.1 PORT FORWARDING. Once you have enabled Port Forwarding, you can configure your DDNS information by following these steps: a. Using a computer that is connected to the same network as your Q-See DVR, use your IE Browser to go to http://myq-see.com.
- Page 45 DEVICE OPERATION Model #: QS434 Figure 3.5.41 d. The next screen will ask you to create a domain name. Domain names must start with an (a-z) or (0-9) and cannot contain a hyphen. Once you choose your domain name, click on the [Request Domain] button.
- Page 46 DEVICE OPERATION Model #: QS434 Figure 3.5.43 Clicking on Network will generate a Network settings dialog box as illustrated in Figure3.5.44. Checking the [DDNS] box (RED box in Figure 3.5.44) will display a DDNS setting dialog box as illustrated in Figure 3.5.45.
-
Page 47: Port Forwarding
DEVICE OPERATION Model #: QS434 18.1 PORT FORWARDING To access the DVR from a remote computer over the internet you would then need to forward port 80 on the router the DVR is attached to, to the IP address of the DVR. You can get instructions on how to do this for most popular routers by going to www.portforward.com... - Page 48 DEVICE OPERATION Model #: QS434 To access the DVR through Internet Explorer: once you have setup the network settings on the DVR to match the settings of your router and forwarded the ports 80 and 9000 you need to modify your browser controls. You need to allow Pop-ups.
- Page 49 DEVICE OPERATION Model #: QS434 To connect to the DVR from the remote computer you would then open an Internet Explorer browser window and enter the internet IP of your router that you got by going to www.myipaddress.com. NOTICE: If you cannot use HTTP port 80 because it is being used by another program, or it is being blocked by your service provider, you can use another port in the same range.
-
Page 50: Remote Surveillance Software
REMOTE SURVEILLANCE SOFTWARE Model #: QS434 4. REMOTE SURVEILLANCE SOFTWARE FEATURES The system features a built-in browser-based software that allows you to access your system remotely over your local area network (LAN) or over the Internet using Internet Explorer®. Figure 4.1.0 Install the software through the IE browser of Windows and you can operate the network remotely. -
Page 51: Remote Surveillance Main Screen
REMOTE SURVEILLANCE SOFTWARE Model #: QS434 REMOTE SURVEILLANCE MAIN SCREEN Select LAN or INTERNET from the drop-down menu and click LOGIN. The process will last for 1~2 minutes. Figure 4.2.0 Figure 4.2.1 Remote access login screen After logging in, the Remote Surveillance main screen will appear in your browser. -
Page 52: Live Viewing
REMOTE SURVEILLANCE SOFTWARE Model #: QS434 6) Functions: Click the icons to show/hide channels, take screen captures, and record. 7) Display Modes: Click the icons to view channels in single-channel full-screen, quad, and split-screen configurations. 8) Volume/Mute: Select a channel (outlined in red) and then click the bars to increase/decrease volume; click the icon to mute/un-mute volume.*... -
Page 53: Sub-Menu
REMOTE SURVEILLANCE SOFTWARE Model #: QS434 4.3.2 SUB-MENU Right-click any channel to open the sub-menu. Figure 4.3.1 4.3.3 PTZ CONTROL You must have a PTZ camera (not included) connected to the system in order to use the PTZ controls. Figure 4.3.2 To control a PTZ camera: Select the channel of the connected PTZ camera(s). -
Page 54: Screen Captures
REMOTE SURVEILLANCE SOFTWARE Model #: QS434 4.3.4 SCREEN CAPTURES Use the remote surveillance software to take a snapshot of the channels on the main display screen. Screen Captures can be useful for your own records, or may be needed by authorities in case of a security incident. - Page 55 REMOTE SURVEILLANCE SOFTWARE Model #: QS434 Figure 4.3.4 The purple bar indicates the download progress. The green marker indicates playback progress. You can click and drag the playback marker (will turn from green to orange) to advance or rewind playback as needed.
- Page 56 REMOTE SURVEILLANCE SOFTWARE Model #: QS434 To backup files remotely: 1) Click REPLAY at the top of the main screen. 2) Select a date(s) on the calendar and click REFRESH. 3) Double-click a file from the File List to begin playback.
-
Page 57: Remote Setup
REMOTE SURVEILLANCE SOFTWARE Model #: QS434 4.3.6 REMOTE SETUP Use the Setup tab to configure the settings of your system from a remote location. NOTE: If the Main Menu is open on the system, you will not be able to make changes to the system from the remote location. - Page 58 REMOTE SURVEILLANCE SOFTWARE Model #: QS434 4.3.6.2 ALARM SETTING Click “ALARM” to enter into setup interface; the parameter settings are the same as on the DVR. Figure 4.3.9 4.3.6.3 PTZ Click to access setup interface; the parameter settings are the same as on the DVR.
- Page 59 REMOTE SURVEILLANCE SOFTWARE Model #: QS434 4.3.6.4 NETWORK Click to access setup interface; the parameter settings are the same as on the DVR. Figure 4.3.11 4.3.6.5 SETTING Click to access setup interface; the parameter settings are the same as on the DVR.
-
Page 60: Host Info
REMOTE SURVEILLANCE SOFTWARE Model #: QS434 BANDWIDTH: Set the bandwidth in kbps (128k, 192k, 256k, 384k, 512k, 1024k) that you want to allocate for traffic depending on the available internet bandwidth. This bandwidth does not include audio. FILE SAVE PATH: The save path of captured picture and recording video. IE login password and DST settings you can set as DVR setting. -
Page 61: Product Specifications
PRODUCT SPECIFICATIONS Model #: QS434 5. PRODUCT SPECIFICATIONS ITEM DEVICE PARAMETER SPECIFICATION SYSTEM LANGUAGE ENGLISH/ CHINESE GRAPHIC MENU (OSD MENU) PASSWORD ADMINISTRATOR PASSWORD, USER PASSWORD VIDEO VIDEO IN 4 CH COMPOSITE VIDEO INPUT 1.0VP-, IMPEDANCE75Ω,BNC VIDEO OUT 1 CH COMPOSITE VIDEO OUTPUT,BNC... -
Page 62: Basic Working Parameters
PRODUCT SPECIFICATIONS Model #: QS434 ITEM DEVICE PARAMETER SPECIFICATION ALARM ALARM INPUT 4 ALARM INPUT CONNECTOR ALARM OUTPUT 1 ALARM OUTPUT SERIAL INTERFACE SUPPORT 1 RS232 SERIAL INTERFACE SUPPORT 1 RS485 NETWORK INTERFACE RJ45,10M/100M SOFTWARE SUPPORTS USB FIRMWARE UPGRADE UPGRADE... -
Page 63: Frequently Asked Questions
FAQ’S Model #: QS434 6. FREQUENTLY ASKED QUESTIONS If your problem is not listed below, please call our toll-free number, 877-998-3440 X 539 for more support. Question: Why is the DVR not working after starting? Answer: Check the power adaptor input... - Page 64 FAQ’S Model #: QS434 Question: DVR is having problems with real-time images, such as bad image color or serious brightness distortion, why? Answer: If PAL and NTSC is not correctly selected on the BNC output, the images will be in black and white...
- Page 65 FAQ’S Model #: QS434 13. Question: Why does the Remote Control not work? Answer: The address of remote control is not correct The distance of remote control is too far or the angle is too wide Remote control batteries are low Remote control is damaged or the front panel of DVR is damaged 14.
-
Page 66: Troubleshooting
TROUBLESHOOTING Model #: QS434 7. TROUBLESHOOTING Error Possible Causes Solutions • System is not receiving • Cable from power adapter is • Confirm that all cables are connected correctly • Confirm that the power adapter is securely connected power or is not powering loose or unplugged. - Page 67 TROUBLESHOOTING Model #: QS434 Error Possible Causes Solutions • The image on the DVR • Audio cables are loose or have • Check the AUDIO connections to the DVR appears but does not been disconnected • Audio channels have been •...