Table of Contents
Advertisement
Mode! No. GGSY79240
Sedal No.
Write the seriaU number in the
space above for future reference,
SeriaU Number DecaU
As a manufacturer,
we are com-
mitted to providing
complete
customer
satisfaction.
If you
have questions,
or if there are
missing
or damaged
parts, we
wilt guarantee
comptete satis-
faction through
direct assis-
tance from our factory.
TO AVOID DELAYS, PLEASE
CALL DIRECT TO OUR TOLL-
FREE CUSTOMER HOT LINE.
The trained
technicians
on our
customer
hot tine will provide
immediate
assistance,
free of
charge.
CUSTOMER NOT LINE:
1°877°776-4777
Mon.=Fri., 6 a.m.=6 p.m. MST
,& CAUTION
Read all precautions
and instruc-
tions in this manual before us ing
this equipment.
Save this manual
for future reference.
US
Advertisement
Table of Contents

Related Manuals for Gold's Gym POWER FLEX


Summary of Contents for Gold's Gym POWER FLEX
- Page 1 Mode! No. GGSY79240 Sedal No. Write the seriaU number in the space above for future reference, SeriaU Number DecaU As a manufacturer, we are com- mitted to providing complete customer satisfaction. If you have questions, or if there are missing or damaged parts, we wilt guarantee...
-
Page 2: Table Of Contents
DRAWING are attached in the center of this manual. Remove the PART iDENTiFiCATiON CHART and PART LIST/EXPLODED DRAWING before begin- ning assembly. GOLD'S GYM is a registered trademark of Gold's Gym International, Inc. This product is manufactured and distributed under license from Gold's Gym Merchandising, Inc. -
Page 3: Warning Decal Placement
WARNING DECAL PLACEMENT The decal shown here has been placed on the exercise rack. mfa decaJ is missing illegible, please call our Customer Service Department toll-free at 1-877-776-4777, Monday through Friday, 6 a.m. until 6 p.m. Mountain Time, and order a free replacement decal Apply the decal in the location shown. -
Page 4: Important Precautions
iMPORTANT PRECAUTIONS AWARNING: To reduce the .skofse.o,,s i njury, read t he following _mportont precautions before using the resistance system. 1. Read all instructions in this manual before 8. Always make sure that the pins and knobs using the resistance system. -
Page 5: Before You Begin
BEFORE YOU BEGIN Thank you for selecting the versatile GOLD'S GYM after reading this manual, please call our Customer POWER FLEX resistance system. The resistance sys- Service Department toHHofree a t 1°877°776-4777, tem offers a selection of exercise stations designed to Monday through Friday, 6 a.m. -
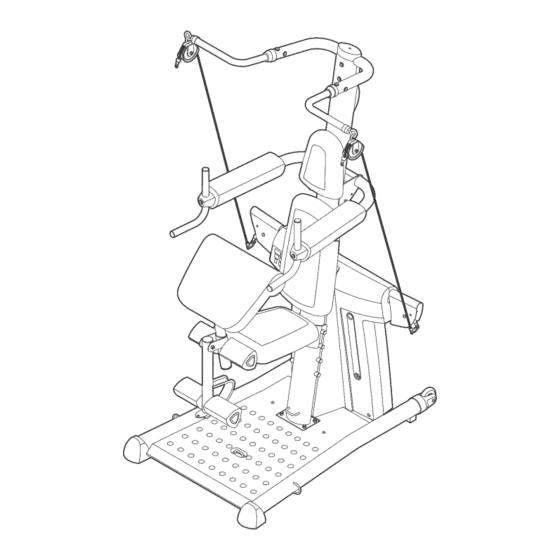
Page 6: Assembly
• As you assemble the exercise rack, make sure all MakeThingsEasierfor Yourself parts are oriented as shown in the drawings. Everything i nthismanual i s designed t o ensure • For help identifying small parts, use the PART thatthe exercise rackcanbe assembled s uc- iDENTiFiCATiON CHART. - Page 7 Attach the Upright Base (2) to the Base (1) with four MIO x 60mm BoUts(80), four M10 Washers (91), and four MIO Nybn Locknuts (74), Do not tighten the Locknuts yet. Attach the Upright (3) to the Upright Base (2) with five MIO x 25mm Button BoUts(99) and five MIO Washers (91), 3-..
- Page 8 Orient the Backrest (16) as shown. Attach the Backrest to the Upright Base (2) and the Upright (3) with two M6 x 100mm Screws (71) and two M6 Washers (85). Wide _2-._ _--Y Attach the Center Cover (59) to the Front Mech Cover (13) with two M4 x 20mm Selfotapping Screws (94).
- Page 9 Attach a Pull-up Handle (18) to the Top Frame (4) with four MIO x 20mm Button Bolts (83) and four M10 Washers (91), Slide a Top Arm Cap (20) over the Pull-up Handle (18) and onto the Top Frame (4), Press a 32mm Round Outer Cap (22) onto the Pull-up Handle (18), Tighten an Eyebolt (23) into the Pull-up Handle,...
- Page 10 11, Grease an MIO x 217mm BoUt(73), Attach the Dip Arm (5) to the Upright (3) with the BoUtand an MlO NyUonLocknut (74), Do not overtighten Locknut; the Dip Arm must be able to pivot easily. Attach the Pin (58) to the Upright (3) with an M4 x 20mm SeUfotappingScrew (94), Insert the Pin into the Upright, Grease...
- Page 11 14, Grease an MIO x 72mm BoUt(101), Attach the Leg Lever (8) to the Seat Frame (6) with the BoUt Grease and an MIO NyUonLocknut (74), Do not over- tighten the Locknut; the Leg Lever must be able to pivot easily. 15, Side two Smal Foam Pads (25) onto the Leg Lever (8), Press two Endcaps (57) onto the Leg Lever,...
-
Page 12: Adjustments
ADJUSTMENTS This section expUains how to adjust the resistance system, See the EXERCUSE GUUDEMNES on page 16 for important information about how to get the most benefit from your exercise program, AUso, refer to the accompa- nying exercise guide to see the correct form for each exercise, Make sure aH parts are properly tightened each time the resistance system is used, RepUace any worn parts immediateUy, The resistance system can be cleaned with a damp cloth and a mild, non-abrasive detergent, Do not use soUvents,... - Page 13 ADJUSTmNG THE DroPARM To perform some exercises, the Dip Arm (5) should be locked in the up position, Remove the Pin (58) and lift the Dip Handb (11), Engage the Pin into the Upright (3) and the hob in the Dip Arm plate, To use the Dip Arm (5), remove the Pin (58) and lower the Dip Handb (11), insert the Pin into the Upright (3),...
- Page 14 ATTACHING THE CURL PAD To use the Cud Pad (29), first remove the 50mm Round SUanted UnnerCap (66) from the Seat Frame (6). Then, insert the Cud Post (9) into the Seat Frame and secure the Cud Post with the Cud Knob (64). Remove the Cud Pad (29} and replace the 50ram Round Slanted inner Cap (66} when performing...
- Page 15 THE RESISTANCE SYSTEM CONSOLE Resistance. To adjust the resistance level press the LBS Up or Down button, The resistance level will be I U U displayed in the top display, Rep Counter. Press the REPS Up or Down button RI!£PS until the center display shows the desired number of repetitions to be completed for an exercise, As repeti- tions are started, the console will count down to zero,...
-
Page 16: Exercise Guidelines
EXERCISE GUiDELiNES THE FOUR BAsmc TYPES OF WORKOUTS PERSONALIZING YOUR EXERCISE PROGRAM Muscb Buitding Determining the exact length of time for each workout, as well as the number of repetitions or sets completed, To increase the size and strength of your muscies, is an individual matter, it is important to avoid overdo- push them to a high percentage of their maximum capacity, Your muscies wHi continualiy adapt and grow... - Page 17 Rest for a short period of time after each set. The slowly as you stretch and do not bounce, Ease into ideaU resting periods are: each stretch gradually and go only as far as you can Rest for three minutes after each set for a muscle without strain, Stretching at the end of each workout building workout.
- Page 18 MONDAY EXERCISE WEIGHT SETS REPS Date: AEROBIC EXERCISE TUESDAY Date: EXERCISE WEIGHT SETS REPS Date: AEROBIC EXERCISE Date: FRUDAY EXERCISE WEIGHT SETS REPS Date: Make photocopies of this page for scheduling and recording your workouts,...
- Page 19 MONDAY EXERCISE WEIGHT SETS REPS Date: AEROBIC EXERCISE TUESDAY Date: EXERCISE WEIGHT SETS REPS Date: AEROBIC EXERCISE Date: FRUDAY EXERCISE WEIGHT SETS REPS Date: Make photocopies of this page for scheduling and recording your workouts,...
- Page 20 PART iDENTiFiCATiON CHART Refer to the drawings beUow to identify small parts used in assemMy, The number in parentheses by each draw- ing is the key number of the part, from the PART LUST in the center of this manual Note: Some small parts may have been pre-attached.
- Page 21 R1204A PART LIST--Model No. GGSY79240 Description No. Qty. Oescdption Qty. Description No. Qty. M12 x 12mm Screw Base AnkRe Strap M3 Nut Upright Base 32mm Round UnnerCap MIO x 98mm Button Upright Band Spacer Bolt Top Frame Pulley MIO x 25mm Button Dip Arm Mech Rope Bolt...
- Page 22 EXPLODED DRAWING--Model No. GGSY79240 R12O4A ,,._ ... ,/94 \\\\ !"_74123 "" 121 119 .'_'" 35 5_. ,_!-_106 2797 116 _...
- Page 23 / 85 ==-==i ;101 .,_'94...
- Page 24 1, The MODEL NUMBER of the product (GGSY79240) 2, The NAME of the product (GOLD'S GYM POWER FLEX resistance system) 3, The SERHAL NUMBER of the product (see the front cover of this manuaH)
Need help?
Do you have a question about the POWER FLEX and is the answer not in the manual?
Questions and answers