Table of Contents
Advertisement
A A A A
D D D D
A A A A
D D D D
T T T T
T T T T
800-04705V1 2/10
Rev. A
E E E E
M M M M
C C C C
O O O O
6 6 6 6
2 2 2 2
E E E E
M M M M
C C C C
O O O O
6 6 6 6
2 2 2 2
o o o o
u u u u
c c c c
h h h h
C C C C
e e e e
n n n n
t t t t
e e e e
o o o o
u u u u
c c c c
h h h h
C C C C
e e e e
n n n n
t t t t
e e e e
7 7 7 7
2 2 2 2
S S S S
e e e e
r r r r
i i i i
e e e e
s s s s
7 7 7 7
2 2 2 2
S S S S
e e e e
r r r r
i i i i
e e e e
s s s s
r r r r
K K K K
e e e e
y y y y
p p p p
a a a a
d d d d
s s s s
r r r r
K K K K
e e e e
y y y y
p p p p
a a a a
d d d d
s s s s
User Guide
Advertisement
Table of Contents

Related Manuals for Honeywell 6272CV


Summary of Contents for Honeywell 6272CV
-
Page 1: User Guide
A A A A D D D D E E E E M M M M C C C C O O O O 6 6 6 6 2 2 2 2 7 7 7 7 2 2 2 2 S S S S e e e e r r r r... -
Page 2: Table Of Contents
Table of Contents (Cont'd) ABOUT THE TOUCHCENTER................. 5 Introduction ....................5 The TouchCenter Interface ................ 6 Navigating through the TouchCenter ........... 6 About Your Home Screen ..............6 Customizable Home Screen ..............6 Memory Card Insertion ................ 7 Slide Show Application ................ 7 TouchCenter "Arming"... - Page 3 Table of Contents (Cont'd) How to Arm the System ..............14 How to Arm Multiple Partitions ............15 How to Display Faults ............... 17 How to Bypass Zones ............... 18 How to Remove Bypassed Zones ............20 How to Hide a Control Panel Message ..........22 How to Disarm the System ..............
- Page 4 Table of Contents (Cont'd) Operating Modes ................37 Language Selection ................38 Backlight Off Activation Time ............. 39 Homepage After Time ............... 40 Auto Slide Show After Time ............... 41 Clean Screen ..................42 Home Setup Button Layout ............... 43 Routine Care ..................
-
Page 5: About The Touchcenter
6272CSV (Color display and Voice feature with silver / black housing) • 6272CBV (Color display and Voice feature with black housing) • 6272CV (Color display and Voice feature with white housing) • One or more other keypads for system control • Various sensors for perimeter and interior burglary protection,... -
Page 6: The Touchcenter Interface
In some extreme cases, the keypad may need to be reset. Honeywell is not responsible for any loss of personal information (files, messages, photos, etc.) -
Page 7: Memory Card Insertion
About the TouchCenter (Cont'd) Tips for proper memory card handling: • Avoid touching the contacts on the card • Quit the slide show application before removing the memory card • When removing the memory card from external devices (PC/Camera) make sure the card is removed properly. Memory Card Insertion 1. -
Page 8: Navigation Icon Descriptions
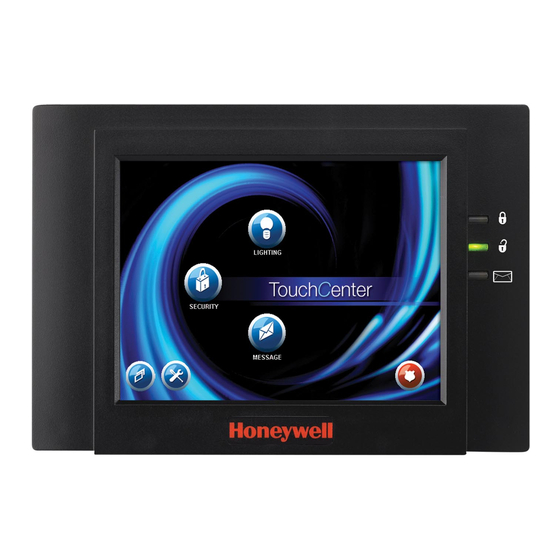
About the TouchCenter (cont'd) Navigation Icon Descriptions To aid in the navigation of the TouchCenter, a set of user-friendly icons has been provided. The appearance, function, and location of these icons are described below: ICON LOCATION FUNCTION Allows you to record and retrieve voice "Home"... -
Page 9: Touchcenter "Arming" Screen
About the TouchCenter (Cont'd) TouchCenter "Arming" Screen From the "Home" screen, press SECURITY to access the TouchCenter "Arming" screen. Use this picture and the table that follows to become familiar with the TouchCenter security functions. Note: The Voice Status Icon ( ) shown in the above illustration indicates the TouchCenter Voice feature. -
Page 10: System Troubles
About the TouchCenter (cont'd) ITEM FUNCTION Arm Multi- Press this button when you want to arm more than one partition. All Partitions partitions within the system can be armed at one time (if the user is so authorized). Note: This option may not be shown for some single partition systems. -
Page 11: System Overview
System Overview Introduction to Your System This system offers you burglary protection and may offer fire, carbon monoxide and emergency protection. Monitoring is accomplished with various contact and motion sensors for perimeter and interior burglary protection, plus the system may have strategically placed smoke, heat, carbon monoxide or combustion detectors. -
Page 12: Alarms
System Overview (Cont'd) time to leave through the designated exit door without setting off an alarm. Exit delay begins immediately after entering any arming command, and applies to all modes of arming protection. If programmed, a slow beeping will sound throughout the exit delay period. -
Page 13: User Codes
System Overview (Cont'd) Note: If a carbon monoxide detector develops a low battery, a “Carbon Monoxide Maintenance” message is displayed. To determine which zone is causing the problem, go to “Display Faults” to determine which zone has the low battery indication. User Codes Each user must be assigned a name with a corresponding 4-digit user code in order to gain access to various features and functions. -
Page 14: Security
Security Introduction to Security System Operation You can arm your system in one of three arming modes: Away, Stay, and Night. The following table lists the three different arming modes and the results of each. FEATURES FOR EACH ARMING MODE Arming Exit Entry... -
Page 15: How To Arm Multiple Partitions
Security (Cont'd) SCREEN ACTION • The TouchCenter beeps twice (Away and Night Maximum Modes) or 3 times (Stay and Night Instant Modes) • a DISARM button appears • a text message appears stating which zones are arming and whether or not there is an entry delay •... - Page 16 Security (Cont'd) SCREEN ACTION 3. Press the appropriate arming mode button. Note: If any zones are bypassed, a Display Faults button will also be displayed on this screen. 4. When prompted, enter the user code authorized to access other partition(s). If the user code is accepted, the system displays the partitions that the user has access to.
-
Page 17: How To Display Faults
Security (Cont'd) SCREEN ACTION • When exit delay time expires, the screen automatically changes to indicate the system is "Armed". The system is now armed in the selected mode. How to Display Faults The Display Faults function is used when you see a Not Ready Fault message and want to determine where the fault is and what type of fault it is. -
Page 18: How To Bypass Zones
Security (Cont'd) The following symbols may be displayed on the "Display Faults" screen. Zone in alarm Zone has trouble Zone is faulted Zone has low battery Zone is bypassed How to Bypass Zones The Bypass function is used when you want to arm your system with one or more zones left open. - Page 19 Security (Cont'd) To bypass zones do the following: 1. From the "Home" screen, press the SECURITY button. The "Arming" screen is displayed. SCREEN ACTION 2. From the "Arming" screen, press the More Choices button. The "More Choices" screen is displayed. Note: If any zones are bypassed or faulted, a Display Faults button will also be displayed on this screen.
-
Page 20: How To Remove Bypassed Zones
Security (Cont'd) SCREEN ACTION The "User Authorization" screen is displayed with the instructions "To Bypass Zones, Enter Code". Note: If zones have already been bypassed, the top of this screen will indicate “Ready Bypass”. 6. Enter your 4-digit user code. The "More Choices"... - Page 21 Security (Cont'd) SCREEN ACTION 2. Remove zone bypasses by pressing the CLEAR BYPASSES button. Note: Bypassed zones are indicated by the Bypass icon 3. The "User Authorization" screen is displayed with the instructions To Clear Bypasses, Enter Code. Note: If the system is armed and you unbypass a zone, it will disarm the system.
-
Page 22: How To Hide A Control Panel Message
Security (Cont'd) How to Hide a Control Panel Message When the Control Panel Message is displayed, press the HIDE button to address the condition later. SCREEN ACTION 1. Press the HIDE button to clear the Control Panel Message later. How to Disarm the System IMPORTANT: If you return and the main burglary sounder is on, DO NOT enter the premises, but call the police from a nearby safe location. - Page 23 Security (Cont'd) SCREEN ACTION Note: If you have a commercial system and a time window has been defined for when you may disarm the system, the system will not disarm if you are outside that time window. To disarm the system when already in the premises: SCREEN ACTION 1.
-
Page 24: How To Check The Status Of Other Partitions
Security (Cont'd) SCREEN ACTION 3. Press the DISARM ALL button if you wish to disarm the system. The TouchCenter beeps once and the "Arming" screen is displayed showing the system as Ready to Arm or not ready if any zone is faulted (open). - Page 25 Security (Cont'd) partition. (Note that only those partitions authorized programmed by the installer can be accessed in this manner.) To check the status of other partitions perform the following: 1. From the "Home" screen, press the SECURITY button. The "Arming" screen is displayed.
-
Page 26: Fire Alarm Operation
Security (Cont'd) Fire Alarm Operation Your fire alarm system (if installed) is on 24 hours a day, providing continuous protection. In the event of an emergency, the installed smoke and heat detectors will automatically send signals to your Control/Communicator, triggering a loud interrupted sound from the keypad. -
Page 27: In Case Of Carbon Monoxide Alarm
Security (Cont'd) 4. When the problem has been corrected, clear the display by entering the DISPLAY FAULTS button on the Arming screen, selecting the fire zone, pressing the CLEAR button and then entering your user code. Note: Contact your Security Company for servicing if you have further problems with your fire system. -
Page 28: Advanced System Features
Security (Cont'd) carbon monoxide zone, pressing the CLEAR button and then entering your user code. Note: Contact your Central Station/Security Company for servicing if you have further problems with your carbon monoxide system. Advanced System Features While most of the commonly used security functions are available from the TouchCenter’s advanced user interface, there are some less used, advanced features that can either be accessed through Console Emulation mode on the TouchCenter or a standard alpha keypad. -
Page 29: Console Emulation Mode
Security (Cont'd) Console Emulation Mode Console Emulation Mode allows you to use a TouchCenter interface just as you would a regular system keypad. All commands shown in Console Emulation mode can also be executed from a standard alpha keypad. Notes: •... -
Page 30: How To View The Event Log
Security (Cont'd) SCREEN ACTION 3. Press the CONSOLE MODE button on the "More Choices" screen. The "Keypad" screen is displayed. 4. Perform functions as you would from a regular alpha keypad. How to View the Event Log Your system has the ability to record various events in a history log wherein each event is recorded with the time and date of its occurrence. - Page 31 Security (Cont'd) SCREEN ACTION The first ten events will be displayed. To view all items, press the Show More button and press the up/down arrows to scroll through the event log. Notes: • When All Partitions or All Events button is pressed, and more than 100 events exist, the Show More button text will change to read Next>>.
-
Page 32: How To Send Emergency Messages
Security (Cont'd) How to Send Emergency Messages • Emergency messages are optional and may not be available on your system. Ask your system installer if emergency messages are available on your system. • The Emergency screen cannot be accessed while running a screen diagnostic test or while in the clean screen mode. -
Page 33: Voice Messages
Voice Messages Introduction to Recording and Retrieving Messages The 6272 Series devices provide the capability of recording voice messages for others on the premises. The number of messages is not limited; however, the total time of all messages added together cannot exceed 120 seconds. -
Page 34: Retrieving And Deleting A Voice Message
Voice Messages (Cont'd) 3. Press the Stop button when you are done recording the message. The message indicator will be flashing and the message will be listed in the message list window. 4. To record additional messages, repeat steps 2 and 3 above or to exit, press the BACK or HOME button and the “Home”... -
Page 35: Setup
Setup Setup Setup allows you to make changes to the way your TouchCenter is operating. The options that can be changed are: • Adjust the touch screen brightness • Adjust the TouchCenter sounder volume You may access the Display & Audio Setup, System Setup (if enabled by your system installer), and Slideshow Setup from the "Setup"... -
Page 36: Adjust The Brightness
Setup (Cont'd) Adjust the Brightness You may adjust the brightness settings by pressing your finger on the slide bar associated with the "Brightness" scale and doing the following: To increase the brightness, move the slide bar above the current brightness setting. To decrease the brightness, move the slide bar below the current brightness setting. -
Page 37: Disp & Audio Setup
Setup (Cont'd) Disp & Audio Setup Operating Modes Operating modes allows you to turn the TouchCenter chime mode on or off. Additionally, you may also turn the voice mode on or off. The operating modes provide the following features: • Chime Mode – When selected, a request is sent to the alarm panel requesting that the panel chime the TouchCenter whenever a change in zone status occurs. -
Page 38: Language Selection
Setup (cont'd) SCREEN ACTION 5. Touch the Voice Mode button to turn the Voice Mode on or off. A checkmark appears in the button when the Voice Mode is “ON”. Note that if the Chime Mode and Voice Mode are both selected, the Voice Chime button will automatically be selected. -
Page 39: Backlight Off Activation Time
Setup (Cont'd) SCREEN ACTION 5. To select a specified language, choose English, French Canadian, Portuguese, South American Spanish, European Spanish and Italian). Once the language is selected, the keypad will revert back to "Home" screen with the selected language applied. Backlight Off Activation Time When the TouchCenter is left idle, it will automatically turn the backlight off after the selected backlight off time has expired (unless... -
Page 40: Homepage After Time
Setup (cont'd) SCREEN ACTION When the update is complete, depending on which selection you made, ( "Home", "Back," "Home Setup" or "RESET Home Setup") the TouchCenter will go to it's respective selected screen. Homepage After Time When the TouchCenter is left idle, it will automatically return to the “Home”... -
Page 41: Auto Slide Show After Time
Setup (Cont'd) SCREEN ACTION 2. Select the time period option you want by pressing it. The drop-down list closes automatically and the selection is displayed. 3. Press either the "Home", "Back," "Home Setup" or "RESET Home Setup" button. A Settings Changed! pop-up window is displayed asking “Remember New Settings?“... -
Page 42: Clean Screen
Setup (cont'd) SCREEN ACTION 2. Select the time interval you want by pressing it. The drop-down list closes automatically and the selection is displayed. Note: Additional time intervals can be viewed by using the up/down "arrows" to select the time period options. 3. -
Page 43: Home Setup Button Layout
Setup (Cont'd) SCREEN ACTION When the "Continue" button is pressed the message "Touch Screen Disabled for =30 Seconds" is displayed. During these 30 seconds the touch screen should be wiped clean of fingerprints using a mild soap solution and a soft cloth. When the counter reaches zero, the window automatically closes and the touch screen is active. -
Page 44: Routine Care
Setup (cont'd) SCREEN ACTION 5. When completed, press either the "Home", or "Back" button. A Settings Changed! pop-up window is displayed asking “Remember New Settings?“ Select Yes to save the change or No to discard the change. After selecting Yes or No, the TouchCenter will revert back to the either Home screen or Display and Audio Setup screen, depending on the selection made... -
Page 45: Slide Show Setup
Setup (Cont'd) SCREEN ACTION 4. A "Reset the Homescreen Setup" pop-up window is displayed prompting the user to select Yes or No. Press Yes to reset the button locations. Press No to have the button layout remain in the default locations. Slide Show Setup The 6272 Keypad offers a Slide Show Feature. - Page 46 Setup (cont'd) SCREEN ACTION 7. Select the time interval that you want to allow between each photo being viewed by touching the Slide Delay arrow and select from the drop-down menu (5, 10, 15, or 20 secs). 8. Select the type of viewing transition desired by touching the Transition arrow and select from (Standard, Horizontal, Vertical or Blind Effects).
-
Page 47: User Setup
Setup (Cont'd) User Setup Each user must be assigned a name with a corresponding 4-digit user code in order to gain access to various features and functions. The TouchCenter can hold the identity for 10 Users in its memory. If additional Users are needed, define the additional Users using the Console Emulation Mode. -
Page 48: How To Add A User
Setup (Cont'd) Access User Setup as follows: 1. From the "Home" screen, press the Setup button. The "Setup" screen is displayed. SCREEN ACTION 2. Press the System Setup button. The "System Setup" screen is displayed. 3. Press the USER SETUP button on the "System Setup"... - Page 49 Setup (Cont'd) SCREEN ACTION 3. Touch the box next to Enter User Name. The Enter Data keyboard screen is displayed. Type in the user name (6 characters max. with no spaces between characters) and press the OK button. Notes: • Use the Shift button for capital letters. •...
- Page 50 Setup (Cont'd) SCREEN ACTION 6. Touch the box next to Enter User Code. The "User Authorization" screen is displayed with the instructions "Enter 4 Digits". 7. Enter the 4-digit User Code for this user. The “User Options” screen is displayed with the user’s name, number and code displayed.
-
Page 51: How To Delete A User
Setup (Cont'd) SCREEN ACTION 10. Press the Save button. The system will save the configuration. When the save is complete, the User Setup screen is displayed with the new user’s name shown. How to Delete a User Delete a User as follows: SCREEN ACTION Three selections are available: add a... -
Page 52: How To Edit A User
Setup (Cont'd) SCREEN ACTION 3. Press the appropriate button. The User Setup screen is displayed. How to Edit a User Note: You cannot edit a User’s name or User number. To modify a User name or User number, you must delete the User and re-enter User. -
Page 53: Safe Mode
Setup (Cont'd) SCREEN ACTION 3. Select the options needed for this user and press the SAVE button. The configuration changes are saved and you are returned to the User Setup screen. Safe Mode In the rare event that the TouchCenter cannot successfully communicate in its graphic mode with the control panel, the Safe Mode is a backup mode that ensures that you can communicate with your system. -
Page 54: Time/Date Setup
Setup (Cont'd) Note that this is a limited mode of operation. While in this mode: • You can use the Security button to access the Console Emulation Mode of operation to try to clear your faults, disarm the system, or enter additional Alpha Keypad commands specified in your panel User Guide. -
Page 55: Setting Daylight Savings Time
Setup (Cont'd) Yes to the following prompt. Additionally, when using the TouchCenter with a residential panel, the panel will download its time into the TouchCenter once an hour after the clock is set. • If Get Time is pressed, the TouchCenter will download the time and date from the control panel and exit the Set Time &... - Page 56 Setup (Cont'd) SCREEN ACTION 3. Select if you want Daylight Savings Time to affect your system clock by touching the DST button. The DST screen is displayed. 4. On the "Daylight Savings" screen, press the Month "arrow" button in the “Start DST”...
-
Page 57: Setting Current Time And Date
Setup (Cont'd) SCREEN ACTION 10. On the "Daylight Savings" screen, press the Weekend "arrow" button in the “End DST” area of the screen. A drop- down list displaying the weeks is displayed. 11. Select the week you want by pressing it. - Page 58 Setup (Cont'd) SCREEN ACTION 3. On the "Time and Date" screen, press the Year that is being displayed. A Year screen is displayed with the instructions to Enter 4 digits for the year. 4. Enter the four digits for the current year.
- Page 59 Setup (Cont'd) SCREEN ACTION 7. On the "Time and Date" screen, press the Minutes that is being displayed. A minute screen is displayed with the instructions to Enter 2 digits for the minutes. 8. Enter the two digits for the current minute.
- Page 60 Setup (Cont'd) SCREEN ACTION 14. On the "Time and Date" screen, press the Apply button. A confirmation screen is displayed. 15. Press the Yes button to save the time changes in your security system or press the No button to have the changes affect the TouchCenter only.
-
Page 61: Glossary
Glossary The following terms are used throughout the guide. Arm/Disarm: “Armed” simply means that the burglary portion of your system is turned ON and is in a state of readiness. “Disarmed” means that the burglary system is turned OFF, and must be rearmed to become operational. - Page 62 Glossary (Cont'd) Master Code: A 4-digit code that gives users access to all of the system’s functions, including the ability to program other users in the system. See also “User Code. Message Button: A graphical button on the Home screen that allows you to record and retrieve voice messages.
- Page 63 ONE YEAR LIMITED WARRANTY Honeywell International Inc., acting through its Security & Communications business ("Seller"), 2 Corporate Center Drive, Melville, NY 11747, warrants its security equipment (the "product") to be free from defects in materials and workmanship for one year from date of original purchase, under normal use and service.
- Page 64 2 Corporate Center Drive, Suite 100 P.O. Box 9040 Melville, NY 11747 Copyright © 2009 Honeywell International Inc. www.honeywell.com/security Ê800 Ê800 Ê800 Ê800- - - - 04705V11Š 04705V11Š 04705V11Š 04705V11Š 800-04705V1 2/10 Rev. A...
Need help?
Do you have a question about the 6272CV and is the answer not in the manual?
Questions and answers