Table of Contents
Advertisement
Advertisement
Table of Contents

Subscribe to Our Youtube Channel
Related Manuals for DigiTech JAMMAN - MANUAL 2


Summary of Contents for DigiTech JAMMAN - MANUAL 2
- Page 1 Owner’s Manual Professional Audio Equipment...
- Page 2 IMPORTANT SAFETY INFORMATION WarnInG for your ProtectIon reaD tHe foLLoWInG: KEEP THESE INSTRUCTIONS HEED ALL WARNINGS FOLLOW ALL INSTRUCTIONS the symbols shown above are internationally accepted symbols that THE APPARATUS SHALL NOT BE ExPOSED TO DRIPPING OR SPLASHING LIqUID warn of potential hazards with electrical products. the lightning flash AND NO OBjECT FILLED WITH LIqUID, SUCH AS vASES, SHALL BE PLACED ON THE with arrowpoint in an equilateral triangle means that there are dangerous APPARATUS...
- Page 3 AstA approved to Bs1362. sandy, utah 84070, usA date: April 7, 2010 european contact: Your local digitech sales and service office or harman music Group If you want to dispose this product, do not mix it with general household waste. There is a...
- Page 4 Warranty We at DigiTech® are very proud of our products and back up each one we sell with the following warranty: 1. The warranty registration card must be mailed within ten days after purchase date to validate this warranty, or you can register via our website (www.digitech.com).
-
Page 5: Table Of Contents
Table of Contents Overview ..................3 Quick Start ..................4 Guided Tour - Front Panel .............10 Guided Tour - Rear Panel ...............16 Making Connections ..............19 Selecting a Loop ................22 Recording a Loop - Inst/Mic Input ..........24 Auto Record Mode .................26 Recording a Loop Using Auto Record ..........28 Recording Overdubs ..............30 Undo, Redo, and Clear ..............32 Undo an Overdub .................. - Page 6 Loop / Single Phrases ..............46 Rhythm Type ...................48 Rhythm Out ....................49 Deleting Individual Loop Phrases ..........50 Erase All Loops - Internal Memory ..........52 Using Optional SD/SDHC Memory Cards ........54 Formatting SD Cards ................... 55 Unformatted Cards ..................55 Erase All Loops - Memory Card ...........56 Factory Restore ................58 Optional FS3X Footswitch ............59 JamManager...
-
Page 7: Overview
DJ applications. The JamMan Stereo features USB connectivity and will sync to DigiTech’s free JamManager™ software that organizes and saves your JamMan Stereo’s loops to a PC or Mac. -
Page 8: Quick Start
Quick Start 1. Get Connected Before powering up your JamMan Stereo: ® a. Make Connections Connect a guitar or bass to the jack on the JamMan Left (Mono) IN Stereo’s rear panel. Connect the JamMan Stereo’s to the input of an Left (Mono) oUt amplifier or a channel of a mixer. - Page 9 Quick Start 2. Select an Empty Loop Rotate the knob or use the footswitches until the seLect LooP UP/LooP DoWN LED and the LED are off. LooP sINgLe Turn the SELECT knob..until these LEDs are off. 3. Select the Record Mode Press the button repeatedly until the LED lights.
- Page 10 Quick Start 4. Adjust the Recording Level Set the knobs to 12 o’clock. Set the INst LeVeL LooP LeVeL RHYtHM LeVeL knob to the 9 o’clock position. Set the LOOP LEVEL to 12 o’clock Set the INST LEVEL and the RHYTHM LEVEL knob knob to 12 o’clock to 9 o’clock...
- Page 11 Quick Start 5. Start Recording Press the (lower left) footswitch to start recording. While Rec/PLaY/oVeRDUb recording, the footswitch and LEDs will light red. Rec/PLaY/oVeRDUb RecoRD Press the REC/PLAY/OVERDUB (lower left) footswitch. While recording, the RECORD and REC/PLAY/OVERDUB LEDs light solid red.
- Page 12 Quick Start 6. Start Loop Playback Press the (lower left) footswitch while recording to set Rec/PLaY/oVeRDUb the loop point and start playing back from the beginning. The Rec/PLaY/ footswitch and LEDs light green. Adjust the oVeRDUb PLaY LooP LeVeL knobs as needed. RHYtHM LeVeL Press the REC/PLAY/OVERDUB (lower left) footswitch while recording...
- Page 13 Quick Start 7. Stop Playback/Store the Loop Press the (lower right) footswitch to stop playback, then press teMPo/stoP button twice to store the loop. stoRe First press the TEMPO/STOP (lower right) footswitch to stop playback. Then press the STORE button twice to store the loop.
-
Page 14: Guided Tour - Front Panel
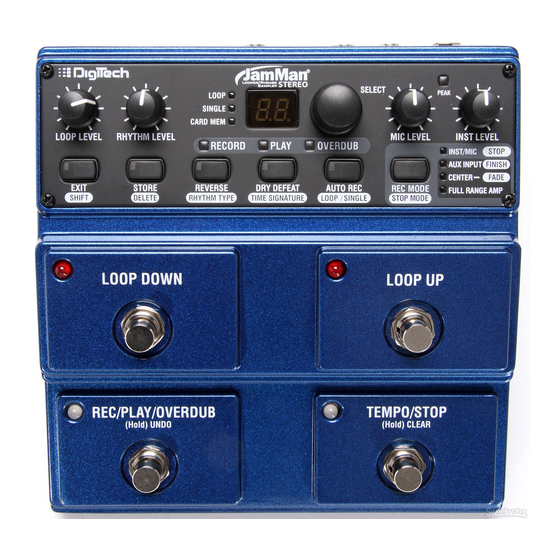
Guided Tour - Front Panel Loop Level Controls the playback level of the loop phrase. Rhythm Level Controls the level of the Rhythm guide track. Loop/Single/Card Mem LEDs Loop LED This green LED indicates the current phrase memory is set to playback continuously as a loop when play is initiated. - Page 15 Guided Tour - Front Panel recorded will be recorded as a loop phrase. Loop phrases can be converted to Single phrases and vice versa. The Loop LED will also flash during processes where the internal memory or optional SD memory is being accessed (loading a loop, Time Stretching, or store/ copy procedure).
- Page 16 Guided Tour - Front Panel Mic Level Knob This knob controls the input signal level from the XLR Mic Input jack. Peak LED This LED lights when Instrument, Mic, or Aux Input signals are detected by the JamMan Stereo. This LED will light green when a ®...
- Page 17 Guided Tour - Front Panel Aux Input (Finish) LED This LED indicates the Aux Input is selected for recording (see page 34). When the Shift button is enabled, this LED will light when the “Finish” stop mode is selected for the Loop. Center –...
- Page 18 Guided Tour - Front Panel Press this button while the Shift button is lit to change the playback status of a recorded phrase. When the Loop LED is lit the phrase will play back in an endless loop. When the Single LED is lit, the phrase will play once and stop.
- Page 19 Guided Tour - Front Panel Loop Down Footswitch This footswitch selects the next lower loop memory. Press and hold this footswitch to scroll quickly through internal and optional SD card memories. Reverse (Rhythm Type) Button Press this button to make the recorded loop phrase play back in reverse.
-
Page 20: Guided Tour - Rear Panel
Guided Tour - Rear Panel Mic Input Connect a microphone here. The mic input accepts low impedance dynamic or self-powered condenser microphones. The mic input is recorded to both left and right channels of a loop recorded in the JamMan Stereo. - Page 21 Guided Tour - Rear Panel Connect a second instrument or second output from a previous pedal for stereo operation. Left and Right inputs are processed separately through the looper and then fed to the Left and Right outputs to keep true stereo separation between channels. Headphone Output This is a stereo headphone output that lets the JamMan Stereo be...
- Page 22 Guided Tour - Rear Panel in the JamMan Stereo before use (see page 55). The JamMan Stereo ® ships with 35 minutes of internal stereo loop memory. USB Jack The USB jack provides a connection to a Windows or Mac computer for transferring loop files to and from the JamMan Stereo via the downloadable JamManager loop librarian application.
-
Page 23: Making Connections
Making Connections Instrument - Mono Instrument - Stereo... - Page 24 Making Connections Mic/Vocal Performance Aux 1 Aux 1 Aux 1 Aux 1 Aux 1 Aux 1 Aux 1 Aux 1 Aux 2 Aux 2 Aux 2 Aux 2 Aux 2 Aux 2 Aux 2 Aux 2 0 +1 0 +1 0 +1 0 +1 0 +1...
- Page 25 Making Connections MP3 Player/Headphones Backing Tracks Backing tracks (no rhythm guide track) Loop audio (with rhythm guide track) Aux 1 Aux 1 Aux 1 Aux 1 Aux 1 Aux 1 Aux 1 Aux 1 Aux 2 Aux 2 Aux 2 Aux 2 Aux 2 Aux 2...
-
Page 26: Selecting A Loop
Selecting a Loop The JamMan Stereo has two banks of loop memory, internal and optional ® card memory. There are 99 memory locations available in each of these banks for a total of 198 memories when an optional SD/SDHC memory card is installed. - Page 27 Selecting a Loop Loop Up Loop Down Loop Select knob footswitch footswitch...
-
Page 28: Recording A Loop - Inst/Mic Input
Recording a Loop - Inst/Mic Input The JamMan Stereo is designed to be very simple to use right out of the box. ® This section explains how to record a phrase and play it back as a continuous loop. You should have an instrument or audio device connected to the 1/4” inputs or a mic connected to the XLR mic input before proceeding. - Page 29 Recording a Loop - Inst/Mic Input...
-
Page 30: Auto Record Mode
Auto Record Mode The JamMan Stereo’s Auto Record feature lets the JamMan automatically ® begin recording when you begin playing or when audio is detected at the JamMan Stereo’s inputs. When enabled, Auto Record works globally on all empty loop memories; you cannot use Auto Record with an existing loop. When the footswitch is pressed, the JamMan Stereo is Rec/PLaY/oVeRDUb... - Page 31 Auto Record Mode Auto Record button...
-
Page 32: Recording A Loop Using Auto Record
Recording a Loop Using Auto Record The JamMan Stereo has an Auto Record feature that automatically starts ® recording when signal is detected at any of the JamMan Stereo’s inputs. NOTE: The maximum loop time the JamMan Stereo can record or play is 10 minutes. - Page 33 Recording a Loop Using Auto Record...
-
Page 34: Recording Overdubs
Recording Overdubs Once a loop phrase is recorded, you can add overdubs over the top of it. Overdubs can only be recorded to Loop phrases and not to Single phrases. Use the knob or the footswitches to select seLect LooP UP/LooP DoWN a previously recorded Loop phrase, or use a newly recorded phrase that has not yet been stored. - Page 35 Recording Overdubs...
-
Page 36: Undo, Redo, And Clear
Undo, Redo, and Clear You can undo or redo an overdub anytime you remain in the current memory where the overdub was recorded. You can also use a footswitch to clear all unstored loop phrase audio. Note: Changing loops discards any unstored overdubs. Storing the overdubs will also remove the ability to undo or clear overdubs. - Page 37 Undo, Redo, and Clear Press and hold Press and hold to to undo or redo clear overdubs and an overdub. unstored phrases.
-
Page 38: Recording A Loop - Aux Input
Recording a Loop - Aux Input The JamMan Stereo can record directly from an MP3 or CD player. This ® feature is useful for learning and practicing new songs as well as creating backing tracks. You should have an audio source connected to the AUX INPUT before proceeding. - Page 39 Recording a Loop - Aux Input...
-
Page 40: Stop Modes
Stop Modes Loop Phrases can be stopped in three ways after the footswitch teMPo/stoP is pressed: • : Stops the phrase immediately when Stop is pressed. stoP • : Finishes playing to the end of the phrase and stops after Stop is pressed. fINIsH •... -
Page 41: Using Auto-Quantizing Looping
Using Auto-Quantize Looping There are two ways you can record loops using the JamMan Stereo, free- ® form looping or using the JamMan Stereo’s Auto-Quantize feature. Free-form looping (see page 24) is the standard way loopers have been used since their inception. You initiate recording, play, and then set the loop point when you reach the end of your passage. -
Page 42: Storing/Copying Phrases
Storing/Copying Phrases Anytime a change is made to a loop memory location (Rhythm Type, Tempo, Time Signature, Record, Overdubs etc.) the button will immediately stoRe light. This indicates that the changes will be lost unless a store procedure is performed before selecting a new loop memory location, turning off the power. - Page 43 Storing/Copying Phrases Store Changes to a Loop Copy a Loop to a Different Memory Location...
-
Page 44: Time Signature
Time Signature The JamMan Stereo is capable of recording in different Time Signatures. A ® Time Signature must be set up prior to recording in a memory location. Once a phrase has been recorded, Time Signature cannot be changed. To set the Time Signature, follow these steps: Use the knob or... - Page 45 Time Signature...
-
Page 46: Setting A Loop Tempo For Recording
Setting a Loop Tempo for Recording Before you begin recording a phrase, you may want to set a tempo at which you want to record the loop at. Setting the tempo in an empty loop memory location automatically starts playing the rhythm guide track (Rhythm Level must be turned up to hear the guide track). - Page 47 Setting a Loop Tempo for Recording...
-
Page 48: Time Stretching A Loop
Time Stretching a Loop Once a loop phrase is recorded, you can change the playback tempo which speeds up or slows down the playback of the phrase without changing its pitch (Time Stretch). Time Stretching a loop is a very useful feature in case the band is playing slightly slower or faster than normal or you just want to change the pace of a backing track slightly. - Page 49 Time Stretching a Loop Time Stretch a Loop that is Stopped Time Stretch a Loop that is Playing...
-
Page 50: Loop / Single Phrases
Loop / Single Phrases Any phrase recorded into the JamMan Stereo can be played in two ways: ® Either as a continuous Loop, or as a Single “one-shot” sample. Single phrases are designed to play the recorded phrase only once and stop. All phrases are recorded as loops by default but they can be changed to a Single phrase if desired. - Page 51 Loop / Single Phrases...
-
Page 52: Rhythm Type
Rhythm Type The JamMan Stereo’s guide track has 9 rhythm types to select from. These ® range from a simple click metronome to various drum samples as the rhythm guide (a tempo must be defined and the knob must be turned up RHYtHM LeVeL to hear the guide track). -
Page 53: Rhythm Out
Rhythm Type Rhythm Output The Rhythm Output isolates the rhythm guide track from the left and right outputs and provides a mono mix of the JamMan Stereo’s looped audio. ® This is useful for someone like a drummer in the band who needs to follow a click track but also wants to hear the looped audio. -
Page 54: Deleting Individual Loop Phrases
Deleting Individual Loop Phrases The JamMan Stereo has 99 memory locations and at some time you may need ® to delete the contents of a memory location so it may be reused or to free up memory. To delete a loop from a memory location, follow these steps: Press the button. - Page 55 Deleting Individual Loop Phrases...
-
Page 56: Erase All Loops - Internal Memory
Erase All Loops - Internal Memory The JamMan Stereo uses both internal memory and optional card memory ® for the storage of loop files. You can erase all loops from internal memory or from card memory without having to delete them one at a time. To erase all loops from internal memory, follow these steps: Select a loop memory location that does not light the LED. - Page 57 Erase All Loops - Internal Memory...
-
Page 58: Using Optional Sd/Sdhc Memory Cards
Using Optional SD/SDHC Memory Cards The JamMan Stereo offers 35 minutes of total built-in loop memory ® storage. You can increase the loop memory by installing an optional SD/ SDHC memory card in the memory card slot on the rear panel. The JamMan Stereo is compatible with SD/SDHC card sizes up to 32GB for over 16 hours of total loop memory. -
Page 59: Formatting Sd Cards
Using Optional SD/SDHC Memory Cards Formatting SD Cards A memory card that is inserted into the Stereo for the first time JamMan ® should be formatted using the JamMan Stereo’s format procedure. To format an SD/SDHC Card in the JamMan Stereo, follow these steps: Enable the button and then press and hold the button... -
Page 60: Erase All Loops - Memory Card
Erase All Loops - Memory Card The Erase Loops procedure only erases JamMan Stereo loop data from a memory card. All other data and files on the card are left untouched. To erase all loops from an optional SD/SDHC memory card, follow these steps: Install an optional SD/SDHC memory card in the JamMan Stereo’s memory card slot on the rear panel. - Page 61 Erase All Loops - Memory Card...
-
Page 62: Factory Restore
Factory Restore This procedure will return the JamMan Stereo to its original factory ® settings. All internal loop memories will be reformatted and the original 10 loops that shipped with the JamMan Stereo will be restored. Factory Restore does not affect any loops on the optional external SD memory card. WARNING: The Factory Restore procedure will erase all loops from the JamMan Stereo internal memory and restore it to its factory state. -
Page 63: Optional Fs3X Footswitch
Optional FS3X Footswitch The optional FS3X Footswitch gives you hands-free control over loop selection, tempo, and stop functions. Mode Switch This footswitch is used for immediately undoing and redoing the last recorded overdub. Down Switch This footswitch is used to play the recorded phrase in reverse. Up Switch This footswitch can be used to set the tempo of a new loop or change the tempo (Time Stretch) of a stored loop. -
Page 64: Jammanager Librarian Software
Librarian Software The JamManager loop librarian software is available as a free download from the DigiTech website. This application runs on both Windows XP/ Vista/7 and Mac OS X computer systems, and lets you archive and transfer loops between the Stereo and your computer. -
Page 65: Specifications
Max Input Level at Unity: 4 dBu DFS Maximum Gain: 14.5 dB Aux Input Connector Type: 1/8” Stereo (Tip-Ring-Sleeve) Input Impedance: 20 kΩ Maximum Input Level: 1 dBu DFS Footswitch Input Connector Type: 1/4” Stereo (Tip-Ring-Sleeve), compatible with optional DigiTech FS3X 3-button ® footswitch... - Page 66 6.84” (L) x 6.70” (W) x 2.89” (H) 173.6 mm (L) x 170.1 mm (W) x 73.4 mm (H) Weight: 2.22 lbs, 1.01 kg DigiTech® engineers are constantly working to improve the quality of our products. Specifications are therefore subject to change without notice.
- Page 68 Printed in the USA DigiTech and JamMan Stereo are registered trademarks of HARMAN. All other product name ® ® and trademarks are the property of their respective owners, which are in no way associated with DigiTech. ©2010 HARMAN. All rights reserved...
Need help?
Do you have a question about the JAMMAN - MANUAL 2 and is the answer not in the manual?
Questions and answers