ECOVACS GOAT, GPL11 Manual
- Instruction manual (128 pages) ,
- Instruction manual (139 pages) ,
- User manual
Advertisement
Packaging Contents and Component Functions
What's in The Box

- ECOVACS GOAT
- Pile of charging station
- Base of charging station
- Power Supply
- Allen Key
- Spare Blade Kit
- Screws (For Base)
- Instruction Manual
- Pre-Start Guide
Parts and Functions
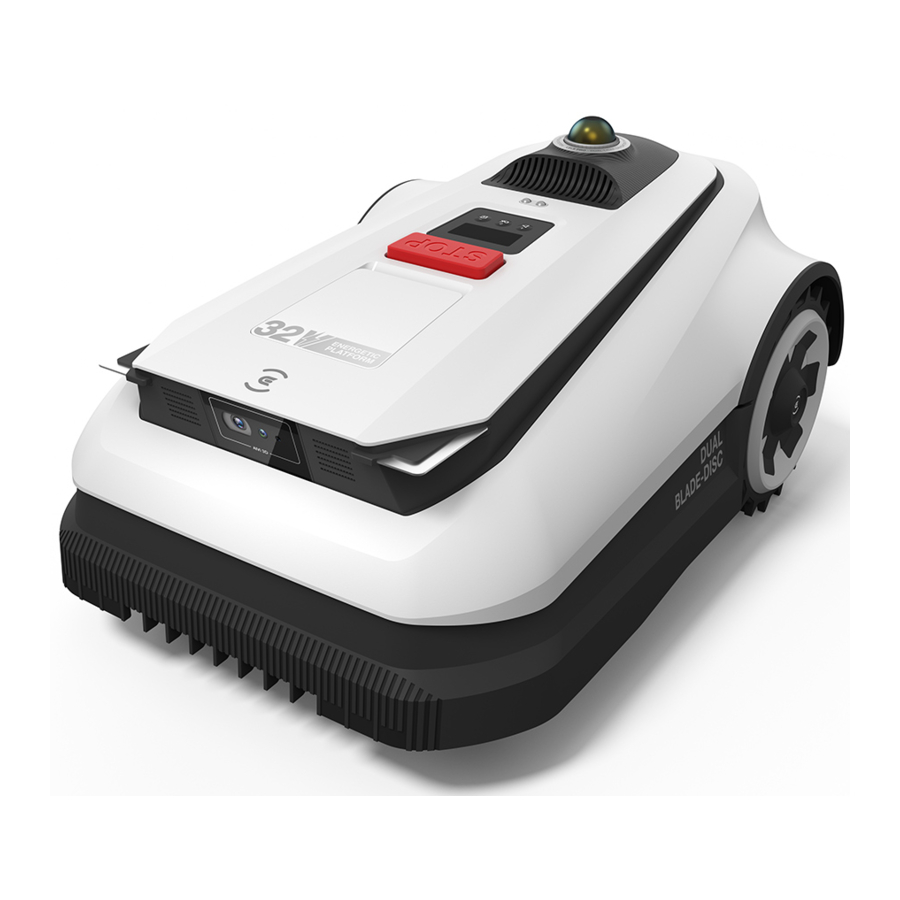
ECOVACS GOAT (Top View)

Control Panel: The buttons on the control panel can be used for the basic operations of the ECOVACS GOAT. The digital numbers on the dashboard display shows mowing progress, battery level, and ECOVACS GOAT status.

Icon:
| Battery |  | Battery level. White --- More than 15% charge. Red --- Less than 15% charge Flashing indicates charging; Steady indicates in use or fully charged. |
| 4G Connection |  | Lights up when additional Connection Module is installed with a SIM Card. |
| WiFi |  | Lights up when your ECOVACS GOAT is Successfully connected with the APP through Wifi. |
| Lock |  | ECOVACS GOAT locked. please enter PIN code to unlock, otherwise the ECOVACS GOAT won't be able to work. |
Button
| Function Buttons | Description |
| START | Press 5 times to show the battery level |
| START-->OK | Start mowing/Continue task |
| OK | Press and hold for 3s to power on/off. |
| HOME | Press and hold for 3s to enter the network connection mode. |
| HOME-->OK | Send the ECOVACS GOAT to the charging station |
| STOP | Stop ECOVACS GOAT operation |
| START+HOME | Press and hold for 5s to reset |
| ADD+ | Increasing the number |
| SUBTRACT— | Decreasing the number |
| OK | Next digit/Confirm |
Reset: All data, except for the lifespan of accessories such as blades and camera brushes, will be cleared during the reset process.
Display:
| Display | Description |
 | ECOVACS GOAT stopped |
 | Ongoing OTA updates |
 | Mowing |
 | Fault Code. For details, please visit www.ecovacs.com. If not resolved, the device will automatically return to the station after 30 minutes. |
Set PIN Code
When the GOAT is off map or to be powered on or reset, it will automatically be locked. You can unlock it by entering the right PIN code.
Set the PIN code when the display shows as below.
Press [+] or [-] to select the PIN code numbers one by one. After the first digit is decided, press [OK] to comfirm, and the cursor will move to the next digit.

- If the
![]() is flashing, please set the PIN code.
is flashing, please set the PIN code. - If the
![]() is solid, enter the previously set PIN code.
is solid, enter the previously set PIN code.
 is flashing, please set the PIN code.
- Once unlocked, the
![]() will disappear. If unlocking fails, the
will disappear. If unlocking fails, the ![]() will flash again, prompting you to reset the PIN code.
will flash again, prompting you to reset the PIN code.
Note:
- 0000 is an invalid PIN code.
- PIN code is to be entered twice to confirm the setting.
- If you enter the wrong numbers while setting the PIN code, the setting process will start all over again.
- You may change the PIN code on the App.
SENSORS
| Name | Description |
| 3D-ToF LiDAR | Perceive obstacle information in front of the robot and help it actively avoid obstacles. Range: Detect the longitude and latitude coordinates of the robot's position. Horizontal: 90 degrees; Vertical: 70 degrees (what you see is what you get) The maximum distance is 3-4 meters. |
| Front AI Camera | Perceive the environmental information in front of the robot, identify special targets, and help the robot interact intelligently with users. Horizontal: 150 degrees; Vertical: 80 degrees (what you see is what you get). |
| Rain sensor | Detect whether it is raining in the current environment and to help the robot decide whether to continue working. |
| LiDAR sensor | 360° high-precision radar positioning sensor. |
Interface
| Name | Description |
| Bluetooth | Enable Bluetooth during network setup to connect the robot to the network. During regular use, enable Bluetooth mode to perform tasks like manual mapping and manual mowing. |
| Wi-Fi | Enable Wi-Fi to transmit data between the app and the robot, allowing app-based control. |
| ECOVACS HOME APP | Download and enable the latest version of the ECOVACS HOME app to access smart features such as network setup, mapping, and mowing (features may vary by product). |
| Charging Contacts | Enable charging by connecting the robot to a power source. |
ECOVACS GOAT (Bottom View)

ECOVACS GOAT (Back View)

Installation&Mapping
Installation
Prepare the APP
Download ECOVACS HOME App
Before you start, make sure that:
- Your mobile phone is connected to a Wi-Fi network.
- The 2.4GHz band wireless signal is enabled on your router.
Note: After installing ECOVACS HOME App, please complete the registration and login.
![www.apple.com]()
![play.google.com]()


Connect ECOVACS GOAT to the Internet
- Bluetooth Connection
- Scan the QR Code on the ECOVACS GOAT or select ECOVACS GOAT manually via the App.
- Turn on Bluetooth on your phone to connect your ECOVACS GOAT.
![]() on the display will light up after successful connection.
on the display will light up after successful connection.
Note:- Ensure your phone has Bluetooth function and your ECOVACS GOAT is within the connectable distance (10 m).
- The ECOVACS GOAT series robotic lawn mowers are designed for domestic mowing scenarios. A home Wi-Fi network is required for operation, and anti-DDOS protection can only be set up through router settings.
![]()
- Wi-Fi Connection
- Make sure your ECOVACS GOAT and your phone are in the same router environment.
- Follow the instructions in the App to complete the connection.
![]() on the display will light up after successful connection.
on the display will light up after successful connection.
Note: Please use a 2.4GHz network.- You also can purchase the additional Connection Module so that ECOVACS GOAT can be connected even without Wi-Fi.
![]()
 on the display will light up after successful connection.
 on the display will light up after successful connection.
How to unbind your ECOVACS GOAT?
Allowing binding to one App account currently, your ECOVACS GOAT is unable to be bound to another App account before unbinding. You can unbind your ECOVACS GOAT in the App. Feel assured to take this operation which would not erase the working data such as schedules of your ECOVACS GOAT. You also can cancel the account in by clicking the small triangle next to the ECOVACS GOAT name to delete it.
Assemble the Station
- Place the Station on an open and flat lawn with no slope or rock. Ensure that there are no objects (e.g. trees, balls or houses) within 2 m on left and right, and 2 m in front of the Station.

- If you want to remotely control your ECOVACS GOAT, put the Station as close as possible to a place with strong Wi-Fi signal.

- Make sure that the grass around the Station is no longer than 10 cm. Overgrown grass may affect the recharging.

- Insert the Pile into the Base Until you hear a "click".

- Fix the Station to the ground in the selected area with Pegs, using the Allen key.

- Connect the Station Plug to the power supply and ensure the blue light is on.


Note: Please ensure the power adapter is positioned 30 cm above the ground to prevent water and moisture damage.
Please plug the device into an indoor outlet or an outdoor waterproof outlet.
Charging the ECOVACS GOAT
Fully charge the ECOVACS GOAT before first use. Place it in the charging station and ensure the white indicator light is steady or flashing, indicating successful charging.

Mapping
- Before mapping, the following tips need to be noted:
- Make sure the ECOVACS GOAT is powered on.
- If the ECOVACS GOAT is stopped, tap START --> OK button on the ECOVACS GOAT.
- If the ECOVACS GOAT is locked, please enter PIN code.
- Mapping
- Choose the appropriate mapping mode for your yard.
For lawns with drop-offs greater than 4 cm or narrow paths less than 1 meters, it is recommended to select Manual Mapping. Otherwise, use the default Automatic Mapping.

- Connect the ECOVACS GOAT
With Bluetooth connection, your phone will connect to the ECOVACS GOAT automatically.

- Find a starting point
Find a proper starting point along the edge of your lawn. Keep within 6 m from the ECOVACS GOAT during the mapping process.

- Start mapping
If the station is on the lawn, simply tap Start Mapping to start mapping.

If the base station is not on the lawn, control the ECOVACS GOAT to move to the lawn boundary, then start Mapping.

Note: To ensure successful recharging, it's recommended to keep the base station within 3 meters of the lawn, and no more than 10 meters away.
Let ECOVACS GOAT start from the Station and follow ECOVACS GOAT within 6 m. If the height difference is more than 4 cm, please keep your ECOVACS GOAT at least 10 cm from the edge of the lawn. Make sure to follow a straight line with a smooth turning angle of no smaller than 90°.

- Switch mapping mode
During the mapping process, you can switch between automated and manual mapping in the app interface.
![]()
- Finish mapping
After tracing the perimeter of the lawn, close the loop at the starting point to complete the boundary.

- Set up A No-Entry Zone
To protect your ECOVACS GOAT, please set up No Entry Zones for objects you want to protect, such as a flowerbed, a trampoline and a vegetable plot.
Follow the instructions in the App. Control your ECOVACS GOAT to the the starting point of the No-Entry Zone. The minimum supported single side length of the restricted area should be more than 0.5m.
Note: It is recommended to keep ECOVACS GOAT 25 cm away from the boundaries of extremely dangerous areas such as a pond or cliff.

- Create a New Area

- Start from the station/within the map, and remotely control the ECOVACS GOAT to the new area to be created.
- Mapping the new area based on the regional environment.
- Create a Path

- The path is intended to connect two separate areas or to connect the edge of a lawn to the charging station.
- The ECOVACS GOAT can automatically generate a path when starting from inside one path and reaching another path.
- Please ensure that the passable width of the path for the ECOVACS GOAT is greater than 1 meter.
- Choose the appropriate mapping mode for your yard.


Start Using Your ECOVACS GOAT
How Your ECOVACS GOAT Works
The following part will help you know how your ECOVACS GOAT works.
- Mowing mode
You can switch modes on your ECOVACS GOAT or via the App.
![]()
- Schedule
You may set your mowing schedule on the ECOVACS HOME App. Supporting two schedules, ECOVACS GOAT enables you to set and switch based on different seasons.
![]()
- Cutting height
ECOVACS GOAT is a smart robot for maintaining your lawn well. Before starting, make sure that the grass is no longer than 10 cm. If longer, cut the grass roughly with a manual lawnECOVACS GOAT. Then your ECOVACS GOAT will keep the grass nicely clipped within a height of 9 cm.
![]()
- Programmed cutting
With programmed cutting, your ECOVACS GOAT mows along an S-shaped path to achieve maximum efficiency.
![]()
- Auto recharging
When the battery is low, your ECOVACS GOAT will pause the task autonomously and go back to the Station to charge itself. When charged and ready to work, your ECOVACS GOAT will resume the unfinished mowing task of the day.
![]()
- Rain sensor
With waterproof level of IPX6, your ECOVACS GOAT will be very pleased to stay outside. However, mowing under heavy rain will not bring out the best result. Your ECOVACS GOAT, equipped with the Rain Sensor, will pause mowing and return to the Station automatically when a certain amount of rainwater is detected. When the rain stops, ECOVACS GOAT will automatically resume the mowing task. It is recommended to mow in dry weather for the best mowing result. You also can inactivate it on your ECOVACS GOAT or via the App to mow on rainy days.
![]()
- Rain delay time
The lawn may still be wet after the rain stops. For a better mowing result, your ECOVACS GOAT will resume mowing 3 hours after the Rain Sensor detects that the rain has stopped by default. You can change the rain delay time via the App.
![]()
- Animal protection
With the aim to protect nocturnal animals, ECOVACS GOAT will stop mowing at night.
You also can inactivate it on your ECOVACS GOAT or via the App to mow at night.
![]()
- Smart obstacle avoidance
Equipped with 3D-ToF LiDAR, your ECOVACS GOAT can detect objects and avoid them in advance. The height of obstacles to be avoided can be set in your ECOVACS HOME App. Moreover, some obstacles can precisely be avoided by Al recognition.
![]()
- No need for disposal of grass clippings
Daily mowing with your ECOVACS GOAT leaves short clippings, which will be scattered evenly on the lawn as the best fertilizer.
![]()
- Safety and PIN code protection
The PIN code you set for your ECOVACS GOAT at the first startup is used to prevent being stolen and operated by children. if it locked, you can unlock it by entering PIN code.
![]()


Note:
After five incorrect attempts, wait 30 minutes before retrying.
You may change the PIN code on the App.
Tips Before First Mowing
- Cut the grass to a height of no more than 10 cm with your manual lawnECOVACS GOAT and clear away obstacles including debris, piles of leaves, toys, wires and stones.
- Do not let your children play on the lawn when your ECOVACS GOAT is mowing.

- Set the mowing direction you need.


Note: Your ECOVACS GOAT will adjust its direction after departing from the Station and go straight forward to mow by default.
READY FOR Mowing
- Start Mowing
Press![]() , then
, then ![]() . ECOVACS GOAT will start mowing. Or you can start mowing via the App.
. ECOVACS GOAT will start mowing. Or you can start mowing via the App.
Note: Make sure the grass has been cut to a height of no more than 10 cm with your manual lawnECOVACS GOAT.

- Pause Mowing
Press![]() to pause ECOVACS GOAT or pause it via the App.
to pause ECOVACS GOAT or pause it via the App. - For security, your ECOVACS GOAT will be stopped and cannot be started directly via the App after
![]() is pressed. Please press START then OK on the Control Panel first.
is pressed. Please press START then OK on the Control Panel first.

- For security, your ECOVACS GOAT will be stopped and cannot be started directly via the App after
- Resume Mowing
Press![]() and then
and then ![]() on ECOVACS GOAT or tap the button in the App to resume mowing.
on ECOVACS GOAT or tap the button in the App to resume mowing.

- End of Mowing
 , then
  . ECOVACS GOAT will start mowing. Or you can start mowing via the App.
 to pause ECOVACS GOAT or pause it via the App.
 and then
- After completing the mowing task, ECOVACS GOAT will return to the Station automatically.
- When ending the mowing process manually, you need to send ECOVACS GOAT to the Station by pressing
![]() and then OK, or tapping
and then OK, or tapping ![]() on the App.
on the App.

 and then OK, or tapping
Touble Shooting
If you encounter any problems while using your ECOVACS GOAT, check out the FAQ articles at https://www.ecovacs.com or from the section on the ECOVACS HOME App.
Maintenance
For better performance and longer lifespan of your ECOVACS GOAT, please maintain it and replace any worn parts properly.

- Always power off your ECOVACS GOAT before operation.
- Always wear protective gloves when replacing the Blades.
- Use only the Blades manufactured by ECOVACS and new screws when assembling the Blades.
- Wipe the unwashable components with a clean and dry cloth. Please do not use cleaning sprays or other detergents.
- Put on the LiDAR cover before turning over your ECOVACS GOAT.
- Gently turn your ECOVACS GOAT over on a soft surface.
Frequency
| Part | Maintenance | Replacment |
| LiDAR | 1 to 2 weeks | - |
| Front AI Camera | 2 to 4 weeks | - |
| Blades | - | 4 to 6 weeks |
Regular Maintenance
Blade Disc, Chassis, Off-road Wheels, and Front Wheels
- ALWAYS wear protective gloves.
- DO NOT use a high pressure sprinkler for high pressure water can enter the sealings and damage electronic and mechanical parts.
STEPS TO CLEAN THE MAIN PARTS
- Power off ECOVACS GOAT.
- Put on the LiDAR cover before turning over your ECOVACS GOAT.
- Gently turn your ECOVACS GOAT over on a soft surface.
- Clean the Blade Disc and the chassis with a brush.
- Check that the Blade Disc can rotate freely and Blades can spin freely.
- Clear the mud from the Off-road Wheels and Front Wheels with a brush.
Other Components
Wipe the components with a clean, dry cloth. Avoid using cleaning sprays or detergents.

Seasonal Maintenance
- Storage Over the Winter
ECOVACS GOAT- Power off your ECOVACS GOAT after it is fully charged.
- Clean it thoroughly.
- Put on the LiDAR cover.
- Store it with water-proof and dust-proof coverings in a cool, well-ventilated, and dry place indoors.
Station - Unplug the Power Supply from the power socket.
- Disconnect Power Supply from the Station.
- Mark the spot where you set the Station for reference in the new working season.
- Store the Station and Power Supply in a cool, well-ventilated, and dry place away from direct sunlight.
Note: It is necessary to put the Station in the original position for working in a new season. Otherwise, it may lead to location fault and map invalidation.
- Restart in the Spring
- Remove all coverings from your ECOVACS GOAT and the Station.
- Assemble the Station, putting it back to where it was in the last working season.
- Check the cables for any damage or breaks and repair as needed. Connect the cables that are safe and qualified to use.
- Check the Blades for sharpness and replace them if necessary. Refer to the Maintenance section of this manual for detailed steps and tips.
- Check and clean the LiDAR lens to ensure proper functionality.
- Power on your ECOVACS GOAT and test if it is connected to the app and works properly.
Part Replacement
Replace the Blades
- Always power off your ECOVACS GOAT before operation.
- Always wear protective gloves when replacing the Blades.
- Use only the Blades manufactured by ECOVACS and new screws when assembling the Blades.
- Wipe the unwashable components with a clean and dry cloth. Please do not use cleaning sprays or other detergents.
STEPS TO REPLACE THE BLADES

- Power off ECOVACS GOAT.
- Put on the LiDAR cover before turning over your ECOVACS GOAT.
- Gently turn your ECOVACS GOAT over on a soft surface.
- Loosen the Screws with a screwdriver.
- Remove the Screws and the Blades.
- Tighten the new Blades and the Screws.
- Make sure that the Blades can spin freely.
Technical Data


Note: Technical and design specifications may be changed for continuous product improvement. Explore more accessories at
https://www.ecovacs.com.
Original Instructions

READ CAREFULLY BEFORE USE KEEP FOR FUTURE REFERENCE
Read the instructions carefully. Make sure you understand the instructions and be familiar with the controls and the proper use of the appliance. Please understand that you can reduce the risk by following the instructions and warnings in this manual, but you cannot eliminate all the risks. Lawn Mowing Robot (hereinafter referred to as "ECOVACS GOAT") has many built-in safety sensors, however, safety risks still exist. All related residual risks have been described or informed in this manual.
Description of intended use: Intelligent lawn mowers are mainly used in mowing grass, especially in parks, private villa yards, and football fields.
For machines used in public areas, that warning signs shall be placed around the working area of the machine.
They shall show the substance of the following text: WARNING! Automatic lawnmower!
Keep away from the machine! Supervise children!
DO NOT modify the mower by yourself. Modifications could interfere with mower operations, result in serious injury and/or damage, or void the Limited Warranty. Use only Ecovacs approved parts and accessories.
Never allow children, persons with reduced physical, sensory or mental capabilities or lack of experience and knowledge or people unfamiliar with these instructions to use the machine, local regulations may restrict the age of the operator. To avoid using the machine and its peripherals in bad weather conditions especially when there is a risk of lightning.
Before each mowing session, check that all parts of the mower can function normally. Periodically inspect the area where the machine is to be used and remove all stones, sticks, wires, bones, and other foreign objects. NEVER allow children to touch the power supply unit, charging station, blades, the battery compartment, or any parts with gaps such as the wheels.
Never to operate the machine and/or its peripherals with defective guards or shields, or without safety devices, or if the cord is damaged or worn. Keep away from the rotating blades! DO NOT put hands or feet under or near the rotating blades. Keep a safe distance from the mower when operating.
DO NOT overreach. Keep your balance at all times and always be sure of the footing on slopes. Walk, never run while operating the machine or its peripherals.
Never allow children to be in the vicinity or play with the machine when it is operating.
DO NOT touch moving hazardous parts before they have come to a complete stop.
For the purposes of recharging the battery, only use the detachable supply unit provided with this appliance (CH2491B).
This appliance contains batteries that are only replaceable by skilled persons.
Safe Usage:
Not to connect a damaged cord to the supply or touch a damaged cord before it is disconnected from the supply for the reason that damaged cords can lead to contact with live parts; keep extension cords away from moving hazardous parts to avoid damage to the cords which can lead to contact with live parts; to connect the machine and/or its peripherals only to a supply circuit protected by a residual current device (RCD) with a tripping current of not more than 30 mA. Unplug the Power Supply from the power socket and then untangle when the power cord or the extension cable is damaged or entangled during use. During the operation, pull the body of the plug rather than the cord to avoid the hazard. Contact Customer Service and let the skilled professional to repair or replace the cord. Please use the extension cable manufactured by ECOVACS.If you have any problem, contact Customer Service.
If the SUPPLY CORD is damaged, it must be replaced by the manufacturer, its service agent or similarly qualified persons in order to avoid a hazard.
Press the STOP Button at once when the mower makes the abnormal sound or raises the alarm. In case of leakage of electrolyte flush with water or neutralizing agent, ask for medical help once it gets contact with the eyes etc.
If there are abnormal vibrations, please restart the mower. If the problem persists, please Contact Customer Service.
Instructions to always wear substantial footwear and long trousers while operating the machine with a manual controller.
Additionally when using the manual controller
- Mow only in daylight or in good artificial light.
- Avoid operating the machine in wet grass.
- Do not operate the machine when barefoot or wearing open sandals. Always wear substantial footwear and long trousers.
- Always be sure of your footing on slopes.
- Use extreme caution when reversing the machine towards you.
- Always switch on the motor according to instructions with feet well away from the blade(s).
Device Update
Typically, some devices are updated bi-monthly, but not always so specific.
Some devices, especially those that went on sale more than three years ago, will only be updated if a critical vulnerability is found and fixed.
 | Class III appliance |
 | Direct current |
 | Alternating current |
 | Polarity of the charging port |
 | Before charging, read the instructions. |
SYMBOLS
 | Read instruction manual before operating the machine. |
 | Keep a safe distance from the machine when operating. |
 | Do not ride on the machine. |
 | Operate the disabling device before working on or lifting the machine. |
 |  Do not touch rotating blade. |
Documents / Resources
References
![www.ecovacs.com]() ECOVACS Official Website - ECOVACS US
ECOVACS Official Website - ECOVACS US![www.apple.com]() App Store - Apple
App Store - Apple![play.google.com]() Google Play
Google Play![www.ecovacs.com]() ECOVACS Official Website - ECOVACS US
ECOVACS Official Website - ECOVACS US
Download manual
Here you can download full pdf version of manual, it may contain additional safety instructions, warranty information, FCC rules, etc.
Advertisement


Need help?
Do you have a question about the GOAT and is the answer not in the manual?
Questions and answers