Advertisement
Product Introduction
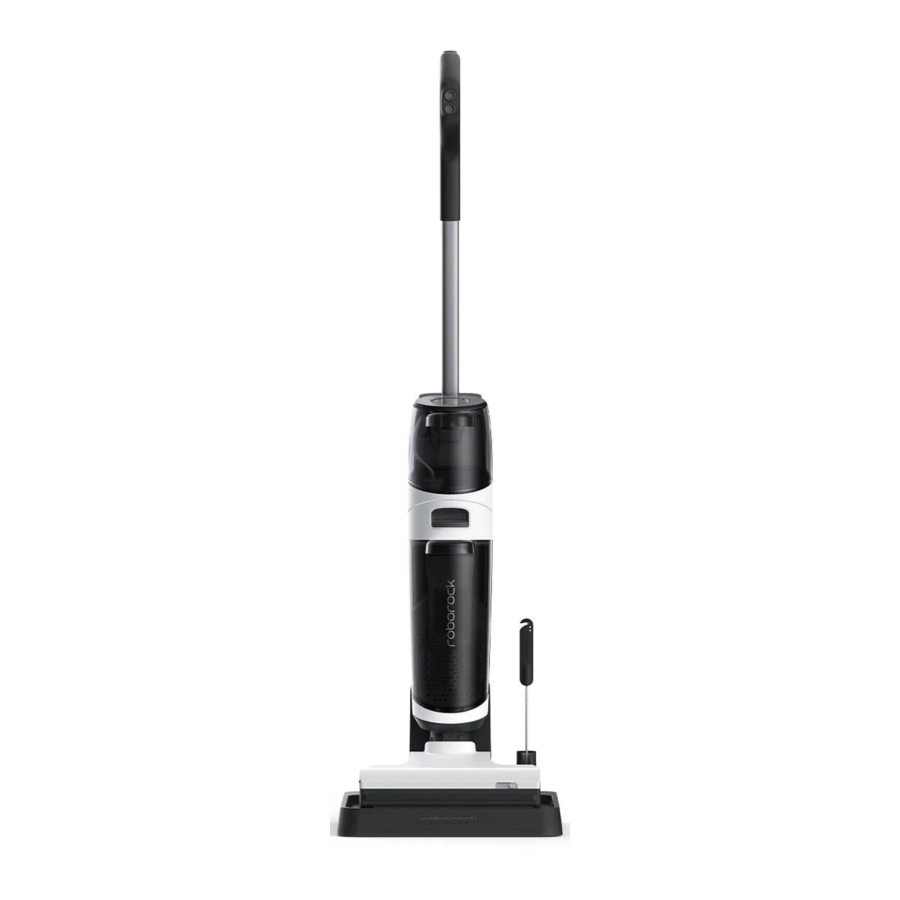
A1 Vacuum Cleaner
![]() Self-Clean
Self-Clean
- Press: Standard mode
- Press and hold for 2s: DEEP mode
![]() Change Mode
Change Mode
- Press: Switch to AUTO/MAX/Floor Drying/ECO mode
![]() Power
Power
- Press: Start/Pause
- Press and hold for 2s: Switch off
- Press while charging: Start/Stop drying
A1-1—Handle
A1-2—LED Display
A1-3—Clean Tank Release
A1-4—Clean Tank
A1-5—Dirty Tank Release
A1-6—Dirty Tank
A1-7—Cleaning Head
A1-8—Splash Guard Lift Toggle
A1-9—Roller
A2 Screen Functions
A2-1—ECO Mode
A2-2—Charging
A2-3—Battery Level
A2-4—Clean Tank Empty
A2-5—Dirty Tank Full
A2-6—Dirt Level
A2-7—AUTO Mode
A2-8—MAX Mode
A2-9—Floor Drying Mode
A2-10—WiFi Indicator
- Off: WiFi disabled
- Flashing slowly: Waiting for connection
- Flashing quickly: Connecting
- Steady on: WiFi connected
A2-11—Error
A2-12—Drying
A2-13—Self-Cleaning
A3 Drying & Charging Dock
A3-1—Body
A3-2—Tray A
A4 Power Supply
A5 Filter
A6 Maintenance Brush
A7 Dirty Water Tank Cover
A7-1—Water Level Sensors
Product Installation
Setting Up the Vacuum Cleaner
B1-1— Insert the handle into the vacuum body until it clicks in place. The power button should face forward.
B1-2— To remove the handle, remove the clean tank and then gently pull the handle while pressing the release button on the vacuum body.
Charging Dock Installation
B2-1—Align the charging dock tray with the charging dock body, press down, making sure they are firmly secured.
B2-2—Connect the power supply into the bottom of the charging dock and plug it in. Power cable can exit from either side.
B2-3—To disassemble the charging dock, grasp the side handles of the tray and pull upward.
Connecting to the App
Download the App
Search "Roborock" in the App Store

or Google Play

or scan the QR code below to download and install the app.

Reset WiFi
- Keep the machine upright and press
![]() to light up the screen and enter standby mode.
to light up the screen and enter standby mode. - Press and hold
![]() and
and ![]() until you hear the "Resetting WiFi" voice alert. The reset is complete when the WiFi indicator flashes slowly. The vacuum cleaner will then wait for a connection.
until you hear the "Resetting WiFi" voice alert. The reset is complete when the WiFi indicator flashes slowly. The vacuum cleaner will then wait for a connection.
 Note: If the mobile phone fails to connect to the vacuum cleaner because your router configuration has changed or you forget your password or for any other reasons, reset WiFi and add your device again.
Add the Device
On the Roborock App, tap "+" on the home page, and add the device as instructed in the app.
Notes:
- The actual process may vary due to ongoing app updates. Follow the instructions provided in the app.
- Only 2.4 GHz WiFi is supported.
- If the vacuum cleaner waits more than half an hour for a connection, WiFi will be automatically disabled. If you want to reconnect, reset the WiFi before proceeding.
Instructions for Use
Filling the Clean Tank
C1-1—Push the Clean Tank Release and remove the tank.
C1-2—Open the plug, add enough clean water to clean the required area and the water level should not exceed the MAX line. If deep cleaning, add the Roborock floor cleaner diluted according to the guidance on the cleaner bottle. Do not add excessive cleaner.
C1-3—Reinstall the Clean Tank bottom first then push forward to secure it in place.
Notes:
- To avoid deforming the Clean Tank, only use cold water.
- To prevent corrosion or damage, do not use any disinfectant and only use detergent recommended by Roborock.
Locking and Unlocking
C2-1—Tap the side of the cleaning head, and push the handle to lock the cleaning head or pull the handle to unlock the cleaning head.
C2-2—Locked
C2-3—Unlocked
Starting the Vacuum Cleaner
Unlock the cleaning head, tilt the body and press the power button to start the vacuum cleaner.
C3-1—Do not tilt over 60°
C3-2—Caution
In order to prevent dirty water from leaking out, do not lay the body flat or tilt it over 60° when dirty tank in place.
Notes:
- The cleaning head does not work when locked. Unlock it first.
- Press power button can only start drying when the vacuum cleaner is charging.
Switching Modes
Press the change mode button to switch to AUTO, MAX, Floor Drying or ECO mode. The screen will display the icon for the current mode.
Notes:
- Floor Drying mode is for removing clean water from wet environments such as bathrooms. It should not be used when water depth exceeds 10mm (0.4in).
- Floor Drying mode is limited to one minute. After which, AUTO mode will resume.
Adjusting the Splash Guard
You can adjust the splash guard using the lift toggle. You can raise it to collect large pieces of waste on the floor and lower it to prevent the cleaning head from getting stuck when there are many objects on the floor.
Standby and Power Off
- When the vacuum cleaner is operating, press the power button to pause it and enter standby mode.
- In standby mode, you can lock the cleaning head and place the vacuum cleaner upright on the floor.
- Lock the cleaning head and press and hold the power button for 2 seconds to turn off the vacuum cleaner. If the vacuum cleaner is left idle for 5 minutes in standby mode, it will automatically turn off.
Note: You can modify the settings in the app to enable automatically resume operation after unlocking the cleaning head.
Adding and Emptying Water
When the dirty tank is full or the clean tank is empty during use, the vacuum cleaner will provide audio and visual alerts. Add water into the clean tank or empty the dirty tank before continuing.
Emptying the Dirty Tank
C5-1—Push the dirty tank release and remove the tank.
C5-2—Hold the handle firmly with one hand, and gently lift out the cover.
C5-3—Pour out the dirty water. If there is any solid dirt in the tank, filter it using the filter at the bottom of the cover.
C5-4—Reinstall the cover, tilt the dirty tank, install the bottom in place, and then gently push it inward to secure it in place.
Charging and Self-Cleaning
- Lock the cleaning head, and place the vacuum cleaner onto the charging dock. The voice alert "Charging" indicates that the vacuum cleaner is charging.
- Press the Self-Clean button to start standard self-cleaning. Press and hold the clean button for 2 seconds to switch to DEEP self-cleaning mode.
- After self-cleaning finishes, empty the dirty tank to prevent odor.
Notes:
- The product is equipped with a built-in high-performance lithium-ion rechargeable battery pack. To maintain battery performance, keep the product charged for normal use.
- Always place the vacuum cleaner on the charging dock after use to prevent water stains.
Drying
Drying starts automatically after self-cleaning is completed. To manually start or stop drying, press the power button on the docked vacuum cleaner.
Voice Alert Settings
Connect to the app to adjust the volume of voice alerts.
Routine Maintenance
To maintain optimal performance of the product, refer to the following table for routine maintenance.
| Parts | Maintenance Frequency | Replacement Frequency |
| Roller | 2–4 weeks | 6–12 months |
| Filter | 1 month | 6–12 months |
| Cleaning head and dirty water pipe | 1 month | N/A |
| Dirty tank | 1 month | N/A |
| Dirty water level sensor | 1 month | N/A |
| Charging dock tray | As needed | N/A |
| Charging contact | 1 month | N/A |
Product Maintenance
If this product is left unused for a prolonged period of time, fully charge it and unplug it before storing it in a cool and dry place. Do not place the product in humid locations or under direct sunlight. Charge it at least once every 3 months to avoid over-discharge.
Cleaning the Body
Wipe and clean the body with a soft and dry cloth. Before cleaning, unplug the power supply and keep the vacuum cleaner off.
Cleaning the Dirty Tank and Filter
D1-1—Take out the dirty tank, pull out the cover, and open the water level sensors. Clean the parts with the provided maintenance brush, rinse them with cold water, and then snap the water level sensors back in place.
D1-2—Take out the filter from dirty water tank cover and remove any trash attached to the filter. If the filter is dirty, rinse it with cold water and then shake off the residual water.
D1-3—Allow up to 24 hours for all parts drying and install them back in place.
Notes:
- Use a second filter if necessary.
- Do not touch the filter with your hands, brushes, or sharp objects to avoid damage to the filter.
Cleaning the Roller
- Remove the vacuum cleaner from the charging dock, switch it off.
- Place the vacuum on a hard and flat floor and lock the cleaning head.
D2-1—Rotate the roller cover to the unlock position, and pull the roller outward.
D2-2—Cut off any hair entangled on the roller and remove any debris using the provided maintenance brush.
Note: Use the maintenance brush carefully to avoid injury.
D2-3—Insert the roller from the side, and then rotate the roller cover from the unlock position to the lock position until it clicks in place.
Cleaning the Cleaning Head and Dirty Water Pipe
- Remove the dirty tank and the roller. Switch off the vacuum cleaner and stabilize the body.
- Clean the roller slot and dirty water pipe with the maintenance brush provided.
- Wipe the charging contacts with a dry cloth.
- Reinstall the roller and dirty tank in place.
D3-1—Charging Contacts
Note: Do not wash the cleaning head directly with water.
Cleaning the Charging Dock Tray
D4-1—Grasp the side handles of the tray and pull upward.
D4-2—Rinse the tray with water and reinstall it in place after drying.
Note: Only remove and wash the tray. Do not wash any other parts of the charging dock.
Basic Parameters
Body
| Model | WD2H2A |
| Weight | 4.1 kg |
| Rated power | 260 W |
| Rated voltage | 21.6 V  |
| Charging time | < 4 hours |
| Battery | 21.6 V/4000 mAh (TYP) Lithium-ion battery |
Power Supply
| Model | E060-1P300190VE or E060-1P300190VA |
| Rated input | 100–240 V~ 50–60 Hz, 1.5 A |
| Rated output | 30 V  1.9 A 1.9 A |
| Battery | 21.6 V/4000 mAh (TYP) Lithium-ion battery |
WiFi Specification
| Service | WiFi |
| Protocol | 802.11b/g/n |
| Frequency Range | 2400-2483.5 MHz |
| Max. Output Power | ≤20dBm |
Common Issues
| Issue | Solution |
| There are large water stains on the floor, the cleaning head leaks water, or water cannot be vacuumed from the floor. |
|
| The screen does not light up and the vacuum cleaner cannot start. |
|
| The dirty tank leaks and the filter is wet. |
|
| There is a strange smell during use. |
|
| Cleaning creates a lot of bubbles. |
|
| The vacuum cleaner does not charge when docked. |
|
| The screen is on, but the buttons do not respond. |
|
| Unable to connect to WiFi. |
|
| Is power always being drawn when the vacuum cleaner is on the dock? |
|
Safety Information
Read this manual carefully before using this product and store it properly for future reference.
Usage Restrictions
- Do not use this vacuum outdoor or in any commercial or industrial environments. It is intended for home use only.
- Do not store the vacuum anywhere in a car to avoid high or low temperatures affecting its battery life.
- The battery pack of this cleaner can not be used for charging or discharging in environments with high humidity, or temperatures above 40°C or below 4°C.
- Use the maintenance brush carefully to avoid injury. Keep out of reach of children.
- Children should be supervised to ensure that they do not play with the appliance.
- This appliance is not intended for use by persons (including children) with reduced physical, sensory or mental capabilities, or lack of experience and knowledge, unless they have been given supervision or instruction concerning use of the appliance by a person responsible for their safety (CB).
- This appliance can be used by children aged from 8 years and above and persons with reduced physical, sensory or mental capabilities or lack of experience and knowledge if they have been given supervision or instruction concerning use of the appliance in a safe way and understand the hazards involved. Children shall not play with the appliance. Cleaning and user maintenance shall not be made by children without supervision (EU).
- To satisfy RF exposure requirements, a separation distance of 20 cm or more should be maintained between this device and persons during device operation. To ensure compliance, operations at closer than this distance is not recommended.
- The antenna used for this transmitter must not be co-located in conjunction with any other antenna or transmitter.
- Keep hair, loose clothing, fingers, and all parts of body away from openings and moving parts.
- Keep limbs and pets away from the rotating brush heads to avoid injury.
- Do not touch the power supply, nor operate the product with wet hands to prevent injuries.
- Do not vacuum any burning or smoking substances (such as non-extinguished cigarette butts).
- Do not vacuum any hard or pointy objects (such as building materials, glass, and nails).
- Please use this product in accordance with the instructions in the User Manual. Users are responsible for any loss or damage that may arise from improper use of this product.
- This product is only to be used in areas below 3,000 meters above sea level.
Battery and Charging

- Do not charge non-rechargeable batteries.
- This product contains batteries that are only replaceable by skilled persons.
- This product can only be charged using a E060-1P300190VE or E060-1P300190VA power supply provided with the product.
- Do not use any third-party batteries, power adapters or docks.
- To reduce the risk of injury from moving parts, keep the power off before servicing.
- Do not disassemble, repair or modify the battery, power adapter or the dock.
- Do not charge the vacuum or install the dock near heat sources or in humid areas (such as radiators or bathrooms).
- Do not wipe the adapter or the dock with a wet cloth, nor touch them with wet hands.
- If the power cord is damaged or broken, immediately stop use and contact after-sales service.
- If the vacuum is not going to be used for an extended period of time, fully charge it, unplug its power supply, and place it in a cool and dry place.
- Make sure that you recharge it once every three months to avoid the battery to over-discharge.
Transportation
- It is recommended to transport the vacuum in its original packaging.
Note
Rinse the filter at least once a month with tap water. For details please refer to Maintenance.
Documents / Resources
References
Download manual
Here you can download full pdf version of manual, it may contain additional safety instructions, warranty information, FCC rules, etc.
Advertisement


Need help?
Do you have a question about the Dyad Air and is the answer not in the manual?
Questions and answers