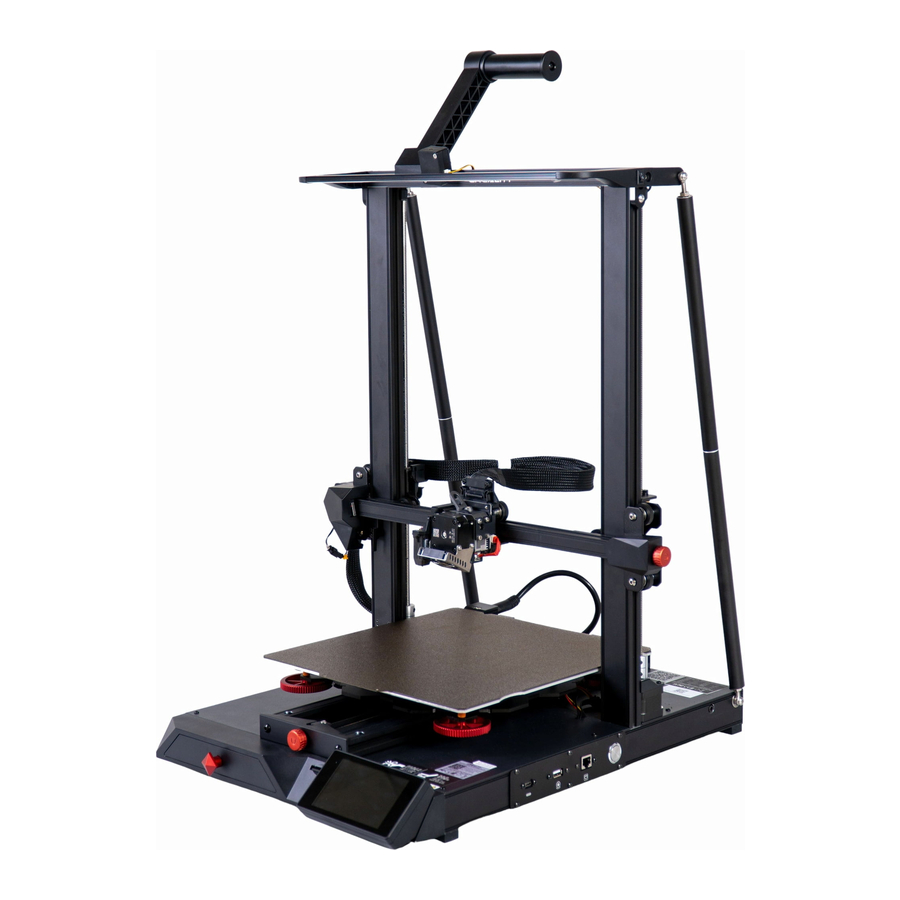
Creality CR-10 Smart Pro - 3D Printer Manual
- User manual (24 pages) ,
- User manual (32 pages) ,
- User manual (45 pages)
Advertisement
- 1 Introduction
- 2 Equipment parameters
- 3 Package Content
- 4 Install the Gantry Frame
- 5 Pull Rod Installation
- 6 Nozzle Kit Installation
- 7 Install the Rack
- 8 Install the touch screen
- 9 Cable Connection
- 10 Bed Leveling
- 11 Preheating Method
- 12 Load Filament
- 13 Network Connection
- 14 Off-line print
- 15 Start Printing
- 16 Network reset
- 17 Printer maintenance
- 18 Circuit Wiring
- 19 Trouble-shooting
- 20 After-Sales Service Card
- 21 Warning
- 22 Firmware Upgrade
- 23 Documents / Resources
Introduction
For the best experience, please read the instructions before operating the Printer. Our teams will always be ready to render you the best services. Please contact us via the phone number or e-mail address provided at the end when you encounter any problem with the Printer. For a better experience in using our product, you can also learn how to use the printer in the following ways: View the accompanied instructions and videos in the storage card. Visit our official website www.creality.com to find relevant software/hardware information, contact details and operation and maintenance instructions.
NOTES
- Do not use the printer any way other than described here in order to avoid personal injury or property damage.
- Do not place the printer near any heat source or flammable or explosive objects. We suggest placing it in a well-ventilated, low-dust environment.
- Do not expose the printer to violent vibration or any unstable environment, as this may cause poor print quality.
- Before using experimental or exotic filaments, we suggest using standard filaments such as ABS or PLA to calibrate and test the machine.
- Do not use any other power cable except the one supplied. Always use a grounded three-prong power outlet.
- Do not touch the nozzle printing surface or motor during operation as they may be hot. Keep hands away from machine while in use to avoid burns or personal injury.
- Do not wear gloves or loose clothing when operating the printer. Such cloths may become tangled in the printers moving parts leading to burns, possible bodily injury, or printer damage.
- When cleaning debris from the printer hotend, always use the provided tools. Do not touch the nozzle directly when heated. This can cause personal injury.
- Children under 10 years old should not use the printer without supervision.
- This machine is equipped with a security protection mechanism. Do not manually move the nozzle or printing platform mechanism manually while booting up, otherwise the device will automatically power off for safety.
- Users should comply with the laws and regulations of the corresponding countries and regions where the equipment is located (used), abide by professional ethics, pay attention to safety obligations, and strictly prohibit the use of our products or equipment for any illegal purposes. Creality will not be responsible for any violators' legal liability under any circustance.

- Feeding holder components
- LED Light
- Filament Detector
- X Limit Switch
- Nozzle Kit
- Printing Platform
- Y-axis belt adjusting knob
- Tool Box
- Storage Card Slot
- Touch screen
- WiFi QR code
- Connecting Interface
- Camera Interface
- Network Interface
- Power-on button
- X-axis belt adjusting knob
- Pull rod
- Screw rod
- Coupling
- Z-axis motor
- Power switch
- AC power supply
- Y-axis Motor
- X-axis Motor
Equipment parameters
Basic Parameters
| Model | CR-10 Smart Pro |
| Printing Size | 300*300*400mm |
| Molding Tech | FDM |
| Nozzle Number | 1 |
| Slice Thickness | 0.1mm-0.4mm |
| Nozzle Diameter | Standard 0.4mm |
| Precision | ±0.1mm |
| Filament | 1.75mm PLA/ABS/TPU/PETG/Wood/Carbon/PA |
| File Format | STL/OBJ/AMF |
| File Transfer | Wifi/Storage card/Online |
| Slice Software | Creality Slicer/Cura/Repetier-Host/Simplify3D |
| Power Supply | Input|:AC100-240V 50/60Hz Output: DC 24V |
| Total Power | 350W |
| Bed Temp | ≤100℃ |
| Nozzle Temp | ≤300℃ |
| Maximum Ambient Temp | ≤35℃ |
| Retraction distance | ≤3mm |
| Resume Printing | Yes |
| Filament Detector | Yes |
| Dual Z-axis | Yes |
| Auto Leveling | Yes |
| Language | 中文/ English/Deutsch/Español/Français/Italiano/Português/Русский/Turkish |
| Printing Speed | 80-100mm/s |
Package Content

Tool List


Tips: the above accessories are for reference only, please refer to the physical accessories!
Install the Gantry Frame
 Twist the coupling to raise the X axis to the position shown in Figure 16.

- Base Frame
![]()
- Gantry Fram
![]()


- M5x45 Sems Screw
![]()


Two Z-axis profiles, installed on the inner step of the Y-axis bottom profile.
Pull Rod Installation
Adjust the proper length of assembled pull rod and install in the position shown in the figure

- M5×12 Hexagon flat round head screw x2
![]()

- M5x20 Hexagon flat round head screws x2
![]()
- M5 Large Flat gasket ×2
![]()


Nozzle Kit Installation

- Nozzle Kit x 1
![]()

Install the Rack
When you wait for the temperature to rise, hang the filament over the Filament Holder.

- Rack x 1
![]()
- Spool x 1
![]()


Install the touch screen

- Touch screen x 1
![]()

- Connect the FFC on the base with the touch screen.
![]()
- Correctly put 3 mounting holes in the back of the touch screen onto studs in the housing, and carefully complete assembly in a direction as indicated by the arrow. Conduct disassembly as illustrated.
![]()


Do not connect or disconnect the cables when the machine is powered on.
Note: carry out assembly and disassembly of the touch screen with care, otherwise the stud is easy to break.
Cable Connection

- Power Cord
- Connect X-axis motor to the 6pin port as shown in the figure
- Connect X Limit Switch to the 2pin port as shown in the figure
- Connect Filament Sensor
- Connect nozzle kit
- Connect Z-axis motor cable
- Connect it to the power cord and turn on the power
- Long press the power button and wait the display screen to start
- Do not connect or disconnect the cables when the machine is powered on.
Bed Leveling
- Select "Level" to automatically level
![]()

 During the leveling process, please do not touch the nozzle cable.
Move the nozzle the front/left leveling screw and adjust the platform height by turning the knob underneath (the thickness of a piece of A4 paper)

 |  The nozzle is too far away from the platform, so the consumables can not adhere to the platform |
 |  Filaments are extruded evenly, just sticking on the platform |
 |  The nozzle is too close to the platform, and the filament is not extruded enough, even scraping the platform |

Use a piece of A4 paper to assist with the adjustment, making sure that the nozzle lightly scratches the paper. Complete the adjustment of the screw on all 4 corners. Repeat above steps 1-2 times if necessary. Keep adjusting until there is a resistance on the A4 paper from the nozzle.

After the leveling is completed, adjust the Z-axis compensation value according to the adhesion of the printing consumables and the glass

During the leveling process, please do not touch the nozzle cable.
Preheating Method
To avoid extended pre-heating time, you can warm up the machine before selecting the model or setting some parameters.

 Notes: The interface of the manual of instruction is only for reference, and the actual interface shall be subject to the display of the machine.

Notes:
- The print preheating standard is adjusted at the factory, PLA preheating standard: nozzle temperature 200 °, hot bed temperature 60 °, ABS preheating standard: nozzle temperature 240 °, hot bed temperature 70 °. If you need to adjust it due to printing materials or other reasons, you can adjust the parameters on the interface home page control → temperature → PLA / ABS preheat setting.
- In case of replacing used filaments, you need to heat the nozzle and draw out remaining filaments when it is melted. Or, some filaments may remain in the nozzles, causing blockages and even damage to the extruder.
Load Filament
When you wait for the temperature to rise, hang the filament over the Filament Holder.


For loading filament smoothly, the end of the filament should be placed as shown above.
When it reaches the target temperature, insert the filament into the small hole of the Extruder until it reaches the nozzle through the filament cutting detection module. If the filament flows out from the nozzle, it presents that the filament is properly loaded.
The method of extrusion spring adjustment: turn left to loosen turn right to tighten (as shown in Fig. A)

Tips: How to replace the filament?
- Cutting filament near the Extruder and slowly feed new filament until they are fed into new filament
- Withdrawing the filament quickly and feeding the new filament after nozzle preheated and filament pushed a little forward
Network Connection
Method 1
- Scan and download
![]()
- Register
![]()
- Log in
![]()


- Select Bluetooth
![]()
- Add equipment
![]()


- Connect to local WiFi
![]()

- Select model
![]()

- Select machine
![]()

- Printing
![]()

- Select device
![]()

- Start printing
![]()

Method 2
- Scan and download
![]()
- Register
![]()
- Log in
![]()


- Scan QR Code
![]()

- Network settings
![]()

- Connect machine WiFi
![]()

- Connect to local WiFi
![]()

- Select model
![]()

- Select machine
![]()

- Printing
![]()

- Select device
![]()

- Start printing
![]()

Off-line print
- Download the software from official website (www.cxsw3d.com) or find the software in storage card for installation.
![]()

- Double click to open the software.
- Select language→Next→Select your machine→Next→Finish.
![]()
- Open Creality 3D slicer → Load (Read file) → Select file.
![]()
- Generate G-code, and save the gcode file to storage card
- Insert the storage card


File names must be Latin letters or numbers, not Chinese characters or other special symbols

Please don't insert or remove the storage card during printing.
Notes
- For details on the software instructions, please refer to the slicing software manual in the storage card.
- Saved files can only be copied to the root directory of the SD card, not to subfolders.
Start Printing
Inspect the machine before printing: Turned off:
- The nozzle is tight and moves left and right smoothly;
- X-axis is tightly horizontal and runs smoothly up and down;
- Y-axis is tight. The platform board does not shake around, and moves back and forth smoothly;
- The filament rack is tight, the roller works smoothly with uninterrupted materials, and the material comes out smoothly. Powered on:
- The display works smoothly and the touch functions normally; the X-axis, Y-axis, and Z-axis move smoothly and sensitively;
- The heating of the nozzle and heated bed functions normally;
- Normal material-in and material-out;
- Normal leveling. The printer can be set to "Auto power-off" through setting parameters during printing while it is working. When auto power-off is set at "ON", the printer will come to full cooling until auto shutdown 5min after finishing model printing.


Network reset

Note:
- In the first use or if you need to clear the owner information, you can click "Restore network" button on the screen, wait for 1-2 minutes and then try to scan the code again or connect the network via Bluetooth.
Printer maintenance

- Manually adjust the tightness as needed by turning the knob left and right (clockwise to tighten and counterclockwise to loosen.) Avoid over tightening, which may break the belt and cause damage to the machine. (As shown in A)
- Please use clean water to clean the dirt on the flat pallet.
- The machine will restart after power interruption and pop out the "resume printing" button. Please clear the redundant filament between the nozzle and model before resumption to avoid printing failure.
Circuit Wiring

Trouble-shooting

After-Sales Service Card
Please read the user manual and warranty card carefully before the use. For any service, Please priorly contact local seller or contact us via Email: cs@creality.com for support. See www.creality.com/after-service-policy/ for specific warranty information about your product and procedures to act on a warranty claim.
Warning
- For pluggable equipment, the socket-outlet shall be easily accessible.
- Do not use this apparatus near water.
- Clean only with dry cloth.
- Only use attachment/accessories specified by the manufacturer.
- Unplug this apparatus during lightning storms or when unused for long periods of time.
- Refer all servicing to qualified service personnel. Servicing is required when the apparatus has been damaged in any way, such as power-supply cord or plug is damaged, liquid has been spilled or objects have fallen into the apparatus, the apparatus has been exposed to rain or moisture, does not operate normally, or has been dropped.
- Internal/External Voltage Selectors: Internal or external voltage selector switches, if any, should only be reset and re-equipped with a proper plug for alternative voltage by a qualified service technician. Do not attempt to alter this yourself.
- Protective earthing terminal: The apparatus should be connected to a mains socket outlet with a protective earthing connection.
- When moving or not using the appliance, secure the power cord (e.g., wrap it with a cable tie). Be careful not to damage the power cord. Before using it again, make sure the power cord has not been damaged. If the power cord has been damaged at all, bring the unit and cord to a qualified service technician for repair or replacement as specified by the manufacturer.
Disconnect power cord before servicing.

TO REDUCE THE RISK OF ELECTRIC SHOCK, DO NOT REMOVE ANY COVER. NO USER- SERVICEABLE PARTS INSIDE. REFER SERVICING TO QUALIFIED SERVICE PERSONNEL ONLY.
Firmware Upgrade
Please login the official website https://www.creality.com/download, switch the language and select the relevant printer and model and download the required firmware, you can use it after the installation is finished.
Documents / Resources
References
![www.cxsw3d.com]() 创想三维(CREALITY) - 3D打印机,教育/工业3D打印机领导品牌
创想三维(CREALITY) - 3D打印机,教育/工业3D打印机领导品牌![www.creality.com]() 3D Printer Slicer Software& Firmware Download - Creality 3D
3D Printer Slicer Software& Firmware Download - Creality 3D![www.creality.com]() CREALITY - Official Website, Leading 3D Printer Supplier & Manufacturer
CREALITY - Official Website, Leading 3D Printer Supplier & Manufacturer
Download manual
Here you can download full pdf version of manual, it may contain additional safety instructions, warranty information, FCC rules, etc.
Advertisement


Need help?
Do you have a question about the CR-10 Smart Pro and is the answer not in the manual?
Questions and answers