Advertisement
To Our Dear Users
Thank you for choosing Creality. To make using our products easier, please read this User Manual before you start and follow the instructions provided carefully. Creality is always ready to provide you with high-quality services. If you encounter any issues or have any questions when using our products, please use the contact information at the end of this manual to contact us.
To further enhance your user experience, you can also use the following methods to f ind out more about using our devices:
SD card user manual: You can find instructions and videos in the SD card provided with your device.
You can also log in to the Creality official website (www.creality.com) to ind information regarding software and hardware, contacts, device instructions, device warranty information, and more.
Instructions for Use
- Please do not use this device with methods and operations that have not been described in this manual to avoid accidental personal injury and property damage;
- Do not place the device in flammable and explosive materials or near high heat sources. Please place the device in a ventilated and cool environment with little dust;
- Do not place the printer in a vibrating or any other unstable environment. The shaking of the machine will affect the printer's printing quality;
- It is recommended to use the filament recommended by the manufacturer to avoid damaging the device;
- Do not use the power cable of other products as a replacement during the installation process. Please use the power cable provided with the machine. The power plug needs to be plugged into a three-hole socket with a ground wire;
- To prevent moving parts from pulling the human body into the device and cause cuts and lacerations, do not wear cotton gloves while operating the printer;
- To avoid burns caused by overheating of the platform, after printing, please wait for the temperature of the HotBed platform to drop before removing the model;
- Please maintain the device often. When the device is unplugged, use a dry cloth to clean the printer, clean up remnants in the filament box, and check for foreign objects on the belt and end stop switch;
- To avoid injuries, children under the age of 10 should not operate this device without adult supervision;
- Do not manually move the nozzle or the heating platform quickly, otherwise, it may cause damage to the moving mechanisms or control circuit;
- Users should abide by the laws and regulations of the corresponding country and region where the equipment is located (place of use), abide by professional ethics, and pay attention to safety obligations. The use of our products or equipment for any illegal purpose is strictly prohibited. Our company is not responsible for the relevant legal responsibilities of any violators.
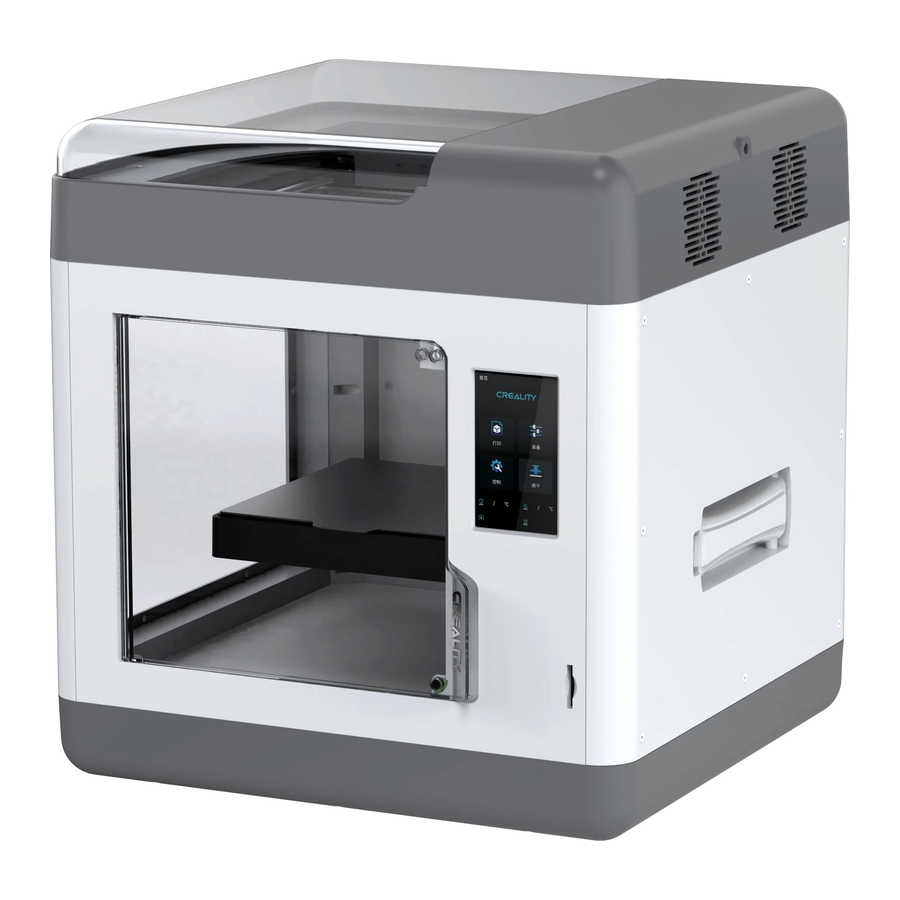
Device Description
About the device

- Cover
- Front door
- SD card slot
- Filament entrance
- Ventilation fan
- Display screen
- Rack
- Power switch
- Power socket
- Voltage adjustment port
List of tool kit items

Device specifications
| Basic Parameters | |
| Model | Sermoon V1 | Sermoon V1 Pro |
| Modeling size | 175x175x165 mm |
| Modeling technology | FDM |
| Number of nozzles | 1 |
| Nozzle diameter | 0.4 mm (Standard) |
| Accuracy | ± 0.1 mm |
| Print materials | 1.75 mm PLA / ABS / PETG |
| Supported slicing file formats | STL / OBJ / AMF |
| Power rating | 150W |
| HotBed temperature | ≤ 80℃ |
| Nozzle temperature | ≤ 250℃ |
| Ambient temperature | 10℃ - 30℃ |
| Power Loss Recovery | Yes |
| Filament detection | Yes |
| Supported slicing software | Creality Slicer, Repetier-Host, Cura, Simplify3D |
| Printing methods | Locally via SD card or cloud printing via Wi-Fi |
| Power specifications | 100-120Vac 200-240Vac 50/60Hz |
| Operating systems | Windows XP / Vista/ 7 / 10/ MAC / Linux |
| Printing speed | ≤ 150 mm/s, normally between 30-60 mm/s |
| Open door sensor | Comes standard with the Pro version |
| Camera | Comes standard with the Pro version |
Instructions for Use
Unboxing instructions

- Please ensure the correct position for the power supply switch and mains before supply connection, in order to avoid damage to the device.
- If the mains between 100V and 120V, please select the 115V for the power supply switch.
- If the mains between 200V and 240V, please select the 230V for the power supply switch (default is 230V).
- Open the device's cover.
![]()
- Use the cutting plier to cut the cable ties around the nozzle.
![]()
- Use the cutting plier to cut of the cable ties on the X-axis and Y-axis belts, and remove the cut cable ties and foam.
![]()
- Remove the foam from the inside of the device.
![]()
- Check whether the moving mechanisms are moving smoothly.
![]()
- Note: Please ensure that the voltage matches the power switch, otherwise the power supply may be damaged or burnt out.
![]()


Local printing
This manual only introduces the installation of Creality slicer software. If users use other slicer software, we recommend to set the retraction parameter to 3mm to avoid the risk of plugging.
Install slicer
- Please login official Creality website (www.creality.com) to download the latest Creality Slicer software
![]()
- Select Preferences in sequence → Configure Creality → Next → Select corresponding language → Next → Finish to complete the setting.
![]()
- Select the current model
![]()
- Open Creality Slicer.
![]()
- Load File
![]()
- Select File
![]()
- Generate G code → Save to memory card
![]()
- Insert Memory Card
![]()


It is important to note file name within the memory card must be in Latin letters or numbers. Chinese characters or any other special symbol cannot be display by the printer.
Note: For details on using the software, please refer to the slicing software user manual on the SD card.
Setup wizard
When using the printer for the first time, please reset the printer to zero. If this procedure fails, please turn off the power and contact after-sales.
Note: The above interface is for reference only. The actual UI may vary.
- No foreign objects on the printing platform
![]()
- Return to zero self-test
![]()
- Install filament
![]()
- Load filament
![]()
- Insert SD card
![]()


Printing modes
- PLA mode: As our company recommends the PLA mode, the system's parameters have been set according to PLA filaments. It is recommended to use Creality filaments for printing. When the inside the box temperature exceeds 30°C, please open the top cover to avoid nozzle blockage.

- ABS mode: As our company recommends the ABS mode, the system's parameters have been set according to ABS filaments. It is recommended to use Creality filaments for printing. When printing, please ensure that the top cover is on to keep the device's temperature inside.
Note: When printing with ABS filaments, it is recommended that the size of a single model be controlled within 100 x 100 mm (length x width) to avoid warping caused by the characteristics of the filaments, which can result in printing failure.


Note: Please install the filaments as shown in the figure above.


Start printing
In this order, go to Print files → Select file → Print.
Note: The above interface is for reference only. The actual UI may vary.

Automatic open door check function (Pro version only)
To prevent the accidental opening of the door and cause burns and mechanical injuries, please turn on the pause door opening function (this function is enabled by default).
")
Cloud printing via app
Install app
- Scan the QR code to download the app
![]()
- Download
![]()
- Create account
![]()
- Log in
![]()


Connect to the network and cloud printing (Method 1 Connect via Wi-Fi)
As shown below, please use your smartphone to select your device model and slicing:
Note: When cloud printing via the app, be sure to uncheck the PLA mode and ABS mode on the device, otherwise the app cannot control the device temperature.
- Add device
![]()
- Scan the QR on the device
![]()
- Network settings
![]()
- Connect to device Wi-Fi
![]()
- Connect to user Wi-Fi
![]()
- New device added
![]()
- Find model
![]()
- Model slicing
![]()
- Print via a network connection
![]()


Connect to the network and cloud printing (Method 2 Connect via Bluetooth)
As shown below, please use your smartphone to select your device model and slicing:
Note: When cloud printing via the app, be sure to uncheck the PLA mode and ABS mode on the device, otherwise the app cannot control the device temperature.
- Add device
![]()
- Search for Bluetooth device
(Turn on Bluetooth on your smartphone)
![]()
- Add device
![]()
- Select user Wi-Fi
![]()
- Connect to user Wi-Fi
![]()
- New device added
![]()
- Find model
![]()
- Model slicing
![]()
- Print via a network connection
![]()


Cloud monitor (Pro version only)
Note: Open the camera interface on the app, and both cloud printing and local printing can be viewed remotely using the camera. The LED light will also automatically turn on in environments with poor light.
Method 1:
- Click
![]()
![]()
- Real-time monitoring
![]()


Method 2:
- Click
![]()
![]()
- Real-time monitoring
![]()


Notes and Daily Maintenance
Feed out and feed in filaments
Note: The above interface is for reference only. The actual UI may vary.

Lubrication maintenance
Note: Please perform regular maintenance on the blue area using oil and lubrication (as shown in the figure).

Leveling the platform
Note: After using the printer for a long time, the distance between the platform and the nozzle may change, which could cause the adhesion of the first layer of the model to become weak and cause a printing failure. Please level the platform regularly.

You can use the leveling card provided to help with the leveling. The nozzle should be just able to scratch the leveling card. Keep adjusting them until you can feel a slight resistance from the nozzle when you pull the leveling card.
Note: The nozzle is a damageable part. If the nozzle becomes heavily worn out, please replace it regularly.


 The nozzle is too far away from the platform, and the filaments cannot stick to the platform. |  The filaments are evenly spread out and are sticking to the platform just right. |  The nozzle is too close to the platform, and the filaments are not extruded enough, which may damage the platform. |
Using and maintaining the magnetic adhesive sticker
Note: The printing platform is a damageable part. Please replace it regularly to ensure the adhesion of the first layer model.
- Take the printed model and platform out of the device together, and partially bend the platform slightly to separate the model from the platform. (The platform is not easy to bend to prevent the platform from deforming and becoming unusable)
![]()
- The filament residue on the platform can be scraped off with a small household blade. Please pay attention to safety when using it.
![]()
- If the adhesion of the f irst layer of the model is weak, please apply a glue stick evenly onto the surface of the platform.
![]()


Cleaning foreign objects from the chassis
- Remove any foreign objects from the inside of the device.
![]()
- Check whether there is any foreign object remaining on the Z-axis limit switch to prevent the Z-axis limit switch from getting stuck.
![]()


Connecting to cloud print
Note: If the network configuration is unsuccessful or you need to re-bind your smartphone, please follow the steps below.
- It is recommended to use the small wrench in the accessory package to enter the rack's reset hole and long-press the reset switch for six seconds before releasing;
![]()
- Once the Wi-Fi indicator light turns off, the system will automatically enable the yellow indicator light. When the yellow light starts f lashing, that means reset has been completed;
![]()
- Once the Wi-Fi has been successfully reset, use your smartphone to scan the QR code on the back of the device again to connect it to the network. You can also use a Bluetooth connection instead;
![]()


Documents / Resources
References
Download manual
Here you can download full pdf version of manual, it may contain additional safety instructions, warranty information, FCC rules, etc.
Advertisement


Need help?
Do you have a question about the Sermoon V1 and is the answer not in the manual?
Questions and answers