DeWalt DW706 Instruction Manual
12" double bevel compound miter saw
Hide thumbs
Also See for DW706:
- Quick start manual (2 pages) ,
- User manual ,
- Instruction manual (49 pages)
Table of Contents
Advertisement
Available languages
Available languages
Before returning this product call
1-800-4-D
Questions? See us in the World Wide Web at www.dewalt.com
INSTRUCTION MANUAL
GUIDE D´UTILISATION
MANUAL DE INSTRUCCIONES
DW706 (120 Volt) DW706 (230 Volt)
12" Double Bevel Compound Miter Saw
Scie à onglet à angles combinés à biseau double de 30,5 cm (12 po)
Sierras de ingletes de bisel doble del 30,5 cm (12")
WALT
E
IF YOU SHOULD EXPERIENCE A PROBLEM WITH YOUR DEWALT PURCHASE,
CALL 1-800-4 DEWALT
IN MOST CASES, A DEWALT REPRESENTATIVE CAN RESOLVE
YOUR PROBLEM OVER THE PHONE.
IF YOU HAVE A SUGGESTION OR COMMENT, GIVE US A CALL.
YOUR FEEDBACK IS VITAL TO THE SUCCESS OF DEWALT'S
QUALITY IMPROVEMENT PROGRAM.
INSTRUCTIVO DE OPERACIÓN, CENTROS DE SERVICIO Y PÓLIZA
DE GARANTÍA. ADVERTENCIA: LÉASE ESTE INSTRUCTIVO ANTES
DE USAR EL PRODUCTO.
Advertisement
Chapters
Table of Contents

Related Manuals for DeWalt DW706


Summary of Contents for DeWalt DW706
- Page 1 IF YOU SHOULD EXPERIENCE A PROBLEM WITH YOUR DEWALT PURCHASE, CALL 1-800-4 DEWALT Before returning this product call IN MOST CASES, A DEWALT REPRESENTATIVE CAN RESOLVE YOUR PROBLEM OVER THE PHONE. 1-800-4-D WALT IF YOU HAVE A SUGGESTION OR COMMENT, GIVE US A CALL.
-
Page 2: Table Of Contents
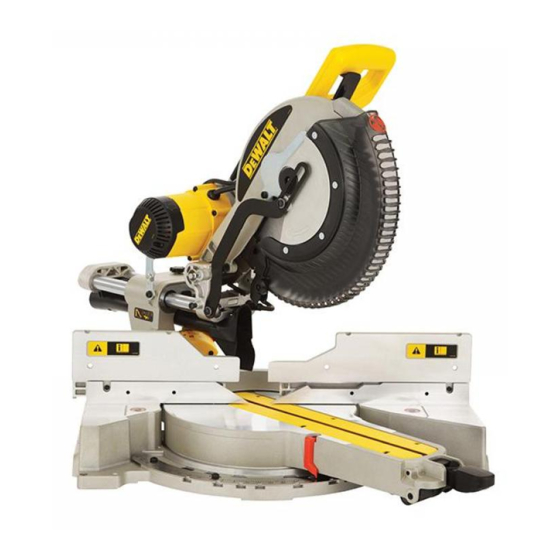
TABLE OF CONTENTS DOUBLE INSULATION/POLARIZED PLUG INSTRUCTIONS ........1 OPERATION ..……………………………………………………………………………7 SAFETY INSTRUCTIONS FOR ALL TOOLS ..…………………………………………1 SWITCH ..........................7 ADDITIONAL SAFETY RULES..……………………………………………………….1 CUTTING WITH YOUR SAW ..................7 ELECTRICAL CONNECTION ..…………………………………………………………2 CROSSCUTS ........................7 ACCESSORIES ......................2 BEVEL CUTS ........................7 BLADE RECOMMENDATIONS..................3 QUALITY OF CUT ......................8 UNPACKING YOUR SAW ..……………………………………………………………3 BODY AND HAND POSITION ..................8 SPECIFICATIONS ......................4... -
Page 3: Double Insulation/Polarized Plug Instructions
Important Safety Instructions • REDUCE THE RISK OF UNINTENTIONAL STARTING. Make sure switch is in OFF position before plugging in. WARNING: When using electric tools, basic safety precautions should always • USE RECOMMENDED ACCESSORIES. Consult the instruction manual for recommend- be followed to reduce risk of fire, electric shock, and personal injury, including ed accessories. -
Page 4: Electrical Connection
• DON’T - Operate unless all clamp handles are tight. ON MOTOR HOUSING: • DON’T - Use blades larger or smaller than those which are recommended. WARNING: FOR YOUR OWN SAFETY, READ INSTRUCTION MANUAL BEFORE OPER- ATING SAW. • DON’T - Wedge anything against fan to hold motor shaft. WHEN SERVICING, USE ONLY IDENTICAL REPLACEMENT PARTS. -
Page 5: Blade Recommendations
Check the contents of your miter saw carton to make sure that you have received all DW706) parts. In addition to this instruction manual, the carton should contain: 1. One No. DW706 miter saw. 2. One D WALT 12" dia. saw blade KNOBS 3. -
Page 6: Specifications
Specifications enhance the tool’s portability, it can be mounted to a piece guard bracket screw (A), until the guard bracket can be of 1/2" or thicker plywood which can then be clamped to raised enough to permit access to the blade screw. The CAPACITY OF CUT your work support or moved to other job sites and blade guard will be held in the raised position by the guard... - Page 7 FIG. 2 OPERATING TRIGGER OPERATING HANDLE HANDLE SWITCH CARRY HANDLE GUARD MOTOR END LOCK DOWN MOTOR HOUSING 0˚ BEVEL STOP LEFT SIDE ADJ. SCREW FENCE RIGHT SIDE BEVEL SCALE LEFT SIDE FENCE FENCE CLAMPING KNOB LOCK DOWN DUST SPOUT HAND INDENTATIONS BEVEL LOCK...
-
Page 8: Miter Scale Adjustment
Once made, these adjustments should remain accurate. POINTER if the pointer does not indicate exactly 45˚, turn the right FIG. 5 FIG. 6 Take a little time now to follow these directions carefully to bevel stop screw until the pointer indicates 45˚. maintain the accuracy of which your saw is capable. -
Page 9: Brushes
33.85˚ BEVEL STOPS (FIG. 9) FIG. 9 The two pawls (D) are used to stop the saw head bevel set- ting at 33.85˚. This setting is used primarily for cutting crown moldings laid flat on the table. HEAD DOWNLOCK PIN (FIG. 9) To lock the saw head in the down position, push the head down, push the pin (E) in and release the saw head. -
Page 10: Quality Of Cut
desired bevel angle has been set, tighten the bevel clamp FIG. 10 FIG. 10A knob firmly. Bevel angles can be set from 48 degrees right to 48 degrees left and can be cut with the miter arm set between zero and 50 degrees right or left. At some extreme angles, the right or left side fence might have to be removed. -
Page 11: Support For Long Pieces
FIG. 12 FIG. 11 corner. For this joint the miter arm was locked in the zero to get miter angle setting on saw (42°). Likewise, follow the position and the bevel adjustment was locked at 45 degrees. vertical intersecting line to the top or bottom to get the bevel The wood was positioned with the broad flat side against the angle setting on the saw (18°). -
Page 12: Cutting Crown Molding
CUTTING BASE MOLDING UP TO 6" HIGH VERTICALLY FIG. 17 AGAINST THE FENCE Position material as shown in Figure 15. All cuts made with the back of the molding against the fence and bottom of the molding against the base. KERF INSIDE CORNER: PLATE... -
Page 13: Special Cuts
BEVEL SETTING TYPE OF CUT INSIDE CORNER: FIG. 19 LEFT SIDE, INSIDE CORNER: Left side 33.85° Left 1. Top of molding against fence 1. Miter right at 45° 2. Miter table set right 31.62° 2. Save the right side of cut 3. - Page 14 TABLE 1 COMPOUND MITER CUT (POSITION WOOD WITH BROAD FLAT SIDE ON THE TABLE AND THE NARROW EDGE AGAINST THE FENCE) SET THIS BEVEL ANGLE ON SAW...
-
Page 15: Maintenance
This warranty does not cover part failure due to normal wear or tool abuse. For further detail of war- ranty coverage and warranty repair information, visit www.dewalt.com or call 1-800-4-D WALT (1-800-433- achieved. Tighten the four screws securely and replace the 9258). -
Page 16: Trouble Shooting Guide
Trouble Shooting Guide BE SURE TO FOLLOW SAFETY RULES AND INSTRUCTIONS TROUBLE! SAW WILL NOT START WHAT’S WRONG? WHAT TO DO… 1. Saw not plugged in 1. Plug in saw. 2. Fuse blown or circuit breaker tripped 2. Replace fuse or reset circuit breaker 3. - Page 17 Table des matières DIRECTIVES CONCERNANT LA DOUBLE ISOLATION ET LES FONCTIONNEMENT ......................23 FICHES POLARISÉES ....................16 INTERRUPTEUR ......................23 CONSIGNES DE SÉCURITÉ RELATIVES À TOUS LES OUTILS ......16 MÉTHODES DE COUPE ....................24 CONSIGNES DE SÉCURITÉ ADDITIONNELLES ............16 COUPES TRANSVERSALES ..................24 RACCORDEMENT ÉLECTRIQUE ................17 COUPES EN BISEAU ....................24 ACCESSOIRES ......................18 QUALITÉ...
-
Page 18: Fiches Polarisées
Importantes consignes de sécurité • BIEN ENTRETENIR L’OUTIL; afin d’obtenir de meilleurs résultats et faire preuve de pru- dence, garder l’outil propre et bien aiguisé. Suivre les consignes lorsqu’on lubrifie ou qu’on AVERTISSEMENT : lorsqu’on utilise un outil électrique, on doit toujours suiv- remplace les accessoires. -
Page 19: Raccordement Électrique
• le plomb dans les peintures à base de plomb, • ON DOIT s’assurer que les rondelles de la lame et des brides de serrage soient propres et que les parties en retrait des colliers soient bien appuyées contre la lame. Bien serrer •... -
Page 20: Accessoires
Menuiserie avec grandes dents moulures et pièces sans éclats UTILISER au carbure décoratives en bois AVEC LE MOD- ÉLE DW706) dur ou en contreplaqué Gamme 40 Corps coupé au laser Mélamine, placage Coupes ultra lisses, Menuiserie avec grandes dents et stratifié... -
Page 21: Déballage De La Scie
(figure 2). Relâcher boîte devrait contenir : doucement la pression ainsi exercée et retenir le bras afin 1. une scie à onglets DW706; qu’il puisse monter jusqu’à sa position maximale. Se servir 2. une lame D WALT de 30,5 (12 po) de diamètre;... - Page 22 FIG. 2 INTERRUPTEUR À GÂCHETTE POIGNÉE DE POIGNÉE DE MANŒUVRE MANŒUVRE POIGNÉE DE TRANSPORT CAPUCHON DISPOSITIF DE D’INSPECTION PROTECTION DES MOTEUR GOUPILLE DE VERROUILLAGE CARTER DU MOTEUR VIS DE RÉGLAGE DE LA BUTÉE D’ANGLE ÉCHELLE DE DE BISEAU DE 0º COUPE EN BISEAU GUIDE...
-
Page 23: Transport De La Scie
s’enclencher. Garder le bouton de verrouillage enfoncé pour RÉGLAGE DE L’ÉCHELLE DE COUPE EN ONGLET l’échelle par le regard (figure 6). Si l’indicateur n’affiche pas empêcher la broche de tourner. Retirer la vis et la lame. (FIG. 5) exactement zéro, desserrer la vis le retenant et aligner l’indi- cateur à... -
Page 24: Réglage Du Guide
à la figure 9 (C ), La poignée de verrouillage d’angle (A) permet d’effectuer n’utiliser que les balais DeWALT identiques et de même et faire glisser le guide vers l’extérieur. Faire un essai à vide des coupes en biseau à... -
Page 25: Directives Concernant La Double Isolation Et Les Fonctionnement
La scie s’arrête automatiquement à zéro lorsqu’on la FIG. 10 FIG. 10A soulève vers la gauche. Pour dépasser la marque de 0º vers la droite, tirer sur le bouton de surpassement; on peut ver- rouiller ce dernier en le faisant tourner d’un demi-tour quand il est soulevé. -
Page 26: Méthodes De Coupe
FIG. 11 si on s’assure d’abord de bien retenir chacune des pièces ment. Ne jamais mettre les mains à proximité de la zone FIG. 12 sur le plateau et contre le guide. On effectue une coupe de coupe; les écarter d’au moins 15 cm (6 po) de la lame. transversale en coupant à... -
Page 27: Coupe De Boiseries Ou D'autres Types De Moulures
un coin droit. Le bouton de réglage du biseau doit être blo- Régler ensuite les angles aux valeurs indiquées; effectuer qué à 45º et le bras, à la position zéro. La surface plane et quelques coupes d’essai et assembler les pièces ainsi large de la planche doit être appuyée contre le plateau et le obtenues afin de vérifier si elles conviennent, et répéter côté... -
Page 28: Coupes De Plinthes
gauche. Pour le diminuer, déplacer le bras afin d’aligner la FIG. 17 RÉGLAGE DU BISEAU TYPE DE COUPE marque de vernier appropriée avec la valeur la plus près sur Gauche 33,85º COIN INTÉRIEUR, CÔTÉ GAUCHE l’échelle, à droite. 1. Appuyer l’angle supérieur de la moulure contre le guide. -
Page 29: Tableau 1 Onglets Mixtes
TABLEAU 1 ONGLETS MIXTES REGLAGE DE L´ANGLE DU BISEAU... -
Page 30: Coupes Particulières
COUPE DE MOULURES EN COURONNE PLACÉES EN FIG. 18 FIG. 20 ANGLE ENTRE LE GUIDE ET LA BASE DE LA SCIE POUR TOUTES LES COUPES 1. Placer la moulure en biais de manière à ce que l’angle inférieur (la section destinée à s’appuyer au mur) s’appuie contre le guide, et l’angle supérieur repose sur la base de la scie, tel qu’illustré... -
Page 31: Entretien
Pour obtenir de plus amples renseignements sur les pièces ou les réparations couvertes par la présente garantie, visiter le site www.dewalt.com ou composer le 1 800 433-9258 (1 800 4-D WALT). Cette garantie ne s’applique pas aux accessoires et ne vise pas les dommages causés par des... -
Page 32: Guide De Dépannage
Guide de dépannage SUIVRE TOUTES LES DIRECTIVES ET LES CONSIGNES DE SÉCURITÉ PROBLÈME : LA SCIE NE DÉMARRE PAS QUE SE PASSE-T-IL ? QUOI FAIRE… 1. La scie n’est pas branchée. 1. Brancher la scie. 2. Le fusible a sauté ou le disjoncteur s’est déclenché. 2. - Page 33 Indice INSTRUCCIONES SOBRE AISLAMIENTO FUNCIONAMIENTO ......................38 DOBLE /ENCHUFES POLARIZADOS ................32 INTERRUPTOR ......................39 INSTRUCCIONES DE SEGURIDAD PARA TODAS LAS HERRAMIENTAS ....32 CORTANDO CON SU SIERRA ..................39 REGLAS DE SEGURIDAD ADICIONALES..............32 CORTES TRASVERSALES....................39 CONEXIÓN ELÉCTRICA ....................33 CORTES DE BISEL ......................39 ACCESORIOS ........................33 CALIDAD DEL CORTE ....................40 RECOMENDACIONES DE CUCHILLAS................34 POSICIÓN DEL CUERPO Y LAS MANOS ..............40...
-
Page 34: Doble /Enchufes Polarizados
Instrucciones importantes de seguridad • NO SE EXTIENDA DEMASIADO. Mantenga el equilibrio en todo momento. • MANTENGA LAS HERRAMIENTAS CON CUIDADO. Mantenga las herramientas afiladas ADVERTENCIA: Cuando use herramientas eléctricas, siempre se deben y limpias para que funcionen en forma mejor y más segura. Siga las instrucciones de lubri- seguir las precauciones de seguridad básicas para reducir el riesgo de cación y para el cambio de accesorios. -
Page 35: Conexión Eléctrica
• Asegúrese de que todas las arandelas de la hoja de la sierra estén limpias y los lados empo- El riesgo que usted corre a causa del contacto con esos productos varía, según la frecuen- trados del anillo estén contra la hoja. Apriete bien el tornillo de árbol. cia en que haga este tipo de trabajo. -
Page 36: Recomendaciones De Cuchillas
CLASIFICADAS PARA VELOCIDAD DE POR LO MENOS 4800 RPM. Nunca use una hoja de menor diámetro. No quedaría bien protegida. CUCHILLAS Nº DE DESC. DE APLICACIÓN TIPO DE DW7051 DEWALT DIENTES CUCHILLA CORTE Serie 20 Placa delgada Fines generales Liso, Construcción... -
Page 37: Para Desempacar Su Sierra
Al sujetar la sierra a cualquier superficie de trabajo, pasador 1. Una sierra de ingletes Nº DW706 sujete solamente en los refuerzos de sujeción donde se seguridad cuando lleve 2. Una cuchilla de 12" de diámetro encuentran los agujeros para los tornillos de montaje. - Page 38 FIG. 2 MANILLA DE GATILLO MANILLA DE OPERACIÓN OPERACIÓN INTERRUPTOR MANILLA PARA ACARREAR GUARDA TAPA DE INSPECCIÓN DE MOTOR PASADOR DE SEGURIDAD ESTÁTOR DEL MOTOR TORNILLO DE AJUSTE DE TOPE DE BISEL A 0º ESCUADRA GUÍA IZQUIERDA ESCUADRA REGLA DE DE LADO BISEL PERILLA PARA SUJE-...
-
Page 39: Transporte De La Sierra
dor de la cuchilla! Ponga en un lugar seguro para su uso el brazo pasado cero. Observe el indicador y la regla de la CORRECCIÓN DEL TOPE DE BISEL A 45º A LA futuro. El resto del ensamblaje de la cuchilla es exacta- sierra a través de la ranura mostrada en la Ilustración 6. -
Page 40: Funcionamiento
33,85º. Este valor se usa principalmente para ramienta para que un centro de servicio DEWALT autoriza- Cuando la esté haciendo correr sola NO ATE, PEGUE NI cortar molduras coronadas puestas de plano sobre la mesa. -
Page 41: Interruptor
INTERRUPTOR FIG. 10 FIG. 10A Para encender la sierra, apriete el gatillo interruptor. Para apagar la herramienta, suelte el gatillo. Deje que la hoja acelere hasta que alcance las RPM necesarias para operar antes de hacer un corte. Suelte el gatillo interruptor y deje que el freno pare la hoja antes de levantar el cabezal de la sierra. -
Page 42: Calidad Del Corte
FIG. 11 FIG. 12 FIG. 14 CORTE DE MARCOS DE CUADROS, ENMARCA- MIENTO DE CAJA Y OTROS PROYECTOS DE CUA- TRO LADOS Para comprender mejor cómo hacer los objetos menciona- dos arriba, sugerimos que intente hacer unos proyectos simples usando madera de sobra hasta que usted capte como funciona la sierra. -
Page 43: Escala De Nonio
inglete estén bien apretadas. Esas perillas deben estar CUANDO CORTE UNA MOLDURA DE BASE apretadas después de hacer cualquier cambio en el bisel o SIEMPRE HAGA UN ENSAYO SIN ELECTRICIDAD inglete. ANTES DE HACER UN CORTE. La tabla de la página 43 lo ayudará a seleccionar los valores Cortes rectos a 90º: del bisel y el inglete apropiados para cortes corrientes de Ponga la madera contra la escuadra de guía tal como se... -
Page 44: Corte De Molduras Coronadas
FIG. 16 Las dos superficies planas de una pieza de moldura corona- Al fijar los ángulos de bisel y de inglete para todos los cortes da están a ángulos que suman exactamente 90 grados. La compuestos, recuerde que: mayoría, pero no todas, de las molduras coronadas tiene un Los ángulos presentados para las moldurass coronadas ángulo superior trasero (la sección que calza plana contra el son muy precisos y difíciles de fijar con precisión. -
Page 45: Tabla 1 Corte De Inglete Compuesto
TABLA 1 CORTE DE INGLETE COMPUESTO AJUSTE ESTE ANGULO DE BISELEN LA SIERRA... -
Page 46: Cortes Especiales
SIEMPRE USE LA CUCHILLA APROPIADA HECHA ESPECIALMENTE PARA CORTAR ALUMINIO. Estas se encuentran disponibles a la venta en su distribuidor DEWALT o centro de servicio D WALT. Ciertas piezas de trabajo, debido a su tamaño, forma o acabado de superficie,... -
Page 47: Garantía
Av. Francisco I. Madero No.831 - Col. Centro (81) 8375 2313 www.dewalt.com o llámenos al 1 800 433-9258 (1-800-4- PUEBLA, PUE WALT). Esta garantía no aplica a accesorios o a daños 17 Norte #205 - Col. Centro... -
Page 48: Guía Para Resolver Problemas
Guía para resolver problemas ASEGÚRESE DE SEGUIR LAS NORMAS E INSTRUCCIONES DE SEGURIDAD ¡PROBLEMA! LA SIERRA NO ENCIENDE ¿QUÉ PASA? QUÉ HACER… 1. La sierra no está enchufada 1. Enchufe la sierra 2. El fusible se rompió o el interruptor se movió 2. - Page 49 WALT Industrial Tool Co., 701 East Joppa Road, Baltimore, MD 21286 (JUL04-CD-1) Form No. 626594-00 DW706, DW706-220 Copyright © 2000, 2003, 2004 D WALT The following are trademarks for one or more D WALT power tools: the yellow and black color scheme; the “D” shaped air intake grill; the array of pyramids on the handgrip; the kit box...
Need help?
Do you have a question about the DW706 and is the answer not in the manual?
Questions and answers