Advertisement
High-Low and High-Low PLUS Exam Tables
Installation and Operation Manual
High-Low
Exam Table
Safety Information ........................................................ 2
Important Information ................................................... 3
Component Identification .............................................. 5
Specifications ............................................................... 6
Installation .................................................................... 8
Operation .................................................................... 16
Simply go to brewercompany.com/warranty-registration, fill out the information fields and click submit.
By registering your product today, you are better safeguarding your investment in the future.
Printed in USA © 2024
Access High-Low
B re w er
Registering your Brewer product is easy.
The Brewer Company, LLC
N88 W13901 Main Street, Suite 100
Menomonee Falls, WI 53051
P 1.888.Brewer.1
F 262.251.2332
E customerservice@brewercompany.com
www.brewercompany.com
Exam Table
High-Low PLUS
Exam Table
Maintenance ............................................................... 29
Service........................................................................ 30
Accessories ................................................................ 31
Power Cord Options .................................................. 31
Warranty ..................................................................... 32
Document 2102818 RevG
Advertisement
Table of Contents

Related Manuals for brewer High-Low


Summary of Contents for brewer High-Low
-
Page 1: Table Of Contents
Access High-Low Exam Table High-Low and High-Low PLUS Exam Tables Installation and Operation Manual High-Low PLUS Exam Table B re w er High-Low Exam Table Safety Information ............2 Maintenance ............... 29 Important Information ........... 3 Service................ 30 Component Identification ..........5 Accessories .............. -
Page 2: Safety Information
Exam Table SAFETY INFORMATION Safety Information Symbols The primary concern of The Brewer Company is that the Yellow triangle with black border and equipment is operated and maintained with the safety of black symbol warns of a hazardous the patient and healthcare staff in mind. To ensure safe situation. -
Page 3: Important Information
Access High-Low Exam Table IMPORTANT INFORMATION General The Brewer Access High-Low PLUS Exam Tables may have the SafeGlide™ Mobility Option. This allows medical Read and understand all operating instructions, safety professionals to move the table around the examination information, and maintenance requirements contained in room more easily. - Page 4 IMPORTANT INFORMATION (CONTINUED) Service If you require assistance with the installation or operation of your Brewer Table, call the Brewer Customer Experience Department at (1-800-558-8777). Our trained staff will attempt to assist you in correcting the problem directly over the phone. If service is required, a factory authorized technician may be sent to your location.
-
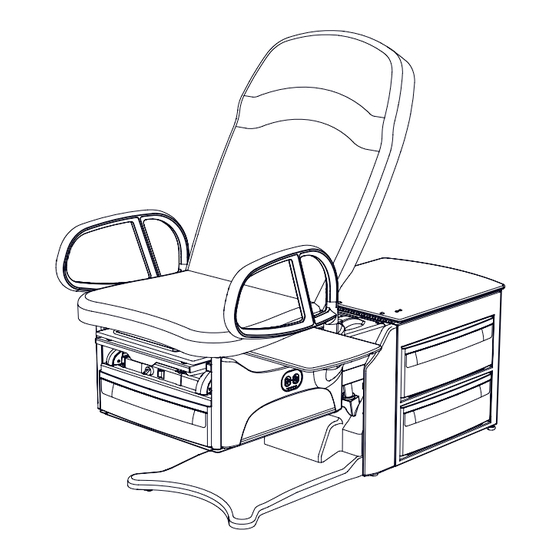
Page 5: Component Identification
Access High-Low Exam Table COMPONENT IDENTIFICATION Paper Roll Holder Patient Assist Handles (Models 6000PLUS/6001PLUS/ 6500PLUS/6501PLUS/ 6800PLUS/6801PLUS) Foot Control On/Off Switch (located on back of cabinet) Pelvic Tilt Paper Storage Drawer Warmer Switch Compartment Lid (Models 6001, 6501, 6801, 6001PLUS, 6501PLUS, &... -
Page 6: Specifications
Access High-Low Exam Table SPECIFICATIONS Weight of Table Fuse Rating • Models 6000, 6001, 6500 & 6501 .......395 lbs • Option/Warmer Fuse Rating .....250V/1.0 Amp • Model 6800 ............423 lbs • Option/Warmer & Outlet Fuse Rating ..250V/3.0 Amp Duty Cycle (10%) •... - Page 7 Access High-Low Exam Table SPECIFICATIONS (CONTINUED) WARNING: Explosion/Fire Hazard Do not use this table in an explosive or oxygen rich atmosphere. Doing so may result in serious personal injury or death. WARNING: Shock Hazard When performing cauterization or similar treatment, the patient must be insulated from the metal portions of the table by non-conductive material.
-
Page 8: Installation
Access High-Low Exam Table INSTALLATION NOTICE: Inspect Carton and Contents Inspect all boxes and contents for damage. Report any damage to the carrier immediately. NOTICE: No Sharp Tools To avoid damaging the table’s upholstery or painted surfaces, DO NOT use a knife or other sharp object to open the packaging. - Page 9 Access High-Low Exam Table INSTALLATION (CONTINUED) 3. Remove stretch wrap surrounding table. 6. Remove the 2 screws attaching the spacers on either side of the wooden U-shaped brace located under the 4. Remove the 4-6 steel shipping brackets securing front corners of the cabinet (Figure 6). Remove the the table to the pallet (Figure 4).
- Page 10 Access High-Low Exam Table INSTALLATION (CONTINUED) 8. Make sure all shipping materials (except for wooden NOTICE: Confirm Voltage and Plug Type brace and spacers) and packing foam are removed See Specifications page for electrical rating of this unit. from the table, pallet and surrounding area.
- Page 11 Access High-Low Exam Table INSTALLATION (CONTINUED) 13. Press “Lift Up” on the foot control to raise the seat NOTICE: Avoid Pelvic Tilt and Upholstery Damage approximately 1" (Figure 10). Do not lift or move table by pulling up on the seat upholstery (Figure 12).
- Page 12 Access High-Low Exam Table INSTALLATION (CONTINUED) 17. Prepare the rear of table for lifting by pulling top rear NOTICE: Avoid Stirrup Damage pass-through drawer to one side (Figure 16). Do not lift or move table by using the stirrups as a hand hold.
- Page 13 Access High-Low Exam Table INSTALLATION (CONTINUED) 19. Position personnel at the front and rear of the table. Front lifting points are the left and right sides of the leg support (Figure 18). Figure 21. Rear Lift Points NOTICE Table weight up to approximately 447 lbs.
- Page 14 Access High-Low Exam Table INSTALLATION (CONTINUED) Transfer of Hi-Low PLUS Exam Tables Leveling the Table 1. For safety, move table onto furniture dolly in two Tools Required steps. With four personnel, lift the table straight up • None and rotate the table 90° to clear the wood block on the shipping pallet.
- Page 15 NOTE: All power cords should be supplied by The Brewer Installing the Foot Control Company. 1. Insert the male plug of the foot control cord into the receptacle on the table (Figure 26).
-
Page 16: Operation
OPERATION Before Use CAUTION: Read this Manual WARNING: Shock Hazard Read this manual before use of the Brewer Access When performing cauterization or similar High-Low or High-Low PLUS Examination Table. treatment, the patient must be insulated from the metal portions of the table by non-conductive material. - Page 17 Access High-Low Exam Table OPERATION (CONTINUED) Models 6000, 6001, 6000PLUS, & 6001PLUS Seat and Backrest Safety Switches Models 6000, 6001, 6000PLUS, & 6001PLUS are All Models equipped with a single pedal foot control that raises and All models are equipped with safety switches. They are lowers the seat.
- Page 18 Access High-Low Exam Table OPERATION (CONTINUED) Backrest Switch Powered Backrest SafeGlide™ Leg Support Models 6500, 6501, 6800, 6801, 6500PLUS, 6501PLUS, The leg support is located under the seat cushion 6800PLUS, and 6801PLUS are equipped with safety (Figure 31). It can be extended 18" for the patient prone switches inside the backrest cover which automatically position.
- Page 19 Access High-Low Exam Table OPERATION (CONTINUED) Treatment Pan Front Drawer A removable treatment pan is built-in underneath the A storage drawer for supplies is located at the front of the leg support pad for use during examination. Pull the leg table.
- Page 20 Installing Drawer Stops An optional feature of the Brewer Access High-Low Exam Table allows the rear cabinet side pass-through drawers to only open from one side. To enable this, install a drawer stop for each drawer.
- Page 21 Access High-Low Exam Table OPERATION (CONTINUED) Pass-Through Work Surface Removing the Work Surface for Cleaning A pass-through work surface, stored under the seat 1. Push work surface in to reveal a white plastic screw. (Figure 38), may be pulled out from either side of the 2.
- Page 22 Access High-Low Exam Table OPERATION (CONTINUED) Patient Assist Handles Adjustable Stirrups In the forward (normal use) position, the Patient Assist Operating the Stirrups Handles lock into place preventing left or right rotation. 1. To operate the stirrups, grasp end of stirrup and pull The Patient Assist Handles can be rotated to the side straight out of the table (Figure 42).
- Page 23 Access High-Low Exam Table OPERATION (CONTINUED) Storing the Stirrups NOTICE: Use Stirrup Only as Designed 1. To store the stirrups in the table, grasp end of stirrup Do not use any part of the stirrup for attachment of any device.
- Page 24 Access High-Low Exam Table OPERATION (CONTINUED) Table Height The table can be adjusted to any height between 18" to Return to Chair Button 37" (Figure 43). Models 6500, 6501, 6800, 6801, 6500PLUS, 6501PLUS, 6800PLUS, & 6801PLUS STOP RETURN TO CHAIR...
- Page 25 Access High-Low Exam Table OPERATION (CONTINUED) Seat Back Minimum Height The back can be adjusted to any angle between For lowering 28" horizontal and 80°. backrest to horizontal NOTICE: To Lower Backrest Fully position. Table must be raised to a height of 28" before the backrest can be lowered to the horizontal position (Figure 45).
- Page 26 Access High-Low Exam Table OPERATION (CONTINUED) Manual Pelvic Tilt Front Drawer Warmer (Models 6001, 6501, 6801, 6001PLUS, (Models 6001, 6501, 6801, 6001PLUS, 6501PLUS, and 6801PLUS) 6501PLUS, and 6801PLUS) The manual pelvic tilt feature sets the seat angle at 0° Models 6001, 6501, 6801, 6001PLUS, 6501PLUS, (horizontal) or 6°...
- Page 27 Access High-Low Exam Table OPERATION (CONTINUED) Outlet EasyGlide Mobility Option (Models 6001 (optional), 6501, 6801, (Available option for all PLUS Models) 6501PLUS, and 6801PLUS) To engage EasyGlide mobility option (deploy wheels on table to enable movement around the exam room): Models 6001, 6501, 6801, 6501PLUS, and 6801PLUS are equipped with an Outlet (Figure 48).
- Page 28 Access High-Low Exam Table OPERATION (CONTINUED) Once EasyGlide is deployed, the table can be rotated and WARNING: Pinch Hazard moved around the exam room to accommodate cleaning Before and during downward movement, keep and positioning of other medical equipment needed for personnel and equipment clear of table to avoid exams.
- Page 29 Only use the receptacle to supply power to equipment intended to form part of the medical Improper cleaning products used on Brewer tables can electrical system. decrease the life of the table. Always follow Brewer’s Cleaning guidelines. You can view the latest guidelines at Preventative Maintenance brewercompany.com/resources/product-manuals/.
- Page 30 Figure 52. Tables with outlet and drawer warmer use a single 3A fuse 4. Replace fuse with Brewer 100777, 1A 250V fuse. 1. Unplug table from wall receptacle. 5. Push new fuse into cap. 2. Fuse is located at the back of the table near the power 6.
- Page 31 Access High-Low Exam Table ACCESSORIES Refer to the Brewer website (www.brewercompany.com) for a list of current accessories. POWER CORD OPTIONS NOTICE This table must be used with a Brewer provided power cord. Failure to do so will void the warranty of electrical components.
- Page 32 Exam Table WARRANTY For Brewer Warranty Information: Registering your Brewer product is easy. Simply go to brewercompany.com/warranty-registration, fill out the information fields and click send. By registering your product today, you are better safeguarding your investment in the future. Document 2102818 RevG...
Need help?
Do you have a question about the High-Low and is the answer not in the manual?
Questions and answers