Advertisement
- 1 PREFACE
- 2 FEATURES AND FUNCTIONS
- 3 UNPACKING AND CHECKING EQUIPMENTS
- 4 OPTIONAL ACCESSORIES
- 5 INSTALLATION OF ACCESSORIES
- 6 BATTERY CHARGING
- 7 BATTERY INFORMATION
- 8 PARTS, CONTROLS AND KEYS
- 9 "LCD" DISPLAY
- 10 BASIC OPERATION
- 11 SHORTCUT MENU OPERATION
- 12 SET MENU DESCRIPTION
- 13 TECHNICAL SPECIFICATION
- 14 TROUBLESHOOTING
- 15 SAFETY INFORMATION
- 16 Documents / Resources
PREFACE
Thank you for purchasing Amateur Portable Radio. We always offer high performance, stable wireless two way radio. Factory developed IP57 water proof two way radio, especially for maritime, shipping users. Please read this manual carefully before use. The information presented herein will help you to derive maximum performance from your radio.
FEATURES AND FUNCTIONS
This is a IP57 dust and waterproof resisting two way radio. After 30 minutes into one meter underwater, the radio still works very well. So that its ensure the product reliability in wet environments.
Drop resistance, Rolling resistance
Chinese/English Switchover
- Dual-band handheld transceiver, with display function menu on the display "LCD".
Working Frequency: VHFI 30-176MHz & UHF400-520MHz - High power/ mid / low (5 W/3W/1 W) selectable
- Up to 128 memory channels.
- Cross band reception/transmission
- A variety of display channel number, frequency, channel frequency, channel name, etc.
- CTCSS & DCS
- Tone end of transmission
- Function "VOX" (voice operated transmission).
- DTMF emergency alarm
- ANI code
- Selectable Frequency step 2.5/5/6.25/1 0/12.5/20/25150 kHz
- Frequency reverse
- Battery saving function "SAVE".
- Emergency SOS sound and light alarm
- Programmable by PC.
- Broadband (Wide 25KHz)/Narrowband (Narrow 12.5KHz), selectable.
- Commercial FM radio receiver (65 MHz ~ 108 MHz).
- Display illumination and programmable keyboard.
- Built-in LED flashlight
UNPACKING AND CHECKING EQUIPMENTS
Carefully unpack the transceiver. We recommend that you identify the items listed in the following before discarding the packing material. If any items are missing or have been damaged during shipment, please contact your dealers immediately.

Note:
Items included in the package, may differ from those listed in the table above depending on the country of purchase. For more information, consult your dealer or vendor.
OPTIONAL ACCESSORIES

Note:
Consult the dealer or retailer for information about options available.
INSTALLATION OF ACCESSORIES
- INSTALLING THE ANTENNA:
Install the antenna as shown in the figure below and turn it clockwise until it stops.
![]()
Note:- When installing the antenna, don't rotate it by its top, holding it by its base and turn.
- If you use an external antenna make sure the "SWR" is about 1.5:1 or less, to avoid damage to the transceiver's final transistors.
- Do not hold the antenna with your hand or wrap the outside of it to avoid bad operation of the transceiver.
- Never transmit without an antenna.
- INSTALLING THE BELT CLIP:
If necessary, install the belt clip at the rear of the battery compartment cover as shown in the figure below.
![]()
Note:- Do not use any kind of glue to fix the screw on the belt clip.
The solvents Glue may damage the battery casing.
- Do not use any kind of glue to fix the screw on the belt clip.
- MICRO-HEADSET INSTALLATION OF EXTERNAL:
Plug the external micro-headset connector into the jack of "SR & MIC"of the transceiver as shown in the figure below.

- BATTERY INSTALLATION:
When attaching the battery, make sure the battery is in parallel and in good contact with the aluminum chassis. The battery bottom is about 1 to 2 centimeters below the bottom of the radio's body.
Align the battery with the guide rails on the aluminum chassis and slide it upwards until a "click" is heard.
The battery latch at the bottom locks the battery.

Turn off the radio before removing the battery.
Slide the battery latch, at the bottom of the radio's body, in the direction indicated by the arrow.
Slide down the battery for about I to 2 centimeters, and then remove the battery from the radio's body.


BATTERY CHARGING
Use only the charger specified by the manufacturer. The charger's LED indicates the charging progress.
| CHARGING STATUS | LED INDICATION |
| Standby (no-load) | Red LED flashes, while Green LED glows |
| Charging | Red LED solidly glows |
| Fully Charged | Green LED solidly glows |
| Error | Red LED flashes, while Green LED glows |
Please follow these steps:

- Plug the power cord into the adapter.
- Plug the AC connector of the adapter into the AC outlet socket.
- Plug the DC connector of the adapter into the DC socket on the back of the charger.
- Place the radio with the battery attached, or the battery alone in the charger.
- Make sure the battery is in good contact with the charging terminals. The charging process initiates when the red LED lights.
- The green LED lights about 4 hours later indicating the battery is fully charged. Then remove the radio with the battery attached or the battery alone from the charger.
BATTERY INFORMATION
- INITIAL USE
New batteries are shipped uncharged fully from the factory. Charge a new battery for 5 hours before initial use, The maximum battery capacity and performance is achieved after three full charge/discharge cycles. If you notice the battery power runs low, please recharge the battery.
![]()
- To reduce the risk of injury, charge only the battery specified by the manufacturer. Other batteries may burst, causing bodily injury and property damage.
- To avoid risk of personal injury, do not dispose of batteries in a fire!
- Dispose of batteries according to local regulations (e.g. recycling).
Do not dispose as household waste. - Never attempt to disassemble the battery.
- BATTERY TIPS:
- When charging your battery, keep it at a temperature among 5°C - 40°C. Temperature out of the limit may cause battery leakage or damage.
- When charging a battery attached to a radio, turn the radio off to ensure a full charge.
- Do not cut off the power supply or remove the battery when charging a battery.
![]()
- Never charge a battery that is wet. Please dry it with a soft cloth prior to charge.
- The battery will eventually wear out. When the operating time (talk-time and standby time) is noticeably shorter than normal performance, it is time to buy a new battery.
- PROLONG BATTERY LIFE:
- Battery performance will be greatly decreased at a temperature below A spare battery is necessary in cold weather. The cold battery unable to work in this situation may work under room temperature, so keep it for later use.
- The dust on the battery contact may cause the battery cannot work or charge. Please use a clean dry cloth to Wipe it before attaching the battery to the radio.
- BATTERY STORAGE:
- Fully charge a battery before you store it for a long time, to avoid battery damage due to overdischarge.
- Recharge a battery after several months' storage (Li-ion batteries: 6 months), to avoid battery capacity reduction due to over-discharge.
- Store your battery in a cool and dry place under room temperature, to reduce self-discharge.
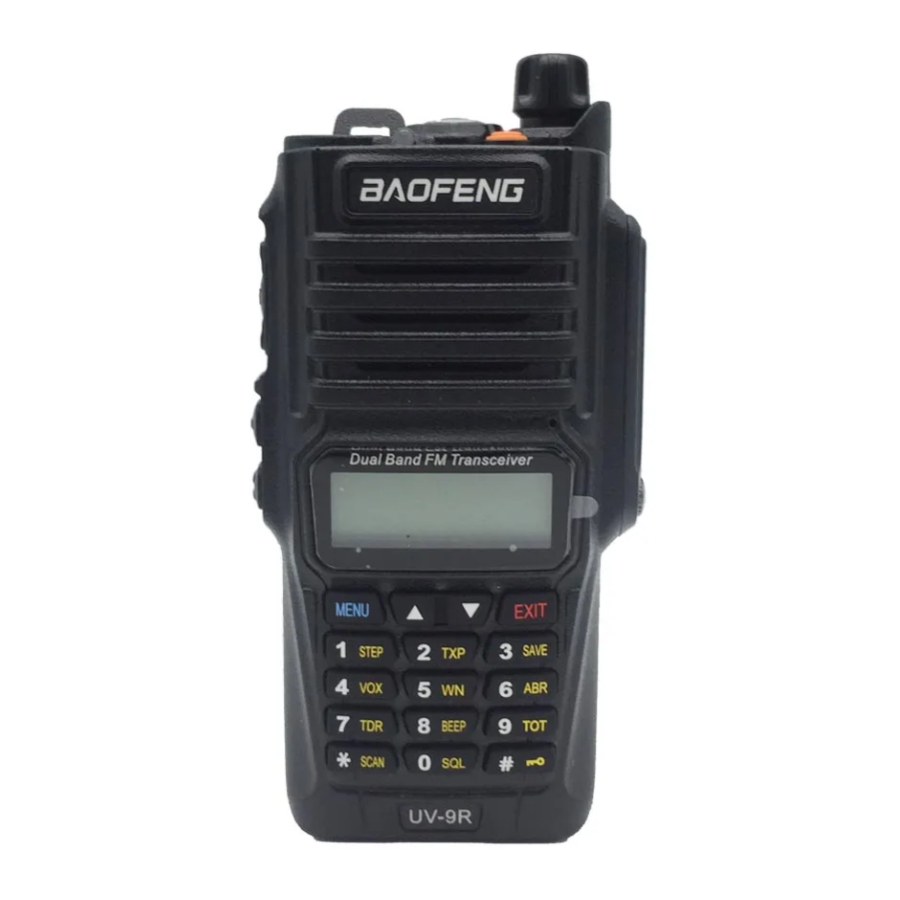
PARTS, CONTROLS AND KEYS
RADIO OVERVIEW

- Antenna
- LCD
- Keypad
- Knob (ON/OFF, volume)
- Flashlight
- Speaker
- Microphone
- Battery latch
- PTT
- SK-side key 1/F
- SK-side key 2/M
- Strap buckle
- Accessory jack
- LED indicator
COMMAND/KEY DEFINITION
Power On:
Rotate PWR/VOL Switch clockwise, you will hear a sound "Beep", report the present channel, the transceiver is ready for working, meanwhile rotate PWR/VOL Switch to adjust the volume
[SOS]Emergency Alarm:
Long press[SOS] to open the alarm function, at this moment, the green light, red light, hand lamp flashes shin at the same time, Press this button again to release the alarm.
[PTT]:
Press and hold PTT button, then talk to the microphone, Release PTT to receive.
SK-SIDE KEY1/[F]:
Press the [F] button, to activate the FM Radio on; Press it again to deactivate the FM Radio.![]()
SK-SIDE KEY2/[M]:
Press the [M] button, to turn on the flashlight; Press it again to turn off. Press and hold on the [M] button, to monitor the signal.
FUNCTION KEYPAD:
[MENU] key:
To enter the menu of the radio and confirm the setting.
Press and hold [MENU] button, then power on, to switch the frequency mode and channel mode.
 key:
key:
Press and hold [ ] or [
 ] key for frequency up or down fast.
Press [] or [] key, the scanning will be opposite.
[EXIT/AB] key:
To cancel/clear or exit.
While standby, press [EXIT/AB] key to switch between Channel A and Channel B.
Under FM radio mode, press [EXIT/AB] key to switch the FM radio band 65-75MHz/76-108MHz.
NUMERIC KEYPAD:
Used to enter information for programming the radio's lists and the non-standard CTCSS
Under transmission mode, press the numeric key to send the signal code( the code should be set by PC software).

"LCD" DISPLAY
The display icons appear when certain operations or specific features are activated.![]()

| Icon | Description |
| CT | 'CTCSS' activated. |
| DCS | 'DCS' activated. |
| + | Frequency Shift + |
| - | Frequency Shift - |
| + - | Frequency offset direction for accessing repeaters. |
| S | Dual Watch/Dual Reception functions activated. |
| VOX | Function 'VOX' enabled. |
| R | Reverse function activated. |
| N | Wide Band selected. |
 | Battery Level indicator |
 | Keypad lock function activated. |
| L | Low transmit power. |
 | Operation frequency. |
 | Signal Strength Level. |
 | Operating channel. |
| 75 25 | Operating frequency. |
BASIC OPERATION
- RADIO ON-OFF/VOLUME CONTROL:
Make sure the antenna and battery are installed correctly and the battery charged.
Rotate the knob clockwise to turn the radio on, and rotate the knob fully counter-clockwise until a 'click' is heard to turn the radio off. Turn the knob clockwise to increase the volume, or counterclockwise to decrease the volume
![]()
The radio will not sound 'click' if you turn off the voice prompt function.
The boot mode display can be set from Function 38 - Transmit and Receive:
Choose the correct channel No, or enter the frequency which you need. Then press and hold PTT button, the radio is transmitting now, then talk to the microphone, your sound will be transmitted. Release PTT to receive,
When you press PTT, the LCD shows L, it means the radio is in low power
When you press PTT, the LCD shows M, it means the radio is in Mid power
When you press PTT, the LCD shows H, it means the radio is in High power
Press [PTT] and then press [SOS] to transmit 1750HZ
Press [PTT] then press DTMF Numbers to transmit DTMF - FUNCTION "VOX" (VOICE OPERATED TRANSMISSION):
This function is not necessary to push the [PTT] on the transceiver for a transmission. Transmission is activated automatically by detecting the radio voice. When finish speaking, the transmission automatically terminated and the transceiver will automatically receive signal. Be sure to adjust the VOX Gain level to an appropriate sensitivity to allow smooth transmission.
Operate:- Press[MENU] to menu setting
- 2Press [
![]() ] or [
] or [![]() ] to Function 4, the screen shows
] to Function 4, the screen shows
![]()
- Press [MENU], sound "VOR" then press [
![]() ] or [
] or [![]() ] to choose the bevel 1-10, 10 is the most sensitive level
] to choose the bevel 1-10, 10 is the most sensitive level - Press[MENU] to confirm the setting. The LCD screen shows VOX after this function was setting, for example,
![]()
- You can choose the VOX level to OFF, and press[MENU] then you will off this function
- AUTOLK (keypad Locked Automatically)
The transceiver has two options: auto lock and manual lock![]()
OFF: Turn off auto lock
ON: When you set autolock the keyboard press for more than 2 seconds
Operate:
In standby, press [menu] + number key 24, then the screen will display "AUTOLK"
Press [MENU] enter, then press [up] and [down] to select keyboard lock ON or OFF
Press [MENU] to confirm, then press [EXIT] to return to standby. - VFO/Channel mode
Turn off the radio, then press [MENU] and rotate the sound knob to turn on the radio, the screen shows
![]()
or
![]()
the lower right corner of the LCD displays the channel number, which means its in the channel mode. In this way, you can also change the channel mode to VFO
SELECTING A FREQUENCY OR CHANNEL:
Press the key [![]() ] or [
] or [![]() ] to select the desired frequency/channel you want. The display shows the frequency/channel selected.
] to select the desired frequency/channel you want. The display shows the frequency/channel selected.
Press and hold down the key [![]() ] or [
] or [![]() ] for frequency up or down fast.
] for frequency up or down fast.
When the radio is on VFO mode, the frequency can be input by the keypad directly.
Note:- You can not select a channel without previously stored.
- TDR (Dual Watch/ Dual Reception)
This feature allows you to operate between frequency A and frequency B. Periodically, the transceiver checks whether a signal is received on another frequency that we have scheduled. If you receive a signal, the unit will remain in the frequency until the received signal disappears.
In standby, press[MENU] + keyboard [7TDR] and then screen will display 'TDR'. Press [MENU] enter, then press [UP] or [DOWN] to select 'TDR' OFF or ON. Press [MENU] to confirm, then press [EXIT] to return to standby. - DEL-CH (Delete Channel)
In standby, press [MENU] + [Number key 28] and then screen will display 'DEL-CH'
Press [MENU] enter, press [UP] or [DOWN] to select the channel you want to delete.
Press [MENU] to confirm, then press [EXIT] to return to standby.
The transceiver has 128 memory channels from 000 to 127. Operate invalid when you into channel without DH- display, it means this channel not parameter. - MEM-CH (Stored In Memory Channel)
When transceiver works in frequency mode or in standby, input the frequency and any kind of parameter you want to store.
In standby, press [MENU] +[Number key 27] and then screen will display 'MEM-CH', then press [MENU] enter, press [UP] or [DOWN] to select the desired channel order. Press [MENU] to confirm then press [EXIT] to return to standby.
A complete memory channel includes RX frequency, TX frequency, CTCSS, DCS, RF Power, Bandwidth, PTT-ID, BCL, ANI, Scan add to, Channel Name, etc. Except for the setting of Scan add to and Channel Name, other settings could be finished by keypad under VFO mode.
Example: We want programming all the data into CHI 06t please do as following:RX Frequency 440.625MHz TX Frequency 430.625MHz RX CTCSS 100.0Hz TX DCS 250.3Hz RF Power High Bandwidth Wide PTT-ID OFF - We have to check whether there are any data in CH106 or not. Come to MENU 28, if there is a 'CH' before '106', that means there are data. So please delete it and you will find there is not a 'CH' before '106' or else you can't have new data in this channel.
- Press and hold [MENU] key, then power on, come to VFO mode. Press [EXIT/AB] key to select frequency A (UP).
- Enter 440,625MHz
- Now through the MENU, you can set other parameters. CTCSS, DCS, RF Power, Bandwidth, etc.
- After you finish all the other settings, press [MENU] key, then come to MENU 27, press [MENU] key two times, you will know all the data have been stored into CH106, however now only RX frequency was stored. At the same time, you press [MENU] key another two times.
Note:- If you want the TX frequency 430.625 stored into CH106, you should do the same steps after you store the RX frequency into CH106.
- CTCSS/DCS SCANNING
Before setting the CTCSS/DCS scanning, you should have a RX frequency and cancel the Dual Standby function, ensure the radio is working under VFO mode.
Come to MENU 11, press [MENU] one time, then press [*/SCAN] key, at the same time, you should press the PTT of another radio, then you will see the CTCSS scanning automatically, When the scanning stops, that means you find the same CTCSS as that of another radio, now press [MENU] to store the CTCSS. - REPEATER TAIL TONE
We all know that repeaters receive on one frequency and simultaneously retransmit that same information on a different frequency. We hear the courtesy tone almost every time we use the repeater, It's that innocuous beep that lets us know that the repeater is alive and, most importantly, that it has heard us. The MENU 35, 36,37 are very helpful settings while your radio work through repeater. MENU 35 and MENU 36 better be set OFF. The parameter of MENU 37 is from 1-10, better set 5.
Sound-Light Alarm/ Cancel the alarm
There are 3 alarm modes in this radio, Alarm, Sending alarm code, sending the background sound.
Press [SOS] alarm function, the radio will sound the alarm sound, the light flights also.
Press [SOS] again to stop the alarm.
When the radio is in emergency alarm, there are only [PTT] and SOS key workable. Press [PTT] to transmit, when the radio receive the transmit the alarm will stop also. - CTCSS/DCS:
In some cases only want to establish communications in a closed user group at a particular frequency or channel, for it will use "CTCSS" or code "'DCS" for reception.
The "squelch" opens only when receiving a frequency with "CTCSS'" or codes "DCS" same as the programmed in your transceiver. If codes of the received signal differs from those programmed![]() in your transceiver, the "squelch" will not open and the received signal can be heard.
in your transceiver, the "squelch" will not open and the received signal can be heard.
Note:- The use of "CTCSS" or "DCS" in a communication, does not guarantee complete confidentiality communication.


CTCSS TABLE
| № | Tone (Hz) |
| 1 | 67.0 |
| 2 | 69.3 |
| 3 | 71.9 |
| 4 | 74.4 |
| 5 | 77.0 |
| 6 | 79.7 |
| 7 | 82.5 |
| 8 | 85.4 |
| 9 | 88.5 |
| 10 | 91.5 |
| 11 | 94.8 |
| 12 | 97.4 |
| 13 | 100.0 |
| 14 | 103.5 |
| 15 | 107.2 |
| 16 | 110.9 |
| 17 | 114.8 |
| 18 | 118.8 |
| 19 | 123.0 |
| 20 | 127.3 |
| 21 | 131.8 |
| 22 | 136.5 |
| 23 | 141.3 |
| 24 | 146.2 |
| 25 | 151.4 |
| 26 | 156.7 |
| 27 | 159.8 |
| 28 | 162.2 |
| 29 | 165.5 |
| 30 | 167.9 |
| 31 | 171.3 |
| 32 | 173.8 |
| 33 | 177.3 |
| 34 | 179.9 |
| 35 | 183.5 |
| 36 | 186.2 |
| 37 | 189.9 |
| 38 | 192.8 |
| 39 | 196.6 |
| 40 | 199.5 |
| 41 | 203.5 |
| 42 | 206.5 |
| 43 | 210.7 |
| 44 | 218.1 |
| 45 | 225.7 |
| 46 | 229.1 |
| 47 | 233.6 |
| 48 | 241.8 |
| 49 | 250.3 |
| 50 | 254.1 |
DCS TABLE:
| № | Code |
| 1 | D023N |
| 2 | D025N |
| 3 | D026N |
| 4 | D031N |
| 5 | D032N |
| 6 | D036N |
| 7 | D043N |
| 8 | D047N |
| 9 | D051N |
| 10 | D053N |
| 11 | D054N |
| 12 | D065N |
| 13 | D071N |
| 14 | D072N |
| 15 | D073N |
| 16 | D074N |
| 17 | D114N |
| 18 | D115N |
| 19 | D116N |
| 20 | D122N |
| 21 | D125N |
| 22 | D131N |
| 23 | D132N |
| 24 | D134N |
| 25 | D143N |
| 26 | D145N |
| 27 | D152N |
| 28 | D155N |
| 29 | D156N |
| 30 | D162N |
| 31 | D165N |
| 32 | D172N |
| 33 | D174N |
| 34 | D205N |
| 35 | D212N |
| 36 | D223N |
| 37 | D225N |
| 38 | D226N |
| 39 | D243N |
| 40 | D244N |
| 41 | D245N |
| 42 | D246N |
| 43 | D251N |
| 44 | D252N |
| 45 | D255N |
| 46 | D261N |
| 47 | D263N |
| 48 | D265N |
| 49 | D266N |
| 50 | D271N |
| 51 | D274N |
| 52 | D306N |
| 53 | D31iN |
| 54 | D315N |
| 55 | D325N |
| 56 | D331N |
| 57 | D332N |
| 58 | D343N |
| 59 | D346N |
| 60 | D351N |
| 61 | D356N |
| 62 | D364N |
| 63 | D365N |
| 64 | D371N |
| 65 | D411N |
| 66 | D412N |
| 67 | D413N |
| 68 | D423N |
| 69 | D431N |
| 70 | D432N |
| 71 | D445N |
| 72 | D446N |
| 73 | D452N |
| 74 | D454N |
| 75 | D455N |
| 76 | D462N |
| 77 | D464N |
| 78 | D465N |
| 79 | D466N |
| 80 | D503N |
| 81 | D506N |
| 82 | D516N |
| 83 | D523N |
| 84 | D526N |
| 85 | D532N |
| 86 | D546N |
| 87 | D565N |
| 88 | D606N |
| 89 | D612N |
| 90 | D624N |
| 91 | D627N |
| 92 | D631N |
| 93 | D632N |
| 94 | D645N |
| 95 | D654N |
| 96 | D662N |
| 97 | D664N |
| 98 | D703N |
| 99 | D712N |
| 100 | D723N |
| 101 | D731N |
| 102 | D732N |
| 103 | D734N |
| 104 | D743N |
| 105 | D754N |
SHORTCUT MENU OPERATION
- Press the key MENU, then press the key [
![]() ] or [
] or [![]() ] to select the desired menu.
] to select the desired menu. - Press the key MENU again, come to the parameter setting.
![]()
- Press the key [
![]() ] or [
] or [![]() ] to select the desired parameter.
] to select the desired parameter. - Press the key MENU to confirm and save, press the key EXIT to cancel setting or clear the input.
![]()

Note:
- Under channel mode, the following menu settings are invalid: CTCSS, DCS, W/N, PTT-ID, BCL, SCAN ADD TO,S-CODE, CHANNEL NAME. Only the H/L power could be changed by pressing
![]() .
.
 .
.SET MENU DESCRIPTION


Reset (Restore To Default Setting)
The transceiver has a menu which resets VFO and ALL message, When you use RESET VFO, all parameter will be return to factory default. When you use RESET ALL, all transceivers and channel parameter will be return to factory default.
In standby, press [MENU]+[Number Key 40], and then screen will display "RESET". Press [MENU] enter, press [UP] or [DOWN] to select the desired work mode VFO or ALL. Press [MENU] to confirm, then press [EXIT] to return to standby.
COPYING
The following step to copy Radio A to Radio B.
- Connecting the two radios with special data cable.
- Turn on the radio B on
- Press [MONI] at the meantime, turn on the radio A, the screen showing
![]() , when the copy finished, Radio B will power off auto and power on auto.
, when the copy finished, Radio B will power off auto and power on auto.
Repeat the above 2 and 3 steps to clone more radios, if you can not clone successful, please turn off both A and B radio, and make sure they were connected correctly with clone cable
 , when the copy finished, Radio B will power off auto and power on auto.
TECHNICAL SPECIFICATION
GENERAL
| Frequency range: | 65MHz-108MHz (OnIy commercial FM radio reception). VHF: 136MHz-174MHz (Rx/Tx). UHF: 400MHz-520MHz (Rx/Tx), |
| Memory channels: | Up to 128 channels |
| Frequency stability: | 2,5ppm. |
| Frequency step: | 2.5kHz/5kHz/6.25kHz/10kHz/12.5kHz/20kHz/25kHz. |
| Antenna impedance: | 50 Ω. |
| Operating temperature: | -20°C to +60°C. |
| Supply voltage: | Rechargeable Lithium-lon mAh 7.4V/1800. |
| Consumption in reception: | 380mA |
| Consumption in transmission: | ≤ 1.4 A |
| Mode of operation: | Simplex or semi-duplex. |
| Duty cycle: | 03/03/54 min. (Rx/Tx/Standby). |
| Dimensions: | 65mmx41.5mmxI 33.8mm |
| Weight: | 279g (approximate). |
TRANSMlTTER
| RF power: | 5W/1W. |
| Type of modulation: | FM. |
| Emission class: | 16KΦF3E/11ΦF3E (W/N) |
| Maximum deviation: | ≤ ±5 kHz/≤ ±2.5 kHz (WIN). |
| Spurious emissions: | <-60 dB. |
RECEIVER
| Receiver sensitivity: | 0.2 µV (at 12 dB SINAD). |
| Intermodulation: | 60 dB. |
| Audio output: | 1W |
| Spurious Radiation: | ≥ 65dB |
Note:
- All specifications shown are subject to change without notice.
TROUBLESHOOTING
| Problem | Possible cause / solution |
| The radio does not start. | The battery is low, replace the battery with a charged battery or proceed to the battery. The battery is not installed correctly, remove the battery and reattach it. |
| The battery runs down quickly, | The battery life has come to an end, replace the battery with a new one. The battery is fully charged, make sure the battery is made in full. |
| The receiving indicator LED lights but do not hear the speaker. | Make sure the volume setting is too low. Make sure the undertones "CTCSS" or code "DCS" are the same as those programmed in the transceiver of the other members of your group. |
| When transmitting, the other members of his group do not receive the communication. | Make sure the undertones "CTCSS" or code "DCS" programmed in your transceiver are the same as those programmed in the transceiver of the other members of your group. Your partner or you, are too far. You or your partner are in a bad area of RF signal propagation. |
| In "standby" mode, the transceiver transmits without pressing the "PTT". | Check the level adjustment function "VOX" is not set too sensitive. |
| Receive communications from other user groups while communicating with your group. | Change frequency or channel. Change the undertones "CTCSS" or code "DCS" in your group. |
| Communication with other members of your group is poor or low quality. | You or your partner is too far away or in an area of poor radio signal propagation, such as inside a tunnel, inside an underground car park, in a mountainous area, including large metal structures, etc.. |
| Once these checks, if you still have problems with the transceiver, check with your distributor, dealer or service center. | |
SAFETY INFORMATION
The following safety precautions shall always be observed during operation, service and repair of this equipment.
- This equipment shall be serviced by qualified technicians only.
- Do not modify the radio for any reason.
- Use only supplied or approved batteries and chargers.
- Do not use any portable radio that has a damaged antenna. If a damaged antenna comes into contact with your skin, a minor burn can result,
- Turn off your radio prior to entering any area with explosive and flammable materials,
- Do not charge your battery in a location with explosive and flammable materials.
- To avoid electromagnetic interference and/or compatibility conflicts, turn off your radio in any area where posted notices instruct you to do so.
- Turn off your radio before boarding an aircraft. Any use of a radio must be in accordance with airline regulations or crew instructions.
- Turn off your radio before entering a blasting area.
- For vehicles with an air bag, do not place a radio in the area over an air bag or in the air bag deployment area.
- Do not expose the radio to direct sunlight over a long time, nor place it close to heating source.
- When transmitting with a portable radio, hold the radio in a vertical position with the microphone 3 to 4 centimeters away from your lips. Keep antenna at least 2.5 centimeters away from your body when transmitting.

If you wear a radio on your body, ensure the radio and its antenna are at least 2.5 centimeters away from your body when transmitting.
Documents / ResourcesDownload manual
Here you can download full pdf version of manual, it may contain additional safety instructions, warranty information, FCC rules, etc.
Advertisement


Need help?
Do you have a question about the UV-9R and is the answer not in the manual?
Questions and answers