Table of Contents
Advertisement
Advertisement
Table of Contents

Related Manuals for Baofeng UV-5G PLUS


Summary of Contents for Baofeng UV-5G PLUS
- Page 1 UV-5G PLUS...
- Page 3 PREFACE Thank you for purchasing this product. which is a dual band/dual display/dual watch. This easy-to-use radio will deliver you secure, instant and reliable communications at peak efficiency. Please read this manual carefully before use. The information presented herein will help you to derive maximum performance from your radio. WARNING European Users should note that operation of this unit in Transmit mode requires the operator to have a valid Amateur Radio License from their respective Countries Amateur Radio Licensing Authority for the...
-
Page 4: Table Of Contents
Table of Contents Chapter1. Getting Started 5.2 Adjusting the volume 1.1 Regulations and Safety Warnings 5.3 Making a call 1.2 Main features 5.4 Channel selection 1.3 Content of the packaging 5.5 Frequency (VFO) mode Chapter2. Charging the Battery 5.6 Channel (MR) mode 2.1 Charging the Battery Pack Chapter6. -
Page 5: Chapter1. Getting Started
Chapter1. Getting Started 1.1 Regulations and Safety Warnings EU Regulatory Conformance As certified by the qualified laboratory, the product is in compliance with the essential requirements and other relevant provisions of the Directive 1999/5/EC (2014/53/EU). All applicable EU regulations are regarded (2006/66/EC, 2011/65/EU, 2012/19/EU). - Page 6 deux conditions suivantes : (1) cet appareil ne doit pas causer d’interférences nuisibles et (2), il doit pouvoir accepter les interférences, incluant celles pouvant nuire à son fonctionnement normal. Tout changement ou modification non approuvé expressément par la partie responsable pourrait annuler le droit à l’utilisateur de faire fonctionner cet équipement.
- Page 7 To protect you against any property loss, bodily injury or even death, be sure to observe the following safety instructions: 1. Do not operate the product in a location containing fuels, chemicals, explosive atmospheres and other flammable or explosive materials. In such location, only an approved Ex-protection model is allowed for use, but any attempt to assemble or disassemble it is strictly prohibited.
- Page 8 6. Overcharge shall always be prohibited for it may shorten the life of your battery. Maintenance Instructions To help your battery work normally or prolong its life, be sure to observe the following instructions: 1. Accumulated dust on charging connector may affect normal charging. Please use a clean and dry cloth to wipe it on a regular basis.
-
Page 9: Main Features
• Keep the Radio dry. Rainwater or damp will corrode electronic circuits. • If it appears that the Radio diffuses peculiar smell or smoke, please shut off its power immediately and take off the charger or battery from the radio. •... -
Page 10: Content Of The Packaging
1.3 Content of the packaging • 1 Radio • 1 Li-Ion battery pack • 1 Antenna • 1 Belt clip If any item is missing, please verify with your dealer. Chapter2. Charging the Battery 2.1 Charging the Battery Pack The Li-ion battery pack is not charged at the factory; please charge it before use. Charging the battery pack for the first time after purchase or extended storage (more than 2 months) may not bring the battery pack to its normal maximum operating capacity. -
Page 11: How To Charge
WARNING When keys, ornamental chain or other electric metals contact the battery terminal, the battery may become damage or injure a human. If the battery terminals are short circuited it will generate a lot of heat. Take care when carrying and using the battery. -
Page 12: Using The Type-C Usb Charger
a. If the battery needs to be stored, keep it in status of 80% discharged. b. It should be kept in low temperature and dry environment. c. Keep it away from hot places and direct sunlight. » Do not short circuit the battery terminals. »... -
Page 13: Installing The Belt Clip
3.2 Installing the belt clip 1). At the back of the radio there are two parallel screws mounted above the battery, remove these and thread them through the holes on the belt clip as you screw them back into the radio body. 2). -
Page 14: Chapter4. Radio Overview
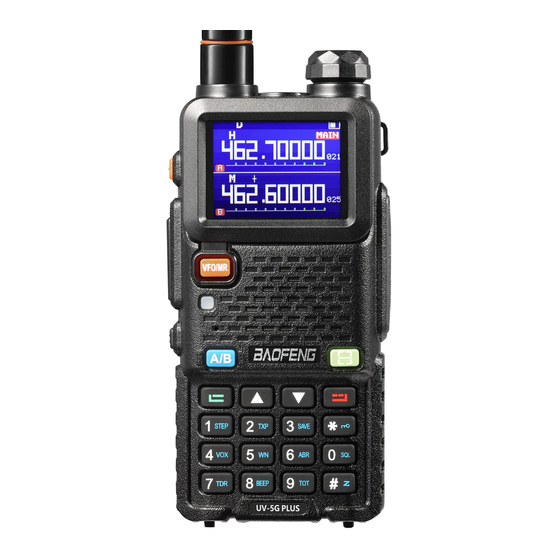
Chapter4. Radio Overview 4.1 Buttons and controls of the radio 1. Power/Volume knob 2.SK1- Broadcast FM and Alarm key 3. PTT key 4. VFO/MR mode key 5. Status LED 6. SK2-Flashlight and Monitor key 7. A / B select key Key (MENU) 9. - Page 15 4.2 LCD Display Icon Description RSSI Squelch Open/ Close Indicator Transmit power level indicator, According to Power (High/Low) Make sure you can hear the DTMF side tone from the radio speaker, set to DT-ST, ANI-ST, DT+ANI. DCS enabled CTCSS enabled Enables access of repeaters in VFO/Frequency Mode.
-
Page 16: Status Indications
4.3 Status Indications The status LED has a very simple and traditional design. LED Indicator Radio Status Constant Red Transmitting. Constant Green Receiving. 4.4 Main keypad controls • Side key 1 (Broadcast FM and Alarm) Press [SK1] key momentarily to start the broadcast FM receiver. Another momentary press turns the broadcast FM receiver off. - Page 17 When listening to broadcast FM, the key switches between 65-75 MHz and 76-108 MHz bands. • It is used for activating the MENU, choose each MENU selection and confirm the parameter. • Press it for more than 2 seconds, the channel and frequency will move upwards rapidly; in SCAN mode, press this control to move the scanning upwards.
-
Page 18: Chapter5. Basic Operations
Chapter5. Basic Operations 5.1 Power on the radio • Turning the unit on To turn the unit on, simply rotate the Volume/Power knob clockwise until you hear a "click". If your radio powers on correctly there should be an audible double beep after about one second and the display will show a message or flash the LCD depending on settings for about one second. - Page 19 5.5 Frequency (VFO) mode In Frequency (VFO) mode you can navigate up and down the band by using the keys. Each press will increment or decrement your frequency according to the frequency step you've set your transceiver to. You can also input frequencies directly on your numeric keypad with kilohertz accuracy. The following example assumes the use of a 12.5 kHz frequency step.
-
Page 20: Making A Call
5.7 Making a call NOTE: Press the [A/B] key to switch the main channel to the other channel if there are 2 channels shown on the display. In standby mode, press [VFO/MR] key to switch between frequency (VFO) mode and channel (MR) mode. •... - Page 21 5.10 FM Radio (FM) The frequency ranges to listen to the radio is 65-108MHz. When listening to broadcast FM, press key switches between 65-75 MHz and 76-108 MHz band. (1) In frequency or channel mode, Press [SK1] key to turn on the radio. (2) Select the desired radio frequency with the keys or input the frequency.
- Page 22 5.14 TX Repeaters tone Press [PTT] + [SK2] key to send 1750Hz repeaters tone. This function is useful for communications through repeaters. If you have the keypad lock enabled on your radio, you can still send a 1750Hz tone the regular way without having to unlock your radio.
-
Page 23: Chapter6. Advanced Features
Weather channel frequencies and names Channel Number RX Frequency MHz Channel Number RX Frequency MHz 162.550 162.500 162.400 162.525 162.475 161.650 162.425 161.775 162.450 163.275 NOTE: Weather Channels Wx 1 Thru 10, Receive-only channels for NOAA and Canadian weather broadcasts. You cannot transmit on these channels. - Page 24 6.1.2 Using short-cuts As you may have noticed if you looked at Appendix B, Menu definitions, every menu item has a numerical value associated with it. These numbers can be used for direct access of any given menu item. The menu is also organized in such a way that the ten most common functions are on top. The parameters also have a number associated with them, see Appendix B, Menu definitions for details.
-
Page 25: Frequency Scanning
6.2.1 Scanning modes The scanner is configurable to one of three ways of operation: Time, carrier or search, each of which is explained in further details in their respective section below. Procedure 5.1. Setting scanner mode 1. Press the key to enter the menu. 2. -
Page 26: Channel Scanning
6.2.3 Channel scanning This function can scan the channels. a. In channels mode, press key for more than 2 seconds. The radio will start scanning according to the channel you set. b. You can change the scanning direction with the keys. - Page 27 These two modes have different functions and are often confused. Frequency Mode (VFO): Used for a temporary frequency assignment, such as a test frequency or quick field programming if permitted. Channel Mode (MR): Used for selecting preprogrammed channels. Ex 1. Programming a Channel Repeater Offset with CTCSS Tone EXAMPLE New memory in Channel 10: RX = 432.55000 MHz TX = 437.55000 MHz (This is a (+ 5) Offset)
-
Page 28: Repeaters Programming
[3][1] [1] [0] Deletes Prior Data in channel (Ex. 10) [1][2] 123.0 Select desired TX encode tone (Ex 123 CTCSS) -->>Use to select Upper display e. Enter RX frequency (Ex. 43266250) [3][0] [1][0] Enter the desired channel (Ex 10) -->> Channel has been added g. - Page 29 again. Certain Amateur Radio repeaters (especially in Europe) use a 1750Hz tone burst to open up the repeater. To see how this is done with the radios, see the section called “1750Hz Tone-burst”. If you're still unable to make a connection, contact the person in charge of the radio system with your employer or your local amateur radio club, as the case may be.
- Page 30 Enabling or disabling Dual Watch mode 1. Press the key to enter the menu. 2. Enter 7 on the numeric keypad to get to Dual Watch. 3. Press key to select. 4. Use the UP and DOWN keys to enable or disable. 5.
- Page 31 6.8 DTMF DTMF is an in-band signaling method using dual sinusoidal signals for any given code. Originally developed for telephony systems, it has proved a very versatile tool in many other areas. In two-way radio systems, DTMF is most commonly used for automation systems and remote control. A common example would be in amateur radio repeaters where some repeaters are activated by sending out a DTMF sequence (usually a simple single-digit sequence).
- Page 32 6.9.2 Beep PROMPT (BEEP) - MENU 8 If you enable this function, every time a key is pressed, you will hear a Beep tone. In standby mode, press + 8. The screen will display “BEEP PROMPT”. Press to enter the function. Press the keys to turn ON/OFF the beep function.
- Page 33 To return to the standby mode press key. 6.9.7 Power On Message (POWER ON MSG) - MENU 40 With this Menu you can customize the welcome message that appears on the display when the radio is switched on. Choose amongst the following options: •...
- Page 34 The display will show “Sure to reset ”. Press again to confirm and the screen will display “Wait…”. Then, the transceiver will turn off and reboot again. Reset ALL In standby mode, press + 42. The screen displays “RESET”. Press to enter the function.
- Page 35 electromagnetic interference). interference. VOX may be turned on or the headset is not installed in Turn off the VOX function. Check that the The radio keeps transmitting. place headphones are in place. NOTE: If the above solutions cannot fix your problems, or you may have some other queries, please contact your dealer for more technical support.
- Page 36 ABR - Display ON [0] | 1 | 2 | 3 | 4 | 5 | 6 | 7 | 8 | 9 | 10 Time-out for the LCD backlight. (seconds) Illumination Time Monitor [A] and [B] at the same time. The display TDR - Dual Watch, OFF [0] | ON [1] with the most recent activity ([A] or [B]) becomes...
- Page 37 Save the scanned CTCSS/DCS in VFO mode. ALL: Save to R-CDCSS and T-CDCSS • CDCSS SAVE MODE ALL[0] RX[1]|TX[2] TX: Save to T-CDCSS only • RX: Save to R-CDCSS only • VOICE OFF [0] | ON [1] Allows audible voice confirmation of a key press - Voice Prompt Set the language type of menu and prompt voice.
- Page 38 the beginning and ending PTT-LT 0[0] 100[1] 200[2] 400[3] - Signal code sending PTT-ID Delay (milliseconds) 600[4] 800[5] 1000[6] delay MDF-A CH [0]: Displays the channel number • [A] MR/Channel Mode Display Format - Channel Mode A NAME [1]: Displays the channel name. •...
- Page 39 • followed by the ANI code over-the-air followed by the ANI code over-the-air This function is used eliminate squelch tail noise between BaoFeng handhelds that are communicating directly (no repeater). - Squelch Tail OFF [0] | ON [1] Reception of a 55 Hz or 134.4 Hz tone burst...
- Page 40 VOICEPRI - Frequency Activate the frequency hopping function to OFF [0] | ON [1] hopping system prevent interference from outside the group RESET Resets the radio to factory defaults, with some VFO [0] | ALL [1] - Restore defaults exceptions. Activate the radio power-on password.
- Page 41 Appendix C. - Technical Specifications General Frequency Range GMRS(RX & TX) 136-173.99 & 400-519.99MHz(Scanning RX) Operation Voltage DC 7.4 V ±10% Frequency Stability ±2.5ppm Operating Temperature to +50 Mode of Operation Simplex Antenna Impedance 50ohm Transmitter Part RF Output Power 5W(GMRS) FM Modulation 11K0F3E@12.5KHz...
- Page 42 Disclaimer The Company endeavors to achieve the accuracy and completeness of this manual, but no warranty of accuracy or reliability is given. All the specifications and designs are subject to change without notice due to continuous technological development. No part of this manual may be copied, modified, translated, or distributed in any manner without the prior written consent of the Company.
Need help?
Do you have a question about the UV-5G PLUS and is the answer not in the manual?
Questions and answers