Drayton MiStat P710R, T720R, T720M, T740R, T740M - RF Packs Programmable Thermostats Installation Manual
- User manual (2 pages) ,
- User manual (9 pages) ,
- Installation manual (2 pages)
Advertisement
- 1 What is a programmable room thermostat?
- 2 Step 1: Keys and Display / Zone Summary
- 3 Step 2: Home Screen
- 4 Step 3: Powersave
- 5 Step 4: Timer
- 6 Step 5: Prog. Timetable
- 7 Step 6: Period Settings
- 8 Step 7: Additional User Settings
- 9 Step 8: Changing the Batteries
- 10 Step 9: Receiver - Key & LED
- 11 Troubleshooting
- 12 Documents / Resources
What is a programmable room thermostat?
... an explanation for householders

A programmable room thermostat is both a programmer and a room thermostat. A programmer allows you to set 'On' and 'Off' time periods to suit your own lifestyle. A room thermostat works by sensing the air temperature, switching on the heating when the air temperature falls below the thermostat setting, and switching it off once this set temperature has been reached.
So, a programmable room thermostat lets you choose what times you want the heating to be on, and what temperature it should reach while it is on. It will allow you to select different temperatures in your home at different times of the day (and days of the week) to meet your particular needs.
Turning a programmable room thermostat to a higher setting will not make the room heat up any faster. How quickly the room heats up depends on the design of the heating system, for example, the size of boiler and radiators. Neither does the setting affect how quickly the room cools down.
Turning a programmable room thermostat to a lower setting will result in the room being controlled at a lower temperature, and saves energy. The way to set and use your programmable room thermostat is to fi nd the lowest temperature settings that you are comfortable with at the different times you have chosen, and then leave it alone to do its job.
The best way to do this is to set low temperatures first, say 18°C, and then turn them up by one degree each day until you are comfortable with the temperatures. You won't have to adjust the thermostat further. Any adjustments above these settings will waste energy and cost you more money.
If your heating system is a boiler with radiators, there will usually be only one programmable room thermostat to control the whole house. But you can have different temperatures in individual rooms by installing thermostatic radiator valves (TRVs) on individual radiators.
If you don't have TRVs, you should choose a temperature that is reasonable for the whole house. If you do have TRVs, you can choose a slightly higher setting to make sure that even the coldest room is comfortable, then prevent any overheating in other rooms by adjusting the TRVs.
The time on the programmer must be correct. Some types have to be adjusted in spring and autumn at the changes between Greenwich Mean Time and British Summer Time.
You may be able to temporarily adjust the heating programme, for example, 'Override', 'Advance' or 'Boost'. These are explained in the manufacturer's instructions.
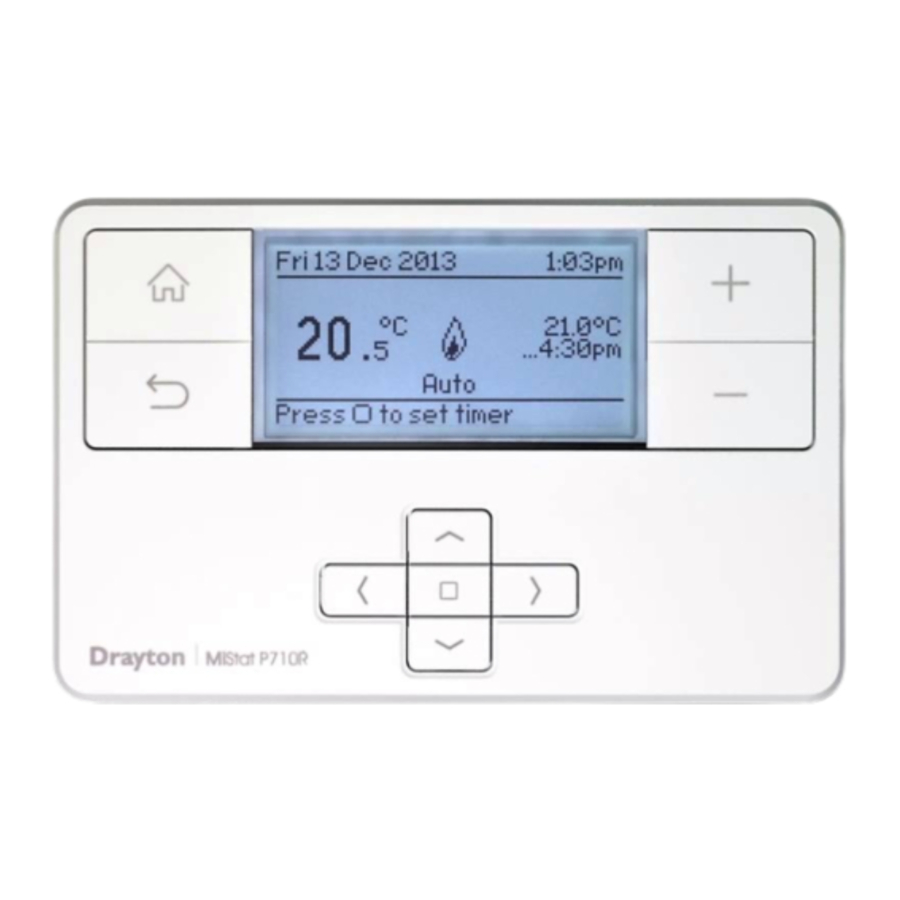
Step 1: Keys and Display / Zone Summary
RF Pack: MiStat P710R

- Date
- Call for heat indication. This flame will be visible when the room temperature is below the set temperature
![]() : Short flashes = RF transmission
: Short flashes = RF transmission
Continuous flashing = RF signal issue
![]() : Indicates a Service warning.
: Indicates a Service warning.
![]() : Indicates that holiday is enabled
: Indicates that holiday is enabled
![]() : Low battery warning; see Step 8.
: Low battery warning; see Step 8.- Time
- Current set temperature & duration, e.g. heating is programmed to be 21.0°C until 12:00 am
- + & - keys: Press to change the current temperature until the next programme event
- Current mode = Auto Options: see table in step 2.
- Select timer function. See Step 4.
Help text: To prompt for next action. It relates to the highlighted line. - Arrow keys: Press to move the highlight on screen, and to change field values
- Select key: Press to select highlighted options, and to open and save editor screens
![]()
This icon used throughout these instructions refers to this button - Current room temperature
- Back key: Press to return to the previous screen
- Home key: Press to go back to the home screen at any time and to toggle between zone summary & home screens


Step 2: Home Screen

Current Mode: Auto
Options: See table below.
Timer: Off. See step 4.
Arrow denotes that further options are available if you scroll down. These are: Programme timetable, Settings
Set: describes the current programme event, e.g. Required temperature is 22.0°C until 12:00am.
Link to Programme timetable - see Step 5.
Now: Current room temperature
Link to Zone summary - see Step 1.
| Mode: | Description: |
| Auto | The room temperature will be controlled according to the loaded programme schedule (see step 6). |
| Manual | The room temperature will be controlled continuously according to the set temperature. Use + - key to change temperature. |
| Custom day (Use: Illness or holiday at home) | The room temperature will be controlled according to the Custom day timetable. The programme is the same each day. |
| Always Off | The heating will be off. |
Step 3: Powersave
This screen will show 2 Minutes after the last key press, if "no display" is selected (see Installer Settings), the screen will be blank.

Step 4: Timer
To set a suitable temperature for up to 23 hours, e.g. for short term absence.
When the timer is running, the time will be counted down each hour. Once the timer has elapsed, it will return to the prior temperature screen.

Step 5: Prog. Timetable

Zone = Heating
Timetable day range: Use left and right keys to select available day blocks.
Options: Individual days (7day), Week and weekend (5/2day), All week (24hr).
The available blocks depend on the selection in menu "Change timetable type"
Help text: Use left/right buttons to select the days you want to change
Arrow denotes that further options are available if you scroll down (see step 7).
Period 1 settings: describes the current timetable settings, e.g. Heating is programmed to control at 21.0°C from 7:00am until 10:00am
Period 3 settings: describes the current timetable settings, e.g. Heating is programmed to control at 21.0°C from 4:00pm until the following day (>>> is indicating an event on next day)
Press select ( ) when highlighted to adjust settings (see step 6)
Up to 8 periods can be programmed
Step 6: Period Settings

Highlight shows adjustable field: Use up/down buttons to adjust values
Help text: Use left/right buttons to change fields
Period settings: 21.0°C from 8:00am until 10:00am. >>> Indicates link to next event
Stored programmes
MiStat P contains 3 pre-set programmes, as shown below. These programs can be modified according to personal needs and can be stored by using a name. Via this name they can also be re-loaded.
Once a programme has been modified, the original factory pre-set will no longer be available. On a System Reset, only the current loaded programme will be replaced with the factory setting – see Installation Guide Step 5.
| Programme 1 | All week | Week & Weekend or Individual Days | ||||
| Mon-Sun | Mon-Fri | Sat-Sun | ||||
| Time | Temp | Time | Temp | Time | Temp | |
| 1st event | 6:30am | 20.0ºC | 6:30am | 20.0ºC | 7:00am | 20.0ºC |
| 2nd event | 8:30am | 16.0ºC | 8:30am | 16.0ºC | 9:00am | 18.0ºC |
| 3rd event | 4:30pm | 21.0ºC | 4:30pm | 21.0ºC | 4:00pm | 21.0ºC |
| 4th event | 10:30pm | 7.0ºC | 10:30pm | 7.0ºC | 11:00pm | 7.0ºC |
| Programme 2 | All week | Week & Weekend or Individual Days | ||||
| Mon-Sun | Mon-Fri | Sat-Sun | ||||
| Time | Temp | Time | Temp | Time | Temp | |
| 1st event | 6:30am | 20.0ºC | 6:30am | 20.0ºC | 7:00am | 20.0ºC |
| 2nd event | 8:30am | 16.0ºC | 8:30am | 16.0ºC | 9:00am | 18.0ºC |
| 3rd event | 12:00pm | 21.0ºC | 12:00pm | 21.0ºC | 12.00pm | 21.0ºC |
| 4th event | 2.00pm | 16.0ºC | 2.00pm | 16.0ºC | 2.00pm | 18.0ºC |
| 5th event | 4:30pm | 21.0ºC | 4:30pm | 21.0ºC | 4.00pm | 21.0ºC |
| 6th event | 10:30pm | 7.0ºC | 10:30pm | 7.0ºC | 11.00pm | 7.0ºC |
| Programme 3 | All week | Week & Weekend or Individual Days | ||||
| Mon-Sun | Mon-Fri | Sat-Sun | ||||
| Time | Temp | Time | Temp | Time | Temp | |
| 1st event | 6:30am | 21.0ºC | 6:30am | 21.0ºC | 7:00am | 20.0ºC |
| 2nd event | 10:30pm | 7.0ºC | 10:30pm | 7.0ºC | 9:00am | 18.0ºC |
| 3rd event | 4:00pm | 21.0ºC | ||||
| 4th event | 11:00pm | 7.0ºC | ||||
Step 7: Additional User Settings

| Feature: | Description: | Factory Pre-Set: |
| Programme Timetable | Temperature and time for the current period can be modified. See description in 'Step 5' | |
| Copy days | Will copy the current day to one or more other days | |
| Add period | Adds a Time/Temperature event. It will be added at the correct position within the day. There is a maximum of 8 periods. | |
| Remove period | Removes the selected period. There needs to be at least two periods | |
| Change timetable type | The visible day-blocks available in "Programme timetable" can be defined | |
| Individual days | Each day can be programmed individually | |
| Week and weekend | Mon... Fri and Sat... Sun can be programmed as 2 blocks | Default |
| All week | Mon...Sun can be programmed as one block | |
| Stored programmes | MiStat contains 3 pre-set programmes, see step 6. The 3 user profiles can be saved by name and restored. | Programme 1 |
| Load stored programme | A pre-set programme can be loaded by name | |
| Save current programme | The current programme can be saved by name (Each pre-set program includes: Individual days, week/ weekend, all day and custom day schedules) | |
| Help Tips | Describes the button functions | |
| Holiday switch off | A specific temperature can be set from.... until a date In the period until holiday starts the product will operate normally. If holiday is disabled manually or terminates automatically, the mode before start of holiday will be re-instated. An enabled holiday will be indicated with a suitcase symbol in the top line. If holiday is active, in the Set: line the holiday end date will be indicated. In the Summary screen the suitcase will be visible together with the holiday temperature. | |
| Status | Enable or disable holiday mode. | Disabled |
| Holiday temperature | Set the temperature to be controlled during your holiday | 16°C |
| Holiday start time (From) | Set the time for the start of your holiday | Current time - nearest hour |
| Holiday start date (From) | Set the date for the start of your holiday | Today |
| Holiday end time (To) | Set the time for the end of your holiday | Current time - nearest hour |
| Holiday end date (To) | Set the date for the end of your holiday | Today + 1 week |
| Time and date settings | ||
| Set time | To set time of day | Factory set |
| Set date | To set date | Factory set |
| Daylight saving | To enable or disable daylight saving | Enabled |
| Clock format | To select 12h or 24h clock mode | 12hr |
Step 8: Changing the Batteries
How do I know when to change the batteries?
When the batteries start to run low a battery icon will fl ash in the display to indicate "low battery", during this time the MiStat will function normally. When the battery icon alone is shown in the display, the batteries are completely exhausted and the MiStat will cease to function (see below). Re-activate by replacing the batteries.

How to replace the batteries
Remove the battery covers as shown. Replace the batteries with 2 x 1.5V IEC LR6 (AA) Alkaline batteries ensuring correct orientation. Replace the battery covers pressing fully home.

Step 9: Receiver - Key & LED

| LED colour | Mode | Action | Key Function |
| Green | Normal | Call for heat (boiler is firing) | None |
| Green Flashing | Normal | RF communication | None |
| Off | Normal | No call for heat (boiler is not firing) | None |
| Red | RF loss or not bound | No call for heat | Switches the boiler On |
| Amber | RF loss or not bound | Call for heat | Switches the boiler Off |
Troubleshooting
- It is not warm early enough
- Are time and temperature periods set correctly?
- Is Optimum start switched on? (see Installation Guide Step 5 Installer settings/System settings)
- Did the thermostat have enough time (a few days) to determine the room data?
- Was the radio link established properly and is it still active? (see Installation Guide Step 5 Installer settings/Signal Strength)
- Heating is starting earlier than set in the programme
- Is the Optimum start switched on? (see Installation Guide Step 5 Installer settings/System settings)
- Setting temperature values are restricted
- Are Minimum/Maximum temperatures activated? (see Installation Guide Step 5 Installer settings/Zone settings)
- No Signal is visible on the screen, no reaction on key presses anymore
- Is the receiver powered? (Red signal lamp should be visible)
- Service due or overdue is visible on the screen, no reaction on key presses
- Check the service feature, see Installation Guide Step 5
- Initialising... Press
![]() to force re-bind is visible on the screen, no reaction on key presses anymore
to force re-bind is visible on the screen, no reaction on key presses anymore - Is the receiver powered? (Red signal lamp should be visible)
- Please wait... Press
![]() to force re-bind is visible on the screen, no reaction on key presses anymore
to force re-bind is visible on the screen, no reaction on key presses anymore - Is the receiver powered? (Red signal lamp should be visible)
Technical Helpline: 0333 7000 622
Website: www.draytoncontrols.co.uk
Email: customer.care@draytoncontrols.co.uk
 @DraytonControls
 /DraytonControls
401 Southway Drive
Plymouth
PL6 6QT
United Kingdom

Documents / ResourcesDownload manual
Here you can download full pdf version of manual, it may contain additional safety instructions, warranty information, FCC rules, etc.
Advertisement


Need help?
Do you have a question about the MiStat P710R and is the answer not in the manual?
Questions and answers