Advertisement
Quick Links
Doro 8050
Quick Start Guide
Quick Start Guide
English
1. UNBOX YOUR NEW PHONE
The first step is to unbox the phone and
assess the items and equipment included in
the delivery. Make sure to read through the
manual so you can familiarise yourself with
the equipment and the basic functions.
For the full manual please visit
www.doro.com/support/
or contact our
Helpline. The items supplied with the device
and any available accessories may vary
depending on the region or service provider.
• The supplied items are designed for this
device and may not be compatible with
other devices.
• Appearances and specifications are subject
to change without prior notice.
• You can purchase additional accessories
from your local Doro retailer. Make sure
they are compatible with the device before
purchase.
3. INSERT SIM CARD (NOT INCLUDED)
AND MEMORY CARD (OPTIONAL
AND NOT INCLUDED)
1. Use your fingernail or other similar
object, to gently pull out the SIM/
memory card tray.
5. TURN ON THE PHONE
Note! When turning on your phone, the
installed applications may need to be
updated. Application updates requires
Internet connection and can take a few
minutes. A Wi-Fi connection is preferable.
The phone may appear a bit slow during
the update.
• Press and hold the power button until the
display lights up.
• Wait for the phone to start.
• Enter your SIM card PIN if requested.
• Follow the setup guide to get on the
Internet and start personalising your new
phone.
• Sign in with an existing Google account or
setup a new account.
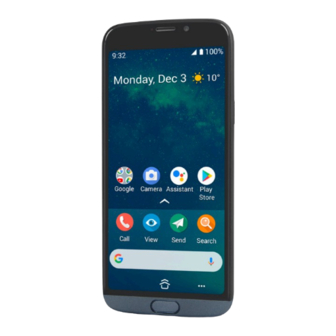
PHONE OVERVIEW
1. Headset port, for standard headset with
3.5 mm phone jack
1
1
2
2
3
3
4
4
5
5
6
6
7
7
2. GETTING STARTED
Before you start using your new phone you
may need:
• Nano SIM card. To take full advantage
of your new smartphone's capabilities,
you should install a SIM card. The SIM
card will enable you to place calls or use
mobile data to connect to various Internet
services. Your mobile service provider will
give you a card and the codes needed for
it (PIN and PUK) when you buy a mobile
contract or a prepaid SIM card. Make sure
you get a suitable contract that fit your
needs regarding calls and mobile data.
• Memory card (optional). You can use a
memory card (MicroSD) to increase the
storage space of your phone to be able to
store more files, pictures, videos etc. Insert
a memory card, reboot your device and
follow the instruction to select how to use
your memory card. We suggest you to use
a high speed memory card.
2. Place the SIM card into the correct tray
slot to ensure that it can be recognized by
the phone.
Make sure that the SIM card's contacts
are facing downwards and that the cut off
corner is down, as shown. Take care not
to scratch or bend the contacts on the
SIM card.
6. STARTUP GUIDE
The first time you turn on your phone, a
Startup guide is launched. Follow the instruc-
tions to start personalising your new phone.
In the beginning you will get a question
asking "Is it your first time using a
Smartphone?".
• If you select "Yes, I am a beginner", you will
get some instructions on how to navigate a
Smartphone and how to handle the touch
screen.
• If you select "No, I have already used one"
or "I'm setting up the phone for someone
else" you will go directly to some audio/
vision and handling settings.
2. Earpiece, for phone calls with the phone
by the ear
3. SIM/SD card tray
8
8
13
13
14
14
9
9
15
15
10
10
10
10
16
16
11
11
12
12
• Google™ account: To be able to fully use
your new smartphone you need a Google™
Account. If you don't have one yet, no
worries, as you will be guided through an
account setup when starting the phone for
the first time. It can however be a good
idea to think of a Username and Password
as these will be used for many services,
such as Gmail™, YouTube™, Google Maps™,
Google Drive™, Google Photos™ and other
Google products.
• Wi-Fi access. If you have a Wi-Fi access
point available, it's always good to connect
to that to reduce costs for data traffic and
possibly increase data speed.
This device only accepts nano SIM card
(4FF). Using a modified incompatible card
that is thicker than a nano SIM card may
damage the card itself, the card slot and
corrupt any data stored on the card.
0.67 mm
0.76 mm
micro SIM
nano SIM
3. You may also optionally place a memory
card in the tray. Make sure that the
memory card's contacts are facing
downwards, as shown. Compatible card
type: MicroSD, MicroSDHC, MicroSDXC.
4. Insert the SIM card tray back into its slot.
7. HARDWARE REBOOT
This device has an internal battery and
therefore the hardware cannot be rebooted
by the removal of the battery. Should you
need to reboot the hardware, if your device
becomes frozen and unresponsive, press and
hold the Power button and the Volume Down
key simultaneously for more than 8 seconds
to reboot it. After the device is rebooted, it
will restart automatically.
Note! Pressing and holding the Power
button and the Volume Down key is also the
key combination that takes a screenshoot
after 1 second.
4. Volume buttons
5. Touch display
6. Home key/fingerprint sensor
7. Microphone
8. Front camera, selfie camera
9. Proximity sensor, turns off the touch
display when the phone is held by the ear
10. Power button, press and hold to turn
phone on/off
11. USB Type-C, for battery charging or
connection to other device like a
computer
12. Loudspeaker, for hands-free mode
13. Second microphone
14. Rear camera
15. Flash
16. Assistance button
must be setup before use, see full manual
for more information
4. CHARGE YOUR PHONE
Charge your phone. Your phone may already
come with enough charge to be powered on
right out of the box, but we recommended to
give it a full charge before first using it.
CAUTION
Only use batteries, charger and accessories
that have been approved for use with
this particular model. Connecting other
accessories may be dangerous and may
invalidate the phone's type approval and
guarantee.
Insert the small end of the included USB
cable into the charging port on the phone
and other end into the wall charger that you
plug into to a wall socket.
8. MORE SUPPORT
Your new phone runs on Android™.
Android is a mobile operating system
developed by Google. It is designed primarily
for touchscreen devices such as smartphones
and tablets.
You can find more help regarding Android™
on https://support.google.com/android/.
Android is also associated with a suite of
software developed by Google, called Google
Mobile Services (GMS), that are pre-installed
on this device. This includes apps such as
Gmail™, the application store Google Play™,
the Google Chrome™ web browser, Google
Search app and many more.
You can find more help regarding the apps in
Google Mobile Services (GMS) on
https://support.google.com/.
Select the app you need help with.
Advertisement

Related Manuals for Doro 8050


Summary of Contents for Doro 8050
- Page 1 • You can purchase additional accessories store more files, pictures, videos etc. Insert from your local Doro retailer. Make sure a memory card, reboot your device and they are compatible with the device before follow the instruction to select how to use purchase.
- Page 2 Doro AB, or in the case of the Specific Absorption Rate, or SAR. The SAR limit for mobile devices is...
Need help?
Do you have a question about the 8050 and is the answer not in the manual?
Questions and answers