Advertisement
Available languages
Available languages
Quick Links
Owner's
Manual
®
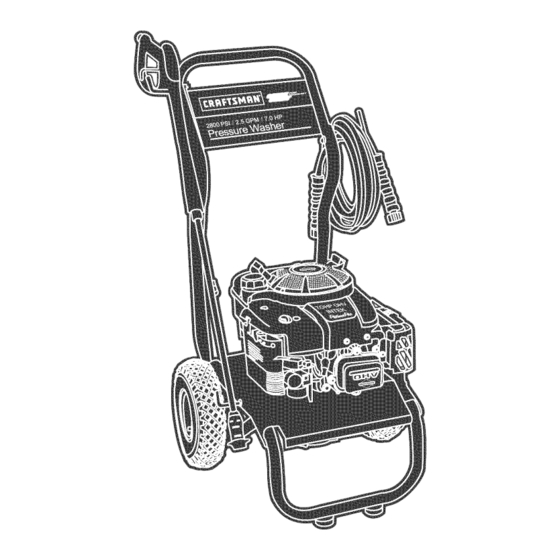
7.0 HORSEPOWER
2800 PSI
2.5 GPM
Model No. 580.752400
CAUTION:
Before
using
this product,
read this manual
and follow
al Safety
Rules and Operating
instructions.
SEARS,
ROEBUCK
and CO., Hoffman
Estates,
IL 60179
U.S.A.
Visit our Craftsman
website:
www.sears.corn/craftsman
Pal_t No. 194052
Dra_ 2 (09,20,2004)
o Safety
o Assembly
o Operation
o Maintenance
o Parts
o EspaSol
0
I
Advertisement

Related Manuals for Craftsman 580.7524


Summary of Contents for Craftsman 580.7524
- Page 1 Model No. 580.752400 CAUTION: Before using read this manual and follow Rules and Operating instructions. SEARS, ROEBUCK and CO., Hoffman Visit our Craftsman website: Dra_ 2 (09,20,2004) Pal_t No. 194052 ® this product, al Safety Estates, IL 60179 www.sears.corn/craftsman o Safety...
- Page 2 MAINTENANCE L_M_TED WARRANTY For one year from the date of purchase, when this Craftsman pressure washer is maintained and operated according to the instructions in the owner's manual, Sears will repair, free of charge, any defect in material and workmanship.
- Page 3 WARNtNG The engine exhaust from this product contains chemicals known to the State of California cancer, birth defects, or other reproductive , DANGER Operate pressure washer ONLY outdoors. Keep exhaust gas from entering a confined windows, doors, ventilation intakes DO NOT operate pressure washer enclosure,...
- Page 4 WARNING Keep water spray away from electric electric shock may result. WARNING DO NOT touch hot surfaces. Allow equipment to cool before touching. The pressure washer must be at least 5 feet from structures having combustible walls combustible materials. Keep at least 3 feet of clearance on all sides of pressure washer for adequate...
- Page 5 KNOW YOUR PRESSURE Read the owner's manual and safety rules before operating your pressure Compare the illustrations with your pressure washer to familiarize yourself with the locations of various controls and adjustments. Save this manual for future reference. Spray Gun...
- Page 6 1-800-222-3136. ASSEMBLING YOUR PRESSURE WASHER Your Craftsman high pressure washer was mostly assembled at the factory. However, you will need to perform these tasks before you can operate your pressure washer: 1. Attach handle.
- Page 7 ** If using SAE 30 oil in temperatures below 40°F (4°C), it will result in hard starting and possible engine bore damage due to inadequate lubrication. Place pressure washer on a level surface and clean area around oil fill. Remove oil dipstick and wipe dipstick with clean cloth.
- Page 8 Provide proper water supply (not to exceed damaged; 100°F). clean if dirty. Be sure to read "Safety Rules" and "Operation" sections before using the pressure washer. if starting unit after storage, see "Storage" section on pages 18o19. CAUTtON to equipment...
- Page 9 DO NOT operate pressure washer enclosure, The pressure washer must be at least 5 ft. (152 cm) from structures having combustible walls and/or other combustible materials. Leave at least 3 ft. (92 cm) all around pressure washer including overhead, for adequate cooling, maintenance and servicing.
- Page 10 11 through 13. IMPORTANT: if engine floods, place choke lever in "Run" position and crank until engine starts. NOTE: Always keep the throttle lever in the "Fast" )osition when operating the pressure washer. WARNING DO NOT touch hot surfaces. Allow equipment to cool before touching.
- Page 11 Automatic (Therma_ If you run the engine on your pressure washer for 3=5 minutes without pressing the trigger on the spray gun, circulating water in the pump can reach temperatures cool the pump by discharging the ground.
- Page 12 ENGtNE TECHNICAL INFORMATION This is a single cylinder, overhead valve (OHV), air cooled engine. It is a low emissions engine. in the State of California, Model Series 120000 engines are certified by the California Air Resources Board to meet emissions standards for 125 hours. Such certification does not grant the purchaser, owner or operator of this engine any additional warranties with respect to the performance or operational life of...
- Page 13 RepIace more often under dirty or dusty conditions. GENERAL RECOMMENDATIONS Regular maintenance will improve the performance and extend the life of the pressure washer. See any authorized Sears dealer for service. The pressure washer warranty does not cover items that have been subjected to operator abuse or negligence.
- Page 14 Daily or before use, clean accumulated debris from pressure washer. Keep linkage, spring and controls clean. Keep area around and behind muffler free from any combustible debris. Pressure washer parts should be kept clean to reduce the risk of overheating and ignition of accumulated debris. CAUTION DO NOT insert any objects through cooling slots.
- Page 15 Use a 8mm allen wrench to remove black pump oil cap between high pressure outlet and garden hose inlet. Tilt pressure washer to drain oil into an approved container until it drips slowly from pump. Tilt pressure washer in opposite direction and empty premeasured pump oil bottle into same opening (a small funnel may be helpful).
- Page 16 Clean area around oil fill, remove oil fill cap/dipstick. Wipe dipstick clean. Tip your pressure washer to drain oi[ from oi[ fiJ[ into a suitabJe container making sure you tip your unit away from spark plug. When crankcase is empty, return pressure washer to upright position.
- Page 17 Service Spark Pmug Service the spark plug every 100 hours of operation or yearly, whichever occurs first. Clean area around spark plug. Remove and inspect spark plug. Replace spark plug if electrodes are worn, or if insulator is cracked or chipped. For replacement use either the standard resistor spark plug, Champion RC12YC or the long life platinum spark plug, Champion RC12PYP.
- Page 18 AFTER EACH USE Water should not remain in the unit for long periods of time. Sediments or minerals can deposit on pump parts and "freeze" pump action. Follow these procedures after every use: Flush detergent siphoning tube by placing filter into a pail of clean water while running pressure washer in low pressure mode (adjustable nozzle in forward position).
- Page 19 LONG TERM STORAGE if you do not plan to use the pressure washer for more than 30 days, you must prepare the engine and pump for long term storage. it is important to prevent gum deposits from forming in essential fuel system parts such as the carburetor, fuel filter, fuel hose or tank during storage.
- Page 20 Problem Pump has following p roblems: failure toproduce pressure, e rratic pressure, chattering, loss of pressure_ low water volume. Detergent fails to mix with spray. Engine runs good at noqoad but "bogs" when load is added. Engine wHI not start; or starts and runs rough.
- Page 22 CRAFTSMAN 2800 PSE Pressure Main Unit m Exploded View and Parts List item Part # Description 192393GS BASE E 194719G S HANDLE 194048GS ASSY, Billboard 194548GS HOSE 192133GS KIT, Engine Mounting Hardware 192131GS KIT, Pump Mounting Hardware B3263GS B2203GS KIT, Handle Connector...
- Page 23 CRAFTSMAN 2800 PSi Pressure Pump m Exploded View and Parts List © item Part # Description 190571GS CAP, Oil 190574GS MANIFOLD 190578GS 190581GS 194298GS THERMAL RELIEF 190585GS OIL BOTTLE (not shown) 190594GS KIT, UNLOADER 190588GS KIT, WATER INLET, ANODIZED 190589GS...
- Page 24 ENGINE_ 7 HP, Briggs and Stratton, 12G612 - E×p_oded View 883_ 584 _84 1029 t022...
- Page 25 ENGINE, 7 HP, Briggs and Stratton, 12G612 - E×p_oded View 276 _ 968_ 445 _ 2s7_ CARBURETOR GASKET 276 @ 633 @ 524_ 163 _ 633A@...
- Page 26 ENGINE, 7 HP, Briggs and Stratton, ENGUNE GASKET _%_ _o@ 868% sss _ 883J_ 12G612 - E×p_oded View 305_ 524_ 121 CARBURETOR OVERHAUL 276_ 1o4_ 633 @ 633A @ 134 127_ 592 ® 332 ® 32,, 1005_...
- Page 27 ENGINE, HP, Briggs and Stratton, Item Part# Description 697893 Cylinder Assembly 399269 Bushing/Seal Kit (Magneto 299819 Oil Seal 498983 Engine Sump 695276 Cylinder Head 695166 Cylinder Head Gasket 495786 Breather Assembly 272481 Breather Gasket 691125 Screw (Breather Assembly) 691260 Breather Tube Crankcase Gasket...
- Page 28 Sears, Roebuck and Co., U.S.A.(Sears),the California Air Resources Board (CARB)and the United States Environmenta_Protection Agency (U.S.EPA) Emission Contro_System Warranty Statement (Owner's Defect Warranty Rights and Obligations) EMISSION CONTROL WARRANTY APPLICABLE TO CERTIFIED ENGINES CALIFORNIA IN 1995 AND THEREAFTER USED IN CALIFORNIA, AND TO CERTIFIED YEAR 1997 AND...
- Page 29 Emissions Durability Period and Information On Your Engine Engines that are certified to meet the California Resources Board (CARB) Tier 2 Emission display information regarding the Emissions and Air Index. The engine manufacturer information available to the consumer The Emissions Durability Period describes...
- Page 30 Partes en Movimiento DE DAI_OS REPUESTOS . PAGINA POSTERIOR DE ALTA PRESTON CRAFTSMAN alguno, cualquier defecto en material haya sido mantenida y puesta en funcionamiento tan solo pot 90 dias a partir de la fecha...
- Page 31 E[ escape dei motor de este producto eiementos qu[micos reconocidos California pot producir c&ncer, defectos u otros dagos de tipo reproduetivo. PELIGRO Opere et lavadora de presi6n SOLAMENTE AsegOrese de que los gases de escape no puedan entrar por ventanas, puertas, tomas de aire de ventitaci6n u otras aberturas en un espacio cerrado en el que puedan acumutarse.
- Page 32 Mantenga et chorro det agua alejado de alambrados de to contrario podrian ocurrir descargas el6ctricas fatales. ADVERTENCIA NO toque tas superficies calientes. Permita que el equipo se enfde antes de tocarlo. Et tavadora a presi6n debe estar situado a an minimo de 152 cm (5 pies) de toda estructura con muros combustibles otras materias combustibles.
- Page 33 CONOZCA SU MAQUiNA Lea e[ manual de[ propietado y [as reg[as Compare las i[ustraciones con su m&quina controles y ajustes. Guarde este manual Extension para Boquillas Arrancador de Retroceso Tapa de la Gasolina Boquilla Ajustable PeriHa del Cebador Palanca de Control de la V&lvula de Regulaci6n Filtro de Aire Bomba...
- Page 34 NO esta Inserte cartelera parte posterior lugar y fije la perillas de plastico, a presi6n Craftsman manualmente, usted debera antes de porter en a presion: del motor. a la pistola el manubrio sobre...
- Page 35 Agregue Aceite de Motor IMPORTANTE: Cualquier intento de hacer el motor antes de que se haya depositado recomendado puede resultar en falla del motor. NOTA: Cuando agregue aceite al compartimiento utilice Onicamente aceite detergente de alta calidad, con la clasificacion API de servicio SF, SG, SH, SJ o superior, clasificado con el peso SAE 30.
- Page 36 Conecte maManguera y e_ Suministro Agua a _a Bomba mMPORTANTE: Usted deber& conectar antes de darle arranque a! motor. La bomba daBada si arranca e! motor sin tenet conectadas y e! suministro agua abierto. Desenrro!le la manguera de a!ta presi6n extremo de la manguera a la base...
- Page 37 COMO USAR SU MAQUINA LAVA,DORA A PRESTON Si tiene problemas operando su maquina presion, por favor Ilame a la linea de ayuda lavadoras a presi6n al 1o800o222o3136. Ubicaci6n de_ Lavadora a Presi6n Espacio Libre A[rededor de[ Lavadora PELIGRO Opere et lavadora de presi6n SOLAMENTE AsegOrese de que los gases de escape no puedan entrar por ventanas, puertas, tomas de aire de ventiiaci6n u otras aberturas en un espacio cerrado en el que puedan acumutarse.
- Page 38 10, Mueva la peril!a del cebador a la posici6n "Ahogado" ("Choke"), NOTA: En el caso de que el motor este ca!iente, de que la perilla dol cebador se oncuontre "En marcha" ("Run"). 1 1. Sujete !a manija y hale ligeramente arranque hasta que sienta cierta...
- Page 39 Mueva la boquilla hacia atras Mueva para obtener ei modo de alta lante para obtener presidn, de baja presi6n aplicaci6n Apunte la boquilla hacia el suelo, desenganche cerroio de seguridad y apriete el gati!lo para probar patr6n de rociado. El patr6n de rociado se ajusta de un patron...
- Page 40 Enjuaqe de la M_quina Lavadora Presion Para Enjuage: Mueva la boqui!la hacia atras para obtener alta presion, oprima el gatillo y espere detergente. NOTA: Tambien puede detener la circulaci6n retirando e! tubo de succi6n del recipiente. Mantenga la pistola de rociado del area que planea rociar.
- Page 41 INFORMACION Tg:CNICA SOBRE EL MOTOR El motor es de uno cilindros, de valvulas refrigerado por aire y de baja emisi6n. En e! Estado de California, los motores han obtenido la certificacion del California Board (Consejo de recursos de aire de California) cumplimiento de la normativa sobre...
- Page 42 RESPONSABIUDADES Siga el programa de mantenimiento Se requiere de servicio con mayor frecuencia CALENDARIO DE MANTENIMIENTO ANOTE LAS FECHAS CONFORME CUMPLA CON EL SERVICIO NORMAL TAREA DE MANTENIMIENTO LAVADORA A PRESI6N Revise/limpieeTfiltro de la entradade agua Revise la manguera de alta presion Revise la manguera del detergente Revise la pistola aspersora y vedfique que no haya fugas en el ensamb_aje...
- Page 43 MANTENIMIENTO DE LA MAQUINA LAVADORA A PRESION Limpie _os Residuos Limpie a diario, o antes de cada use, los residuos acumulados en el lavadora a presi6n. conexiones, los muelles y los mandos. combustible de la zona que rodea al silenciador del mismo.
- Page 44 Mantenimiento de [a Boqui[la Si siente una sensacion pulsante a[ momento gatiHo de la pisto[a rociadora, puede presi6n excesiva en la bomba. La causa presi6n excesiva en la bomba es cuando encuentra atascada o tapada con materiales como tierra, etc. Para corregir el problema, inmediatamente la boquilla...
- Page 45 MANTENIM ENTO DEL MOTOR CUANDO AJUSTE O HAGA REPARACIONES M,'_QUINA LAVADORA DE PRESKDN Siempre desconecte el alambre de la bujfa y col6queto donde no pueda entrar en contacto con ta bujia. CUANDO PRUEBI= LA BUJiA Utilice un comprobador de bujfas homologado. NO comprueba la chispa sin ta bujia instalada.
- Page 46 Rempmace _a Bu]ia Remplace la bujia anualmente o cada operaci6n, Limpie el area alrededor de la bujia y retirela. Retire y revise la bujia. Para el uso del reemplazo o e! bujia uniforme chispa de re6stato, el Champion largo de la chispa de platino de vida, el Champion RC12PYP.
- Page 47 DESPUES DE CADA USO No deber& haber agua en la unidad tiempo. Los sedimentos de minerales en partes de la bombay "congelar" a cabo estos procedimientos despues Lave e! tubo de succi6n de detergente filtro en un balde de agua limpia hace funcionar la maquina...
- Page 48 ALMACENAMIENTO PROLONGADO Si usted no planea usar la maquina mas de 30 dias, debera preparar el motor almacenamiento pro!ongado. Es importante evitar la formaci6n de depositos las partes esenciales de! sistema del combustible como carburador, filtro del combustible, de! combustible durante el almacenamiento.
- Page 49 Prob[ema Causa La bomba presenta s[gu[entes prob[emas: produce pres[6n o produce una presi6n errada, traqueteo, p_rd[da presi6n, ba]o voiumen agua. E[ detergente no se mezc[a con eJ rociado. E[ motor funciona bien La ve!ocidad cuando no tiene cargas, pero funciona "ma["...
- Page 50 Sears, Roebuck and Co., U.S.A. California, CARB, por sus sig[as en ingles) Ambienta[ Dec[araci6n (derechos y obHgaciones LA COBERTURA DE LA GARANT[A DE CONTROL APLICA A LOS MOTORES CERTIFJCADOS CALIFORNIA EN 1995 Y POSTERIORMENTE, CALIFORNIA, Y A MOTORES CERTIFtCADOS POSTERIORES QUE SEAN ADQUtRIDOS REGION...
- Page 51 Jnformaci6n Sobre el Periodo Durabilidad de las Emisiones de Aire en _a Etiqueta de Emisiones Motor Los motores con certificaci6n de cumplimiento normativa sobre emisiones de nivel 2 del California Resources Board (CARB) deben mostrar el periodo de durabilidad de las emisiones aire.
- Page 52 For repair - in your iiiiiiiiiiiiiiiiii!_ _¸_ lawn and garden iiiiiiiiiiiiiiiiiii no matter iiiiiiiiiiiiiiiiiii For the replacement iiiiiiiiiiiiiiiiiii owner's manuals iiiiiiiiiiiiiiiiiii For Sears professional iiiiiiiiiiiiiiiiiii and items like garage iiiiiiiiiiiiiiiiiii iiiiiiiiiiiiiiiiiii 1-800-4-MY-HOME iiiiiiiiiiiiiiiiiii (1-800-469-4663) www.sears.com iiiiiiiiiiiiiiiiiii iiiiiiiiiiiiiiiiiii iiiiiiiiiiiiiiiiiii iiiiiiiiiiiiiiiiiii For repair of carry-in !!!!!!!!!!!!!!!!!!! and electronics, iiiiiiiiiiiiiiiiiii...