
Related Manuals for SilverStone RM21-308


Summary of Contents for SilverStone RM21-308
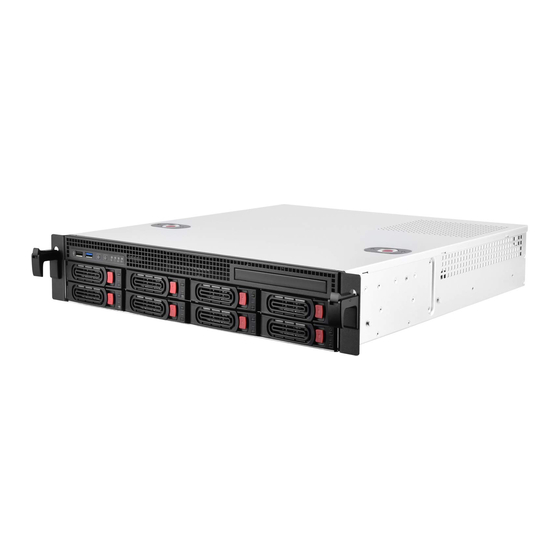
- Page 1 RM21-308 Top cover Bottom chassis Optional power supply 80mmx15mm fans Slim optical drive bracket 2.5” drive bracket 2.5”/3.5” drive trays Front panel I/O and indicators Rack handles WWW.SILVERSTONETEK.COM...
- Page 2 Front panel I/O and indicators Power LED USB 2.0 x1 HDD LED USB 3.1 Gen 1 x1 LAN LED 1 Power button LAN LED 2 System reset button...
- Page 3 1. Install rackmount ears Please install rackmount ears as the last step right before integrating the chassis into the rackmount. If you plan on shipping the chassis, please remove rackmount ears.
-
Page 4: Removing The Top Cover
2. Removing the top cover Press and hold the top cover’s two buttons while pushing the cover towards the rear of the chassis to remove it. -
Page 5: Install Motherboard
3. Install motherboard... -
Page 6: Install Power Supply
4. Install power supply 4-1 If installing ATX power supply, place it into the chassis and secure with screws... - Page 7 4-2 If installing 2U single or redundant power supply, attach corresponding power supply plate to the chassis first, then place the power supply into the chassis and secure with screws...
-
Page 8: Optical Drive Installation
5. Optical drive installation 5-1 Remove optical drive bracket and its front bezel 5-2 Install optical drive into the bracket, secure with screws and reinstall the assembled drive bracket back into the chassis... - Page 9 6. Internal 2.5" drive installation Install drive into the bracket, secure with screws and reinstall the assembled drive bracket back into the chassis...
- Page 10 7. External 2.5" / 3.5" drive installation 7-1 Pull drive tray out of the chassis 7-2 Install drive into the drive tray, secure with screws and reinsert the assembled drive tray back into the chassis...
- Page 11 Replacement product will be warranted for remainder of the warranty period or thirty days, whichever is longer. All products should be sent back to the place of purchase if it is within 30 days of purchase, after 30 days, customers need to initiate RMA procedure with SilverStone Technology in USA by first downloading the “USA RMA form for end-users”...
- Page 12 有毒有害物质/元素及其化学含量表 铅 汞 镉 六价铬 多溴联苯 多溴二苯醚 部件名称 (Pb) (Hg) (Cd) (Cr(VI)) (PBB) (PBDE) 机壳 ○ ○ ○ ○ ○ ○ (金属) 风扇 ○ ○ ○ ○ ○ ○ 线材 ○ ○ ○ ○ ○ ○ 螺丝 ○ ○ ○ ○...
Need help?
Do you have a question about the RM21-308 and is the answer not in the manual?
Questions and answers