Table of Contents
Advertisement
Quick Links
GE Healthcare
Mobile C-Arm X-Ray Product
Operator Manual
Brivo OEC 715/Brivo OEC 785/Brivo OEC 865
For USA, OEC Brivo Prime/OEC Brivo Essential/OEC Brivo Plus are respectively described as Brivo OEC 715/Brivo OEC
785/Brivo OEC 865 in the manual.
5358650-1EN
Rev.16
© 2020
General Electric Company
All rights reserved
Advertisement
Table of Contents

Related Manuals for GE Brivo OEC 715


Summary of Contents for GE Brivo OEC 715
- Page 1 Brivo OEC 715/Brivo OEC 785/Brivo OEC 865 5358650-1EN Rev.16 © 2020 General Electric Company All rights reserved For USA, OEC Brivo Prime/OEC Brivo Essential/OEC Brivo Plus are respectively described as Brivo OEC 715/Brivo OEC 785/Brivo OEC 865 in the manual.
- Page 2 IMPORTANT SAVE THESE INSTRUCTIONS. PLEASE READ THIS MANUAL BEFORE USING Brivo OEC 715/Brivo OEC 785/Brivo OEC 865 Mobile C-Arm X-Ray Product. This manual may not be reproduced, in whole or in part, without the written permission of GE Healthcare. Other product and company names mentioned herein are the property of their respective owners.
- Page 3 This product conforms with the Medical Device Directive, Council Directive 93/42/EEC: June 14, 1993, as amended by 2007/47/EC following the provisions of Annex II, when it bears the following CE Mark of Conformity. European Representative: GE Medical Systems S.C.S. Quality Assurance Manager 283 rue de la Minière 78530 BUC France...
-
Page 4: Table Of Contents
Contents Contents Chapter1. Introduction and Safety ..............1-1 1.1. Overview ..................................1-2 1.2. Owner Responsibilities ............................1-2 1.2.1. System Compatibility ..........................1-2 1.2.2. Operator Qualifications ........................... 1-2 1.2.3. Continued Compliance ..........................1-2 1.2.4. Unauthorized Modifications ........................1-3 1.3. Manufacturer's Responsibilities ........................1-4 1.3.1. - Page 5 Contents 1.13. External Devices..............................1-24 1.14. Patient Environment ............................1-25 1.14.1. Within the United States ........................1-25 1.14.2. Outside the United States ........................1-25 Chapter2. System Overview .................. 2-1 2.1. General Description............................... 2-2 2.2. C-Arm Components............................... 2-3 2.3. Workstation Components ..........................2-5 Chapter3.
- Page 6 Contents 4.4. Workstation Controls ............................4-17 4.4.1. Workstation Membrane Keyboard ....................4-17 4.4.2. Touch Screen .............................. 4-23 4.5. Image Quality Control ............................4-23 Chapter5. Usual Operations .................. 5-1 5.1. Exam Management .............................. 5-2 5.1.1. Create a New Exam ........................... 5-2 5.1.2.
- Page 7 Contents 8.3. C-Arm System ................................8-4 8.4. Security ..................................8-5 8.5. Maintenance ................................8-7 Chapter9. Maintenance ..................9-1 9.1. Overview ..................................9-2 9.2. Performance Checks ............................9-3 9.2.1. Mechanical Performance Check ......................9-3 9.2.2. Electrical Performance Check ....................... 9-3 9.2.3. Emergency Switch Performance Check ...................
- Page 8 Contents 12.2.1. Classification Type ........................... 12-2 12.2.2. Environmental Requirements ......................12-2 12.2.3. Power Requirements ..........................12-3 12.2.4. Physical Specifications ........................... 12-4 12.3. Specification of Key Components ........................ 12-6 12.3.1. X-Ray Generator ............................12-6 12.3.2. X-Ray Source Assembly ......................... 12-8 12.3.3. Grid ................................
-
Page 9: Chapter1. Introduction And Safety
Chapter1. Introduction and Safety... -
Page 10: Overview
Introduction and Safety 1.1. Overview This manual describes operation for Brivo OEC 715/785/865 Mobile C-Arm X-Ray Product only. It is intended for qualified medical personnel who have been trained in the use of medical imaging equipment. It is not designed to replace or substitute for certified training in the radiological or medical field. -
Page 11: Unauthorized Modifications
This equipment meets US Federal regulations and International standards. Unauthorized modifications to the equipment may impact adherence to these standards and make the equipment unsafe to operate. Never make any modifications or adjustments to the equipment unless directed by a qualified GE Healthcare representative. -
Page 12: Manufacturer's Responsibilities
X-Ray equipment complies with applicable international standards. 1.3.2. After-sale Operating and Safety Practices GE HUALUN Medical Systems, Co. Ltd. assumes no responsibility or liability for personal injury or damage resulting from misuse of its systems. 1.3.3. Essential Performance... -
Page 13: Safety Hazards
Brivo OEC 715/785/865 Mobile C-Arm X-Ray Product Tel: 8610-58068888 Call center: 400-812-8188 European Representative: GE Medical Systems S.C.S. 283 rue de la Minière 78530 BUC France Tel: +33 1 30 70 40 40 You may also call or fax these numbers to order circuit diagrams, component part lists, calibration instructions or other information which will assist qualified service engineers to repair the system. -
Page 14: Equipment Stability And Positioning
Contact your local fire department as soon as possible. 1.5.3. Equipment Stability and Positioning Brivo OEC 715/785/865 Mobile C-Arm X-Ray Product is mounted on wheels. If it is moved or operated improperly it could roll out of control. Follow these guidelines: Two people should maintain control of the equipment when moving up or down an incline. -
Page 15: Electrical Fire
To avoid this hazard, never remove any of the WARNING system covers. Brivo OEC 715/785/865 Mobile C-Arm X-Ray Product is not waterproof. If water, soap or other liquids drip into the equipment, this can cause short circuit leading to electric shock WARNING and fire hazards. -
Page 16: Ground Fault
International regulations specify that a minimum source-skin distance be maintained, except for specific surgical applications. Brivo OEC 715/785/865 Mobile C-Arm X-Ray Product has a skin spacer attached in order to meet this requirement. The system is prefabricated with a spacer for 30cm source-to-skin distance. -
Page 17: Dose To Patient
The measurement is performed at patient entrance reference point. Following dosimetric data are typical values in normal use cases. There might be with some tolerance in actual use cases. The following data are for Brivo OEC 715, 785 with I.I.(23XZ4ST/BS). Operation... - Page 18 Introduction and Safety Low Dose dose rate 4.92 7.08 9.10 1.58 2.26 3.78 19.43 12.14 (mGy/min) Low Dose High Level Fluoro dose rate 7.58 10.62 15.17 2.37 3.50 5.35 19.43 12.14 (mGy/min) Pulsed Normal Fluoro dose rate 3.72 5.20 7.04 1.00 1.60 2.51...
- Page 19 Brivo OEC 715/785/865 Mobile C-Arm X-Ray Product Fluoro dose rate 2.79 3.90 5.58 0.77 1.20 1.71 11.66 7.29 4pps (mGy/min) Pulsed Low Dose 4pps dose rate 0.81 1.05 1.44 0.18 0.30 0.49 3.89 2.43 (mGy/min) Pulsed Low Dose High Level dose rate 1.17...
- Page 20 Introduction and Safety Fluoro dose rate 0.70 0.98 1.39 0.19 0.30 0.43 2.91 1.82 1pps (mGy/min) Pulsed Low Dose 1pps dose rate 0.20 0.26 0.36 0.05 0.08 0.12 0.97 0.61 (mGy/min) Pulsed Low Dose High Level dose rate 0.29 0.41 0.59 0.08 0.13...
- Page 21 Brivo OEC 715/785/865 Mobile C-Arm X-Ray Product The following data are for Brivo OEC 865 and Brivo OEC 715/785 with I.I.(E5830SD-P10A). Operation Technique Auto (PMMA 200mm) Mode Pediatrics With Grid, No Filter With Filter, No Grid With Grid, No Filter...
- Page 22 Introduction and Safety Pulsed Low Dose High Level Dose Rate 2.53 3.61 4.56 0.73 1.05 1.68 7.77 4.86 Fluoro (mGy/min) 8pps Pulse Normal Fluoro Dose Rate 1.86 2.60 3.52 0.52 0.80 1.25 7.77 4.86 4pps (mGy/min) Pulsed High Level Fluoro Dose Rate 2.79 3.90...
- Page 23 Brivo OEC 715/785/865 Mobile C-Arm X-Ray Product Dose 2pps Dose Rate 0.41 0.53 0.72 0.09 0.15 0.24 1.94 1.21 (mGy/min) Pulse Low Dose High Level Dose Rate 0.59 0.81 1.17 0.16 0.26 0.38 1.94 1.21 Fluoro (mGy/min) 2pps Pulse Normal...
-
Page 24: Ingress Of Fluids
The system does not require any special cooling methods, natural cooling is necessary. Draping Brivo OEC 715/785/865 Mobile C-Arm X-Ray Product may restrict airflow to components that provide heat sinking and to vents designed to cool the equipment. Drape equipment and cover vents only when exposure to excessive fluids is unavoidable and extended use of the equipment is not required. -
Page 25: Electromagnetic Compatibility Statement
There may be RISKS of reciprocal interference posed by this equipment during specific investigations and treatments. To provide reasonable protection against such interference, the Brivo OEC 715/785/865 Mobile C-arm X-ray Product system complies with emissions limits for a Group 1, Class A Medical Devices and has applicable immunity level as stated in IEC60601-1-2. - Page 26 (Conducted and equipment. radiated) The Brivo OEC 715/785/865 Mobile C-arm X-ray CISPR 11 Product is suitable for use in all establishments other Class A than domestic and those directly connected to the...
- Page 27 Brivo OEC 715/785/865 Mobile C-Arm X-Ray Product Guidance and manufacturer’s declaration - Electromagnetic Immunity Brivo OEC 715/785/865 Mobile C-arm X-ray Product is intended to use in the electromagnetic Brivo OEC 715/785/865 environment specified below. The purchaser or operator of the...
- Page 28 RF transmitters, an electromagnetic site survey should be performed. If the measured field strength exceeds the RF compliance level above, observe the Brivo OEC 715/785/865 Mobile C-Arm X-Ray Product to verify normal operation in each use location. If abnormal performance is observed, additional measures may be necessary, such as re-orienting or relocating the [EQUIPMENT and/or SYSTEM].
- Page 29 Recommended Separation Distances for Portable and Mobile RF Communications Equipment and the Brivo OEC 715/785/865 system The Brivo OEC 715/785/865 Mobile C-arm X-ray Product is intended to use in the electromagnetic environment where the RF interference is controlled. According to the power rating of the communication...
- Page 30 The Brivo OEC 715/785/865 Mobile C-arm X-ray Product is intended to use in the electromagnetic environment specified below. The purchaser or operator of the Brivo OEC 715/785/865 Mobile C-arm X-ray Product should assure that it is used in an electromagnetic environment as described below:...
- Page 31 Brivo OEC 715/785/865 Mobile C-Arm X-Ray Product It is applicable for Ed4.0 only Portable RF communications equipment (including peripherals such as antenna cables and external antennas) should be used no closer than 30 cm (12 inches) to any part of this WARNING equipment, including cables specified by the manufacturer.
-
Page 32: Equipment Malfunction
2. Unplug the power cable. 1.13. External Devices To ensure patient safety, only connect external equipment that has been approved by GE HUALUN Medical Systems Co, Ltd. All equipment such as keyboard, wireless mouse, mobile HDD, etc, attached to the external interface connections must meet the requirements of IEC 60601-1 when operated within the patient environment. -
Page 33: Patient Environment
Brivo OEC 715/785/865 Mobile C-Arm X-Ray Product 1.14. Patient Environment 1.14.1. Within the United States Within the US the Patient Environment is defined by NFPA 99 and UL 60601-1:2003. In areas in which patients are normally cared for, the patient environment is the space with surfaces likely to be contacted by the patient or an attendant who can touch the patient. -
Page 34: Chapter2. System Overview
Chapter2. System Overview... -
Page 35: General Description
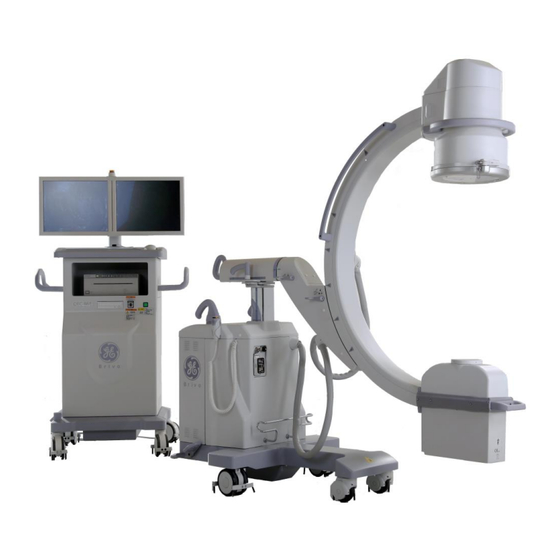
System Overview 2.1. General Description Only properly trained persons can operate this equipment. WARNING Brivo OEC 715/785/865 Mobile C-Arm X-Ray Product includes: • Mobile C-Arm, console, X-Ray generator, X-Ray image intensifier, display device (monitor frame, monitor, computer and power supply units). -
Page 36: C-Arm Components
Brivo OEC 715/785/865 Mobile C-Arm X-Ray Product 2.2. C-Arm Components Page 2-3... - Page 37 System Overview 1. Image intensifier and CCD camera 2. Lateral rotation movement brake handle 3. Orbital movement brake handle 4. Skin spacer 5. X-Ray tube head (X-Ray tube and collimator) 6. Front wheel 7. Rear wheel 8. Wig-wag movement brake handle 9.
-
Page 38: Workstation Components
Brivo OEC 715/785/865 Mobile C-Arm X-Ray Product 2.3. Workstation Components Page 2-5... - Page 39 8. Workstation membrane keyboard 9. DVD driver (Option) 10. Brake pedal (only for Brivo OEC 865) 11. Central control wheel (for Brivo OEC 865) ; Universal wheel with brake (for Brivo OEC 715/785) 12. Handles 13. Room Control Connector (Room interface) 14.
-
Page 40: Chapter3. Mechanical Positioning
Chapter3. Mechanical Positioning... -
Page 41: Overview
WARNING 3.2.1. C-Arm Orbital Rotation Brivo OEC 715/785/865 C-Arm X-Ray Image System provides 120° of orbital rotation (90° underscan and 30° overscan). The bearing side of the C-Arm is marked with a scale to aid in positioning. Orbital Rotation Brake Handle To lock or unlock the orbital rotation brake, turn either of the brake handles located on both sides of the C-Arm support assembly. -
Page 42: Lateral Rotation
Brivo OEC 715/785/865 Mobile C-Arm X-Ray Product 3.2.2. Lateral Rotation Lateral Rotation Brake Handle During rotation, there are accessible moving parts, keep hands/fingers away from the WARNING moving parts or the location that the moving parts may collide. The C-Arm can provide ±205° of lateral rotation on the C-Arm support axis. -
Page 43: Wig-Wag
Mechanical Positioning 3.2.3. Wig-Wag Wig-Wag Brake Handle The movement range of the Wig-Wag is 25° ( ±12.5°). Release the Wig-Wag brake by placing the brake handle in the position indicated by the “unlock” label to enable the Wig-Wag movement of the C-Arm. Lock the Wig-Wag brake by placing the brake handle in the position indicated by the “lock”... -
Page 44: Vertical Column Operation
Please check and clear the obstacle. Then you can continue to raise or lower the C-Arm. WARNING If any failure occurs, please contact GE Healthcare service engineer. When positioning the vertical column, observe the moving assemblies to ensure the safety of patients and hospital personnel. -
Page 45: Horizontal Cross-Arm
Mechanical Positioning 3.2.5. Horizontal Cross-Arm The horizontal Cross-Arm extends a maximum of 20cm. To position the Cross-Arm: 1. Release the Cross-Arm brake by placing the brake handle in the position identified by the "unlock" label. 2. Push or pull the Cross-Arm to the desired position. Use the centimeter scale located on the Cross-Arm as an aid in positioning. -
Page 46: C-Arm Brakes
Brivo OEC 715/785/865 Mobile C-Arm X-Ray Product 3.2.6. C-Arm Brakes To lock the wheel brake and steering handle, press the brake pedal. Pressing the brake release pedal allows the wheels to rotate freely and the steering handle to steer. Brake Release Pedal... -
Page 47: C-Arm Steering Handle
Mechanical Positioning 3.2.7. C-Arm Steering Handle Use the right steering handle to turn the rear wheels ±90 to the right or left. Use this feature to position the C-Arm during clinical applications or to negotiate sharp turns during transport. The rear wheels turn at approximately the same angle as the right steering handle. -
Page 48: Workstation Brakes
Brivo OEC 715/785/865 Mobile C-Arm X-Ray Product 3.2.9. Workstation Brakes Brivo OEC 715/785 Workstation provides wheel brakes. Pressing the wheel brakes allows you to lock the brakes and prevent the Workstation from moving. Unlock the brakes by pressing down the wheel brakes again. -
Page 49: Moving The C-Arm And Workstation
Otherwise, equipment damage or personal injury may result. WARNING If any brakes are not firmly locked, don’t transport the system and contact GE Healthcare Service Engineer. Cords and cables connected to the Workstation and C-Arm can become trip and/or snag hazards in the work area. -
Page 50: Moving The C-Arm
Brivo OEC 715/785/865 Mobile C-Arm X-Ray Product 3.3.2. Moving the C-Arm Familiarize yourself with the location and mechanical operation of all controls prior to moving the C-Arm. Use the handles provided on the C-Arm to position mechanical assemblies. CAUTION 1. Return all moving assemblies to their most compact positions. Lower the vertical column and retract the Cross-Arm. -
Page 51: Moving The Workstation
Mechanical Positioning 3.3.3. Moving the Workstation To move the mobile Workstation from one place to another, operate as follows: 1. Ensure the system power is off. 2. Unplug the power supply cable and secure the power cable. 3. Disconnect the interconnect cable from the C-Arm and secure the interconnect cable. 4. - Page 52 Chapter4. Start Up and Operating Control...
-
Page 53: Chapter4. Start Up And Operating Control
NOTE Brivo OEC 715/785/865 Mobile C-Arm X-Ray product provides a UPS to protect data loss. If the power lost during operation, UPS battery will supply power to computer and right monitor until system shut down automatically. - Page 54 If the connector does not lock in place, unreliable system operation may result. CAUTION Forbid to use different model or serial number between Brivo OEC 715/785/865 Workstation and C-Arm. System will pop up a warning message of unmatched connection. WARNING There is unpredictable risk to continue using the system in this case.
- Page 55 If a problem is encountered during power on, error message may be displayed on the right monitor and restart will be required. Refer to Chapter 10 "Display Messages" for more information about messages. If restart system and failure remains, call GE Healthcare Communication Center for service.
-
Page 56: Standby Or Power Off
Brivo OEC 715/785/865 Mobile C-Arm X-Ray Product 4.2.2. Standby or Power Off Standby: 1. Turn the C-Arm key switch to the standby position ( ). The system is still power on. Placing the equipment in standby disables X-Rays and vertical column operation so these NOTE features will not be activated unintentionally. -
Page 57: C-Arm Controls
Start Up and Operating Control 4.3. C-Arm controls This section describes the C-Arm’s operating controls. Before you begin imaging, familiarize yourself with the following contents: • C-Arm Control Panel • Footswitch and Handswitch • Emergency Switch Do not touch tube housing or let it touch anyone during operating due to the potentially high CAUTION temperature generated by the tube. - Page 58 Brivo OEC 715/785/865 Mobile C-Arm X-Ray Product Only functions applicable to the mode selected are active. If any function is active, then CAUTION the corresponding indicator lights are illuminated. The normal auto fluoroscopy mode is the default setting. Image Orientation Use these keys to rotate or reverse the image produced on the left WorkStation monitor.
- Page 59 Start Up and Operating Control Image Intensifier Field Size Field Size Press the “Field Size” key to select the X-Ray field size. The illuminated LED indicates which field size is selected. Press the “Field Size” key until the field size you want is selected. Refer to the table below: TEXT ICON FIELD SIZE...
- Page 60 Brivo OEC 715/785/865 Mobile C-Arm X-Ray Product Fluoro time, kVp, mA/mAs Display Display fluoro time (min), kVp and mA/mAs values. Continued using without cooling may damage the X-Ray tube. A warning message will display on the Workstation if the tube temperature is too high. Although fluoroscopy is not CAUTION prevented, you should wait for the tube to cool before making another exposure.
- Page 61 Start Up and Operating Control X-Ray Off Indicator When the key switch is placed in X-Ray off position ( ) or standby position ( ), X-Ray is disabled and this indictor will light. In the other X-Ray off case, this indictor will light too. Generator Control Press the “kVp”...
- Page 62 Brivo OEC 715/785/865 Mobile C-Arm X-Ray Product Pulse Rate / Pulse Press “Pulse” key to enable pulsed imaging, press “Pulse Rate” key to select pulse rate. Press the key until the pulse rate you desire is selected. The illuminated LED indicates which pulse rate is selected.
- Page 63 Start Up and Operating Control Film Press the “Film” key to enable film operation. The film LED illuminates when film mode is enabled. In this mode, kVp and mAs values can be adjusted manually. Refer to Chapter 7 “Radiographic Film” for details. Image Processing Keys Noise Filter Press the “Noise Filter”...
- Page 64 Brivo OEC 715/785/865 Mobile C-Arm X-Ray Product Workstation Operations Save Press the “Save” key to save the left monitor image on the system disk. After you have completed the exposure, press the “Save” key to save the last image displayed on the left monitor to the Workstation hard-drive.
-
Page 65: Footswitch And Handswitch
Start Up and Operating Control 4.3.2. Footswitch and Handswitch The X-Ray foot/handswitch offer maximum flexibility to control X-Rays generation. Switches may be used to generate X-Rays or save images. Before Exposure, please check and confirm the mode you selected to avoid unexpected WARNING X-Ray Exposure. - Page 66 Brivo OEC 715/785/865 Mobile C-Arm X-Ray Product Handswitch Press the left black switch labeled to produce standard fluoroscopic images. Press the right yellow switch labeled to produce high level fluoro or digital spot images. Press any switch to generate Radiographic Film.
-
Page 67: Emergency Switch
Start Up and Operating Control 4.3.3. Emergency Switch The emergency switch located on the top of C-Arm control panel. When emergency situation occurs, press the switch to stop vertical column mechanical movement and disable X-Rays. Emergency Switch If pressing an emergency switch fails to stop motor movement or X-Rays, press the power WARNING off switch or disconnect the power plug from the AC receptacle. -
Page 68: Workstation Controls
Brivo OEC 715/785/865 Mobile C-Arm X-Ray Product 4.4. Workstation Controls This section describes how to use the Workstation controls for imaging and post-processing. Before using the Workstation, you should become familiar with the controls located on the Workstation membrane keyboard. - Page 69 Start Up and Operating Control Function Keys Exam Management Press the “Exam Management” key to display the Exam Management screen. This screen allows you to enter patient information. Refer to Chapter 5.1 “Exam Management” for details. Image Directory Press the “Image Directory” key to display the Image Directory screen. This screen allows you to review, print, and archive stored images and dose information.
- Page 70 Brivo OEC 715/785/865 Mobile C-Arm X-Ray Product Image Processing Keys Image processing keys allow you to adjust images displayed on the left monitor. Contrast Press the “Contrast” key to adjust the contrast level display. Brightness Press the “Brightness” key to adjust the brightness level display.
- Page 71 Start Up and Operating Control Noise Filter Press the “Noise Filter” key to select relative noise filter. Noise Filter is only available when real time imaging and the image was LIH. Recursive Filter function provides image noise reduction. Higher levels of recursive filtering produce smoother (or less noisy) image, but cause more lag when imaging moving objects or anatomy.
- Page 72 Brivo OEC 715/785/865 Mobile C-Arm X-Ray Product Save Press the “Save” key to save the left monitor image on the system disk. After you have completed the exposure, press the “Save” key to save the last image displayed on the left monitor to the Workstation hard-drive.
- Page 73 Start Up and Operating Control Backspace Delete one character to the left of the cursor. Also deletes a selected marker or comment. Caps Lock The Caps Lock key is used to toggle between all upper case letters and mixed case letters. When Caps Lock is engaged, the Caps Lock LED in the upper right corner of this key is lighted and the membrane keyboard types only upper case letters.
-
Page 74: Touch Screen
Brivo OEC 715/785/865 Mobile C-Arm X-Ray Product 4.4.2. Touch Screen Brivo OEC 865 provides a touch screen on the right monitor for interacting with the Workstation. Using the touch screen and the keyboard for text-entry you can: • Enter and view patient information •... - Page 75 Start Up and Operating Control Is “Auto Brightness/Contrast” key Turn on “Auto turned off? Brightness/Contrast” key. When the automatic function is Switch to HLF mode or Digital selected in Normal Fluoro mode, Spot mode. does technique reach maximum limitation? (110kVp) Does air cover large portion in the Re-position to decrease the image?
- Page 76 Patient. Brivo OEC 715/785/865 Mobile C-Arm X-Ray Product also provides the feature of Auto-Adaptive Non-uniformity Correction to improve the uniformity of the image. Because of the curved nature of the image intensifier tube, less X-Ray energy is received at the periphery of the tube than at the center. This causes the image to appear darker around the image edge.
-
Page 77: Chapter5. Usual Operations
Chapter5. Usual Operations... -
Page 78: Exam Management
Usual Operations 5.1. Exam Management Use Exam Management screen to: • Create a new exam. • Display Scheduled Exams screen. • Display Performed Exams screen. • Edit patient information. Be cautious while the system is in use. Any sudden, intense impact can damage the system or could result in loss of images and prevent further imaging. -
Page 79: Scheduled Exams Feature
Brivo OEC 715/785/865 Mobile C-Arm X-Ray Product Press the “Exam Management” key on the Workstation membrane keyboard or select the “Exam Management” button on the system panel to display Exam Management screen in use. Click “New” to create a new exam. - Page 80 Usual Operations The Scheduled Exams screen displays a list of scheduled exams by Exam Time at descending order. To list by Source, Patient Name, Patient ID, Physician, click the related column header. User can choose to display Patient ID or Accession# in System Setup. Select a server from the server dropdown list.
-
Page 81: Resume A Performed Exam
Brivo OEC 715/785/865 Mobile C-Arm X-Ray Product 5.1.3. Resume a Performed Exam The Performed Exams screen contains a list of previously performed exams. Select the “Resume Exam” button from the Exam Management screen. A Performed Exams Screen is displayed. The Performed Exams list displays exams by Exam Time at descending order. To list by Status, Patient Name, Patient ID, Physician, click the related column header. -
Page 82: Edit Patient Information
Usual Operations Click “Append” to create a new scheduled exam based on the selected exams. Only the completed and discontinued exams could be appended for further X-Ray exposures. Select the “OK” button to close the Performed Exams screen and display the Exam Management screen for the selected exam. -
Page 83: Imaging Mode
Brivo OEC 715/785/865 Mobile C-Arm X-Ray Product User cannot edit patient information under following scenarios: NOTE 1. Exams queried from MWL server. 2. Image(s) of the exam has/have been sent to server. 3. MPPS has been reported to server. 4. Exam is completed or discontinued. - Page 84 Usual Operations X-Ray Switch Mode Status Bar During an exam, the configured active mode pair is displayed on the status bar. The status bar is located on the bottom left corner monitor when an image is displayed. Left half part displays image mode triggered by left switch on foot/handswitch, right half part displays image mode triggered by right switch on foot/handswitch.
-
Page 85: Normal Fluoro Imaging
Brivo OEC 715/785/865 Mobile C-Arm X-Ray Product 5.2.1. Normal Fluoro Imaging Normal fluoro mode displays live fluoroscopic images on the left monitor. After the image has been acquired, image attributes such as edge enhancement or contrast and brightness can be modified. -
Page 86: Digital Spot Imaging
Usual Operations 5.2.3. Digital Spot Imaging Digital Spot mode creates a short-duration, high mA exposure to produce a high quality single image. After the image has been acquired, image attributes such as edge enhancement or contrast/brightness can be modified. Pulsed operation is not allowed in digital spot mode. To produce a Digital Spot image 1. -
Page 87: Low Dose Imaging
Brivo OEC 715/785/865 Mobile C-Arm X-Ray Product 3. To reselect continuous operation, press the “Pulse” key again. The pulse rates will no longer display on the status bar. 5.2.5. Low Dose Imaging Lose dose imaging is to reduce the exposure dose to the patient. - Page 88 Usual Operations Pulsed Normal Fluoro kVp:40 to 110 Reduce X-Ray dose to patient Auto/ Manual mA: 0.1 to 4 Pulsed High Level kVp:40 to 110 High quality and low-dose Fluoro Imaging mA: 0.2 to 12 Auto/ Manual Pulsed Low Dose kVp:40 to 110 Reduce X-Ray dose to patient...
-
Page 89: Modes Of Operation: Engaging And Disengaging
Brivo OEC 715/785/865 Mobile C-Arm X-Ray Product 5.2.7. Modes of Operation: Engaging and Disengaging The fluoro modes used on the Workstation can be engaged in a variety of ways including mode keys on the C-Arm control panel, Workstation user interface, and the various footswitches and handswitches used by the systems. - Page 90 Usual Operations The following information with the image is displayed on the left monitor: 1. Patient information, physician name 2. Time and hospital when generating the image 3. Image contrast value, brightness value, edge enhance value, smart metal value 4. Technical parameters used during the exposure, flip/flop indictor, rotation indicator and image number 5.
- Page 91 Brivo OEC 715/785/865 Mobile C-Arm X-Ray Product 8. Dose information (Dose measured at 30cm above the Image Intensifier, center along the reference axis) • Dose Range: 0-80,000 mGy; Accuracy: +-35% • Dose Rate Range: 0-120 mGy/min; Accuracy: +-35% • Range: 0-20,000 Gy.cm2; Accuracy: +-35% 9.
- Page 92 Usual Operations 4. Dose Summary: Display the dose summary information. 5. Preview Images: Display image thumbnails to select. 6. Change Exams…: Used for recalling images that have been previously saved in performed exam. 7. Report MPPS: Used to report MPPS. This button is only displayed when you choose the MPPS option for some model.
-
Page 93: Review Dose Information
Brivo OEC 715/785/865 Mobile C-Arm X-Ray Product 5.3.2. Review Dose Information The Dose Summary screen contains X-Ray exposure data of the current exam. ” Select the “Dose Summary button from the Image Directory screen to display the Dose Summary on the left monitor. - Page 94 Usual Operations MODE (Dose measured at 30 cm above the Image Intensifier) Fluoro Pulsed Fluoro High Level Pulsed High Digital Spot Film Fluoro Level Fluoro Country/ kVp: 40 to 110 kVp: 40 to 110 kVp: 40 to 110 kVp:40 to 110 kVP:40 to 110 kVp: 40 to 110 Region...
- Page 95 Brivo OEC 715/785/865 Mobile C-Arm X-Ray Product MODE (Dose measured at 30 cm above the Image Intensifier) Fluoro Pulsed Fluoro High Level Pulsed High Digital Spot Film Fluoro Level Fluoro Country/ kVp: 40 to 110 kVp: 40 to 110 kVp: 40 to 110...
- Page 96 Usual Operations MODE (Dose measured at 30 cm above the Image Intensifier) Fluoro Pulsed Fluoro High Level Pulsed High Digital Spot Film Fluoro Level Fluoro Country/ kVp: 40 to 110 kVp: 40 to 110 kVp: 40 to 110 kVp:40 to 110 kVP:40 to 110 kVp: 40 to 110 Region...
- Page 97 Brivo OEC 715/785/865 Mobile C-Arm X-Ray Product MODE (Dose measured at 30 cm above the Image Intensifier) Fluoro Pulsed Fluoro High Level Pulsed High Digital Spot Film Fluoro Level Fluoro Country/ kVp: 40 to 110 kVp: 40 to 110 kVp: 40 to 110...
- Page 98 Usual Operations MODE (Dose measured at 30 cm above the Image Intensifier) Fluoro Pulsed Fluoro High Level Pulsed High Digital Spot Film Fluoro Level Fluoro Country/ kVp: 40 to 110 kVp: 40 to 110 kVp: 40 to 110 kVp:40 to 110 kVP:40 to 110 kVp: 40 to 110 Region...
- Page 99 Brivo OEC 715/785/865 Mobile C-Arm X-Ray Product MODE (Dose measured at 30 cm above the Image Intensifier) Fluoro Pulsed Fluoro High Level Pulsed High Digital Spot Film Fluoro Level Fluoro Country/ kVp: 40 to 110 kVp: 40 to 110 kVp: 40 to 110...
-
Page 100: Print, Export And Import
Usual Operations 5.3.3. Print, Export and Import Print to local printer 1. Press the “Image Directory” key on the Workstation membrane keyboard or select the “Image Directory” button on the system panel to display the Image Directory screen. 2. Select the image you want to print. Press and hold on “Ctrl” key on the membrane keyboard to select multiple images if you want. - Page 101 CD/DVD: DVD+R, DVD-R, DVD-RW, CD-R, CD-RW • USB: Some removable disks with USB connector can’t be used. Brivo OEC 715/785/865 only supports USB disks in Fat16, Fat32, Ext2, Ext3 and Ext4 format. This section describes how to export from the system to CD/DVD as an example.
- Page 102 BMP: BMP format image Raw: System original format image, used to import exams among Brivo OEC 715, Brivo OEC 785 and Brivo OEC 865 systems Image: The Workstation supports the following modalities: X-Ray Radio Fluoroscopic Image Storage. Default option. 1000 x 1000 pixel, static.
- Page 103 Brivo OEC 715/785/865 Mobile C-Arm X-Ray Product Secondary Capture Image Storage, screen capture type image with Annotation and markers. 1000 x 1000 pixel, static. Dose Summary: RDSR: X-Ray Radiation Dose Structured Report Secondary Capture image Remove Patient Information: Select “Remove Patient Information” to remove all patient identification information of selected images to copy.
- Page 104 Usual Operations 8. After the copy is finished, the CD/DVD will eject automatically. DICOM Viewer The system provides a DICOM Viewer to view the images exported to CD/DVD/USB media. DICOM Viewer can be exported together with the images. DICOM Viewer is able to run on Windows OS including Windows XP and Windows 7.
-
Page 105: Retrieve A Performed Exam
Brivo OEC 715/785/865 Mobile C-Arm X-Ray Product 5.3.4. Retrieve a Performed Exam Select “Change Exam” from the Image Directory screen. The Performed Exams screen is displayed on the right monitor. Select an exam and then click “OK” button, this exam is displayed. -
Page 106: General Dose Planning
Usual Operations 5.4.2. General Dose Planning There are several dose reduction measures available in the system. They are: Low Dose Mode, Pulsed Mode using reduced frame rates, removal of the contrast grid, and additional filtration. As a general guideline, Low Dose Mode will typically reduce the dose by 50%. This will typically result in ... -
Page 107: Emergency Mode
Brivo OEC 715/785/865 Mobile C-Arm X-Ray Product 5.5. Emergency Mode When user forgets the login password, emergency mode can be used to produce images in emergency case. Press “Emergency Login” to login emergency mode screen. User can access Exam Management, Zoom &... - Page 108 Chapter6. Special Applications...
- Page 109 Special Applications 6.1. Image Annotation This section explains how to create annotation and how to use image annotation to place markers, add comments, crop images. Image annotation is available based on which system you have purchased. Press the “Annotation” key from the Workstation membrane keyboard or select the “Annotation”...
- Page 110 Brivo OEC 715/785/865 Mobile C-Arm X-Ray Product 6.1.1. Place Markers on an Image The markers object bar includes a directional arrow and L (Left), R (Right), A (Anterior), P (Posterior) H (Head) and F (Foot) markers. 1. Select a button in the object bar to select a marker. The marker is displayed on both the left and right monitors.
- Page 111 Special Applications 6.1.2. Add Comments to an Image 1. Select the “Comment” button on the Image Annotation screen. The comment box is displayed on both the left and right monitors. 2. Enter text in the comment box. You can enter up to 80 characters. 3.
- Page 112 Brivo OEC 715/785/865 Mobile C-Arm X-Ray Product 6.1.3. Crop an Image Crop shutters allow you to shade out portions of the image on the left monitor. 1. Select the “Crop” button from the Annotation screen. The crop shutter is displayed on the right monitor.
- Page 113 Special Applications 3. Reselect the “Crop” button, the crop is deleted on both right monitor and left monitor. The part of image hidden is back to display. To save a copy of the cropped image: press the “Save” on the Workstation membrane keyboard.
- Page 114 Brivo OEC 715/785/865 Mobile C-Arm X-Ray Product 6.2. Image Measurement This section explains how to measure an image. Image Measurement is available based on which system you have purchased. Measurement includes the following options. • Calibration • Distance • Angle Measurements can be applied to a saved image, a recalled image, and the current image displayed.
- Page 115 Special Applications when X-Ray is on. 6.2.1. Calibration To perform a calibration between two points, a measuring device should be placed in the plane of interest. The distance on the image should be marked during calibration and the length value entered in the value box.
- Page 116 Brivo OEC 715/785/865 Mobile C-Arm X-Ray Product adjacent to the end point. When calibration is changed during the procedure, the distance measurements are recalculated and display the new values. To perform distance measurements Perform Calibration. Select the “Distance” button. A default measurement line is displayed. This line is based on the calibration performed.
- Page 117 Special Applications 6.2.3. Angle Measurement To perform angle measurements Select the” Angle” button. An angle is displayed on both the left and right monitors. Select an angle, adjust length and angle degree by anchor dragging, the angle degree value is displayed at bottom of the angle.
- Page 118 Workstation. The DICOM application allows the Workstation to connect to and use existing DICOM networks. You can download the DICOM conformance statement file for Brivo OEC 715, Brivo OEC 785, Brivo OEC 865 mobile C-Arm X-Ray product from the website: www.ge.com/dicom.
- Page 119 Special Applications 6.3.3. DICOM Setup The Workstation must be configured to access the DICOM network. Configuration identifies the server to the network and defines the DICOM network nodes to the Workstation. The DICOM features include: • Worklist • DICOM Print •...
- Page 120 Brivo OEC 715/785/865 Mobile C-Arm X-Ray Product Local Network Setup Click “Configure…” of local network to setup the local network. Input the target IP Address, Gateway and subnet mask on the screen. Fill in the information on this screen. You can obtain the correct information from your network administrator.
- Page 121 Special Applications To setup the Worklist: 1. Select “Worklist” button from the setup screen. The Worklist screen is displayed. 2. Setup Scheduled Exam Date and Modality. 3. Click “Add” button to display the Worklist Server Config screen. Obtain the following information about the worklist server from your network administrator and enter it on this screen: Alias: Unique name, internal to WorkStation, used to identify the server in the list of available destination devices.
- Page 122 Brivo OEC 715/785/865 Mobile C-Arm X-Ray Product 4. Select the “Verify” button to verify that the server is connected. A verified successful message appears if the server has connected. Select “OK” to close the screen. 5. Repeat steps three to four for each DICOM Worklist server on the network. You can edit or delete server by clicking the relevant button.
- Page 123 Special Applications 2. Select “Add” button. Obtain the following information from the Network Administrator for your facility and enter it in the text-entry fields on this screen: Alias: Unique name, internal to the OEC WorkStation, used to identify the server in the list of available destination devices.
- Page 124 Brivo OEC 715/785/865 Mobile C-Arm X-Ray Product 4. Select the “Empty Density...” button and choose the image empty density. The available options are: • BLACK • WHITE 5. Select the “Copies...” button and choose the number of copies that will be printed each time a print command is sent to this printer.
- Page 125 Special Applications 12. Select the “Verify” button to verify that the printer server is connected. A verified successful message appears if the server has connected. Select “OK” to close the screen. 13. You can edit or delete servers in the list by clicking relevant button. 14.
- Page 126 Brivo OEC 715/785/865 Mobile C-Arm X-Ray Product 2. Select the “Add” button to add storage server you want to configure. 3. Obtain the following storage information from your network administrator and enter it: Alias: Unique name, internal to WorkStation, used to identify the server in the list of available destination devices.
- Page 127 Special Applications Dose Summary: RDSR: X-Ray Radiation Dose Structured Reporting Secondary Capture image Send RDSR on Complete: Check it when you want to send RDSR on completing an exam. 4. Select the “Verify” button to verify that the server is connected. A verified successful message appears if the server has connected.
- Page 128 Brivo OEC 715/785/865 Mobile C-Arm X-Ray Product 9. Select “OK” button to close the screen. 10. Repeat steps one through nine for each Storage and Commitment server on the network. You can edit or delete server by clicking the relevant button. When you have finished configuring all servers, select the “Exit”...
- Page 129 Special Applications IP Address: Unique IP address assigned to the server you are configuring. Port Number: Port number assigned to the query server. Time out: The time in seconds that the Workstation waits for a response from the server before timing out. Information Model: There are two items of Information Model: Study Root - Starts queries at the study level;...
- Page 130 Brivo OEC 715/785/865 Mobile C-Arm X-Ray Product 2. Click “Add” button to display the MPPS Server Config screen. Obtain the following information about the MPPS server from your network administrator and enter it on this screen: Alias: Unique name, internal to WorkStation, used to identify the server in the list of available destination devices.
- Page 131 Special Applications 3. Select the “Verify” button to verify that the server is connected. A verified successful message appears if the server has connected. Select “OK” to close the screen. 4. Repeat steps one through three for each MPPS server on the network. You can edit or delete server by clicking the relevant button.
- Page 132 Brivo OEC 715/785/865 Mobile C-Arm X-Ray Product 6.3.4. Worklist DICOM Worklist Query feature allows you to query the scheduled exams’ information from DICOM server. You can use the query result to start the exam directly. 1. Make sure the Worklist server is setup successfully.
- Page 133 Special Applications The Scheduled Exams screen displays a list of scheduled exams. 3. Choose a worklist server at the bottom from the server dropdown list. 4. Click “Quick Query” button to perform a DICOM query. When the search is complete, the results are displayed in the Scheduled Exams screen.
- Page 134 Brivo OEC 715/785/865 Mobile C-Arm X-Ray Product 6.3.5. DICOM Print Use these steps to print on a DICOM printer. 1. Make sure the DICOM Print server is setup successfully. 2. Press “Image Directory” key on the Workstation membrane keyboard. Select DICOM print tab.
- Page 135 Special Applications 6.3.6. Storage and Commitment The Workstation allows to storage images and storage commitment on a DICOM storage server. 1. Make sure the Storage and Commitment server is setup successfully. 2. Select the “DICOM Storage” tab from Image Directory and then select a DICOM storage server from the “Send to”...
- Page 136 Brivo OEC 715/785/865 Mobile C-Arm X-Ray Product 6.3.7. Query and Retrieve DICOM Query and Retrieve allows you to query the remote server to get DICOM exam information, retrieve images of desired exams from the Query and Retrieve Server, filter retrieved exams, review retrieved images.
- Page 137 Special Applications 7. Select a retrieved exam and select Previous/Next button to display the previous/ next image thumbnail. 8. Select “Review Image” button to display Image Viewer, the selected image will be displayed. Operator could use mouse to adjust the image contrast and brightness. 9.
- Page 138 Brivo OEC 715/785/865 Mobile C-Arm X-Ray Product 6.3.8. MPPS A DICOM Modality Performed Procedure Step (MPPS) is an information object that describes the activities, conditions and results of an exam (imaging procedure) performed on a modality. The MPPS package provides capabilities of reporting this information back to the connected RIS (Radiology Information System).
-
Page 139: Chapter7. Radiographic Film
Chapter7. Radiographic Film... -
Page 140: Overview
Radiographic Film 7.1. Overview Use Film mode to produce radiographic films. Film mode is not available in some countries as local regulations requirement. The film cassette holder described in this chapter is available as an option and should be used if you use film mode. For film imaging, a cassette holder should be placed on the face of the image intensifier. - Page 141 Brivo OEC 715/785/865 Mobile C-Arm X-Ray Product 9. To remove the cassette holder, open the cassette holder handle and press firmly against the side of the cassette holder. The cassette holder is designed to snugly attach to the image intensifier lip when the handle is engaged.
-
Page 142: Chapter8. System Setup
Chapter8. System Setup... -
Page 143: System Information
System Setup This chapter explains how to use the Setup function to tailor the setup of Workstation operation to your specific requirements. Features related with DICOM setup such as Network & DICOM, Worklist, DICOM Printers, Storage & Commitment Servers, Query & Retrieve and MPPS Servers have been already described in Section 6.3. -
Page 144: Date Time & Region
Brivo OEC 715/785/865 Mobile C-Arm X-Ray Product 8.2. Date Time & Region Select “Date Time & Region” tab to: • Enter Date, Time, Time Zone and Language • Select Date, Time and Number Format • Select Weight and Height Unit Select “Exit”... -
Page 145: C-Arm System
System Setup 8.3. C-Arm System Select “C-Arm System” tab to: • Enter Hospital Name • Select Retain Last value at Exam Change or Boot up: Collimator, Mag, Rotation, Flip or Flop • Enable/ disable Screen Saver • Setup Screen Saver Wait Time •... -
Page 146: Security
Brivo OEC 715/785/865 Mobile C-Arm X-Ray Product 8.4. Security The “Security” screen is used to setup Workstation for HIPAA compliance. This feature is only open to the administrator. Click “Security” and enter the administrator password to display security setup screen. If the administrator password has not been set, the default administrator password is “123456”. - Page 147 System Setup Selection of “Require Users to Login”, a login screen will be displayed when the Workstation boot up. The user must enter a password before proceeding to use the Workstation. Use the “Add” button to setup a user and its password. The account will be displayed in the account list. Select an account and click “Remove”...
-
Page 148: Maintenance
Brivo OEC 715/785/865 Mobile C-Arm X-Ray Product 8.5. Maintenance The “Maintenance” setup screen is used for system maintenance. Export/ Import System Setup: Insert a medium, select the medium from “Medium” dropdown list. Clicking “Export” button allows export of Setup file/Connectivity configuration file. After the process is completed, a message is shown to indicate file exported successfully. - Page 149 System Setup Click any mouse button to return to normal screen. Page 8-8...
-
Page 150: Chapter9. Maintenance
Chapter9. Maintenance... -
Page 151: Overview
The system should have an expected service life of 10 years. Periodic maintenance of the system is required to maintain the system lifecycle. The first periodic maintenance shall be implemented after first 13 months of use. Then it is suggested to do once per year by a GE qualified service engineer. Page 9-2... -
Page 152: Performance Checks
Brivo OEC 715/785/865 Mobile C-Arm X-Ray Product 9.2. Performance Checks 9.2.1. Mechanical Performance Check C-Arm 1. Check the Wig-Wag brake operation. Check Wig-Wag for ease of movement (side to side swing) without excessive play. 2. Check the Horizontal Cross-Arm brake operation. Extend and retract the Horizontal Cross-Arm. Check for ease of movement without excessive play. -
Page 153: Emergency Switch Performance Check
Maintenance 9.2.3. Emergency Switch Performance Check This check is performed as a matter of routine operator maintenance to ensure that the Emergency Switch safety feature is functioning properly. Perform this check as often as possible in conditions such as removal from long-term storage and exposure to fluids. -
Page 154: Film Mode Performance Check
Brivo OEC 715/785/865 Mobile C-Arm X-Ray Product 9.2.5. Film Mode Performance Check This procedure produces X-Rays. Take the appropriate precautions. WARNING 1. Press the “Film” key on the C-Arm control panel to select film mode. 2. Install the film cassette holder on the image intensifier and load a film cassette. -
Page 155: Cleaning And Disinfections
Maintenance 9.3. Cleaning and Disinfections Before cleaning and disinfecting the equipment, make sure the system is turned off and the power cord is unplugged to avoid electrical shock. WARNING Biohazard may be present on surface of the equipment. Wear rubber gloves during cleaning. -
Page 156: Disinfections
Brivo OEC 715/785/865 Mobile C-Arm X-Ray Product 9.3.2. Disinfections All parts of the equipment, including accessories and connecting cables, can be disinfected by wiping them with a cloth dampened with disinfectant, such as 75% alcohol. Never use corrosive or solvent disinfectants since it could cause damage to the equipment. -
Page 157: Storage
Maintenance 9.4. Storage 9.4.1. Temporary Storage (less than 60 days) To prepare the C-Arm for storage, move all mechanical assemblies into their most compact position, set all locks and brakes and remove all power. Cover the C-Arm with a dust cover. Refer to the "Technical Reference" chapter for the range of environmental conditions in which the C-Arm can be safely stored. -
Page 158: Maintenance Schedule
Brivo OEC 715/785/865 Mobile C-Arm X-Ray Product 9.5. Maintenance Schedule 9.5.1. User Routine Checks Items The user of the equipment must follow the user routine check items in the table below. It is for the operator of the equipment to ensure that all checks have been satisfactorily met before attempting to use the equipment. -
Page 159: Periodic Maintenance
Maintenance 9.5.2. Periodic Maintenance Periodic Maintenance should be performed by a GE HUALUN medical systems Co. Ltd. representative or a qualified service engineer. The following periodic maintenance schedule is recommended. Item Description Frequency Earth (Ground) Check maximum earth of whole system... -
Page 160: Chapter10. Display Messages
Chapter10. Display Messages... -
Page 161: Overview
Display Messages 10.1. Overview This chapter describes messages that appear on the right Workstation monitor during system operation. Messages may indicate any of the following: • Error Messages • Warning Messages • Information When the error message appears, an error code will also be displayed on the kV, mA display field on the control panel, if the Mainframe is connected with Workstation. -
Page 162: Chapter11. Labels And Symbols
Chapter11. Labels and Symbols... -
Page 163: Overview
Labels and Symbols 11.1. Overview This chapter describes labels and symbols that are located on your C-Arm and Workstation. Two types of labels are described: warning labels and regulatory certification labels. Warning labels define potential hazards and advise against misuse that might result in personal injury. Familiarize yourself with these labels and their meanings in order to ensure a safe environment for both the patient and yourself. - Page 164 Brivo OEC 715/785/865 Mobile C-Arm X-Ray Product This label indicates the position of the C-Arm orbital movement brake handle. When the handle is rotated to the dashed line position, the brake is released. When the handle is in solid line position, the brake is locked.
- Page 165 Labels and Symbols Note label. Pay attention and keep your feet away from this area. This label is attached below Workstation handles. It is to note that Workstation handles are not allowed to use to lift this system; This label is attached by printer cabinet.
- Page 166 Brivo OEC 715/785/865 Mobile C-Arm X-Ray Product Potential equalization terminal label. Note label. Pay attention and keep your hands/fingers away from this area. This label indicates that you should not touch the connector and the patient at the same time. The connector must be connected to the appointed device only.
- Page 167 Labels and Symbols System rating plate indicates manufacture information and input power requirements. Page 11-6...
- Page 168 Brivo OEC 715/785/865 Mobile C-Arm X-Ray Product X-ray Generator rating plate. Total Filtration label Page 11-7...
- Page 169 Labels and Symbols Collimator, Beam Limiting Device label. Laser warning label. (This label will only exist on the laser aimer option.) This label warns the operator or the patient not to look at the laser beams directly. (This label will only exist on the laser aimer option.) Page 11-8...
- Page 170 Brivo OEC 715/785/865 Mobile C-Arm X-Ray Product This label indicates equipment was tested by a Notified Body and was found to be in compliance with the requirements of all relevant directives and standards in effect within the European Union time manufacture.
- Page 171 Labels and Symbols This label can be found on the X-Ray generator. It indicates the location of the X-Ray source and the controls used to produce ionizing X-Radiation. Use appropriate precautions protective equipment when using the system and at all times when X-Rays are present.
- Page 172 Brivo OEC 715/785/865 Mobile C-Arm X-Ray Product Image Intensifier label for Brivo OEC 715/785. Image Intensifier label for Brivo OEC 865. Image Intensifier label for Brivo OEC 715/785/865. Hg label is attached on the monitor back. Page 11-11...
- Page 173 Labels and Symbols Removable filter, 3.5 mm Al equivalent filtration 0.1 mm Cu. Removable Grid. Skin spacer. WIFI label. Only available when you choose Wi-Fi Internet Adapter option for some configuration. IC/FCC ID label. The Circuit Breaker or other over current protector used in power supply for this product shall meet the requirements.
- Page 174 Brivo OEC 715/785/865 Mobile C-Arm X-Ray Product Packing label. Brivo OEC 715 Product Brand name. Brivo OEC 785 Product Brand name. Brivo OEC 865 Product Brand name. Component, Spot Film Device label. Page 11-13...
- Page 175 Labels and Symbols Unique Device Identifier (UDI) Every medical device has a unique marking for identification. It is attached on the mainframe base cover. Note that this is only an example of a UDI marking. The characters used in the UDI marking represent specific...
-
Page 176: Locations Of The Labels
Brivo OEC 715/785/865 Mobile C-Arm X-Ray Product 11.2.2. Locations of the Labels Page 11-15... - Page 177 Labels and Symbols 31 27 24 18 39 Page 11-16...
-
Page 178: Symbols
Brivo OEC 715/785/865 Mobile C-Arm X-Ray Product 11.3. Symbols Be familiar with the following symbols that may appear on equipment and schematics, so you can safely maintain and operate the system: Name Symbol Description This symbol identifies areas where Dangerous hazardous voltages may be present. -
Page 179: Chapter12. Technical Reference
Chapter12. Technical Reference... -
Page 180: Overview
The policy of GE Healthcare is one of continual product development and improvement. For this reason, GE Healthcare reserves the right to change the operating characteristics and specifications of newer products at any time, without prior notice, and without incurring any obligation relating to previously manufactured items. -
Page 181: Power Requirements
Brivo OEC 715/785/865 Mobile C-Arm X-Ray Product 12.2.3. Power Requirements Voltage: AC 100V/110V/120V|200V|220V/230V/240V Frequency: 50Hz/60Hz Rated Momentary Line Current (shorter than 5s): • 30A (100V/110V/120V) • 28A (200V) • 25A (220V/230V/240V) Rated Continuous Line Current: • 20A (100V/110V/120V) • 12A (200V) •... -
Page 182: Physical Specifications
Technical Reference 12.2.4. Physical Specifications C-Arm SID (Source Image Distance) 39.3’’ (100cm) Horizontal travel 8’’ (20cm) Vertical travel 17.5’’ (44.5cm) Orbital rotation 120°(90°underscan /30°over scan) Lateral rotation ±205° Wig-Wag 25°(±12.5°) Weight 260±10kg Page 12-4... - Page 183 Brivo OEC 715/785/865 Mobile C-Arm X-Ray Product Workstation Weight: 17010kg Page 12-5...
-
Page 184: Specification Of Key Components
Technical Reference 12.3. Specification of Key Components 12.3.1. X-Ray Generator • Nominal electric power: 2.0kW (100kV, 20mA, 0.1s) • Maximum electric power: Normal Fluoro 440W (110kV, 4mA) High Level Fluoro 660W (110kV, 6mA; 55kV, 12mA) Low Dose 220W (110kV, 2mA) Digital Spot 1.76 kW (110kV, 16mA) @ 200V, 220V, 230V, 240V;... - Page 185 Brivo OEC 715/785/865 Mobile C-Arm X-Ray Product 110kV, the obtainable highest X-Ray tube current is 10mA @ 100V, 110V, 120V. Film 1mAs~80mAs @ 200V, 220V, 230V, 240V; current: 20mA, stationary; the obtainable highest X-Ray tube voltage is 110kV; 1mAs~40mAs @ 100V, 110V, 120V; current: 10mA, stationary; the obtainable highest X-Ray tube voltage is 110kV.
-
Page 186: X-Ray Source Assembly
Technical Reference 12.3.2. X-Ray Source Assembly Inherent Filter 2.55 mm Al @50KV with LOHMANN tube Removable filter 3.5 mm Al @50kV Maximum continuous heat dissipation rate 177W 327mm ×132 mm×238 mm Tube assembly dimension (length×Width×Height) Tube assembly weight 17.5 kg Maximum heat capacity 900,000HU Maximum cooling rate... - Page 187 Brivo OEC 715/785/865 Mobile C-Arm X-Ray Product X-Ray tube Nominal high voltage 110 kV Nominal input power 2.2 kW Maximum anode heat capacity 53 kJ Target material Tungsten Target angle 10° Small focal spot (IEC336) (Normal Fluoro, High Level 0.6×1.4 (IEC336)
- Page 188 Technical Reference Nominal diameter circle: 23cm (9”) • Shutter collimator Full Range Rotation Angle: 360° Operation: Controlled on panel The total filtration 3.35 mm Al /4.3 mm AI without removable filter 6.85 mm Al with removable filter Page 12-10...
-
Page 189: Grid
Brivo OEC 715/785/865 Mobile C-Arm X-Ray Product 12.3.3. Grid Type Circular Focus distance 100 cm 12.3.4. Image Intensifier Mode Normal Mag1 Mag2 Input field size 9’’(23 cm) 6’’(15cm) 4.5’’(11cm) Central resolution (23XZ4ST/BS) 44Lp/cm 50Lp/cm 54Lp/cm Central resolution (TH9438HXH249VR19 ST) 52Lp/cm... -
Page 190: Tube Rating Chart
Technical Reference 12.4. Tube Rating Chart The following charts and data describe tube characteristics when operated with three-phase full-wave rectification, a reasonable approximation to the high frequency generator with minimal ripple. 12.4.1. Filament Emission Characteristics Small Focal Spot LOHMANN Large Focal Spot LOHMANN Page 12-12... -
Page 191: Single Load Ratings
Brivo OEC 715/785/865 Mobile C-Arm X-Ray Product 12.4.2. Single Load Ratings Small Focal Spot LOHMANN Large Focal Spot LOHMANN Page 12-13... -
Page 192: Thermal Characteristic
Technical Reference 12.4.3. Thermal Characteristic Anode Heating and cooling characteristics: LOHMANN Tube Housing heating and cooling characteristic: Tube Housing Heating and Cooling Characteristics 300W 200W 800 000 640 000 480 000 320 000 160 000 Time (minutes) Page 12-14... -
Page 193: Scatter Radiation
Brivo OEC 715/785/865 Mobile C-Arm X-Ray Product 12.5. Scatter Radiation Isokerma Map Test This test method is according to clause 203.13.4 in EN 60601-2-43:2010. The measurement is performed at 2 planes at typical height: 1m & 1.5m from the ground. - Page 194 Technical Reference Lateral configuration, 1.5m: LOHMANN Lateral configuration, 1m: LOHMANN Page 12-16...
- Page 195 Brivo OEC 715/785/865 Mobile C-Arm X-Ray Product Vertical configuration, 1.5m: LOHMANN Vertical configuration, 1m: LOHMANN Page 12-17...
- Page 196 Technical Reference Significant Zones of Occupancy Test This test method is according to clause 13.4 in IEC 60601-1-3:2008. LOHMANN X-Ray tube : Page 12-18...
- Page 197 Brivo OEC 715/785/865 Mobile C-Arm X-Ray Product Horizontal & Vertical Plane Test This test is performed at fluoroscopic mode in 70kV, 3mA, without shielding. Horizontal Plane The following illustration shows measurement points in a plane perpendicular to the beam axis at a height indicated by reference point C1.
- Page 198 Technical Reference Vertical Plane The following illustration shows measurement points in a plane through the beam axis at a height indicated by reference point C1, which represents the 30-inch SSD. The measurement points are 25 cm apart. The table following the illustration shows expected scatter radiation at these points. Dose Rate Measurement Point...
-
Page 199: Room Interface (Rif)
Brivo OEC 715/785/865 Mobile C-Arm X-Ray Product 12.6. Room Interface (RIF) Room Interface (RIF) is an interface interactive with operation room or some peripheral equipment. The lamps in operation rooms such as Room In Use indicator or X-Ray On indicator can be connected to system to warn user, injector can be controlled by room interface if necessary, also the exposure can be restrained of door status in case of excessive radiation to user, all functions in RIF are not mandatory when operating. -
Page 200: Options
Technical Reference 12.7. Options 12.7.1. Thermal/ Film Printers UP-D897 UP-990AD UP-971AD/UP-991AD UP-D898MD 100 to 120V AC, Power 100 to 240V AC, 240V 100 to 240V AC, 220 to 240V AC, requirements 50/60Hz 50/60Hz 50/60Hz 50/60 Hz Dimensions ... -
Page 201: Laser Aimer
Brivo OEC 715/785/865 Mobile C-Arm X-Ray Product provides two laser aimer options, which are attached to the tube and Image Intensifier. Laser Aimer, which is attached to the tube, is incorporated with the tube cover. Press the laser aimer’s ON switch to generate the laser beam. -
Page 202: 30Cm Skin Spacer
Technical Reference 6. After attaching the laser aimer, place the C-Arm in the position it will be used during the procedure. 7. Turn the laser aimer ON and adjust the beam alignment knobs until the laser beam is centered on the crossing of the cross-hair on the tube cover. -
Page 203: Film Cassette Holder
Brivo OEC 715/785/865 Mobile C-Arm X-Ray Product 12.7.4. Film Cassette Holder Film cassette holder dimension: 33.1cm x35.0cm x5.2cm for 9’’ Image Intensifier. Film cassette dimensions: 10’’ x 12’' (24 cm x 30cm) for 9’’ Image Intensifier. If user need install the film cassette holder, please make sure the lock handle is locked into place. -
Page 204: Wi-Fi Internet Adapter
Technical Reference 12.7.8. Wi-Fi Internet Adapter When using the wireless network, operator should open the Wi-Fi Internet Adapter on the back Workstation and then setup the wireless network. Refer to section 6.3.3 “DICOM Setup” for details. A Wi-Fi Internet Adapter converts wire network interface into wireless network interface. The WiFi adaptor complies with the limits for a Class B digital device, pursuant to Part 15 of the FCC Rules. -
Page 205: Replacement Parts
Brivo OEC 715/785/865 Mobile C-Arm X-Ray Product 12.10. Replacement Parts Parts as below can be replaced in the field. Call service to replace or maintain the parts. • Circuit board and cable • Collimator • DC power supply, fuse, capacitor, filters, breaker and so on •... -
Page 206: System Block
Technical Reference 12.11. System Block Page 12-28... - Page 207 Brivo OEC 715/785/865 Mobile C-Arm X-Ray Product SERVICE OFFICES For service issues, contact the service representative or service office in your country. AMERICAS UNITED STATES OF AMERICA GE Medical Systems Headquarters Tel: +1–414–544–3011 3000 North Grandview Blvd. WAUKESHA, WI 53188 Mail: P.O.
- Page 208 GE Healthcare Parklands Estate, Building 4B 21 South Street, Rydalmere, NSW 2116 T: (61) 2-9846-4000; F: (61) 2-9846-4001 EUROPE Contact GE Healthcare service representative European Representative: GE Medical Systems S.C.S. Quality Assurance Manager 283 rue de la Minière 78530 BUC France...
- Page 210 www.gehealthcare.com Imagination at work...
Need help?
Do you have a question about the Brivo OEC 715 and is the answer not in the manual?
Questions and answers