Table of Contents
Advertisement
Advertisement
Table of Contents
Troubleshooting

Related Manuals for Inseego M3000


Summary of Contents for Inseego M3000
- Page 1 USER GUIDE Mobile hotspot M3000...
- Page 2 INSEEGO COPYRIGHT STATEMENT © 2022 Inseego Corp. All rights reserved. Complying with all copyright laws is the responsibility of the user. Without limiting the rights under copyright, no part of this document may be reproduced, stored in or introduced into a retrieval system, or transmitted in any form or by any means (electronic, mechanical, photocopying, recording or otherwise), or for any purpose without the expressed written permission of Inseego Corp.
-
Page 3: Table Of Contents
Display view ................................8 Side view .................................. 8 Status indicators and icons ............................. 9 Getting started ................................10 Setting up with the Inseego Mobile app ....................10 Installing a SIM Card ............................11 Turning on and off ............................. 12 System requirements ............................13 Finding your Wi-Fi name and password .................... - Page 4 LAN tab ................................... 83 Port Filtering tab ..............................86 Port Forwarding tab ............................88 VPN tab .................................. 91 Inseego Connect Tab ............................93 Troubleshooting and support ..........................94 Overview ..................................95 First troubleshooting steps ..........................95 Common problems and solutions ........................95 My MiFi powered off without pressing the Power button ..............
- Page 5 I forgot my Wi-Fi password ..........................96 I forgot my MiFi Admin web UI password ....................96 I cannot connect a device to my MiFi ......................96 I see other networks, but not the network name for my MiFi ............97 I see the network name, but cannot connect a device to my MiFi ..........
-
Page 6: Introduction And Getting Started
Introduction and getting started Overview Description Status indicators and icons Getting started Caring for your MiFi MiFi X PRO 5G USER GUIDE... -
Page 7: Overview
Overview MiFi X PRO 5G is Inseego’s 5G mobile hotspot, providing groundbreaking speeds using T-Mobile’s 5G Ultra Capacity network. Connect with dual-band Wi-Fi 6 (supporting up to 32 connected devices), a USB Type-C port, or an RJ45 Ethernet port for direct internet connection. -
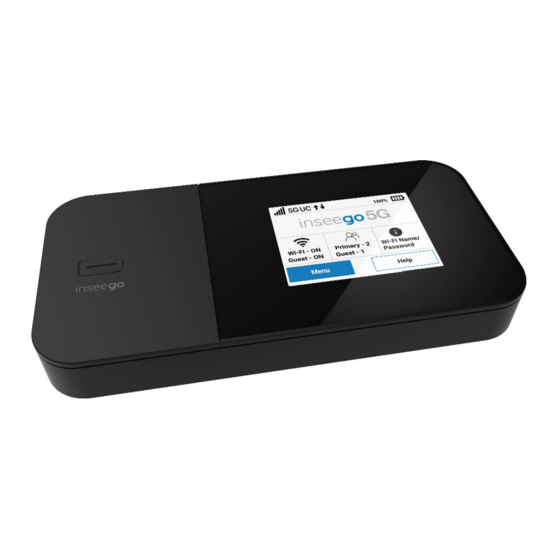
Page 8: Display View
Display view Press and hold the Power button for three seconds to turn your MiFi X PRO 5G on and off. Press and release the Power button to wake up the display. The 2.4-inch IPS color touchscreen displays and allows you to view Wi-Fi name and password, connected devices, data usage, and more. -
Page 9: Status Indicators And Icons
Status indicators and icons The MiFi X PRO 5G uses the following status indicators and display icons. Display Icon Description No icons The MiFi is powered off or not receiving power, or the screen is in power-saving mode. Home Home Network signal Network Signal Strength Indicator. -
Page 10: Getting Started
When fully charged, the battery has all day life Setting up with the Inseego Mobile app You can set up and manage your MiFi with the Inseego Mobile app: 1. Scan the QR code to install from AppStore or Google Play. -
Page 11: Installing A Sim Card
Installing a SIM Card Your SIM card is a small rectangular plastic card that stores your phone number and important information about your wireless service. The MiFi X PRO 5G supports only Nano SIM cards. To prevent damage to the SIM slot, please select the correct SIM for this device. CAUTION: Always use a factory-made SIM card supplied by the service provider. -
Page 12: Turning On And Off
3. Lift the SIM access tab by placing a fingernail underneath the white arrow and lifting the tab up and to the right. 4. If necessary, remove the SIM card from the outer card, being careful not to touch the gold- colored contacts. -
Page 13: System Requirements
System requirements Any device with Wi-Fi capability can connect to your MiFi. You can also connect via USB or Ethernet. The MiFi must have proper data service to function and is compatible with all major operating systems and the latest versions of browsers. Finding your Wi-Fi name and password Tap Wi-Fi Name/Password on the Home screen. -
Page 14: Caring For Your Mifi
Connecting devices with USB You can tether to a device using the USB-C port: 1. Connect the USB-C end of a USB cable into the USB-C port on your MiFi. Connect the USB-A end of a USB cable into the device you wish to connect. The USB Connection Options touchscreen appears. - Page 15 2. Connect the USB-A end of the USB cable into another device, such as a laptop. The USB Connection Options touchscreen appears. 3. Select Charge the M3000 and tap OK. Charging with a wall charger You can charge your MiFi to a power outlet using its charging/data cable (included) and a compatible wall adapter (not included).
- Page 16 Do not use the Charge Other Device feature if you want to use the battery for a full day. Charging best practices For optimum battery health and life, Inseego does not recommend keeping the battery fully charged for an extended period of time. To support this, your MiFi includes the Battery Preservation Mode (BPM) feature, which helps prevent overcharging and preserves the integrity of your battery.
-
Page 17: Battery Preservation Mode
CAUTION: Always use official OEM batteries and chargers that have been approved by Inseego for optimal performance and safe operation of your MiFi. Battery Preservation Mode Battery Preservation Mode is designed for users that typically keep their MiFi plugged in for extended periods (over 24 hours at a time). -
Page 18: Battery Tips
Once Battery Preservation Mode has been activated, your MiFi no longer charges to 100%. Initially, the charge level is between 70% and 99% and eventually, 70% to 80%. If this is not desired, you can disable Battery Preservation Mode on the touchscreen (Menu > Settings), or on the Admin web UI (Settings >... -
Page 19: Replacing The Battery
Replacing the battery CAUTION: Whenever you remove or insert the battery, ensure your MiFi is not connected to any device or power source. Never use tools, knives, keys, pens or any type of object to force the door open or to remove the battery. Using any of these types of objects could result in puncturing the battery. -
Page 20: Replacing The Sim Card
Replacing the SIM card Your SIM card is a small rectangular plastic card that stores your phone number and important information about your wireless service. Your MiFi comes with a pre-installed SIM card. NOTE: Should your SIM card be lost or damaged, contact your network operator. To remove the SIM card: 7. -
Page 21: Unlocking The Sim Card
To place a new SIM card: 1. If necessary, remove the SIM card from the outer card, being careful not to touch the gold- colored contacts. 2. Slide the SIM card into the slot notch first, with the contact points facing down. 3. -
Page 22: Resetting Your Mifi
Resetting your MiFi You can reset your MiFi to factory settings using the Reset button on the MiFi, from the MiFi touchscreen, or from the Admin web UI. CAUTION: Resetting returns your MiFi to factory settings, including resetting the Wi-Fi name and password and Admin password. -
Page 23: Care Tips
Care tips Inseego Wireless recommends the following care guidelines: Protect your MiFi from liquids, dust, and excessive temperatures. • Do not apply adhesive labels to your MiFi; they might cause the device to potentially • overheat or alter the performance of the antenna. -
Page 24: Touchscreen
Touchscreen Overview Managing Wi-Fi settings Managing connected devices Viewing data usage Managing settings Charging other devices Viewing software update info Viewing messages Viewing info about your MiFi Viewing help MiFi X PRO 5G USER GUIDE... -
Page 25: Overview
Overview You can view and customize your MiFi settings directly on the MiFi touchscreen. Home screen The Home screen lets you see what your MiFi is doing at a glance. Status bar: The top of the screen displays status indicators, which may include: network signal strength , network type (for example, ), data traffic activity... -
Page 26: Navigation Tips
Navigation tips Tap on the arrows to navigate through topics. • to return to the Home screen. • A multiple screen icon indicates there are multiple screens on that topic. Swipe left • and right through screens. If there is a scroll bar visible on the right, swipe up or down to scroll. •... -
Page 27: Band Selection
Band Selection Use the default values as they appear or adjust them for your environment. Each network can be accessed over two bands: 2.4 GHz and 5 GHz: The 2.4 GHz band is supported by all devices with Wi-Fi and should be used by devices •... -
Page 28: Wi-Fi Protected Setup (Wps)
Wi-Fi Protected Setup (WPS) Enabling Wi-Fi Protected Setup (WPS) allows compatible Wi-Fi devices to easily connect to your MiFi primary or guest network. NOTE: If WPS is off, you can turn it on using the Admin web UI Wi-Fi pages. Tap a network Select a connection option Use WPS Button... -
Page 29: Managing Connected Devices
Managing connected devices The Connected Devices screen lists all devices currently connected to your MiFi, along with the network they are using. You can view device details and block or unblock devices from internet access. To manage connected devices, tap the connected devices icon on the Home screen (or tap Menu >... -
Page 30: Viewing Data Usage
Viewing data usage You can view data usage on the Home screen or tap Menu > Data Usage. NOTE: The data usage information displayed is an estimate and may differ from official T-Mobile data usage numbers. Always refer to your T-Mobile account for precise data usage information. Tap Menu Tap Data Usage View estimated usage and plan info... -
Page 31: Charging Other Devices
Set timer for sleep mode Tap Factory Reset to restore all settings Use the Admin web UI to the factory default values. Your MiFi will turn off and then on again and all connected devices will be disconnected. NOTE: Factory Reset can be locked from the Admin web UI. If it is locked, you will receive an error message and it must be unlocked from the Admin web UI (Settings >... -
Page 32: Viewing Software Update Info
Viewing software update info Software updates are delivered to the MiFi automatically over the mobile network. Use the Software Updates screen to view the current software version, the last check for updates, update history, and to check for a new update. Tap Menu Swipe up and tap Software Update Tap Check History... -
Page 33: Viewing Info About Your Mifi
Swipe up and tap About View details about your MiFi The About touchscreen provides the following information: Model: M3000. SW Version: The version of the software currently installed on your MiFi. Wireless Number: The phone number stored in the SIM card for your MiFi. -
Page 34: Viewing Help
Viewing help When you see on a screen, tap it for more information on that topic, or use the Help menu. The Help screen provides all the help topics and a tutorial for your MiFi. Tap Help and then Select a topic View Help topic MiFi X PRO 5G USER GUIDE... -
Page 35: Admin Web Ui
Admin Web UI Overview Admin password Managing data usage Managing Wi-Fi settings Managing connected devices Managing settings Viewing info about your MiFi Getting help MiFi X PRO 5G USER GUIDE... -
Page 36: Overview
Overview You can access basic and advanced MiFi settings using the Admin web UI. On a computer or browser-supported device connected to your MiFi, open any web browser and go to http://192.168.1.1. Home page The Home page is the local gateway to configuring and managing your MiFi. It displays current data usage and Wi-Fi status, lists currently connected devices, and offers links to other pages with option settings and help. -
Page 37: Admin Password
Admin password The Admin password is what you use to sign into the MiFi Admin web UI. Initially, it is the same as the default password for your MiFi primary network. Tap Wi-Fi Name/Password on the Home touchscreen of your MiFi to view the initial default password. You are prompted to change the Admin password upon first login. -
Page 38: Managing Data Usage
Managing data usage On the web UI Home page, the Data Usage panel displays graphs of your MiFi data usage for the current billing cycle. NOTE: The data usage information displayed is an estimate and may differ from official T- Mobile data usage numbers. -
Page 39: Data Usage Page
Data Usage page Use the Data Usage page to view details about your MiFi data usage and billing plan. NOTE: The data usage information displayed is an estimate and may differ from official T- Mobile data usage numbers. Always refer to your T-Mobile account for precise data usage information. - Page 40 Session Duration: The amount of time that has elapsed since the connection for the current Internet session was established. Session Tx: The amount of data transmitted for the current Internet session. This counter starts at zero when the connection is established. Session Rx: The amount of data received for the current Internet session.
-
Page 41: Managing Wi-Fi Settings
Managing Wi-Fi settings Your MiFi offers primary and guest networks for accessing the Internet over Wi-Fi. Each network can be accessed over two bands: 2.4 GHz and 5 GHz. On the web UI Home page, the Wi-Fi panel shows the current name (SSID) and state of primary and guest networks. -
Page 42: Settings Tab
Settings tab You can use the default values as they appear on this tab or can adjust them for your environment. Wi-Fi Preferences Use the Allow Wi-Fi Devices to Connect ON/OFF slider to turn Wi-Fi on or off. This selection affects primary and guest networks. - Page 43 Band Selection Each network can be accessed over two bands: 2.4 GHz and 5 GHz: The 2.4 GHz band is supported by all devices with Wi-Fi and should be used by devices • that are a few years old or older. This band passes through walls better and propagates over longer distances, so it may have a longer range.
-
Page 44: Primary Network Tab
Primary Network tab Use these settings to connect initially to the primary Wi-Fi network or change primary network information. Connected devices must use the Wi-Fi settings shown on this screen. Network Settings NOTE: If you change these settings, existing connected devices may lose their connection. Primary Network Name (SSID): Enter a primary network name (SSID) to set up or change the primary network name. - Page 45 Generate New Password: This button inserts a strong random password in the Password field. You can click the eye icon to view the password. Other Settings Hide primary network name (SSID) on the touchscreen: Check this box to hide the Wi-Fi primary network name on the MiFi touchscreen.
-
Page 46: Guest Network Tab
Guest Network tab The Wi-Fi guest network allows you to segregate traffic to a separate network rather than share access to your Wi-Fi primary network. Use settings on this tab to set up or change Wi-Fi guest network information. Connected devices must use the Wi-Fi settings shown on this screen to connect to the guest MiFi Wi-Fi network. - Page 47 Important: It is recommended that you change the password from the default and use a different password from your Admin or primary network password to keep the device and your network secure. Generate New Password: This button inserts a strong random password in the Password field. You can click the eye icon to view the password.
-
Page 48: Managing Connected Devices
Managing connected devices On the web UI Home page, the Connected Devices panel lists all devices currently connected to your MiFi, along with the network they are using. To manage connected devices, select from the Home page Connected Devices panel (or select Connected Devices from the web UI side menu). -
Page 49: Connected Devices Page
Connected Devices page This page provides details about each device connected to the MiFi and allows you to edit how device names appear in the web UI. You can also block or unblock a device from internet access. Connected Devices This table lists all devices connected to the MiFi: Device: An icon indicates the connection type (Wi-Fi, USB, or Ethernet) for each device. - Page 50 Select Change Wi-Fi connection limit to change the maximum number of devices allowed to connect to your MiFi Wi-Fi. Use the slider to select a number and click Save Changes. The maximum number of connected devices is 32. Blocked This section lists all devices blocked from connecting to the MiFi. NOTE: Since blocked devices are not currently connected, they do not have an IP address.
-
Page 51: Managing Settings
Managing settings On the web UI Home page, the Settings panel shows the current Mobile Network, Port Filtering and GPS settings (ON/OFF), and the date and time of the last system update. To change system settings, select from the Home page Settings panel (or select Settings from the web UI side menu). - Page 52 Device Preferences sub tab Use this page to set options for the MiFi touchscreen. USB mode when connected to a computer: Use the drop-down list to select the type of connection you want for devices connecting to the MiFi USB-C port: USB charging, internet access via USB and Wi-Fi, or internet access via USB only.
- Page 53 Allow factory reset from the touchscreen: Use the ON/OFF slider to allow or disallow factory reset from the MiFi Reset button and touchscreen (Settings > Factory Reset). If ON, factory reset is allowed from the MiFi Reset button and touchscreen. Factory reset resets all settings to factory default settings and disconnects all connected devices.
- Page 54 Notifications sub tab Use this page to set options for notifications on your MiFi. Stealth mode: Check this box to turn off the LED and audio capabilities of your MiFi. NOTE: checked, other than the startup process, the MiFi touchscreen turns on only when the Power button is pushed.
- Page 55 Play sounds for these alerts: Check the boxes for the events you want to trigger an audio alert: Startup/Shutdown Low battery Critical low battery Charging device Charge other device USB mode SIM status ...
- Page 56 User Preferences sub tab Use this page to change how dates, time, and numbers are displayed in the MiFi Admin web UI. Language: Select a language for the Admin web UI. Date: Select the date format to be used throughout the web UI (mm/dd/yyyy or dd/mm/yyyy). Time: Select the time format to be used throughout the web UI (12 or 24 hour).
-
Page 57: Software Update Tab
Software Update tab Software updates are delivered to the MiFi automatically over the mobile network. This tab displays your current software version, last system update information, software update history, and allows you to check for new software updates. Current Software Modem Software Version: The version of software currently installed for the modem component. - Page 58 Update status: This is area is usually blank. If you check for an update, the result of that check, or the download progress of an update displays. Check for Update: Click this button to manually check for available software updates. If a new software update is available, it is automatically downloaded.
-
Page 59: Backup And Restore Tab
Backup and Restore tab Use this tab to back up current MiFi settings to a file on your computer, restore (upload) a previously saved configuration file, reset the router to factory defaults, or restart or turn off your MiFi. Backup Configurations To back up current MiFi settings to a file on your computer, enter your Admin password in the Admin password box. - Page 60 NOTE: The backup file cannot be edited or viewed on the downloaded system or on any other device. This file can only be restored for this model of MiFi. Restore Settings CAUTION: Restoring settings (uploading a configuration file) changes ALL of the existing settings to match the configuration file.
-
Page 61: Gps Tab
GPS tab The MiFi incorporates a GPS receiver. The GPS receiver can determine your current location. Use this tab to enable GPS, view current location information, and to enable GPS streaming to devices with the GPS over Wi-Fi feature. GPS Settings Enable GPS: This setting enables or disables the GPS radio on your MiFi. -
Page 62: Advanced Tab
GPS Driver For the GPS over Wi-Fi feature, if you want to access the GPS data stream from a virtual COM port instead of the TCP port (above), use the Download Driver button to download and install a GPS driver for your Windows platform. This driver creates a virtual NMEA port, obtains GPS data from the MiFi, and makes this GPS data available to NMEA-aware third-party applications. -
Page 63: Viewing Info About Your Mifi
Viewing info about your MiFi On the web UI Home page, the About panel shows current internet status, the name of the network to which the MiFi is connected, technology, and amount of time connected. To view more detailed information about your MiFi and its use, select from the Home page About panel (or select About from the web UI side menu). -
Page 64: Internet Status Tab
Internet Status tab Use the Internet Status tab to view general internet connection and system information. General Status: The current status of the MiFi internet connection. Network Name: The name of the network for the current internet session established. Technology: Indicates the current cellular data connection, for example, 5G. Time Connected: The amount of time that has elapsed since the connection for the current internet session was established. -
Page 65: Internet Sessions Tab
IPv6 IP Address: The global IPv6 address for the MiFi (blank if IPv6 is turned off or is not supported by the current network connection or operator). DNS: The Domain Name Server currently used by the MiFi. Internet Sessions tab Use the Internet Sessions tab to export and view internet session data. -
Page 66: Diagnostics Tab
Diagnostics tab This tab displays detailed information used solely for troubleshooting or technical support. Modem Mobile Number (MDN): The phone number of your MiFi. IMEI: The International Mobile Equipment Identity (IMEI) for your MiFi. This is a 15-digit code used to uniquely identify an individual mobile station. The IMEI does not change when the SIM is changed. -
Page 67: Device Info Tab
Device Info tab Use this tab to view details about your internal WAN connection. General Manufacturer: Inseego. Model: M3000. Software Components Modem Software Version: The version of software currently installed for the modem component. Wi-Fi Firmware Version: the version of firmware (software) currently installed for the Wi-Fi component. -
Page 68: Logs Tab
Logs tab Use this tab to view log information for troubleshooting. Log Settings Turn On Logging: Check this box to turn on logs as needed. Automatically Clear Logs: Use the drop-down list to select when you want system log data deleted. -
Page 69: Getting Help
Getting help On the web UI Home page, the Help panel provides links to introductory help and support. To view more detailed help information, select from the Home page Help panel (or select Help from the web UI side menu). The Help page includes two tabs: Help •... -
Page 70: Help Tab
Help tab This page provides links to help topics for every page of the Admin web UI and general topics useful for getting started with your MiFi. MiFi X PRO 5G USER GUIDE... -
Page 71: Customer Support Tab
Model: Model of the device. Your Wireless Number: The phone number associated with your MiFi. User Guide: A link to this User Guide. Manufacturer: A link to the Inseego website. Customer Support Contact your service provider or reseller for customer support. -
Page 72: Advanced Settings
Advanced settings Overview Using advanced settings MiFi X PRO 5G USER GUIDE... -
Page 73: Overview
Overview The Advanced Settings pages on the MiFi Admin web UI are intended for users with technical expertise in the area of telecommunication and networking. WARNING! Changing the Advanced settings may be harmful to the stability, performance, and security of the MiFi. Using advanced settings When you select the Advanced tab on the Settings page, a warning message appears. -
Page 74: Cellular Tab
Cellular tab In most configurations, the MiFi is used with a dynamic IP and SIM and the Access Point Name (APN) is available from the network. However, if you are on a private network, you may need to set the APN on this tab for the network to communicate with the MiFi. Allow device to connect to the mobile network: Use the ON/OFF slider when necessary to turn off cellular data and prevent access to the mobile network. - Page 75 APN Settings CAUTION: Changing the APN may cause a loss of data connectivity and disconnect you from the web UI. APN: Use the drop-down to choose the APN for your MiFi. Authentication: Select the authentication method for your private network from the drop-down (None, PAP, CHAP, PAP or CHAP).
-
Page 76: Manual Dns Tab
Manual DNS tab The MiFi automatically selects a Domain Name Server (DNS). This tab allows you to manually assign up to two DNS IP addresses. Manual DNS Turn on manual DNS: Check this box to manually select a DNS. DNS 1 IP address: Enter the IP address for the primary DNS. This address is required to use the Manual DNS feature. -
Page 77: Sim Tab
SIM tab The SIM card in your MiFi can be locked using a PIN. If the SIM card is locked, you must enter the PIN before connecting to the mobile network. Once entered, the PIN is remembered until the next shutdown. You may also need to provide the existing PIN to change a SIM. The default PIN is available from your service provider. - Page 78 PUK Lock - If the SIM is currently PUK locked, the only operation possible is to enter the PUK. NOTE: If an incorrect PUK is entered too many times, the SIM becomes permanently unusable. You will need to obtain a new SIM. A counter indicates how many entry attempts remain.
-
Page 79: Firewall Tab
Firewall tab The MiFi firewall determines which internet traffic is allowed to pass between the MiFi and connected devices and protects your connected devices from malicious incoming traffic from the internet. The firewall cannot be turned off. Use the Firewall tab to adjust the general security level of the firewall, designate a specific device to receive all traffic, and set up specific firewall rules. - Page 80 Destination IP address: Enter the IP address of the connected device you wish to become the DMZ device (the DMZ destination). NOTE: You can check the IP address of each connected device on the Connected Devices screen. Click Save Changes. MiFi X PRO 5G USER GUIDE...
-
Page 81: Mac Filter Tab
MAC Filter tab The MAC filter allows only selected devices to access the MiFi primary Wi-Fi network. By default, MAC filter is turned OFF. Use this tab to turn the MAC Filter ON and specify device access. NOTE: The MAC filter has no effect on devices connected to the guest Wi-Fi network. MAC Filter Configuration To use the MAC filter, select the device(s) from the device list that you want to be allowed to connect to the primary network and move the ON/OFF slider to ON. - Page 82 Notes on Blocking Devices There are two ways to block devices from connecting to the MiFi: Temporarily block a device from connecting to the MiFi via the primary and guest • networks and via USB or Ethernet. To use this method, go to the Connected Devices page and click the Block button next to the device.
-
Page 83: Lan Tab
LAN tab This tab provides settings and information about the MiFi local area network (LAN). The LAN consists of the MiFi and all Wi-Fi, USB, and Ethernet connected devices. IP Passthrough IP Passthrough (IPPT) enables the first device detected on the specified interface to obtain the IP address assigned by the mobile network. - Page 84 Hostname: When enabling IPPT on the USB interface, enter the hostname of the device connected for IP Passthrough. This is the only USB-connected device that can obtain the IP address assigned to the mobile network. You can view the hostname on the Home or Connected Devices page.
- Page 85 IPv6 Turn on IPv6: Check this box if any of your connected devices support IPv6. This enables IPv6 connected devices to make IPv6 connections to the internet. Link-Local Address: The Link-Local IPv6 address if the connected device supports IPv6. Click Save Changes to activate and save new settings. MiFi X PRO 5G USER GUIDE...
-
Page 86: Port Filtering Tab
Port Filtering tab Port Filtering allows you to block outgoing internet connections and permit only selected applications to access the internet. Traffic is identified by port numbers. Some applications are pre-defined. You can define additional applications if you know the details of the traffic used and generated by the applications. - Page 87 Port STCP Application Name Email POP3 Assigned POP3S IMAP Assigned IMAPS Assigned SMTP Assigned SecureSMTP FTP control (command) Assigned FTP data transfer Assigned HTTP Assigned HTTPS Assigned Telnet Assigned Custom Applications You can define up to ten custom applications. Add custom application: Use this button to add a new row to the custom application list. On: Check this box if you want the new application to be able to access the internet.
-
Page 88: Port Forwarding Tab
Port Forwarding tab Port Forwarding allows incoming traffic from the internet to be forwarded to a particular device connected to your Wi-Fi network. Normally, the built-in firewall blocks incoming traffic from the internet. Port forwarding allows internet users to access any server you are running on your computer, such as a Web, FTP, or Email server. - Page 89 Port Forwarding Configuration Port forwarding: To turn on port forwarding, move the ON/OFF slider to ON. To turn off port forwarding, so that no inbound traffic is forwarded to a LAN client, move the slider to OFF. Check the box next to each Port Forwarding application that you want to allow. To forward all inbound WAN traffic on a specific port to a single LAN client, enter the IP address of the target device in the Application IP address field for the application.
- Page 90 Custom Applications You can add up to ten custom applications. Once defined, these applications can be turned on and off the same way as pre-defined applications. Add custom application: Use this button to add a new row to the custom applications list. On: Check this box if you want the application to be able to access the internet (enabling •...
-
Page 91: Vpn Tab
VPN tab Use this page to establish a tunnel connection to an OpenVPN server and route all traffic on connected devices through the tunnel. OpenVPN Settings This section is visible once you have configured your MiFi for OpenVPN using the Configure OpenVPN Settings button. - Page 92 Auto-connect VPN: When the Auto-connect VPN ON/OFF slider is ON, the VPN tunnel will automatically be established whenever an internet connection is made. When OFF, the VPN connection must be established manually. Clear All OpenVPN Settings: This button deletes all OpenVPN files, logs, and resets all OpenVPN settings.
-
Page 93: Inseego Connect Tab
DOWN – The MiFi is NOT communicating with Inseego Connect servers. Last reported: The time when your MiFi last sent a packet to Inseego Connect servers. Reporting interval: This is the interval at which your MiFi will send packets into the Inseego Connect server. -
Page 94: Troubleshooting And Support
Troubleshooting and support Overview Common problems and solutions Technical support MiFi X PRO 5G USER GUIDE... -
Page 95: Overview
Overview The MiFi is a highly reliable product. Most problems are caused by one of these issues: System resources required by the MiFi are being used by other devices. • Network coverage is unavailable due to coverage area, an account problem, or a network •... -
Page 96: No Service Is Available
No service is available Reorient your device. If you are inside a building or near a structure that may be blocking • the signal, change the position or location of the device. For example, try moving your device close to a window. You are outside your coverage area, or there may be a problem with your account. -
Page 97: I See Other Networks, But Not The Network Name For My Mifi
I see other networks, but not the network name for my MiFi The default multi-mode settings on your MiFi work for most Wi-Fi clients, however, some older devices require that you set one of the Wi-Fi bands to support older BGN standards: 1. -
Page 98: I Want To See The Firmware (Software) Version Installed On My Mifi
On the MiFi Admin web UI: The Connected Devices panel on the Home page lists the number of connected devices to the right of Connected Devices. Click in the bottom-right corner of the panel for details on connected devices. I want to see the firmware (software) version installed on my MiFi NOTE: Software updates are delivered to the MiFi automatically over the mobile network. -
Page 99: Technical Support
Contact your service provider for assistance. More Information Documentation for your MiFi is available online. Go to https://inseego.com/download/mifixpro- userguide-tmobile.pdf. Or, from the MiFi Admin web UI, select Help > Customer Support > User Guide. MiFi X PRO 5G USER GUIDE... -
Page 100: Product Specifications And Regulatory Information
Product specifications and regulatory information Product specifications Regulatory information Product Certifications and Supplier’s Declarations of Conformity Wireless communications Limited warranty and liability Safety hazards Proper battery use and disposal MiFi X PRO 5G USER GUIDE... -
Page 101: Product Specifications
Product specifications Device Name: MiFi X PRO 5G Model: M3000B Regulatory: Standards, approvals, PTCRB certifications: Dimensions: 5.9” x 2.91” x 0.74” (150mm x 74mm x 18.9mm) Weight: 8.5 oz (241 g) Ports: USB-C port – charging, tethering, charging of other external devices 1 Gbps RJ45 Ethernet port - tethering SIM: 4FF Nano SIM... -
Page 102: Power
Power Charging: Qualcomm QC-compliant wall Input voltage: 100 – 240 Vac adapter with a minimum power Frequency: 50 / 60Hz output of 18W (for optimal charging) Output voltage/current: 5V/3A, 9V/2A, 12V/1.5A Wall adapter with a minimum power Input voltage: 100 – 240 Vac output of 15W (charge time will vary) Frequency: 50 / 60Hz Output voltage/current: 5V/3A... -
Page 103: Software
3rd party penetration testing, Anti-CSRF, VPN passthrough, OpenVPN Warranty and services Industry leading warranty Inseego Care support and advanced replacement options available MiFi provisioning available to apply custom templates and verify device activation prior to shipment Regulatory information Federal Communications Commission Notice (FCC – United States) -
Page 104: Fcc Rf Exposure Guidance Statement
MODIFICATIONS: The FCC requires that you be notified that any changes or modifications made to this device that are not expressly approved by Inseego Corp. may void your authority to operate the equipment. -
Page 105: Wireless Communications
Inseego Corp. or its partners will not be held responsible for damages of any kind resulting from the delays or errors in data transmitted or received with the M3000 device, or failure of the M3000 device to transmit or receive such data. -
Page 106: Safety Hazards
Safety hazards Do not operate the 5G MiFi X PRO 5G in an environment that might be susceptible to radio interference resulting in danger, specifically: Areas where prohibited by the law Follow any special rules and regulations and obey all signs and notices. Always turn off the host device when instructed to do so, or when you suspect that it might cause interference or danger. -
Page 107: Proper Battery Use And Disposal
discharge reset the device. If the software is not operational after an ESD occurrence, then restart your computer. Proper battery use and disposal IMPORTANT: In the event of a battery leak: - Do not allow the liquid to come in contact with the skin or the eyes. If contact has been made, wash the affected area with large amounts of water and seek medical advice. -
Page 108: Glossary
Glossary MiFi X PRO 5G USER GUIDE... -
Page 109: Glossary
Glossary 4G LTE —Fourth Generation Long Term Evolution. LTE is a standard for wireless data • communications technology and an evolution of the GSM/UMTS standards. The goal of LTE is to increase the capacity and speed of wireless data networks using new DSP (digital signal processing) techniques and modulations that were developed around the turn of the millennium. - Page 110 FTP — File Transfer Protocol. A standard network protocol used to transfer computer • files between a client and server. GB — Gigabyte. A multiple of the unit byte for digital information storage. Usage • depends on context. When referring to disk capacities it usually means 10 bytes.
- Page 111 by different names in different regions, some examples are: wireless provider, network provider, or cellular carrier. MSID — Mobile Station IDentifier. A number for a mobile phone that identifies that phone • to the network. Network Operator — The vendor that provides your wireless access. Known by different •...
- Page 112 SIM — Subscriber Identification Module. Found in LTE and GSM network technology, the • SIM is a card containing identification information for the subscriber and their account. The SIM card can be moved to different devices. SMTP — Simple Mail Transfer Protocol. The standard protocol for sending emails across •...
- Page 113 VPN — Virtual Private Network. A secure private network that runs over the public • internet. Commonly used to connect to an office network from elsewhere. Wi-Fi — Any system that uses the 802.11 standard developed and released in 1997 by the •...
Need help?
Do you have a question about the M3000 and is the answer not in the manual?
Questions and answers