Advertisement
Quick Links
Advertisement

Related Manuals for AnyCubic Kobra


Summary of Contents for AnyCubic Kobra
- Page 2 Dear customer, Thank you for choosing ANYCUBIC products. Maybe you are familiar with 3D printing technology or have purchased ANYCUBIC printers before, but we still highly recommend that you read this manual carefully. The installation techniques and precautions in this manual can help you avoid any unnecessary damage or frustration.
-
Page 3: Safety Instructions
It is recommended to use protection glasses when cleaning/sanding the printed models to avoid small particles in eyes. Keep the Anycubic 3D printer and its accessories out of the reach of children. Vapors or fumes may be irritating at operating temperature. Always use the Anycubic 3D printer in an open and well ventilated area. -
Page 4: Packing List
Packing List Spring Washers (4PCS) Frame Base M5 x 45 Screws (4PCS) M5 x 14 Screw (1PCS) Touchscreen Print Head Filament Holder M5 x 6 Screws (2PCS) M3 x 6 Screws (4PCS) M4 x 6 Screws (3PCS) Spare Nozzle R Type Cable Clamp Card Reader Spare Teflon Tube Power Cord... -
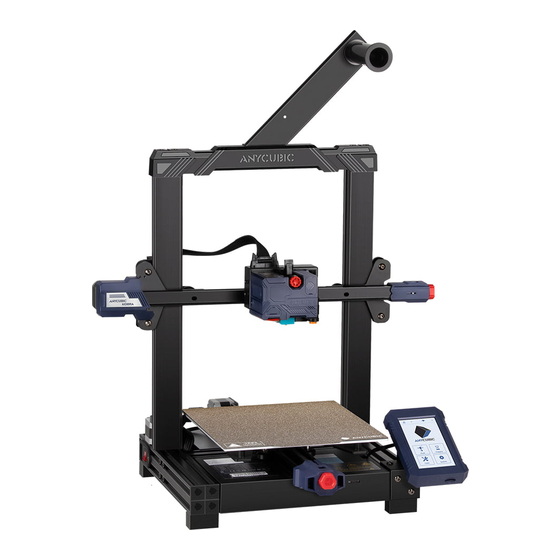
Page 5: Product Overview
Product Overview Front Filament holder Print head Proximity switch Printing platform Touchscreen Y belt tensioner Data cable port Memory card slot... - Page 6 Product Overview Back Lead screw X belt tensioner X motor Z motor Voltage regulator Power switch Y motor...
- Page 7 If there are some tiny scratches on the aluminum beams or slight unevenness on the platform, it is normal and won’t affect the printing quality. Thank you very much for your kind understanding. Team ANYCUBIC...
- Page 8 Installation 1. Cut off the zip tie on the X-axis bracket. Cut off the zip tie 2. Turn the coupler to raise the X axis. (Back side) Coupler...
- Page 9 Installation 3. Install the frame. (Front side) Make sure the Z aluminum beam is accurately mounted onto the groove of the base aluminum beam. Spring washer M5 x 45 Screw...
- Page 10 Installation 4. Install the print head. (Front side) M3 x 6 Screw 5. Install the screen. (Front side) M5 x 14 Screw M5 x 6 Screw...
- Page 11 Installation 6. Install the filament holder. (Back side) M4 x 6 Screw...
- Page 12 Installation 7. Wiring: connect all these cables to their ports following the corresponding label. (The cables are packed under the heated bed, please tear off the tape and pull out the cables carefully.) Do not connect or disconnect any cables when the machine is powered on. Do not twist the print head cable.
- Page 13 Installation 8. Secure the print head cable to the bracket with an R type cable clamp and one M4 X 6 screw. (Back side) M4 x 6 Screw...
Need help?
Do you have a question about the Kobra and is the answer not in the manual?
Questions and answers