Table of Contents
Advertisement
Quick Links
Operation Manual
You must read the Usage and Safety Precautions before use.
©2022 ZOOM CORPORATION
Copying or reprinting this manual in part or in whole without permission is prohibited.
Product names, registered trademarks and company names in this document are the property of their respective companies. All trademarks and
registered trademarks in this document are for identification purposes only and are not intended to infringe on the copyrights of their respective owners.
Proper display is not possible on grayscale devices.
Advertisement
Table of Contents

Related Manuals for Zoom MultiTrak R12


Summary of Contents for Zoom MultiTrak R12
- Page 1 Operation Manual You must read the Usage and Safety Precautions before use. ©2022 ZOOM CORPORATION Copying or reprinting this manual in part or in whole without permission is prohibited. Product names, registered trademarks and company names in this document are the property of their respective companies. All trademarks and registered trademarks in this document are for identification purposes only and are not intended to infringe on the copyrights of their respective owners.
-
Page 2: Notes About This Operation Manual
• Recording from copyrighted sources, including CDs, records, tapes, live performances, video works and broadcasts, without permission of the copyright holder for any purpose other than personal use is prohibited by law. Zoom Corporation will not assume any responsibility related to infringements of copyrights. -
Page 3: Table Of Contents
Contents Notes about this Operation Manual........................2 R12 overview................................6 Terms used in this manual............................6 Functions of parts................................7 Connection example..............................12 Touchscreen display..............................13 Home Screen overview.............................13 Control Bar overview..............................18 Touchscreen operation overview..........................21 Making preparations..............................24 Inserting microSD cards............................24 Connecting output devices............................ - Page 4 Playing projects................................. 87 Editing projects................................89 Editing regions................................89 Editing waveforms (audio/rhythm regions)......................105 Editing notes (synth regions)..........................110 Editing tracks................................115 Using markers................................121 Mixing projects................................ 127 Checking track levels.............................. 127 Muting tracks................................128 Listening to selected tracks only (soloing)......................129 Adjusting the volume..............................130 Adjusting the panning, EQ and effects of tracks....................
- Page 5 Setting the date and time............................. 174 Setting the type of batteries used........................176 Adjusting the brightness of the touchscreen..................... 177 Setting the touchscreen backlight........................178 Managing microSD cards............................179 Checking microSD card information........................179 Testing microSD card performance........................180 Formatting microSD cards............................. 182 Using as a card reader............................184 Restoring default setting values...........................
-
Page 6: R12 Overview
R12 overview Terms used in this manual Multitrack recorder (MTR) A recorder that can record and play multiple tracks is called a multitrack recorder (MTR). The R12 can simultaneously record up to 2 tracks and simultaneously play up to 8 tracks. Project The R12 manages recording and playback data for a single song in a unit called a project. -
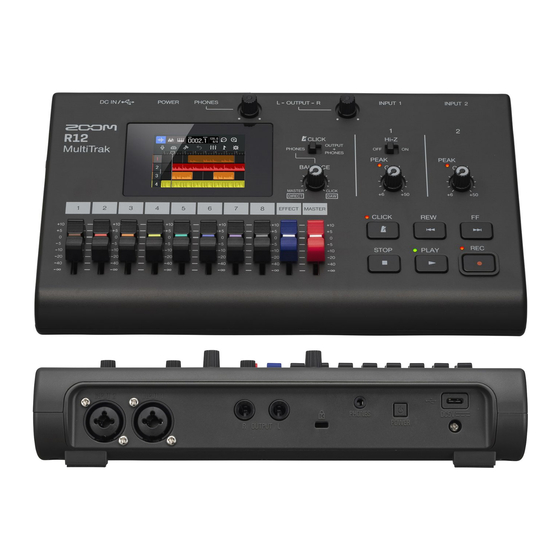
Page 7: Functions Of Parts
Functions of parts ❶ Touchscreen This shows various types of information and is operated by touch. ❷ PHONES volume knob Use to adjust the headphone volume. ❸ OUTPUT volume knob This adjusts the OUTPUT volume. ❹ BALANCE knob / CLICK switch When the CLICK switch is set to PHONES, use the BALANCE knob to adjust the balance between the MASTER and CLICK signals output from the PHONES jack. - Page 8 ❽ Other buttons • This turns the click (metronome) on/off. The indicator lights when it is on. • Press to skip back one bar. Press and hold to search backward. • Press to skip forward one bar. Press and hold to search forward. •...
- Page 9 Bottom ❶ Battery compartment cover Open this when installing or removing AA batteries.
- Page 10 Side ❶ microSD card slot This supports cards that meet microSDHC/microSDXC specifications.
- Page 11 Back ❶ INPUT 1–2 jacks Connect mics, keyboards and guitars to these. These support XLR and 1/4-inch phone (unbalanced) plugs. ❷ OUTPUT jacks Connect these to a power amplifier, a PA system or powered monitor speakers, for example. ❸ PHONES output jack Connect headphones here.
-
Page 12: Connection Example
Connection example This is an example of connections to record vocals and guitars. ❶ Mics for lead and backing vocals, drums and other sound sources Dynamic and condenser mics can be connected. When a condenser mic is connected, turn on phantom power. -
Page 13: Touchscreen Display
Touchscreen display The R12 touchscreen shows information necessary for operation. Tap and slide on the screen to conduct various operations, including selecting, adjusting and editing. This section explains various screens shown on the R12. Home Screen overview This appears on the touchscreen when the R12 power is turned on. The Home Screen has two views: Track View and Level Meter View. - Page 14 The display can be changed by doing the following. • Tap to zoom out on the timeline display. (This enables showing many bars at the same time.) • Tap to zoom in on the timeline display. (This enables displaying more detail.)
- Page 15 • Slide up, down, left or right to show tracks that were hidden and to change the part of the timeline that is visible.
- Page 16 Level Meter View Screen This screen shows the level meters and faders for all tracks. This screen makes observing the volume of all tracks easy, so it is useful for recording multiple channels simultaneously and balancing the mix. ❶ Control Bar This shows the recording/playback position and various buttons.
- Page 17 ❿ MASTER fader and level meters This shows the MASTER fader position and MASTER track levels. ⓫ EFFECT fader and level meters This shows the EFFECT fader position and EFFECT track levels.
-
Page 18: Control Bar Overview
This shows the bar and beat of the recording/playback position. ❸ Tempo and time signature This shows the current tempo and time signature settings. This can be tapped to open the Project Settings Screen. ❹ Zoom in/out buttons These change the magnification of the timeline display. - Page 19 • : Zoom in on the timeline display. • : Zoom out on the timeline display. ❺ Remaining battery charge (only when battery-powered) When the remaining battery charge becomes low, replace the batteries (→ Installing batteries), or connect the AC adapter (→...
- Page 20 During playback, drag this horizontally to change the playback position. ⓫ Screen Switching button This switches between the Track View Screen and Level Meter View Screen. • : This opens the Level Meter View Screen. • : This opens the Track View Screen. ⓬...
-
Page 21: Touchscreen Operation Overview
Touchscreen operation overview Operations on various screens Tap and slide on the touchscreen to operate it. Tap: Select Tap a value you want to set. The current setting value is shown in blue. Tap: Change settings to change settings. ... - Page 22 Slide: Scroll through items While touching the display, slide vertically to scroll. Returning to the previous screen/Home Screen (Track View Screen / Level Meter View Screen) at the top left of the screen. To return to the Home Screen, tap repeatedly until it opens.
- Page 23 Character Input Screen overview The Character Input Screen appears on the touchscreen to enable file names to be input and edited, for example. Tap the keyboard to input characters. ❶ Character input area A cursor shows the input position. ❷ Move cursor ❸...
-
Page 24: Making Preparations
Making preparations Inserting microSD cards Turn the power off and then open the microSD card slot cover. Insert the microSD card into the microSD card slot. To remove a microSD card, push it further into the slot and then pull it out. NOTE: •... -
Page 25: Connecting Output Devices
Connecting output devices Powered monitors and headphones can be connected to check the sound. Use OUTPUT to adjust the OUTPUT volume. Use PHONES to adjust the headphone volume. NOTE: Turn powered monitors off before connecting them. HINT: The OUTPUT jacks support balanced output. -
Page 26: Supplying Power
Supplying power The R12 can be operated using power from a power supply connected to the USB port (AC adapter, USB bus power or mobile battery) or AA batteries. A power supply connected to the USB port will be used instead of AA batteries when available. Installing batteries To operate the R12 using batteries, press and lift to open the battery compartment cover on the... - Page 27 Connecting the AC adapter Connect the cable of the dedicated AC adapter (AD-17) to the USB port (Type-C). Then, plug the AC adapter into an outlet. USB (Type-C) Using other power supplies The R12 can be operated using bus power from a computer connected to the USB port (Type-C). A 5V mobile battery (commercially-available) can also be used for power.
-
Page 28: Turning The Power On/Off
Turning the power on/off Turning the power on Confirm that the output devices connected to the R12 are turned off. Set all and faders to their minimum values. Press until the indicators light. This turns the R12 power on, opening the Projects Screen (→ projects) or Home Screen (→... - Page 29 NOTE: • The power will automatically turn off if it is unused for 10 hours. To keep the power on at all times, disable the automatic power saving function. (→ Setting the Auto Power Off function) • If “No SD Card!” appears on the display, confirm that a microSD card is inserted properly. (→ Inserting microSD cards)
-
Page 30: Setting The Date And Time (First Time Starting Up)
Setting the date and time (first time starting up) The first time the power is turned on after purchase, set the date and time when the Date/Time Setting Screen opens. This is used to add the date and time to recorded files. to set the date and time. - Page 31 HINT: The date and time setting can also be changed later from the Menu screen. (→ Setting the date and time)
-
Page 32: Opening Projects
Opening projects The R12 saves and manages recording and playback data in units called projects. A list of projects is shown on the Projects Screen. Tap a project to select it for recording, playback and editing. New projects can also be created on the Projects Screen. ... -
Page 33: Creating New Projects
Creating new projects Templates that already have rhythm loops included can be selected for various genres to create projects that make starting a music project easy. Projects can also be made by first setting the tempo and time signature, for example. NOTE: •... - Page 34 Tap “Create”. This will create a new project and open the Track View Screen, showing the rhythm loop for the selected genre. HINT: • Projects will be named “ZOOM0001” – “ZOOM9999”. Project names can be changed later. (→ Changing project names) •...
- Page 35 Tap “Details”. Tapping “Create” will create a project without changing settings. Change the project settings by tapping and sliding. ❶ Project name editing Tap this to open the Character Input Screen. See Character Input Screen overview for editing procedures. ❷ Tempo This changes the setting of the tempo used for the entire song (40.0–250.0).
- Page 36 HINT: ❶ By default, projects are automatically named “ZOOM0001” – “ZOOM9999”. Tap to create a project with an edited name. That name will be saved and used when creating new projects, adding consecutive numbers in a “01” format automatically to the ends of their names. Project names can be changed later.
- Page 37 Tap “Create”. This will create a new project with the changed settings, and open the Home Screen. NOTE: The settings made on the Details Screen are saved. The same settings will be used when creating new projects later. Tapping “Create” on the Projects Screen without making settings on the Details Screen will create a new project using the Tempo, Time Signature and Bit Depth settings previously made on the screen.
-
Page 38: Opening Projects
Opening projects Tap “Projects” on the Projects Screen. Tap the desired project to select it. The selected project will be framed in blue. HINT: (project name order) or (date and time used order) to change the order shown. Tap “Open”. The project selected on the Home Screen will be shown. - Page 39 NOTE: If the opened project file has a problem, the “Project Open Error!” message will appear. Follow these procedures to repair the project. 1. Tap “Execute”. This will repair and open the project. Tap “Cancel” to cancel repair. 2. Tap “Close”. After repairing a project, a warning mark will be added to the original invalid project and a new repaired project will be created on the Projects Screen (→...
-
Page 40: Changing Project Settings
Changing project settings Various project settings can be made on the Project Settings Screen. Settings are saved separately with each project. Project settings can be made during playback. (→ Playing projects) Opening the screen where various project settings can be made ... -
Page 41: Changing Project Tempos
Changing project tempos This changes the tempo used for the entire song. on the Project Settings Screen (→ Slide the “Tempo” slider or tap Opening the screen where various project settings can be made). HINT: • This can be set from 40.0–250.0. •... -
Page 42: Changing Project Time Signatures
Changing project time signatures This changes the setting of the time signature used for the entire song. Tap the desired “Time Signature” setting on the Project Settings Screen (→ Opening the screen where various project settings can be made). HINT: •... -
Page 43: Setting The Click (Metronome)
Setting the click (metronome) The R12 has a metronome with a precount function. This metronome, which can function during recording and playback, has switchable sounds, a precount on/ off setting and adjustable volume. Using the click (metronome) Set whether the click is used during recording and playback. Tap “On”... - Page 44 Setting the precount A click can be sounded before starting recording. Tap “On” or “Off” for “Precount” on the Project Settings Screen (→ Opening the screen where various project settings can be made). Setting Explanation Off This turns off the precount. This turns on the precount.
- Page 45 Changing the click sound The click sound can be set to the preferred one. Tap the desired “Sound” setting on the Project Settings Screen (→ Opening the screen where various project settings can be made). Setting Explanation Bell Metronome sound (with bell on accents) Click Metronome sound (click only) Stick...
- Page 46 Setting the click volume on the Project Settings Screen (→ Slide the “Level” slider or tap Opening the screen where various project settings can be made). HINT: • This can be set from 0 to 100. • Use to set the click output(s). - PHONES: The sound is output only from the PHONES jack.
-
Page 47: Setting Tracks For Output As Master And Click Signals
Setting tracks for output as MASTER and CLICK signals. Set the output destination of each track. By setting rhythm tracks, for example, to CLICK, they can be used like a click during recording, synchronized performances and other situations. Tap the Output Routing □ boxes on the Project Settings Screen (→ Opening the screen where various project settings can be made). - Page 48 Adjusting the volume balance of the MASTER and CLICK signals output to headphones When monitoring with headphones, the volume balance between the MASTER and CLICK output signals can be adjusted. to PHONES. When set to OUTPUT + PHONES, the balance adjusted using the track faders is output to both the OUTPUT and PHONES jacks.
-
Page 49: Changing The Snap Setting
Changing the snap setting The snap setting used for the entire project can be changed. If this is “On”, notes and regions will be aligned to ruler increments when moved (→ Control Bar overview). Tap “On” or “Off” for “Snap” on the Project Settings Screen (→ Opening the screen where various project settings can be made). -
Page 50: Using The Tuner
Using the tuner Use the tuner function to tune guitars and other instruments. Tap “Tuner” on the Project Settings Screen (→ Opening the screen where various project settings can made). This opens the Tuner Screen. On the Input Routing Screen, select the input that is connected to the guitar, bass or other instrument that you want to tune (→... -
Page 51: Selecting The Tuner Type
Selecting the tuner type on the Tuner Screen (→ Using the tuner). Display Explanation String number/note Chromatic The name of the nearest note (in – – – – – – – semitones) and the amount of detuning are shown. Guitar Standard guitar tuning with a 7th string Bass... -
Page 52: Setting The Standard Pitch Of The Tuner
Setting the standard pitch of the tuner on the Tuner Screen (→ Using the tuner). NOTE: This can be set from 435Hz to 445Hz. Using flat tunings All strings can be tuned down from standard tuning by 1–3 semitones. on the Tuner Screen (→ Using the tuner). -
Page 53: Recording
Recording Recording process • Insert a microSD card (→ Inserting microSD cards) • Connect mics, instruments and other sources to inputs (→ Connecting Prepare before input devices) recording • Turn the power on (→ Turning the power • Create a new project (→ projects) or open a project (→... -
Page 54: Making Input Settings
Making input settings Connecting input devices Connect the devices that you want to record. Mics, guitars, basses, synthesizers and other instruments can be connected. ■ Connecting mics Connect dynamic and condenser mics to INPUT 1 and 2 using mic cables with XLR connectors. INPUT 1 and 2 support phantom power (+48V). - Page 55 ■ Connecting guitars, basses and other instruments Guitars, basses, synthesizers and other electronic instruments can be connected to INPUT 1 and 2 using cables with standard 1/4-inch plugs. When directly connecting a guitar or bass with passive pickups, use INPUT 1 and set to ON.
- Page 56 Enabling tracks for recording Tracks can be selected for recording. • When an audio track is selected, the sound input through the corresponding INPUT jack will be recorded. • When a synthesizer track is selected, MIDI data input using a MIDI keyboard, for example, will be recorded.
- Page 57 NOTE: Recording to rhythm tracks is not possible. Tap the phantom icons for inputs that have condenser mics that require phantom power connected to them. Tapped input icons will light, showing that the phantom setting is on. The Home Screen will reopen. On the Track View Screen, the numbers of the tracks armed for recording are shown with red backgrounds.
- Page 58 Adjusting input levels The levels of signals input to the R12 can be adjusted. Turn for INPUT 1 and 2 to adjust their input levels. Adjust them so that their indicators do not light. HINT: • If the sound distorts even after lowering the input level, try changing mic positions and adjusting the output levels of connected devices.
- Page 59 Using the Comp/Limiter/Gate function The volume can be adjusted suitably according to input signal levels and unwanted noise can be cut, making the sound clearer. • Comp The compressor reduces level differences between loud and quiet sounds, making the sound clearer. •...
- Page 60 Parameter Explanation Threshold Comp/Limiter: This adjusts the input level that activates the effect. When the input level exceeds the threshold, the excess level is compressed with a ratio of 1:4 for Comp and 1:20 for Limiter. Gate: This adjusts the input level that deactivates the effect. Sound below the threshold level will not be output.
- Page 61 Tap ◀ and ▶ to select an input for setting the Comp/Limiter/Gate function. Select “Input 1” or “Input 2”. HINT: Comp/Limiter/Gate settings can be made separately for each input. Tap the desired setting. Setting Explanation Off This turns the Comp/Limiter/Gate off. No settings can be made from step 2.
- Page 62 Slide the Threshold slider or tap to adjust the threshold level. HINT: This can be set from −16 to −2 dBFS for the compressor and limiter. This can be set from −80 to −2 dBFS for the noise gate. Slide the Attack Time slider or tap to adjust the attack time.
-
Page 63: Making Track Settings
Making track settings Settings can be made for tracks to be recorded. Track types can be selected, EQ, spatial and distortion effects can be adjusted, monitor panning can be set and send effects can be adjusted. In addition, two adjacent tracks can be stereo-linked and used as a stereo track. Setting track types Track types can be set to audio, rhythm or synthesizer. - Page 64 NOTE: Each project can only have one set synthesizer track. If a synthesizer track already exists and has a region, a new synthesizer track cannot be set.
- Page 65 Opening Track Settings Screens On Track Settings Screens, EQ and send effects can be adjusted, and monitor panning and stereo links can be set. Double-tap the header for the track that you want to set. Tap “Track Settings”. This opens the Track Settings Screen. HINT: •...
- Page 66 Adjusting panning for monitoring The left–right panning of each track can be adjusted when monitoring input signals through headphones or powered monitors. On a Track Settings Screen (→ Opening Track Settings Screens), slide the Pan slider or tap NOTE: • The setting range is L100 (left) – Center – R100 (right). •...
- Page 67 Adjusting EQ The amount of boost/cut can be adjusted for each frequency band. On a Track Settings Screen (→ Opening Track Settings Screens), slide the EQ Low, Middle and High sliders or tap ■ High This adjusts the boost/cut of high-frequency equalization. •...
- Page 68 Enabling stereo linking Two adjacent tracks (1 and 2 or 3 and 4, for example) can be set as a stereo track. This enables those inputs to be handled as a stereo sound. This will record the tracks as stereo data, which is convenient when editing, for example.
-
Page 69: Using Effects
Using effects The R12 has effects that are equivalent to those in ZOOM multi-effects processors. In addition to reverb, delay and other individual effects, patch memories that contain up to three effects can also be selected. By selecting effects and patch memories, a variety of effects can be applied to instruments, voices and other sound sources. - Page 70 On the Send Effect Screen, select an effect (①), and tap (②). This reopens the Track Settings Screen. HINT: Patch memories can be used by selecting “Patch Memory” on the Send Effect Screen. Tap this to open the Effect Screen. Then, select the desired patch memory and tap .
- Page 71 Use the EFFECT fader to adjust the effect level of all tracks. NOTE: To record affected sounds, use insert (input) effects.
- Page 72 Using insert (input) effects Tap a Track Header on the Track View Screen to select the audio track to which the insert (input) effect will be assigned. NOTE: Effects can only be used on audio tracks. in the Control Bar. On the Effect Screen, select a patch memory (①), and tap (②).
-
Page 73: Editing Patch Memories
Editing patch memories Opening the patch memory Edit Screen On the Effect Screen, tap for the patch memory you want to edit. This opens the patch memory Edit Screen. ❶ Effects used Tap these to adjust the parameters of the effects. (→ Adjusting effect parameters) ❷... - Page 74 ❼ Patch memory name edit button Tap this to open the Character Input Screen. See Character Input Screen overview for editing procedures. ❽ Select next patch memory HINT: The content of edited patch memories will be saved automatically. Turning patch memories on/off Tap “On”...
- Page 75 Adjusting effect parameters Tap the effect you want to edit on the patch memory Edit Screen (→ Opening the patch memory Edit Screen). This opens the Effect Settings Screen. Adjust the effect. ❶ Return to the patch memory Edit Screen ❷...
- Page 76 Copying patch memories Patch memory changes are saved automatically. To save the original patch before changing it, copy it to an empty patch memory. on the patch memory Edit Screen (→ Opening the patch memory Edit Screen). This opens a patch memory list. Tap the name of the copy destination patch memory.
- Page 77 Changing patch memory names on the patch memory Edit Screen (→ Opening the patch memory Edit Screen). This opens the Character Input Screen. Input the patch memory name. Character Input Screen overview for how to input characters. When “Done” appears, tap “Close”. This changes the patch memory name and returns to the previous screen.
- Page 78 Changing patch memory levels On the patch memory Edit Screen (→ Opening the patch memory Edit Screen), slide the “Patch Level” slider or tap NOTE: This can be set from 0 to 120.
-
Page 79: Recording
Recording Press when the Track View Screen or Level Meter View Screen is open. This starts recording from the current playback position. The indicator lights during recording. Pressing when a screen other than the Track View Screen or Level Meter View Screen is open will open one of those screens. - Page 80 HINT: • Pressing during playback will start recording from that point. • See Using the synthesizer for information about recording synth tracks. • Even when recording, the Screen Switching buttons ( ) can be tapped to switch to the Track Screen.
-
Page 81: Using Internal Rhythm Loops
Using internal rhythm loops The R12 includes rhythm loops for various genres. By setting the track type to rhythm, drum patterns and other rhythm loops can be assigned to it as desired and played back. Tap the track on which you want to place a rhythm loop on the Track View Screen. - Page 82 to preview rhythm loops. The selected rhythm loop will play back. again to stop playback. for the rhythm loop you want to add. The selected rhythm will be added to the rhythm track. NOTE: • The rhythm loop will be added to the selected track from the playback position. •...
- Page 83 ■ Rhythm loops The R12 has Intro, Verse, Bridge, Chorus and Outro sections for the following rhythm loops. Genre Genre 8th Note Beats Bounce Pop 16th Note Beats Modern R&B 4th Note Beats Neo Soul Pop Rock Modern 80’s Retro Rock 80’s Pop Hard Rock Synthpop...
-
Page 84: Using The Synthesizer
Using the synthesizer The R12 includes various synthesizer sounds. By connecting a USB MIDI keyboard (sold separately) to the R12, the keyboard can be played to record the selected synthesizer sound. (→ Using MIDI keyboards) Selecting the synth sound On the Track View Screen, tap the track you want to record the synth on. - Page 85 to check the sound of a synth. This will open a keyboard. Tap the keys to play the sound. ❶ Return to the previous screen. ❷ Lower the octave. ❸ Raise the octave. HINT: • Note names are shown on every C of the keyboard (every octave). •...
-
Page 86: Recording
Recording Referring to Using MIDI keyboards, connect a MIDI keyboard to the R12. on the Input Routing Screen so that it lights red (→ Enabling tracks for recording). Press Recording will start from the current playback position. Play the MIDI keyboard. The MIDI keyboard performance will be recorded as MIDI data on the synth track. -
Page 87: Playing Projects
Playing projects Press Button operations during playback • Search backward/forward: Press and hold • Move playback position forward/backward: Press • Stop: Press • Return to beginning: Press when stopped • Adjust track volume: Move channel fader • Adjust master track volume: Move MASTER fader •... - Page 88 Touchscreen operations during playback • Zoom out/in horizontally: to zoom out on the timeline display. to zoom in on the timeline display. (This enables showing many bars at the same (This enables displaying more detail.) time.) • Move playback position: Slide playback position left/right or tap the ruler.
-
Page 89: Editing Projects
Editing projects Recorded audio data and notes can be edited by region. For example, regions can be moved, deleted, copied, pasted, looped and split. With waveform editing, audio regions can be stretched without changing pitch and unnecessary parts can be deleted. With MIDI note editing, notes can be added and deleted as well as be adjusted for length and velocity, for example. - Page 90 ■ Moving multiple regions simultaneously On the Track View Screen, double-tap a region that you want to move. This highlights that region and opens the Option Menu at the top of the screen. Tap “Select”. Tap the other regions that you want to move. The selected regions will be highlighted.
- Page 91 Looping regions Regions can be looped (played back repeatedly). On the Track View Screen, tap the region you want to loop. This highlights the selected region. Drag the right edge of the region. Dragging right will increase the number of loops, while dragging left will decrease the number.
- Page 92 Creating empty synth track regions (synth track only) Regions can be created for adding MIDI notes manually. (→ Editing notes (synth regions)) On the Track View Screen, double-tap an area with no region on the synth track. The Option Menu will open at the top of the screen. Tap “Create Region”.
- Page 93 Loading WAV files as regions WAV files on microSD cards and USB flash drives can be loaded into projects. NOTE: Files with the following formats can be loaded. • WAV files: Either 44.1kHz/16-bit or 44.1kHz/24-bit according to the project setting Copy the files that you want to load onto the microSD card or USB flash drive in advance.
- Page 94 Tap “Add Audio File”. Tap “Project” to load from a project, “SD Card” to load from a microSD card, or “USB Memory” to load from a USB flash drive. HINT: When loading from a USB flash drive, connect it to the USB port. (→ Connecting USB flash drives) to preview the file you want to load.
- Page 95 for the file you want to load. NOTE: • An error message will appear if it cannot be loaded. Select a different file. • Loading is not possible if the maximum number of regions in the project would be exceeded. - Total number of audio and rhythm regions: 50 - Synth regions: 80 Input the file name of the loaded WAV file.
- Page 96 Loading MIDI files as regions MIDI files on microSD cards and USB flash drives can be loaded into projects. NOTE: MIDI files with the following formats can be loaded. • SMF (Standard MIDI File): Format 0/Format 1 Copy the files that you want to load onto the microSD card or USB flash drive in advance. •...
- Page 97 Tap “Add MIDI File”. Tap the channel in the MIDI file that you want to load. NOTE: • This loads the notes of the selected channel. • When loading a MIDI file that has notes on multiple channels, selecting “Ch All” will create a region with the notes from those channels on the R12 synth track.
- Page 98 to preview the file you want to load. This will play the selected file. will light ( to stop playback. for the file you want to load. This completes loading the track and opens the Track View Screen. NOTE: • An error message will appear if it cannot be loaded. Select a different file. •...
- Page 99 Copying and pasting regions Regions can be copied and pasted to other locations. On the Track View Screen, double-tap the region that you want to copy and paste. This highlights that region and opens the Option Menu at the top of the screen. Tap “Copy”.
- Page 100 Double-tap the track where you want to paste in an area that has no regions. The Option Menu will open at the top of the screen. Tap “Paste”. This pastes the copied region at the playback position. The playback position will move to the end of the pasted region. Tap anywhere else to close the Option Menu.
- Page 101 Deleting regions On the Track View Screen, double-tap the region that you want to delete. This highlights that region and opens the Option Menu at the top of the screen. Tap “Delete”. Tap “Execute”. The selected region will be deleted. Tap “Cancel”...
- Page 102 ■ Deleting multiple regions simultaneously On the Track View Screen, double-tap a region that you want to delete. This highlights that region and opens the Option Menu at the top of the screen. Tap “Select”. Tap the other regions that you want to delete. The selected regions will be highlighted.
- Page 103 Tap “Execute”. The selected region will be deleted. Tap “Cancel” to cancel deletion and return to the previous screen.
- Page 104 Splitting regions Regions can be split. On the Track View Screen, move the playback position to where you want to split the region. Double-tap the region that you want to split. This highlights that region and opens the Option Menu at the top of the screen. Tap “Split”.
-
Page 105: Editing Waveforms (Audio/Rhythm Regions)
Control Bar. The Waveform Editing Screen for the selected region opens. ■ Main operations on the Waveform Editing Screen • Zoom out/in horizontally: Tap • Scroll horizontally: Slide left and right HINT: When the Waveform Editing Screen is open, pressing... - Page 106 Trimming regions Regions can be trimmed to delete unwanted parts. On the Waveform Editing Screen, drag left/right at the bottom left and right of the region to set the range. Set these to leave the necessary part. Parts outside the selected range will be cut. This will apply the trimming and reopen the Track View Screen.
- Page 107 Changing region lengths without changing pitch The lengths of regions can be changed without changing their pitches. Regions that have had lengths changed can be saved as new audio data. On the Waveform Editing Screen, tap to turn this function on ( is off).
- Page 108 Input the file name of the edited audio file. Character Input Screen overview for how to input characters. When “Done” appears, tap “Close”. The file with the changed length will be assigned to the track.
- Page 109 Completing editing on the Waveform Editing Screen. The Track View Screen will reopen.
-
Page 110: Editing Notes (Synth Regions)
The Piano Roll Screen for the selected synth track opens. ■ Main operations on the Piano Roll Screen • Zoom in/out horizontally: Tap • Zoom in/out vertically: Tap • Scroll horizontally: Slide left and right • Scroll vertically: Slide up and down... - Page 111 Adding/deleting notes Notes can be added and used to play synth sounds using their pitch, length and velocity data. On the Piano Roll Screen, tap to turn this function on ( is off). Add a note. Tap the Piano Roll to add a region and note at that position. HINT: •...
- Page 112 Changing note lengths On the Piano Roll Screen, tap to turn this function on ( is off). Tap a note and slide it left/right to change its length. HINT: The shortest length is a 32nd note.
- Page 113 Adjusting note velocity (strength) On the Piano Roll Screen, tap to turn this function on ( is off). Tap the note for which you want to adjust the velocity. A Velocity Slider will appear at the top of the screen. Slide the slider or tap to adjust the velocity.
- Page 114 Trimming regions Regions can be trimmed to delete unwanted parts. On the Piano Roll Screen, tap to turn them off. Drag left/right at the bottom left/right of the region to set the range. Set these to leave the necessary part. Parts outside the selected range will be cut. Completing editing 1.
-
Page 115: Editing Tracks
Editing tracks When editing tracks, tracks can be deleted and moved, synth tracks can be converted to audio tracks, and track data can be exported as audio data. Deleting tracks A selected track can be deleted. All the regions in the track will also be deleted. Double-tap the header of the track that you want to delete on the Track View Screen. - Page 116 Converting synth tracks to audio tracks Only one synth track is available, so converting a synth track to an audio track makes it possible to create a new synth track. The notes of a synth track can be performed and exported as an audio file using the currently selected sound.
- Page 117 Tap “Convert to Audio”. Input the name of the audio file to be exported. Character Input Screen overview for how to input characters. When “Done” appears, tap “Close”. This converts the synth track to an audio track and reopens the Track View Screen.
- Page 118 Exporting tracks Tracks can be exported as WAV files to the AUDIO folder or as MIDI files to the MIDI folder on the microSD card. On the Track View Screen, double-tap the header of the track that you want to export as a WAV or MIDI file.
- Page 119 Tap “Export”. Input the name of the WAV or MIDI file to be exported. Character Input Screen overview for how to input characters. When “Done” appears, tap “Close”. This exports the track as a WAV or MIDI file and reopens the Track View Screen.
- Page 120 Reordering tracks Tap the header of the track that you want to reorder on the Track View Screen. This highlights the tapped track header. Drag it to the desired position.
-
Page 121: Using Markers
Using markers By adding markers with names, for example, intro, verse and chorus, to the beginnings of parts, the overall song structure can be made easy to see, which is useful when editing and mixing. Markers are shown in the Control Bar ruler. Adding markers On the Track View... - Page 122 HINT: • Marker names will be assigned automatically each time a marker is added in the following order. Intro → Verse → Chorus → Bridge → Outro → Verse → Verse → ... Marker names can be changed in step 5. •...
- Page 123 Moving marker positions On the Track View Screen, move the playback position to the marker you want to move. HINT: The playback position can be moved in ruler increments by pressing This opens the Marker Menu at the top of the screen. to move the marker.
- Page 124 Changing marker names On the Track View Screen, move the playback position to the marker you want to rename. HINT: The playback position can be moved in ruler increments by pressing This opens the Marker Menu at the top of the screen. Tap a marker name in the Marker Menu.
- Page 125 Change the marker name. Character Input Screen overview for how to input characters. HINT: Marker names can use a maximum of 10 characters. When “Done” appears, tap “Close”. This changes the marker name and returns to the Track View Screen.
- Page 126 Deleting markers On the Track View Screen, move the playback position to the marker you want to delete. HINT: The playback position can be moved in ruler increments by pressing This opens the Marker Menu at the top of the screen. Tap “Delete”.
-
Page 127: Mixing Projects
Mixing projects Switch between the Track View Screen Level Meter View Screen for different purposes when mixing. to switch screens. Switching to the Level Meter View Screen Switching to the Track View Screen Checking track levels The levels of all tracks, the overall level and the send effect level can be checked at a glance on the Level Meter View Screen. -
Page 128: Muting Tracks
Muting tracks The signals of specific tracks can be muted. Drag the track numbers right on the Track View Screen. This opens the mixer. This mutes that track, and lights ( Multiple tracks can be muted at the same time. Slide up and down on the screen to mute other tracks. -
Page 129: Listening To Selected Tracks Only (Soloing)
Listening to selected tracks only (soloing) Specific tracks can be selected to listen to only their signals. Drag the track numbers right on the Track View Screen. This opens the mixer. This mutes all other tracks, and lights ( Multiple tracks can be soloed simultaneously. Slide up and down on the screen to solo other tracks. -
Page 130: Adjusting The Volume
Adjusting the volume Use the channel faders to adjust the levels of individual tracks, and use the EFFECT fader for the send effect level and the MASTER fader for the overall level. Check the levels on the Level Meter View Screen. - Page 131 HINT: If the position of a physical fader and its fader setting are different, the physical fader will not adjust the level. First, align the physical fader position with the current fader position. Then, the position of the physical fader will start adjusting the level. ❶...
-
Page 132: Adjusting The Panning, Eq And Effects Of Tracks
Adjusting the panning, EQ and effects of tracks Adjusting panning The left-right stereo panning of track playback sounds can be adjusted. Adjusting panning for monitoring for operation details. Adjusting EQ The frequency bands of individual tracks can be boost/cut. Adjusting EQ for details about operation. -
Page 133: Mixing Down
Mixing down A recorded project can be mixed and output as a stereo mixdown file (WAV). The mixed-down stereo file will be saved in the “AUDIO” folder on the microSD card with the following format. • Sample rate: 44.1 kHz •... -
Page 134: Managing Projects
Managing projects Projects created on the R12 are saved on the microSD card. The names of projects saved on microSD cards can be changed. These projects can also be copied and deleted and their creation date/time and format data can be checked. When a USB flash drive is connected to the R12, projects can be saved on it and loaded from it. - Page 135 Folders are created with the names “ZOOM0001” – “ZOOM9999”. ❷ Audio files recorded for each track Audio files will be created with names as follows. REC01_01.WAV ① Track number ② Recording number (“01” is the first recording, followed by “02”, “03” and so on.) Example: The name of the file for the second recording made on track 4 would be “REC04_02.WAV”.
-
Page 136: Folder And File Structure On Usb Flash Drives
Folder and file structure on USB flash drives When a USB flash drive is connected to the R12, folders are created as shown below. The R12 can write project data to the following folders and load necessary files from them. Root ZOOM_R12 PROJECTS... - Page 137 Connecting USB flash drives Connect USB flash drives to the USB port. Use USB flash drives that are compatible with USB Type-C. USB (Type-C) NOTE: • Never disconnect a USB flash drive when data is being transferred. • To connect a USB flash drive while an AC adapter is connected, use a USB Hub that supports the Power Delivery function.
-
Page 138: Opening The Project Option Menu
Opening the Project Option Menu Manage projects on the Project Option Screen. on the Home Screen (Track View Screen/Level Meter View Screen). Track View Screen Level Meter View Screen This opens the Project Settings Screen. Tap “Projects” on the Project Settings Screen. This opens the Projects Screen. - Page 139 Tap “Option”. This opens the Project Option Screen for the selected project.
-
Page 140: Changing Project Names
Changing project names Tap “Rename” in the Project Option Menu (→ Opening the Project Option Menu) of the project that you want to rename. Change the project name. Character Input Screen overview for how to input characters. NOTE: • An error message will appear if the same name already exists after changing a project name. If this happens, change the project name. -
Page 141: Duplicating Projects
Duplicating projects Tap “Duplicate” in the Project Option Menu (→ Opening the Project Option Menu) of the project that you want to duplicate. Input the name for the duplicated project. Character Input Screen overview for how to input characters. NOTE: •... -
Page 142: Checking Project Information
Checking project information Tap “Information” in the Project Option Menu (→ Opening the Project Option Menu) of the project with information that you want to check. This opens the project Information Screen where you can check the following information. Item Explanation Date/Time Date and time of project creation... -
Page 143: Deleting Projects
Deleting projects Tap “Delete” in the Project Option Menu (→ Opening the Project Option Menu) of the project that you want to delete. Tap “Execute”. Tap “Cancel” to cancel deletion and return to the previous screen. When “Done” appears, tap “Close”. This deletes the selected project and reopens the Projects Screen. -
Page 144: Rendering Projects As Wav Files
Rendering projects as WAV files Projects can be rendered in the following format to the AUDIO folder on a microSD card or the ZOOM_R12 > AUDIO folder on a USB flash drive. • Stereo WAV file • Sample rate: 44.1 kHz •... - Page 145 Tap where the rendered stereo WAV file should be saved. Setting Explanation To SD Card This renders to the microSD card. To USB Memory This renders to the USB flash drive. Input the file name. Character Input Screen overview for how to input characters. NOTE: •...
-
Page 146: Saving Projects To Usb Flash Drives
Saving projects to USB flash drives Projects are saved to microSD cards, but backups can also be saved to USB flash drives. Projects will be saved in the ZOOM_R12 > PROJECT folder on a USB flash drive. Connect a USB flash drive to the USB (Type-C) port (→ Connecting USB flash drives). -
Page 147: Importing Projects From Usb Flash Drives
Importing projects from USB flash drives Projects saved in the ZOOM_R12 > PROJECTS folder on a USB flash drive can be imported to microSD cards. (→ Folder and file structure on USB flash drives) Connect a USB flash drive to the USB (Type-C) port (→ Connecting USB flash drives). - Page 148 When “Done” appears, tap “Close”. This completes importing and reopens the Import Screen (shown in step 3).
-
Page 149: Using As An Audio Interface
Using as an audio interface The R12 can be used as a 2-in/4-out or 2-in/2-out audio interface. The R12 can send 2 separate channels of track audio signals or a mixed stereo signal to a computer, smartphone or tablet. Either 2 or 4 channels of audio signals can be input from a computer, smartphone or tablet. Installing drivers Windows computers Download the R12 Driver to the computer from zoomcorp.com. -
Page 150: Connecting Computers, Smartphones And Tablets
Connecting computers, smartphones and tablets on the Projects Screen (→ Opening projects). Tap “Audio Interface”. Tap a mode to select it. Setting Explanation 2In/2Out This mode sends a stereo signal that is a mix of all tracks. 2In/2Out (iPad) Use this to connect a smartphone/tablet with a 2-in/2-out setting Use AA batteries to operate the R12. - Page 151 The Level Meter View Screen for the selected mode will open. Use a USB cable to connect the R12 with a computer, smartphone or tablet. USB (Type-C) NOTE: • Use a USB (Type-C) cable that supports data transfer. • When connecting to a computer, set the R12 as the sound device. •...
- Page 152 Disconnecting computers, smartphones and tablets on the audio interface Level Meter View Screen. Tap “Execute”. This disables the audio interface function and opens the Settings Screen. Tap “Cancel” to return to the previous screen. Disconnect the USB cable connecting the R12 and the computer, smartphone or tablet.
-
Page 153: Making Audio Interface Settings
Making audio interface settings Settings can be made for the monitoring sound and the Comp/Limiter/Gate function used on sounds input to the R12. Setting direct monitoring This function directly outputs the sound being recorded by the R12 before sending it to the computer, smartphone or tablet. - Page 154 NOTE: • When in 2In/4Out mode (→ Connecting computers, smartphones and tablets), the direct monitoring sound is from the pre-fader mix, so fader adjustments will not affect the volume. • When in 2In/2Out mode (→ Connecting computers, smartphones and tablets), the direct monitoring sound is from the post-fader mix, so fader adjustments will affect the volume.
- Page 155 Enabling the loopback function (2In/2Out mode only) This function allows the playback sound from the computer, smartphone or tablet and the R12 inputs to be mixed and sent back (looped back) to the computer, smartphone or tablet. This function can be used, for example, to add narration to music played back from a computer and record the mix or stream it on the computer.
-
Page 156: Using As A Control Surface
The R12 control surface function conforms to the Mackie Control standard. In the DAW settings menu, add “Mackie Control” to the “Devices”, and select “ZOOM R12” for MIDI input and output. For details, see the manual of the DAW being used. -
Page 157: R12 Functions
R12 functions The buttons and faders as well as on-screen buttons on the R12 can be operated to control various DAW functions. Button and fader functions Button/fader Explanation Channel faders Adjust volumes of corresponding tracks Master fader Adjust master volume Search backward Search forward Stop... -
Page 158: Playing Back Projects In Order (Sequential Play)
Playing back projects in order (sequential play) Multiple projects can be added to a playlist and played back in order. This is convenient for live performances and output to an external recorder, for example. Creating playlists Tap “Seq Play” on the Projects Screen (→ Opening projects). - Page 159 Input the playlist name. Character Input Screen overview for how to input characters. When “Done” appears, tap “Close”. The Playlist Editing Screen opens. Tap “Add Project”. Tap the project you want to add to the playlist, and tap “Add”. The selected project will be added to the playlist.
- Page 160 Repeat step 7 to create the playlist. When finished, tap The new playlist will be added to the Seq Play Screen.
-
Page 161: Editing Playlists
Editing playlists Projects can be added to and removed from playlists. Playback order can also be changed, and projects can be set to pause after they are played. Tap the playlist that you want to edit on the Seq Play Screen (Creating playlists). - Page 162 ❷ Add project Tap this to open a screen where projects can be added to the playlist. See Creating playlists the procedure to add projects. ❸ Delete project Tap these to delete projects from the playlist. Tap “Execute” to confirm deletion. Tap “Cancel”...
-
Page 163: Deleting Playlists
Deleting playlists Tap the playlist that you want to delete on the Seq Play Screen (Creating playlists). Tap “Delete”. Tap “Execute”. The selected playlist will be deleted. Tap “Cancel” to cancel deletion and return to the previous screen. -
Page 164: Changing Playlist Icon Colors
Changing playlist icon colors The colors of playlist icons shown on the Seq Play Screen can be changed. Tap the playlist with the icon color that you want to change on the Seq Play Screen (Creating playlists). Tap “Color”. Touch the color that you want to use. The icon will change to the selected color. -
Page 165: Playing Playlists
Playing playlists Tap the playlist that you want to play on the Seq Play Screen (Creating playlists). Tap “Play”. This opens the Sequence Playback Screen. The projects that have been added to the playlist will be shown in a list and played in the order on the screen. - Page 166 Button operations during playback • Stop: Press • Search backward/forward: Press and hold • Play previous/next project: Press • Return to beginning: Press when stopped • Adjust track volume: Move channel fader • Adjust master track volume: Move MASTER fader •...
- Page 167 Screen during playback ❶ Screen switching button This opens the Level Meter View Screen. Level Meter View Screen for an explanation of this screen. ❷ Playback time This shows the playback position of the playing project in minutes and seconds. ❸...
- Page 168 Playback will automatically pause at this point.
-
Page 169: Using Guitar Lab
The Guitar Lab application can be used on a computer (Mac/Windows) to add effects that are distributed online as well as to edit and back up patch memories, for example. HINT: • Download Guitar Lab from the ZOOM website. (zoomcorp.com)https://zoomcorp.com • See the app manual for setting and operation procedures. - Page 170 Use a USB (Type-C) cable to connect the R12 and the computer. USB (Type-C) NOTE: • Use a USB (Type-C) cable that supports data transfer. • The R12 can be operated using USB bus power. Launch Guitar Lab on the computer. Tap an input to select it for effect use.
- Page 171 Disconnecting from the computer on the Guitar Lab Screen. Tap “Execute”. Tap “Cancel” to return to the previous screen. Disconnect the USB cable connecting the R12 and the computer.
-
Page 172: Using Midi Keyboards
Using MIDI keyboards The R12 has a variety of synth sounds. By connecting a MIDI keyboard (sold separately) to the R12, performances using it to play desired sounds can be recorded. Connecting MIDI keyboards Use a USB (Type-C) cable to connect the R12 and the MIDI keyboard. See the manual included with the MIDI keyboard for details about its settings. -
Page 173: Setting The Auto Power Off Function
Setting the Auto Power Off function The power will automatically turn off if the R12 is unused for 10 hours. To keep the power on at all times, turn off the automatic power saving function. on the Projects Screen (→ Opening projects). -
Page 174: Setting The Date And Time
Setting the date and time Set the date and time added to recording files. on the Projects Screen (→ Opening projects). Tap “Date/Time”. to set the date and time. - Page 175 Tap the displayed date format to use. • mm/dd/yy: month/day/year • dd/mm/yy: day/month/year • yy/mm/dd: year/month/day This confirms the set date and time and returns to the previous screen. NOTE: If power is not supplied by an AC adapter for a long time, date and time settings will be reset. If the Date/ Time Setting Screen appears during startup, set them again.
-
Page 176: Setting The Type Of Batteries Used
Setting the type of batteries used Set the type of battery used by the R12 correctly so that the amount of remaining battery charge can be shown accurately on the screen. on the Projects Screen (→ Opening projects). Tap the type of batteries. Setting Explanation Alkaline... -
Page 177: Adjusting The Brightness Of The Touchscreen
Adjusting the brightness of the touchscreen The brightness of the touchscreen can be adjusted. on the Projects Screen (→ Opening projects). Slide the LCD Brightness slider or tap This adjusts the brightness. HINT: This can be set from 1 to 20. -
Page 178: Setting The Touchscreen Backlight
Setting the touchscreen backlight The touchscreen backlight illumination can be set to conserve power. on the Projects Screen (→ Opening projects). Tap the desired LCD Backlight setting. Setting Explanation Off The touchscreen backlight will always stay off. The touchscreen backlight will always stay on. 30sec/1min/3min/5min The touchscreen backlight will turn off... -
Page 179: Managing Microsd Cards
Managing microSD cards Checking microSD card information The size and open space of microSD cards can be checked. on the Projects Screen (→ Opening projects). Tap “SD Card”. Check the open space and size shown by “Size”. ❶ Open space ❷... -
Page 180: Testing Microsd Card Performance
Testing microSD card performance You can test whether a microSD card can be used with the R12. A Quick Test can be done in a short amount of time, while a Full Test examines the entire microSD card. on the Projects Screen (→ Opening projects). - Page 181 Tap “Quick Test” or “Full Test”. Then, tap “Execute”. The card performance test will start. Quick testing Full testing The Quick Test should take about 30 seconds. The amount of time required for the full test will be shown. The result of the test will be shown when it completes.
-
Page 182: Formatting Microsd Cards
Formatting microSD cards To maximize the performance of a microSD card, use the R12 to format it. on the Projects Screen (→ Opening projects). Tap “SD Card”. Tap “Format”. - Page 183 Tap “Execute”. This formats the card. Tap “Cancel” to cancel formatting. NOTE: • Before using microSD cards that have just been purchased or that have been formatted on a computer, they must be formatted by the R12. • Be aware that all data previously saved on a microSD card will be deleted when it is formatted.
-
Page 184: Using As A Card Reader
Using as a card reader By connecting with a computer, data on cards can be checked and copied. Use this to back up projects on a computer and to load audio data and MIDI files from a computer, for example. Connecting to a computer on the Projects Screen (→... - Page 185 Use a USB (Type-C) cable to connect the R12 and the computer. USB (Type-C) NOTE: • Use a USB (Type-C) cable that supports data transfer. • The R12 can be operated using USB bus power.
- Page 186 ■ Disconnecting from the computer Disconnect on the computer. Windows: Select the R12 with “Safely Remove Hardware”. From Mac: Drag the R12 icon to the Trash and drop it. NOTE: Always conduct computer ejection procedures before disconnecting the USB cable. Disconnect the USB cable connecting the R12 with the computer, and tap Tap “Execute”.
-
Page 187: Restoring Default Setting Values
Restoring default setting values The R12 can be restored to its factory default settings. on the Projects Screen (→ Opening projects). Tap “Factory Reset”. Tap “Execute”. This executes the reset. Tap “Cancel” to cancel resetting and return to the previous screen. When “Done”... - Page 188 NOTE: • Resetting will restore all settings to their factory defaults. Be certain before using this function. • After resetting the R12 to its factory default state, initial settings will be necessary the next time the power is turned on. (→ Setting the date and time (first time starting up) )...
-
Page 189: Managing The Firmware
This shows the firmware and preset versions. Updating The R12 firmware can be updated to the latest versions. The latest update file can be downloaded from the ZOOM website (zoomcorp.com).https://zoomcorp.com Follow the instructions in the “R12 Firmware Update Guide” on the R12 download page. -
Page 190: Appendix
Appendix Troubleshooting If you think the R12 is operating strangely, check the following items first. Recording/playback trouble There is no sound or output is very quiet • Check the connections to the monitoring system and its volume setting. • Confirm that the volume of the R12 is not too low. (→ Playing projects) Sound from connected equipment or inputs cannot be heard or is very quiet... -
Page 191: Block Diagram
Block diagram... -
Page 192: Midi Implementation Chart
MIDI implementation chart [MultiTrak] Model : R12 Date : Sept. 1, 2022 Version :1.00 Function ... Transmitted Recognized Remarks Basic Default 1 - 16 Channel Changed Default Mode 1 Mode Messages Altered ****************** ****************** Note 0 - 127 Number True voice ****************** C0 - E8 24 - 124... -
Page 193: Specifications
Specifications Input and output Inputs MIC/LINE (mono) channel counts Outputs MASTER OUT PHONES Inputs Connectors 2 XLR/TRS combo jacks (Balanced, XLR: 2 HOT / TRS: TIP HOT) Input gain +6 dB – +50 dB Input impedance XLR: 3.9 kΩ TRS: 3.9 kΩ/1 MΩ (when Hi-Z ON, INPUT 1 only) Phantom power +48 V (switchable separately for... - Page 194 USB 2.0 High Speed (5V/200 mA power function supplied) USB MIDI keyboard USB 1.1 Full Speed (5 V/200 mA power connection supplied) Power Batteries: 4 AA (alkaline, lithium, or rechargeable NiMH) AC adapter: ZOOM AD-17 (5V/1.0A) • USB bus power is supported.
- Page 195 Estimated continuous operation time using During playback with +48V Alkaline batteries: about 5 hours batteries off and 32Ω headphone NiMH batteries (1900 mAh): about 5 load hours Lithium batteries: about 11 hours • The above values are approximate. • Continuous battery operation times were determined using in-house testing methods.
- Page 196 ZOOM CORPORATION 4-4-3 Kanda-surugadai, Chiyoda-ku, Tokyo 101-0062 Japan zoomcorp.com Z2I-4584-01...
Need help?
Do you have a question about the MultiTrak R12 and is the answer not in the manual?
Questions and answers