
Related Manuals for Miele CS 1322 BG 240V


Summary of Contents for Miele CS 1322 BG 240V
- Page 1 Operating and Installation Instructions ProLine Barbecue Grill To prevent accidents and machine damage, read these instructions before installation or use. en-US M.-Nr. 07 346 950...
-
Page 2: Table Of Contents
Contents IMPORTANT SAFETY INSTRUCTIONS ............Caring for the environment ................14 Overview......................15 Grill ........................15 CS 1312......................15 CS 1322......................16 Indicators......................16 Standard accessories..................17 Before first use ....................18 Cleaning the ProLine element for the first time ........... 18 Switching on the ProLine element for the first time .......... - Page 3 Contents Installation......................33 IMPORTANT SAFETY INSTRUCTIONS - INSTALLATION ........33 Safety distances....................34 Installation notes ....................37 Installation dimensions..................38 CS 1312......................38 CS 1322......................39 Countertop cut-out for several ProLine elements ..........40 Installation ......................42 Electrical connection ................... 47...
-
Page 4: Important Safety Instructions
“IMPORTANT SAFETY INSTRUCTIONS”. Miele cannot be held liable for injury or damage caused by non- compliance with these instructions. Keep these instructions in a safe place and pass them on to any future owner. - Page 5 IMPORTANT SAFETY INSTRUCTIONS Appropriate use This grill is designed for domestic use and for use in similar envi- ronments. This grill is not intended for outdoor use. This grill is intended for domestic use only to cook food and keep it warm.
- Page 6 IMPORTANT SAFETY INSTRUCTIONS Safety with children Do not leave children unattended: Children should not be alone or unsupervised in the area where the appliance is installed. Do not al- low them to sit or stand on the appliance. Children should be supervised in the vicinity of the grill.
- Page 7 Unauthorized installation, maintenance, and repairs can cause considerable danger for the user. Installation, maintenance, and re- pairs must only be carried out by a Miele authorized technician. Damage to the grill can compromise your safety. Check the grill for visible signs of damage.
- Page 8 Do not open the grill housing under any circumstances. While the appliance is under warranty, repairs should only be un- dertaken by a service technician authorized by Miele Customer Ser- vice. Otherwise the warranty will be invalidated. Defective components should be replaced by Miele original parts only.
- Page 9 IMPORTANT SAFETY INSTRUCTIONS During installation, maintenance, and repair work, the grill must be completely disconnected from the domestic electrical supply. It is only completely isolated from the supply when: - The breakers have been switched off. - The screw-out breakers have been completely removed. - The electrical plug (if present) is removed from the socket.
- Page 10 IMPORTANT SAFETY INSTRUCTIONS Correct use DO NOT TOUCH THE APPLIANCE OR AREAS NEAR THE APPLI- ANCE – The appliance may be hot even though it is dark in color. Ar- eas near the appliance may become hot enough to cause burns. During and after use, do not touch, or let clothing or other flammable materials contact the appliance or areas near it until they have had sufficient time to cool.
- Page 11 IMPORTANT SAFETY INSTRUCTIONS Overheated fat or oil, food residues, and greasy residues in the lava rocks are a fire hazard. Never leave the grill unattended when in use. Never attempt to put out oil or grease fires with water. Switch the grill off and extinguish the flames carefully with a fire blanket or a damp dish towel.
- Page 12 IMPORTANT SAFETY INSTRUCTIONS Where several ProLine elements are installed side by side: Hot objects can damage the seal of the spacer bar. Do not place hot pans near or on the spacer bar.
- Page 13 “Cleaning and care”. Accessories Use only genuine original Miele parts. If parts or accessories from other manufacturers are used, the warranty may become void. Miele will guarantee to supply functional parts for a minimum of 10 years and up to 15 years following the discontinuation of your...
-
Page 14: Caring For The Environment
Consult with local authorities, dealers or Miele in order to dispose of and recycle electrical and electronic appliances. Miele assumes no responsibility for deleting any personal data left on the appliance being disposed. -
Page 15: Overview
Overview Grill CS 1312 a Grate b Rear grilling element c Front grilling element d Lava rock container e Indicators f Symbols for allocation of knobs g Drain tap h Knobs... -
Page 16: Indicators
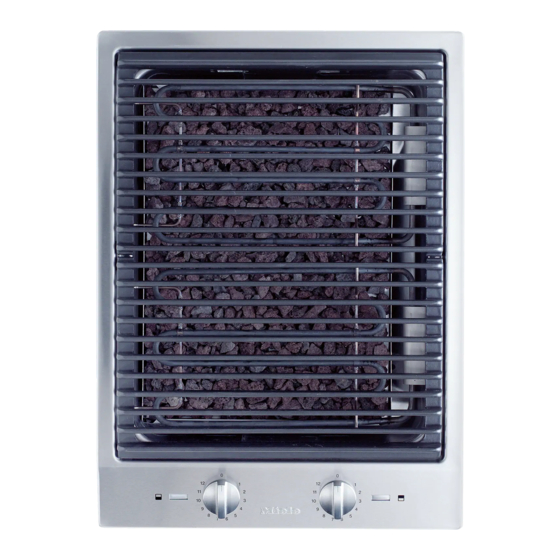
Overview CS 1322 a Grate b Rear grilling element c Front grilling element d Lava rock container e Indicators f Symbols for allocation of knobs g Drain tap h Knobs Indicators a In operation... -
Page 17: Standard Accessories
Overview Standard accessories Lava rocks Barbecue tongs Cleaning brush... -
Page 18: Before First Use
Before first use Please adhere the extra appliance Switching on the ProLine ele- data plate (supplied) in the space pro- ment for the first time vided in the “After sales service” sec- The metal components have a protec- tion of this manual. tive coating. -
Page 19: Grilling Chart
Grilling chart [min] Food for grilling Meat and sausage Sausage 6–8 Steak tenderloin 4–10 Patties 12–16 Chicken legs 16–18 Lamb chops 4–8 Liver 3–6 Turkey cutlets 8–10 Kebabs 14–18 Cutlets 8–12 Spare ribs 15–20 T-bone steak 10–20 Fish/Seafood Trout 12–16 Shrimp 2–4 Salmon steak... - Page 20 Grilling chart [min] Food for grilling Apple slices 2–3 Other Toast 2–3 Tofu 4–6 Grilling duration The durations specified in the chart are guidelines only and apply to food grilled using power levels 9–11 on a preheated grill. The duration will vary depending on the type of food, its density, and thickness.
-
Page 21: Operation
Operation Preparing the grill You can use the grill with or without lava rocks: - Without lava rocks, the food will stay particularly succulent due to the ris- ing steam. - Using lava rocks will give the food a particularly intense barbecue flavor. ... -
Page 22: Knobs
Operation The grill has 2 heater elements which Grilling can be switched on and regulated inde- When grilling, always make sure that pendently. Both elements can be used there is water in the grill trough. Add together when grilling large quantities of more water if necessary. -
Page 23: Tips For Grilling
Operation Tips for grilling After grilling Switch the grill off. - Pat down wet food items with paper towel to prevent splatters during After each use, clean the grill when it grilling. is cool enough to touch (see “Clean- - To prevent meat drying out, do not ing and care”). -
Page 24: Safety Features
Safety features Overheating protection Safety shut-off If there is not enough water in the grill Your grill has a safety shut-off feature. trough, overheating protection will This will switch off the heater element switch off the heater element automati- automatically if the grill is switched on cally. -
Page 25: Cleaning And Care
Cleaning and care Allow the ProLine element to cool Danger of burning due to hot down before cleaning. surfaces. The surfaces will be hot after cook- Clean the ProLine element and ac- ing. cessories after each use. Switch the grill off. ... -
Page 26: Cleaning The Stainless-Steel Frame/Control Panel
Cleaning and care Clean the frame and the control panel Cleaning the stainless-steel using a solution of warm water and a frame/control panel small amount of liquid dish soap ap- plied with a soft sponge. Soften any Risk of damage caused by stubborn soiling beforehand. -
Page 27: Cleaning The Rack And Lava Rock Container
Cleaning and care Cleaning the rack and lava Cleaning the lava rocks rock container Clean the lava rocks regularly: Wash the rack and lava rock con- Put the stones into a container with tainer after every use in hot water and hot water and a small amount of liq- a small amount of liquid dish soap. -
Page 28: Cleaning The Grill Trough
Clean the grill trough. If the grill trough is heavily soiled, it is recom- mended to use a stainless-steel spiral pad and the Miele Ceramic and Stainless-steel Cleaner. Drain the dirty water away and clean the drain with a bottle brush. Rinse with hot water, and then wipe the grill trough and the drain dry. -
Page 29: Frequently Asked Questions
Frequently Asked Questions With the help of the following guide minor faults in the performance of the ma- chine, some of which may result from incorrect operation, can be remedied with- out contacting the Service Department. This guide may help you to find the reason for the fault, and how to correct it. Problem Possible cause and solution The grill does not heat... -
Page 30: Optional Accessories
Optional accessories Miele offers a range of useful acces- Wire frame for griddle plate sories, as well as cleaning and condi- CSGP 1300 tioning products for your appliance. These products can be easily ordered from the Miele webshop. These products can also be ordered... - Page 31 Optional accessories Cleaning and care products Ceramic and stainless steel cleaner 250 mL Removes heavy soiling, lime scale, and aluminum residue. Stainless-steel care product 250 ml Easily removes water marks, stains, and fingerprints. Also prevents re-soiling.
-
Page 32: Customer Service
Miele dealer or Miele Customer Service. You can book a Miele Service Call online at www.miele.com/service. Contact information for Miele Customer Service can be found at the end of this document. Please quote the model identifier and serial number of your appliance (SN) when contacting Miele Customer Service. -
Page 33: Installation
*INSTALLATION* Installation IMPORTANT SAFETY INSTRUCTIONS - INSTALLATION Risk of damage caused by incorrect installation. Incorrect installation can cause damage to the ProLine element. The ProLine element must only be installed by a qualified person. Damage from falling objects. Take care not to damage the ProLine element when installing upper cabinets or a ventilation hood above it. -
Page 34: Safety Distances
*INSTALLATION* Installation Safety distances Safety distance above the ProLine el- ement The safety distance specified by the manufacturer of the ventilation hood must be maintained between the Pro- Line element and the ventilation hood above it. If the ventilation hood manu- facturer’s instructions are not available or if combustible objects are installed above the ProLine element (e.g., cabi-... - Page 35 *INSTALLATION* Installation Safety clearances to the sides and back of the cooktop Ideally the ProLine element should be installed with plenty of space on either side. The minimum safety distance shown below must be maintained between the back of the ProLine element and a tall unit or wall.
- Page 36 *INSTALLATION* Installation Safety distance from the wall covering If a wall covering is installed, a minimum safety distance must be maintained be- tween the countertop cut-out and the covering, since high temperatures can dam- age these materials. If the covering is made of a combustible material (such as wood), the minimum safety distance ...
-
Page 37: Installation Notes
*INSTALLATION* Installation Tiled countertop Installation notes Sealing strip between the ProLine el- ement and the countertop The grouting and the shaded area under the frame of the ProLine element must be smooth and flat so that the frame will sit evenly on the countertop and so that the sealing strip under the ... -
Page 38: Installation Dimensions
*INSTALLATION* Installation Installation dimensions All dimensions in this instruction booklet are given in mm and inches. CS 1312 9 / 1 6 " ( 1 5 m " 5 / 1 6 1 / 2 " 1 1 / 1 6 ( 2 8 8 ( 5 2 0 "... - Page 39 *INSTALLATION* Installation CS 1322 a Spring clips b Front c Height d Electrical supply connection box with power cord Power cord L = 4' (1,200 mm) e Drain tap f Data plate...
-
Page 40: Countertop Cut-Out For Several Proline Elements
*INSTALLATION* Installation Countertop cut-out for several ProLine elements 2 5 - 3 0 / 1 6 " 1 " - 1 3 2 5 - 3 0 / 1 6 " 1 " - 1 3 5 6 8 3 7 2 / 3 / 8 "... - Page 41 *INSTALLATION* Installation Calculating the countertop cut-out The frames of the ProLine elements overlap the countertop at the outside right and left by 5/16" (8 mm) on each side. Add up the widths of the ProLine elements and subtract 5/8" (16 mm) from this sum.
-
Page 42: Installation
*INSTALLATION* Installation Securing the spring clamps and Installation spacer bars – wooden countertops Preparing the countertop Make the countertop cut-out as shown in the illustration in “Installa- tion dimensions” or as calculated (see “Installation” – “Installing several ProLine elements”). Remember to maintain the minimum safety dis- tances (see “Installation”... - Page 43 *INSTALLATION* Installation Securing the spring clamps and spacer bars – granite and marble countertops You will need heavy-duty double-sided adhesive tape (not supplied with the appliance) to fasten the spring clips or spacer bars. 3 / 1 6 " 1 " - 1 m m ) m - 3 0 ( 2 5 m...
- Page 44 *INSTALLATION* Installation Installing the ProLine element Installing several ProLine elements Feed the power cord down through Push the built-in ProLine element to the cut-out in the countertop. the side until the holes in the spacer bar can be seen. ...
- Page 45 *INSTALLATION* Installation Connecting the ProLine element Removing a ProLine element Connect the ProLine element/ele- If the ProLine element is not accessi- ments to the domestic electrical sup- ble from below, you will need a special ply. tool to remove it. ...
- Page 46 *INSTALLATION* Installation Installing the splash guard and covers The splash guard and covers only need to be installed if the grill is being built in as an individual appliance. Place the mount onto the countertop at the back of, and aligned centrally with, the grill.
-
Page 47: Electrical Connection
It is impera- Miele cannot be held liable for any tive that this basic safety require- damage arising as a result of such ment be met. If there is any doubt, work. - Page 48 *INSTALLATION* Installation Connection Make sure that the power outlet is ac- cessible after the installation of the ap- Ensure that the connection data on pliance. the data plate (voltage, frequency, and fuse rating) match those of your Further information can be found on the electrical supply.
- Page 51 Customer Service. U.S.A. Canada Miele, Inc. Importer Miele Limited National Headquarters 9 Independence Way Headquarters and Miele Centre Princeton, NJ 08540 161 Four Valley Drive www.mieleusa.com Vaughan, ON L4K 4V8 www.miele.ca Customer Support Phone: 888-99-MIELE (64353) Customer Care Centre info@mieleusa.com...
- Page 52 CS 1312, CS 1322 en-US M.-Nr. 07 346 950 / 06...