Miele SALAMANDER GRILL CS 1421 Operating And Installation Instructions
Salamander grill
Hide thumbs
Also See for SALAMANDER GRILL CS 1421:
- Operating and installation instructions (36 pages) ,
- Operating and installation instructions (36 pages)

Related Manuals for Miele SALAMANDER GRILL CS 1421


Summary of Contents for Miele SALAMANDER GRILL CS 1421
- Page 1 Operating and Installation Instructions Salamander Grill CS 1421 en - CA To prevent accidents and machine damage, read the Operating Manual before installation or use. M.-Nr. 07 472 000...
-
Page 2: Table Of Contents
Contents Safety instructions and warnings ........3 Description of the unit . -
Page 3: Safety Instructions And Warnings
WARNING- When using your appliance follow basic precautions, including the following: Read all instructions before installation or use to prevent injury and appliance damage. This appliance conforms to all uniform safety codes and regulations. The manufacturer cannot be held responsible for damage or injury caused by improper use of this appliance. - Page 4 Safety instructions and warnings Children Always supervise any children in the vicinity of the appliance. Do not allow children to play with the unit. Children should use the grill only if they have received sufficient instruction to operate it safely. They must be able to understand and recognize the potential hazards of improper operation.
- Page 5 Technical safety Only skilled persons duly authorized by the manufacturer may install this appliance or perform maintenance and repair work on it. Work performed by unqualified persons carries the risk of serious harm to the user, for which the manufacturer will not be held liable. Before installation, check the appliance for visible signs of external damage.
- Page 6 Defective components should be replaced by Miele original replacement parts only. Only these parts are guaranteed by the manufacturer to comply with safety requirements. Do not operate the grill if there is a...
- Page 7 Do not set up or operate the appliance in the open air. Do not use the ledge for storage. If the appliance is accidentally switched on or there is residual heat, there is the danger that any items located there will heat up and melt, depending on the materials involved, and generating a risk of fire and burns.
-
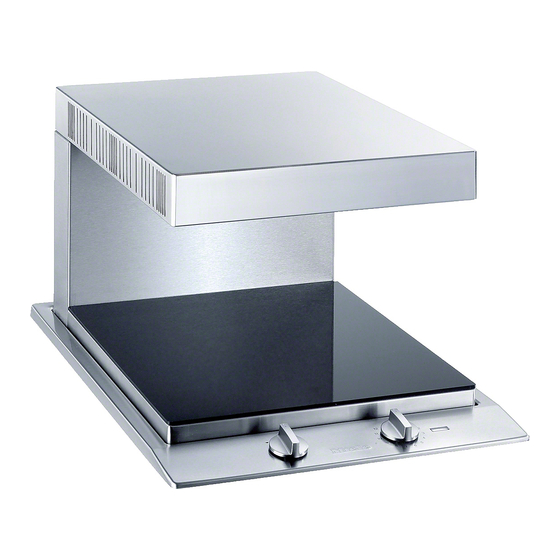
Page 8: Description Of The Unit
Description of the unit a Browning unit, retractable b Ledge, removable c Display Control knob d For setting the power level e For selecting the height of the browning unit Display f "ON" light g Residual heat indicator... -
Page 9: Before Using For The First Time
Clean the appliance ^ Remove any protective foil. ^ Wipe down all surfaces with a damp cloth, then dry. The metal parts have a protective coating. This will cause an odour the first time the appliance is used. Note that the odour and any vapours will disappear after a brief period of time and are not a sign of malfunction or a defective appliance. -
Page 10: Operation
Operation Raising and lowering the browning unit ^ To raise the browning unit, turn the left-hand control to Extend ("-"). The browning unit will automatically extend to its full height, even when you release the control knob back to "ß". You can stop the unit at any height by briefly turning the control knob to "e". -
Page 11: Browning
Browning ^ Raise the browning unit. ^ Place the dish you wish to brown on the ledge. ^ Lower the browning unit until the heating element is 1 (30 - 50 mm) away from the top of the food. ^ Turn the control knob to setting "12". The food will brown in 3-5 minutes, depending on the desired result. -
Page 12: Safety Features
Safety features Safe retraction To avoid damaging the appliance, your grill is equipped with a retraction safety device. The browning unit can be fully retracted only once the appliance has cooled sufficiently, i.e., after the residual heat indicator has gone out. Height recognition The unit heats up only when the browning unit is raised at least 2... -
Page 13: Care And Cleaning
Warning: NEVER use a steam cleaner to clean this appliance. Steam could reach the electrical components and cause a short circuit. Clean the appliance on a regular basis, preferably after each use. First allow the appliance to cool down. After any cleaning with liquid, wipe the appliance dry. -
Page 14: Stainless Steel
Care and cleaning Stainless steel Use a non-abrasive stainless steel cleanser for cleaning the appliance. To help keep the appliance clean longer, we recommend using a stainless steel care product (see "Optional accessories"). Apply the product sparingly, using a soft cloth. Do not use stainless steel cleanser on areas where there is printing. -
Page 15: Frequently Asked Questions
Frequently asked questions Solution Remove the dirt or the object which has become stuck. Contact a qualified electrician or Miele Technical Service for assistance. Solution Raise the browning unit by at least " (70 mm). -
Page 16: Technical Service
Technical Service In the event of a fault which you cannot easily fix yourself, please contact the Miele Technical Service Department at the address on the back of this booklet. When contacting Technical Service please quote the serial number and model of the appliance. -
Page 17: Installation Instructions
Installation Instructions IMPORTANT: SAVE FOR THE LOCAL ELECTRICAL INSPECTOR'S USE To prevent accidents and machine damage read these instructions before installation or use. -
Page 18: Safety Instructions For Installation
However, under certain conditions it may be possible for installation in these applications. Please contact the Miele Technical Service Department with specific requirements. The appliance should not be installed immediately beside an electric barbeque (CS 1312/1322) or the Tepan Yaki (CS 1326). - Page 19 SAFETY INSTRUCTIONS FOR INSTALLATION Safety distances above the appliance The minimum distance between the appliance and an installed exhaust hood must be at least 25 (650 mm). However, if the hood manufacturer requires a larger distance, the larger distance takes precedence.
- Page 20 SAFETY INSTRUCTIONS FOR INSTALLATION Safety distances to the sides of the appliance The appliance should only be installed as shown in the illustrations, while maintaining the required safety distances shown. Do not install the appliance between two tall cabinets, this is a fire hazard. A distance of alteast 2"...
-
Page 21: Installation
Installation Installation dimensions a Spring clips b Appliance front c Installation height d Power supply box with connection cable, L = 78 " (2000 mm) e Browning unit, height-adjustable... - Page 22 Installation Cut out ^ Make the worktop cut-out for one or more appliances as applicable. Remember to maintain a minimum safety distance from the back wall, as well as from any tall unit or side wall to the right or left of the appliance(s).
-
Page 23: Installation Of Multiple Appliances
Installation of multiple appliances When installing more than one combiset appliance, a support bar b must be installed between the appliances. Countertop cut-out two appliances For the installation of two appliances the width of the countertop cut-out D is the sum of A and C. A, B and C = appliance widths ", 15"... - Page 24 Installation Sample calculations for a countertop cut-out for three appliances appliance width minus " (8 mm) 11" (280 mm) 11" (280 mm) 11" (280 mm) " (372 mm) " (372 mm) " (372 mm) /8" (568 mm) " (568 mm) "...
- Page 25 Installation 2 5 - 3 0 5 0 5 0 2 5 - 3 0 5 6 8 3 7 2 / 2 8 0 / 5 7 6 3 8 0 / 2 8 8 / 5 6 8 3 7 2 / 2 8 0 / a Spring clips...
-
Page 26: Attach The Spring Clips And Support Bars
Installation Attach the spring clips and support bars Wood or solid surface countertops ^ Place the supplied spring clips a and the support bars b at the marked positions as shown above, by laying them on the upper edge of the cut-out and then securing them with the "... - Page 27 ^ Coat the edges of the spring clips a, ^ and the space d between the strips b and the countertop with silicone (supplied). Installation...
-
Page 28: Installing The Appliance
Installation Installing the appliance ^ Feed the power cord down through the cut-out. ^ Then place the front side of the appliance in the countertop cut-out. ^ Then with a hand on each side of the appliance press down evenly on the edges until it clicks into position. -
Page 29: Sealing
Sealing The appliance must not be permanently sealed into the countertop when installed. The sealing strip under the edge of the appliance provides a sufficient seal for the countertop. If the appliance is sealed into position, the countertop or appliance could be damaged if it needs to be removed for maintenance or service. -
Page 30: Electrical Connection
Electrical connection CAUTION: Before installation or servicing, disconnect the power supply by either removing the fuse, shutting off the main power supply or manually "tripping" the circuit breaker. Installation work and repairs should only be performed by a qualified technician in accordance with all applicable codes and standards. -
Page 31: Help Protect Our Environment
Disposal of packing materials The cardboard box and packing materials are biodegradable and recyclable. Please recycle. Ensure that any plastic wrappings, bags, etc. are disposed of safely and kept out of the reach of children. Danger of suffocation! Help protect our environment Disposal of an old appliance Old appliances contain materials that can be recycled. - Page 32 Alteration rights reserved / 4608 M.-Nr. 07 472 000 / 00 For the most updated manual see the Miele web site.