
Related Manuals for Philips NeoPix Ultra 2+


Summary of Contents for Philips NeoPix Ultra 2+
- Page 1 User Manual NeoPix Ultra 2 Home projector Register your product and get support at www.philips.com/support...
-
Page 2: Table Of Contents
Table of contents Introduction �������������������������������������������������3 5 Connect to playback devices ����������� 13 Dear customer ...............3 Connect to devices through HDMI ....... 13 About this user manual ..........3 Connect to devices through AV ......13 What’s in the box ............3 Connect to a computer through VGA ....14 Customer service centre ..........3 Connect to external speakers or headphones 14 General safety information ���������������... -
Page 3: Introduction
Damage can result from improper You can find the support hotlines on the handling. warranty card or online: Web: www.philips.com/support Mail: philips.projector.eu@screeneo.com International Phone: +41 215 391 665 Please ask your provider for international call costs! Access the electronic user manual at https://support.philipsprojection.com... -
Page 4: General Safety Information
If the product gets too hot or emits smoke, shut it down immediately and unplug the power cable. Have your product checked by an authorised service centre. Keep the product away from open flames (e.g. candles). Philips · NeoPix Ultra 2... -
Page 5: Power Supply
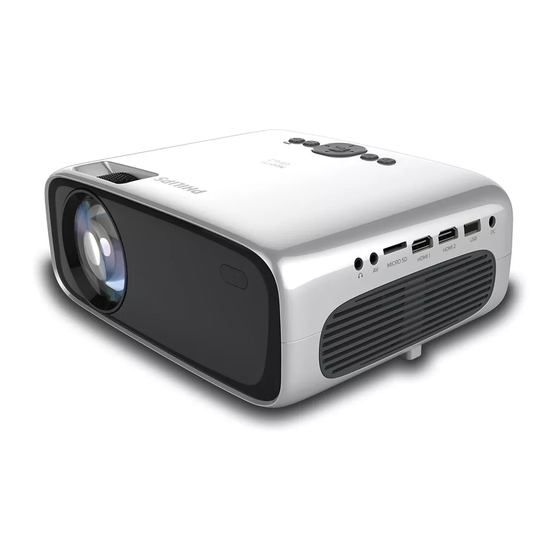
2 Overview Power supply Use only a power adapter which is certified for this product (see Technical data, page 22). Top view Check whether the mains voltage of the power supply matches the mains voltage available at the setup location. This product complies with the voltage type specified on the product. -
Page 6: Front View
Connect to the AC adapter. Access the voice command or search function (Google Assistant). Confirm a selection or entry, or turn an option on or off. Display installed apps and access the app store. Increase or decrease the volume. Philips · NeoPix Ultra 2... - Page 7 Projector remote control Quick access to the Netflix service. Quick access to the Amazon Prime Video service. Enable or disable the remote control. Return to the previous screen or exit the current screen. Access the Android TV home screen. Navigation buttons (Up, Down, Left, Right) •...
-
Page 8: Initial Setup
HDMI 2 Connect to power supply CAUTION! Always use the button to turn the projector on and off. Select a supplied power cable with the correct plug (EU/UK/US/CH). Connect the power cable to the AC adapter. Philips · NeoPix Ultra 2... -
Page 9: Prepare The Remote Controls
Connect the AC adapter to the socket sensor on the projector, and make sure on the projector. there is no obstacle between the remote control and the IR sensor. Connect the power cable to an electrical socket. Power on and set up the •... -
Page 10: Set Up Android Tv
Android TV remote control to choose Continue. Ensure your Android phone has the Google NeoPix Ultra 2 installed and is connected to a Wi- Fi network. On your phone, open the Google app and sign in if you haven't already. Philips · NeoPix Ultra 2... -
Page 11: Use Android
4 Use Android TV Type or say “set up my device.” Follow the instructions on your phone until you get a code. Enter the code on your You will see the Android TV home screen similar Android TV. to the one below after completing the setup. On your phone, tap the name of your Android TV when it shows up. -
Page 12: Configure Android Tv
Google Assistant is not available in certain list. languages and countries. Select your Bluetooth device. When your Android TV says, “Pair with this device?”, choose Pair. The device will be paired within a few seconds. Philips · NeoPix Ultra 2... -
Page 13: Connect To Playback Devices
5 Connect to Connect to devices through playback devices You can connect a playback device (e.g. a DVD player, gaming console, camcorder or digital Notice camera) to the projector through AV connection. Make sure all devices are disconnected With this connection, images are shown on the from their power supplies before projection screen, and audio is played on the establishing or changing any... -
Page 14: Connect To A Computer Through Vga
WXGA 1280 x 768 60 Hz 1280 x 720 60 Hz FULL HD 1920 x 1080 60 Hz Press on the projector remote control to display the input source list, and then select VGA. Philips · NeoPix Ultra 2... -
Page 15: Play Videos From Storage Devices
6 Play videos from During video playback, press on the remote control to start, pause or resume playback. Press on the remote storage devices control to skip to the previous/next video file in the current folder. Using the projector, you can access and play While a video file is playing, you can press video files stored on a local storage device. -
Page 16: Change Settings
Bluetooth settings Go to Remotes & Accessories to pair the projector with the projector's remote control, or a Bluetooth keyboard/mouse/gamepad/ speaker. Apps settings Go to Apps to access the following settings. Philips · NeoPix Ultra 2... - Page 17 Notice • View all the installed and system apps, and the storage used by each app. A factory reset erases all your personal • Set various permissions for the installed information and downloaded apps and apps, e.g. location, contacts, camera, you can't reverse this action.
-
Page 18: Chang Projector Settings
Select Restore Factory Default, and then press the OK button � Press to start restoring the projector to its factory default settings. The projector will turn off after the restoration. Philips · NeoPix Ultra 2... -
Page 19: Maintenance
Update software through USB careful that you do not scratch the surfaces. Check the latest software version on www. philips.com/support. Find your product Cleaning the lens (model number: NPX645), and locate ‘Software and drivers’. Use a soft brush or lens cleaning paper for Download the software installation file to cleaning the lens of the projector. -
Page 20: Troubleshooting
1920*1080 (for VGA connection) or 1080P (for HDMI connection). The projector turns itself off. • When the projector is running for a long period of time, the surface becomes hot. • Check that the power cable is connected correctly. Philips · NeoPix Ultra 2... - Page 21 Problem Solution The projector cannot read the USB storage • The projector does not support the exFAT file device. system. • Format the USB storage device in FAT32 or NTFS format, then use it. The projector does not react to remote •...
-
Page 22: Appendixes
AV in ................x1 NPX645/INT EAN: 7640186960601 Power source UPC: 793565993602 Power consumption ....operating: 100 W ............Standby: 0.3 W Power adapter ................Input: AC 100-240V, 50/60Hz, 1.4A (Max) ......... Output: DC 24.0V, 3.0A, 72.0W External Dongle Philips · NeoPix Ultra 2... -
Page 23: Ce Statement
The Declaration of Compliance can be • Consult the dealer or an experienced radio/ consulted on the site www.philips.com. TV technician for help. Frequency bands Maximum output power During operation, the separation distance... -
Page 24: Other Notice
Screeneo Innovation SA/PHILIPS products or package recovery and recycling infrastructures. Screeneo Innovation SA/PHILIPS approved Please respect the sorting rules set up locally products. - Page 25 Screeneo Innovation SA Route de Lully 5c - 1131 Tolochenaz - Switzerland Philips and the Philips Shield Emblem are registered trademarks of Koninklijke Philips N.V. used under license. Screeneo Innovation SA is the warrantor in relation to the product with which this booklet was packaged.