
Related Manuals for Philips NeoPix Easy NPX440


Summary of Contents for Philips NeoPix Easy NPX440
- Page 1 EN User Manual FR Manuel utilisateur DE Bedienungsanleitung ES Manual del usuario IT Manuale d’uso Register your product and get support at www.philips.com/support...
- Page 2 User Manual Register your product and get support at www.philips.com/support...
-
Page 3: Table Of Contents
Table of contents Introduction �������������������������������������������������3 Set sleep timer .............14 Set auto sleep ..............14 Dear customer ...............3 7 Service �������������������������������������������������� 15 About this user manual ..........3 What’s in the box ............3 Cleaning .................15 General safety information ��������������� 4 Update software ............15 Troubleshooting ............16 Setting up the product .......... -
Page 4: Introduction
Introduction What’s in the box NeoPix Easy projector (NPX440) Remote control with 2 AAA batteries Dear customer A/C power adapter Thank you for purchasing this projector. Power plugs (EU, UK, US) We hope you enjoy this product and the many Quick Start Guide functions it offers! Lens cover... -
Page 5: General Safety Information
Have your product checked by product. an authorised service centre. Keep the product Do not remove the type label from this product, away from open flames (e.g. candles). as this will void the warranty. Philips · NeoPix Easy... -
Page 6: Power Supply
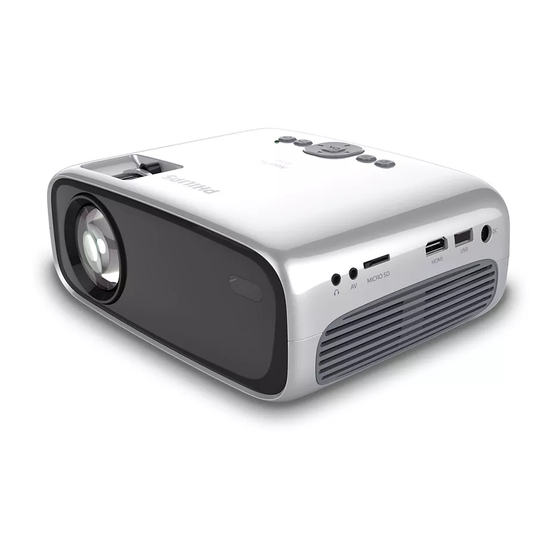
2 Overview Power supply Use only a power adapter which is certified for this product (see Technical data, page 17). Top view Check whether the mains voltage of the power supply matches the mains voltage available at the setup location. This product complies with the voltage type specified on the product. -
Page 7: Front View
Switch the projector on or to standby. • When the projector is switched on, the LED turns green. When the projector is in standby, the LED turns red. VGA port Connect to the VGA port on a computer. Rear IR sensor Philips · NeoPix Easy... -
Page 8: Access Home Menu
3 Initial operation Access home menu The home menu provides easy access to media player, setup and other useful features in the Placing projector projector. You can install the projector in four different Press . The home menu is displayed. configuration. -
Page 9: Changing Screen Size
• The LED on the projector turns red. To adjust projection to the correct position, press , and go to SETUP - Panel Flip MICRO SD HDMI Rotate. Philips · NeoPix Easy... -
Page 10: Preparing The Remote Control
Preparing the remote To adjust the screen height when placing the projector on the table, turn the angle control adjustment knob located on the bottom of the projector. CAUTION! The improper use of batteries can lead to overheating, explosion, risk of fire and injury. -
Page 11: Connect To Playback Devices
VGA signal to an external monitor. The following resolutions Using a RCA cable with 3.5 mm plug, are supported: connect the AV connector (3.5 mm) on the projector to the analogue audio output Philips · NeoPix Easy... -
Page 12: Connecting To External Speakers Or Headphones
Image Resolution refresh rate MICRO SD HDMI 640 x 480 60 Hz SVGA 800 x 600 60 Hz 1024 x 768 60 Hz WXGA 1280 x 768 60 Hz 1280 x 720 60 Hz FULL HD 1920 x 1080 60 Hz Press to display the input source list, and then select VGA. -
Page 13: Media Playback
If music media player is selected, only the playable music files can be • If video media player is selected, displayed. only the playable video files can be Select a music file and press OK to play displayed. music. Philips · NeoPix Easy... -
Page 14: Photo Playback
The playback control icons are displayed • Pause or resume play at the bottom of the projection screen. • Select a previous or next photo file You can access the following playback • Stop play functions. • Select a play mode: repeat one/repeat •... -
Page 15: Change Settings
Select SETUP, and then press OK to access • Surround Sound: Turn surround on or off. the setting options. Select Auto Sleep, and then press / to select a period of time (in hour). Philips · NeoPix Easy... -
Page 16: Service
Update software The latest software of the projector can be found on www.philips.com/support for you to get the best features and support from the projector. Before you update the software of the projector, check the current software version: •... -
Page 17: Troubleshooting
What to do if the projector does • Check that the HDMI cable is plugged in correctly. not work when connecting to a • Make sure that the notebook PC has been switched to notebook PC? projector display. Philips · NeoPix Easy... -
Page 18: Appendix
8 Appendix Package content NeoPix Easy projector, remote control with 2 AAA batteries, AC adapter, power plugs Technical data (EU, UK, US), lens cover, Quick Start Guide Technology/optical Display technology ..........LCD Light source ............LED Resolution ........800 × 480 pixel LED lifetime ........up to 20,000 h Contrast ratio ............ - Page 19 The Declaration of Compliance can be this device must accept any interference consulted on the site www.philips.com/ received, including interference that may projection. cause undesired operation. FCC RF Radiation Exposure Statement: Preservation of the environment as part...
- Page 20 Screeneo Innovation SA/PHILIPS products or Screeneo Innovation SA/PHILIPS approve d products. Screeneo Innovation SA shall not be held liable...
- Page 21 PHILIPS and the PHILIPS’ Shield Emblem are registered trademarks of Koninklijke Philips N.V. used under license. This product was brought to the market by Screeneo Innovation SA., further referred to in this document as Screeneo Innovation SA., and is the manufacturer of the product.
Need help?
Do you have a question about the NeoPix Easy NPX440 and is the answer not in the manual?
Questions and answers