Table of Contents
Advertisement
Advertisement
Table of Contents

Related Manuals for TC Electronic Ditto X2 Looper


Summary of Contents for TC Electronic Ditto X2 Looper
- Page 1 English Manual...
-
Page 2: Table Of Contents
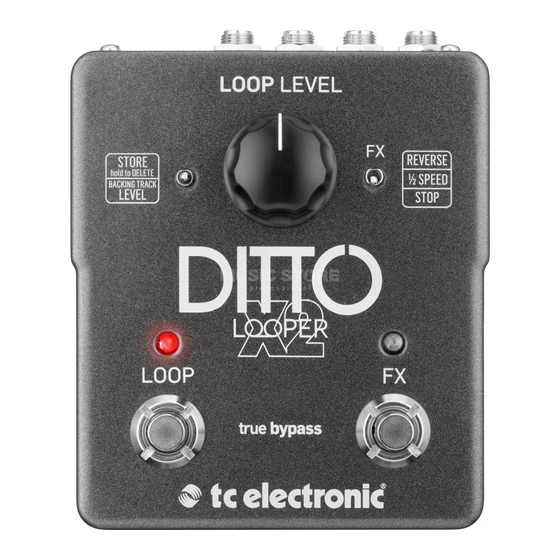
6. Loop / backing track level control knob 7. Store / Delete / Backing track level switch 8. FX selector switch 9. USB port Product Ditto X2 Looper Product (firmware) version Document English Manual Document version / date 2014-11-20 Ditto X2 Looper English Manual... -
Page 3: Important Safety Instructions
12. Use only with a cart, stand, tripod, bracket, or table specified by the manufacturer, or sold with the ap- paratus. When a cart is used, use caution when moving the cart/apparatus combination to avoid injury from tip-over. Ditto X2 Looper English Manual... -
Page 4: Emc / Emi
– Connect the equipment into an outlet on a cir- cuit different from that to which the receiver is connected. – Consult the dealer or an experienced ra- dio / TV technician for help. Ditto X2 Looper English Manual... -
Page 5: About This Manual
About this manual Introduction This manual will help you learn understanding Ditto X2 Looper is the logical heir to the looping and operating your TC product. throne after the smash hit Ditto Looper. It houses all the features that made the original Ditto Loop- This manual is only available as a PDF download er such a success –... -
Page 6: Setup
Setup Ready… Set… Let’s get loopin’! The Ditto X2 Looper box should contain the fol- – Connect a 9V power supply delivering a mini- If you are in a hurry, chances are you’ll find what lowing items: mum of 100 mA with the following symbol to you’re looking for in this overview. -
Page 7: Setup Examples
Setup examples Setup examples Setup example 1: Basic looping – no effects This is the most basic mono setup: your instru- ment, Ditto X2 Looper and your amp. Input Combo Ditto X2 Looper English Manual... - Page 8 Setup examples Setup example 2: Ditto X2 Looper and effects Place your effects before Ditto X2 Looper. This will allow you to create and record different sounds within the same looping session simply by switching your effects on and off.
- Page 9 Pedal(s) Looper in that FX loop. Again: To get the most out of your setup, place Ditto X2 Looper at the end of the FX loop. This gives you the flexibility to add parts with or without signal processing by simply switching effects on and off as required.
- Page 10 Setup examples Setup example 4: Dual amp setup Got two amps? Feed’em! Drive Stereo effect pedals pedal Combos Ditto X2 Looper English Manual...
- Page 11 Dual mono with two instruments As they say: Two can play! Share the love (i.e., your Ditto) with another guitar (or bass) player. You’ll just have to agree on who gets to hit the LOOP footswitch… Combos Ditto X2 Looper English Manual...
-
Page 12: Inputs, Outputs, Controls
See “Balancing backing track and supplied). To minimize hum, use a power supply current loop levels” (page 16). Connect Ditto X2 Looper to a computer to trans- with isolated outputs. You can also run Ditto X2 fer loops between your computer and Ditto X2 Store / Delete / Looper using batteries. -
Page 13: Creating Loops
Undo and you changed your mind, you can re- of Ditto X2 Looper (Record loop > Playback > Re- store that take. To do so, simply press and hold cord overdubs). You can also use an alternative To record another take (overdub), press the the LOOP footswitch for 1.5 seconds or longer... - Page 14 The LED will flicker red and then turn off to indi- cate that the loop has been deleted. When you delete your loop from Ditto X2 Looper, the device goes into True Bypass mode. Other than clearing the last overdub (which can be undone), deleting the full loop as de- scribed in this section cannot be undone.
- Page 15 2. Press it again to switch from recording your original loop to creating additional takes (over- dubs) right away. 3. Press it a third time to go to playback. With Ditto X2 Looper, you can choose your pre- ferred method. Ditto X2 Looper English Manual...
-
Page 16: Storing, Importing And Exporting Loops
This means that you can transfer au- complete backing tracks) from and to your com- 12). dio files to and from Ditto X2 Looper – but you puter/DAW. cannot play back (or record) audio at the same time. Ditto X2 Looper does not act as a USB You can set playback volume for the in-memory audio interface. - Page 17 Exporting Ditto X2 Looper About audio formats loops to a computer Ditto X2 Looper saves audio files in 32 bit float- Never let a great loop go to waste! ing point format. If your DAW does not support this AIFF/WAV “flavor” – or if it doesn’t support If you have created a really great loop (e.g.
- Page 18 What you are recording with Ditto X2 Looper is that you would like to use on stage as a backing into Ditto X2 Looper: This will give you the high- called “the current loop”. If you store this current track? Well, with Ditto X2 Looper, you can – with-...
-
Page 19: Jam Track Central Tracks
– Jan Cyrka: “Johnny Winter Style” Free Jam Track Central tracks will be avai- – Luke Roberts: “Roundhouse” lable for every Ditto X2 Looper owner on the – Paul Harvey & Martin Miller: “Sassafras” JTC site starting February 7, 2014. -
Page 20: Using Effects
The FX footswitch will light up green, and Ditto X2 Looper will immediately slow down loop playback (including all layers) to half speed. – To return to the original loop playback speed, tap the FX footswitch again. Ditto X2 Looper English Manual... - Page 21 If you switch on the Half speed effect before re- If you switch on the Reverse effect before re- effects in Ditto X2 Looper will apply them “non- cording a new loop, you are effectively “running cording, that loop / overdub will be recorded in destructively”: What you have recorded will be...
-
Page 22: Bypass Modes
USB and running in USB transfer mode. Make sure that no files are currently being trans- ferred to or from Ditto X2 Looper and remove the USB cable to return to normal operation. Ditto X2 Looper English Manual... -
Page 23: Footswitch Led State Reference
LOOP end is reached) Loop recording Blinking red Loop currently being erased or converted FX footswitch LED… Reverse effect active Green Half speed effect active Blinking red & Reverse and Half speed ef- green fects active Ditto X2 Looper English Manual... -
Page 24: Updating The Firmware
4. Press and hold the leftmost footswitch on your TC pedal. 5. Insert the DC power supply plug. The leftmost LED on your pedal should turn green. 6. Release the footswitch. Your TC pedal will now be recognized as an updatable device. Ditto X2 Looper English Manual... -
Page 25: Technical Specifications
– Dimensions (Width x depth x height): and exporting loops as backing tracks, creative 113 mm x 135 mm x 54 mm / techniques etc., please go to the Ditto X2 Looper 4.44” x 5.31” x 2.13 FAQ at – Weight: 512 g / 1.13 lbs. - Page 26 Ditto X2 Looper English Manual...
Need help?
Do you have a question about the Ditto X2 Looper and is the answer not in the manual?
Questions and answers
I’ve connected the Ditto Looper to my computer with USB cable but the orange pedal light does not turn on. I am using batteries in Ditto as power source. Is it necessary to plug into an external power source?