Miele HS18 Operating Instructions Manual
Hide thumbs
Also See for HS18:
- Operating instructions manual (204 pages) ,
- Operating instructions manual (80 pages) ,
- Operating instructions manual (176 pages)

Related Manuals for Miele HS18


Summary of Contents for Miele HS18
- Page 1 智能吸尘器使用说明书 Robot vacuum cleaner operating instructions HS18 M.-Nr. 10 814 540...
-
Page 2: Table Of Contents
目录 ______________________________________________________________________________________________________________________________________________ 注意事项与安全说明..........电器结构说明........... 环境保护............智能吸尘器的功能和特征......... 标准配件............使用前准备............. 使用............开启与关闭............. 开始清扫............结束清扫:从充电基座开始清扫........结束清扫:从房间内某处开始清扫......... 手动清扫............暂停清扫............手动导航(不清扫)..........将智能吸尘器引导至充电基座........手动结束清扫........... 运行模式............选择运行模式........... 当前运行模式下结束..........设定计时器............. 取消计时器............. 激活计时器/显示设定的开始时间........取消声音信号........... 降低最大跨越高度..........维护............清空集尘盒............. 清洁集尘盒............. 清洁空气过滤网..........清洁滚筒刷............. 清洁边刷............清洁集尘盒密封条.......... - Page 3 目录 ______________________________________________________________________________________________________________________________________________ 更换集尘盒密封部件..........清洁前轮............清洁传感器............. 更换遥控器电池..........更换充电电池........... 存放/出厂默认设置..........清洁与保养............. 售后服务............故障联系............保修............故障排除指南............ 故障信息............电气连接............版权及许可...............
-
Page 4: 注意事项与安全说明
注意事项与安全说明 ______________________________________________________________________________________________________________________________________________ 本智能吸尘器符合所有当地和国家现行安全标准。但是,不当使用可能 导致人身伤害和财产损失。 首次使用前,请认真阅读本说明书,以免发生意外或损坏机器。本说明 书包含了关于安全、使用和维护等方面的重要信息。避免发生对个人和 电器造成损坏 请妥善保管本说明书,如果产品所有权发生转移,请将说明书转交给新 的所有者。 进行任何维护和清洁前或长时间不使用时,请关闭智能吸尘器。检查故 0以关机。 如果 障时应当关闭吸尘器。 按压智能吸尘器侧面的开关 至 智能吸尘器出现异样,请将其关闭。 正确使用 本智能吸尘器仅供清洁家庭或相似工作和居住环境的地板。 本智能吸尘器不适于户外使用。 本智能吸尘器仅限于清洁室内干燥地面。 若将其挪作其它任何用途、 或对 吸尘器进行任意改造,可能导致危险,对于此类行为,生产商均不予以支 持。 具有身体、 感官或精神障碍的人士, 以及缺乏相关经验或知识的人士使用 本机时必须有人看管。... - Page 5 注意事项与安全说明 ______________________________________________________________________________________________________________________________________________ 儿童安全注意事项 窒息危险。机器包装,如塑料包装必须放在婴儿和儿童触及范围之外。儿 童可能在玩耍时困在包装内,或将其套在头上造成窒息。 除非有人持续看管,八岁以下的儿童须远离本智能吸尘器。 八岁以上的儿童可以在无人看管的情况下使用本智能吸尘器, 但必须向其 详细说明安全操作方法,并且使其了解和认识到使用不当可能造成的后果。 儿童在无人看管的情况下不可清洁或维护本智能吸尘器。 儿童在本智能吸尘器附近时请注意看管,避免儿童误操作机器。 确保将充电电池和遥控器电池放在儿童无法触及的地方。 技术安全 本智能吸尘器操作电压为 14.4 伏。 每次使用本智能吸尘器之前,请检查电器和所有配件是否存在明显损坏。 切勿使用损坏的电器或配件。...
- Page 6 检查智能吸尘器铭牌上的连接数据和电源 (电压和功率) 是否与总电源相 匹配。数据必须完全匹配。 电源插头必须装有合适的保险丝。 只有将充电基座连接总电源时,本智能吸尘器才可以安全、稳定地运行。 在保修期内,智能吸尘器的维修作业只能由 Miele 授权的维修人员进行, 否则保修无效。 只能由 Miele 授权的技术人员进行维修。 未经授权的维修及其它作业可能 对用户造成重大危险。 确保电源线无损坏、弯折或扭曲。勿将重物放在电源线上。 勿将任何电源线缠绕在智能吸尘器上。 仅可使用本机随附的配件(电源适配器、电源设备和充电基座)为充电电 池充电。 电池和充电电池会随着时间放电。 可能泄漏腐蚀性液体。 避免接触眼睛和 皮肤。如发生此类情况,应当用水彻底冲洗并就医。 请勿在充电基座前部粘贴任何胶贴, 因为会挡住红外发射器。 不要在其前...
- Page 7 注意事项与安全说明 ______________________________________________________________________________________________________________________________________________ 请勿将智能吸尘器或随附部件浸入水中。 仅可用干布或略微湿润的布清洁 所有部件。 请勿摔落智能吸尘器或随附部件。 出于安全考虑, 请勿使用掉落或损坏部 件。 正确使用 安装集尘盒、预滤器和空气过滤网前勿使用本智能吸尘器。 请移除地板上所有易碎或轻质物品, 并确保智能吸尘器不会被衣物、 窗帘、 流苏或类似物品缠绕。 确保智能吸尘器远离动物。切勿让动物站在或蹲在智能吸尘器上。 采取必要防护措施, 确保智能吸尘器不会从高处如阳台掉落。 应设置障碍 以防机器进入无护栏的高处,如设置实物障碍。 请勿用智能吸尘器清扫正在燃烧或者灼热的物品 (无论这些物品仍有火光 还是表面已熄灭) ,如香烟、灰烬或煤等。请勿在壁炉附近使用吸尘器。 请勿用本产品清扫水、 液体或潮湿污垢。 刚被清洗过的地毯或其它地板覆 盖物,应待其完全干燥后再清扫。 请勿使用本产品清扫墨粉粉尘。打印机和复印机等使用的墨粉会导电。...
- Page 8 注意事项与安全说明 ______________________________________________________________________________________________________________________________________________ 请勿使用本产品清扫任何易燃气体或液体, 也勿在存放该类物品的区域清 扫。 智能吸尘器处于持续工作状态时, 请勿坐或躺在智能吸尘器正在清扫的表 面,从而避免宽松或长毛绒织物接触吸尘器的滚筒刷或其它移动部件。 处理充电电池和遥控器电池: 寄送充电电池之前,请联系 Miele 售后服务部。 请勿抛扔或摔落充电电池。 出于安全考虑, 如果充电电池掉落或损坏则不 要继续使用。 让充电电池或遥控器电池远离明火或其他热源。 不得让充电电池或遥控器 电池受热,或受到阳光直接照射。 请勿拆卸充电电池。 不论是有意还是无意,不得跨接充电电池或遥控器电池的接点引起短路。 请勿让充电电池或遥控器电池接触液体。 ...
- Page 9 注意事项与安全说明 ______________________________________________________________________________________________________________________________________________ 处理旧电池和充电电池: 将充电电池和遥控器电池分别从吸尘器和遥控器 中取出。在弃置之前隔离金属接点以避免短路。安全处理旧电池和充电电 池。勿将电池与日常生活垃圾一同处置。 报废电器前必须取出电池。 配件 请只使用带有“Original Miele(Miele 原装)”标志的原装配件,否则生 产商无法保证产品安全。 因用户操作使用不当,或不遵守注意事项与安全说明而引起的任何损 坏,Miele 概不负责。 ...
-
Page 10: 电器结构说明
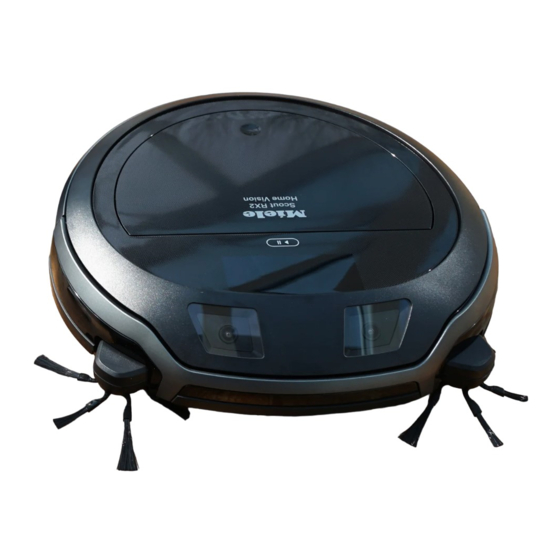
电器结构说明 ______________________________________________________________________________________________________________________________________________ A – 智能吸尘器顶部和底部... - Page 11 电器结构说明 ______________________________________________________________________________________________________________________________________________ 显示屏 时间模式显示(am/pm) 开始/停止感应键() 摄像头 冲击保护 开/关(I/0) 存储盒按压开关 Silent(静音)吸尘模式感应键 Turbo(快速)吸尘模式感应键 Base(自动充)感应键 Spot(精扫)吸尘模式感应键 Auto(自动)标准吸尘模式感应键 计时指示器 充电电池状态指示灯 边刷 滚筒刷 前轮 传感器(倾翻保护) 充电对接点 滚筒刷架 驱动轮...
- Page 12 电器结构说明 ______________________________________________________________________________________________________________________________________________ B – 充电基座和遥控器 充电基座 收线器 电线槽孔 电源线插头插孔(图中不可见) 充电连接点 遥控器 Power(电源)按键(开启和关闭) Base(自动充)按键(将吸尘器引导至充电基座) OK 确认键,四周有方向键 开始/停止键() (开始/停止清扫) Mode(模式)按键(选择吸尘模式) Clock(时间)按键(设置时间) Timer(计时器)按键(设置计时器) Mute(静音)按键(激活/取消声音信号) Climb(上升)按键(减少跨越高度) 电池盒(后方)...
- Page 13 电器结构说明 ______________________________________________________________________________________________________________________________________________ C – 集尘盒 手柄 带刮器清洁工具 刮器按钮 机盖 机盖释放按钮 集尘舱 预过滤网 空气过滤网 空气过滤舱盖...
-
Page 14: 环境保护
材料的使用, 也可减少垃圾处理场的 和充电电池包含可能对人体健康和 废物量。 环境造成损害的物质。 废旧电器的处理 电器及电子电器中通常含有某些有 电池和充电电池上包含更多处理指 价值的材料。 同时含有对电器正常运 示。带杠垃圾箱表示切勿在任何情况 行安全不可或缺的某些材料、 组件和 下将电池或充电电池与生活垃圾一 部件。 若处置不当或随意丢弃, 会对 同弃置。带杠垃圾箱加上一个或多个 人体健康和环境造成潜在危害。因 化学标志,表明电池或充电电池含有 此, 请勿将旧电器与生活垃圾一同弃 铅(Pb) ,镉(Cd)和/或汞(Hg) 。 置。 旧电池和充电电池含有重要原材料, 可以进行回收。分开处理电池和旧电 请在当地社区的垃圾收集/回收中心 池可以帮助更好地回收处置。 处理电器,或咨询 Miele。您对删除 已处理电器中可能存储的任何个人 信息负责 (法律责任, 取决于您所在 的国家) 。 请确保废旧电器留待处理 时不会对儿童造成危险。... -
Page 15: 智能吸尘器的功能和特征
______________________________________________________________________________________________________________________________________________ 智能吸尘器的功能和特征 智能吸尘器适用于短绒地毯、 铺装地 毯和硬质地板的日常清洁。 请遵循地板生产商提供的清洁 小心将 2 只边刷推入相应插脚直至 与保养说明 。 听到声音。确保正确对应标记 L 和 R。 智能吸尘器装有一个摄像头和多个 除去保护膜 传感器。 吸尘器清洁过程中, 它的存 储器会保存记录房间布局和房间内 物品摆设位置。 吸尘器将根据这些数 据制定一个高效的清扫方案, 然后开 始自动清扫。 标准配件 - 遥控器/2 节电池 - 两把边刷 除去充电基座和智能吸尘器顶部的 保护膜。 - 带插头的电源线 - 电源适配器 将电池装入遥控器... - Page 16 ______________________________________________________________________________________________________________________________________________ 启动智能吸尘器 将随附的电源插头插入充电基座后 方的插孔。您可以将多余电线绕在 按压智能吸尘器侧面的 I/0 开关至 收线器上。将电线从两个电线槽孔 I。 之一中穿过。 显示屏中充电电池状态指示灯将亮 起。约 60 秒后吸尘器将切换至待机 状态。 按遥控器上任意按键或显示屏 上任一感应键,可重启吸尘器。 连接充电基座 请依照示意图正确组装充电器,然 后将其插入所选插座。 为充电电池充电 随附的充电电池没有充满电。首次使 用之前,需在智能吸尘器开启(I/0 开 将充电基座放在一块靠墙可轻易 关滑至 I)时将电池充满。 够到插座的平地上。确保其前方 至少 1.5 米、 左右各 0.5 米范围内 您也可以在吸尘器关闭(I/0 开关 无任何障碍物。...
- Page 17 ______________________________________________________________________________________________________________________________________________ 短按 Clock(时间)键。 正确连接智能吸尘器和充电基座 上的充电对接点。 显示屏将显示 24h。 为充电电池充电时, 显示屏中电池状 如需显示 24 小时制,按 OK 键。 态指示灯将闪烁。 如需显示上午/下午 12 小时制, 按 Scout RX2 充电时间最长为 150 分 键,然后按 OK 键确认 12h。 钟。 显示屏中电池状态指示灯亮为绿 指示区中小时指示灯将闪烁。 色时,说明充电完毕。 Scout RX2 充电后可清扫达两个小 按 + 或...
-
Page 18: 开启与关闭
按下遥控器上的 Power(电源)键 或显示屏上任意感应键。 开始清扫 有两种开始清扫方式。 方法 1(遥控器) 将本机随附的磁条铺贴在地上 (槽 面向下) 。 吸尘器将不会跨越该磁条。 本机随附的磁条可作永久固定。 您可 按下 键。 通过 Miele 网上商店订购磁条。 方法 2(显示屏) 使用 首次清扫新环境或家里有新变 化时,请始终留意智能吸尘器。 这样您就可以发现并移开可能 按下 感应键。 的障碍物,或用磁条划出工作 吸尘器即对房间进行清扫。 区域。请务必同时检查吸尘器 智能吸尘器至少清扫 5 分钟,与清扫... -
Page 19: 结束清扫:从房间内某处开始清扫
______________________________________________________________________________________________________________________________________________ 吸尘器将继续运行初始清扫过程。 结束清扫:从房间内某处开始清扫 暂停清扫 吸尘器将返回清扫起始点,约 60 秒 后切换到待机状态。 如果电池电量过低,吸尘器将停 住不动。这时您需要给它充电。 手动清扫 按下遥控器上的 键或显示屏上 您可以通过遥控器上的方向键, 对房 的 感应键。 间特定区域进行清扫。 智能吸尘器将停止运行。 吸尘器清扫时, 请持续按住其中一 再次按下按键或感应键, 吸尘器再次运 个方向键。 行。 吸尘器将转向既定方向, 直至松开该 如将智能吸尘器从地上抬起后放到其 方向键。 它地方,再次激活时显示屏将显示 rLOC。智能吸尘器将转身,根据已存 地图数据对比新地点。 如果数据兼容,智能吸尘器将开始清 扫,不会清扫已清扫过的地面。 持续按住 + 方向键。 如果数据不兼容,智能吸尘器将不会... -
Page 20: 将智能吸尘器引导至充电基座
______________________________________________________________________________________________________________________________________________ 持续按住其中一个方向键。 您 也 可 以 在 60 秒 内 再 次 按 下 Power(电源)键,智能吸尘器将 吸尘器将沿所需方向行进而不清扫。 切换至待机状态。 不能将智能吸尘器手动引导至 按遥控器上任意按键或显示屏上任意 充电基座进行充电。 感应键,即可重启智能吸尘器。 将智能吸尘器引导至充电基座 运行模式 (仅用于从充电基座开始清扫) 共有五种不同的清扫模式。 Auto 标准清扫模式, 用于清 扫普通脏污地板。 Spot 集中清扫智能吸尘器 所选起始点周围大约 1.8 1.8 m 的区域。 ... -
Page 21: 选择运行模式
______________________________________________________________________________________________________________________________________________ 选择运行模式 当前运行模式下结束 按下遥控器上的 Power(电源) 键。 可通过两种方法选择清扫模式。 按下遥控器上的 Power(电源)键 方法 1(遥控器) 或显示屏上的 感应键。 约 60 秒后吸尘器将切换至待机状态。 显示屏被禁用。 您 也 可 以 在 60 秒 内 再 次 按 下 重复按 Mode(模式)键,直至显 Power(电源)键,智能吸尘器将 示 屏 中 亮 起 所 需 运 行 模 式 的 符 切换至待机状态。... -
Page 22: 取消计时器
______________________________________________________________________________________________________________________________________________ 短按遥控器上的 Timer(计时器) 按 OK 键确认选择。 按键。 显示屏中的计时器 和显示灯区 中的小时指示灯将闪烁。 重复按 Mode(模式)键,直至显示 屏中亮起所需运行模式的符号。 按 OK 键确认选择。 按 + 或 - 方向键设定所需小时 值。 这些设置将显示约 3 秒钟。至此,智 能吸尘器将每天同一时间开始清扫。 计时器指示灯 亮起, 表明计时 器被启用。 ... -
Page 23: 激活计时器/显示设定的开始时间
毫米的高度。 这使机器能够清扫地毯 和跨越门槛等。 订购配件 如果您希望降低该高度(降至约 6 Miele 原装配件可通过 Miele 网上商 毫米)以保护椅腿、桌腿或灯具等, 店、Miele 服务部订购。 可以修改出厂默认设置。 可 通 过 Miele 原 装 配 件 包 装 上 的 “ Original Miele ” 标 志 辨 别 是 否 为 Miele 原装配件。 ... -
Page 24: 清空集尘盒
______________________________________________________________________________________________________________________________________________ 按照箭头方向按压一个或两个释放 按钮,取下集尘盒盖。 清空集尘盒。 如果集尘盒中只含家庭生活灰尘,则 清空集尘盒 可以按照一般生活垃圾处理。 请在每次使用后清空集尘盒, 从而达 装回盒盖,关上集尘盒,确保卡入 到最佳清洁效果。 到位。 请至少在指示区上下滚动显示I_ _I 将集尘盒装回智能吸尘器中,向下 时清空集尘盒。 推动把手使其卡入到位。 合上存放盒盖, 按压凹处使其固定。 清洁集尘盒 按照要求清洁集尘盒。 按压智能吸尘器顶部凹处。 集尘盒盖顶部有一个清洁工具。 存放盒盖将打开。 取下清洁工具。 将把手向上提,解开集尘盒。 取出集尘盒。 用清洁工具清洁集尘盒和盖子底部。 ... - Page 25 ______________________________________________________________________________________________________________________________________________ 清洁边刷 集尘盒处有一个空气过滤网舱。 按照要求清洁边刷。您需要使用集尘盒 取下集尘盒盖。 盖顶部的清洁工具。 将智能吸尘器翻转放在平整的干净 表面上。 在集尘盒中展开滤网部件。 用双手抓住两边塑料边刷向上将 其拉出。 取下预滤器, 根据要求用清洁工具 用清洁工具底部的清洁刷除去线头 清洁。 和毛发。 将清洁刷置于垃圾箱上方。 解开空气过滤网, 将其取下并用清 多次按压清洁刷顶部按钮, 直至所有 洁工具清洁。 将空气过滤网装回机盖中。 线头和毛发均已抖出。 将预滤器放在空气过滤网上。 滤网部件此时全部装好。 小心装回滤网部件,卡入到位。 ...
-
Page 26: 清洁滚筒刷
______________________________________________________________________________________________________________________________________________ 用清洁工具底部的清洁刷除去线头 为保证最佳清洁效果,边刷大 和毛发。 约需每年更换一次。 清洁滚筒刷 按照要求清洁滚筒刷。 您将用到集尘 盒盖顶部的清洁工具。 将清洁刷置于垃圾箱上方。 将智能吸尘器翻转放在平整的干 净表面上。 多次按压清洁刷顶部按钮, 直至所有 线头和毛发均已抖出。 取下两只边刷, 参考 “清洁边刷” 。 装回滚筒刷。 确保尖头一端插入对应 位置。 拉开并取下滚筒刷盖。 小心装回滚筒刷盖,确保卡入到位。 用剪刀剪开缠绕在边刷上的线头 和毛发。... -
Page 27: 清洁集尘盒密封条
______________________________________________________________________________________________________________________________________________ 装回两只边刷, 参考 “清洁边刷” 。 插入新的密封部件,使箭头指向 标志。 为保证最佳清洁效果,滚筒刷 固定密封部件,确保卡入到位。 大约需每年更换一次。 箭头指向标志。 清洁集尘盒密封条 清洁前轮 根据要求清洁集尘盒底部的密封条。 根据要求清洁前轮。 您将用到集尘盒盖 将智能吸尘器翻转放在平整的干 顶部的清洁工具。 净表面上。 将智能吸尘器翻转放在平整的干净 表面上。 用湿布清洁密封条。 打开盖子。 为保证最佳清洁效果,密封部 件大约需每年更换一次。 取下前轮。 更换集尘盒密封部件 取下集尘盒。 ... -
Page 28: 更换遥控器电池
Scout RX2 (YCR-M05) 遥控器需要两节 1.5V(AAA)电池。 小心拉动电线,将插头连接拉出。 取下电池盒盖。 按压插头连接上的闭锁,释放插头。 更换新电池。确保极性正确。 取出充电电池。 合上电池盒盖。 遵循说明书开头处 “注意事项与安 全说明”和“环境保护”中关于 处理和弃置电池的特殊说明。 将新的充电电池插头插入对应点, 确 更换充电电池 保卡入到位。 您将用到 Miele 原装锂充电电池: 小心插入充电电池,确保正确安放 — YCR-M05,用于 Scout RX2 (参见右侧插图)。 请勿使用不可充电电池。... -
Page 29: 存放/出厂默认设置
______________________________________________________________________________________________________________________________________________ 将插头连接存放在边侧位置。 出厂默认设置 智能吸尘器可以重置为出厂默认设置。 手握遥控器。 小心装回并关上充电电池盒盖, 确 保卡入到位。 遵循说明书开头处 “注意事项与安 全说明”和“环境保护”中关于 处理和弃置电池的特殊说明。 存放/出厂默认设置 存放 同时按住显示屏上 Spot(精扫)感 应键和 Turbo(快速)感应键至少 5 如果长时间不使用智能吸 秒。 尘器,请将其关闭。按压智能 吸尘器侧面的 I/0 开关至 0 即可 显示屏将显示 r:St。 关闭吸尘器。 如果长时间不使用智能吸尘器, 请将 其存放在通风阴凉处。 在接下来的 2 秒内按遥控器上的 OK 键。... -
Page 30: 售后服务
______________________________________________________________________________________________________________________________________________ 保修 在进行维护操作之前,先 更多关于您所在国家的电器保修信息, 关闭智能吸尘器。按压智能吸 请联系 Miele 售后服务部。 具体联系方 尘器侧面的 I/0 开关至 0 即可关 式请参见本说明书封底。 闭吸尘器。 智能吸尘器及其附件的表面可以用 干燥或略微湿润的抹布擦拭, 也可以 用适当的塑料制品专用清洁剂进行 清洁。 静电会导致吸尘器内的灰尘堆积。 可 以用干的软布去除。 不要使用研磨清洗剂、玻璃 清洗剂、全效清洗剂或含油的 保养清洁剂! 不要将智能吸尘器和随机 器提供的任何配件浸入水中! 售后服务 发生故障时联系 如有您自己无法排除的故障发生, 请 联系 Miele 售后服务部。 ... -
Page 31: 故障排除指南
______________________________________________________________________________________________________________________________________________ 故障排除指南 日常运行中很多故障均可以轻松解决,为您节省时间和金钱,无需致电 Miele 售后服务部。 以下指南可能会帮助您发现故障原因并进行排除: 在处理任何故障前先关闭智能吸尘器。 按压智能吸尘器侧面的 I/0 开关 至 0 以关机。 故障 可能的原因和解决方法 通过电源按钮开机后 充电电池电量不足。 智能吸尘器自动关闭。 将智能吸尘器正确连接至充电基座的充电连接 点。 清洁效果欠佳。 集尘盒已满。 请清空并清洁集尘盒。 滚筒刷变脏或老化。 请清洁滚筒刷。 请更换滚筒刷。 集尘盒的密封条变脏或老化。 请清洁密封条和中间的吸入管道。 请更换密封部件。 空气过滤网变脏。 请清洁空气过滤网。... - Page 32 ______________________________________________________________________________________________________________________________________________ 故障 可能的原因和解决方法 在房间内某处开始 Auto(自动)标准清扫模式。 清扫后智能吸尘器不 返回充电基座。 智能吸尘器清扫后将返回清扫起始点。 已选择 Spot(精扫)模式。 智能吸尘器清扫后将返回清扫起始点。 光线不足,智能吸尘器无法导航。 提供充足光线。 充电基座未正确连接。 请严格按照使用说明中所述连接充电基座,参见 “准备使用–连接充电基座”。 吸尘器上红外发射器与遥控器之间信号断开。 请用干的软布小心清洁基座前部和智能吸尘器前 部,确保没有任何物品阻挡它们之间的信号。 地板上的障碍物可能会影响导航。 清扫时,请留意吸尘器。 移开可能的障碍物。 用磁条划出障碍区域。 降低智能吸尘器的最大跨越高度,参见“使用— 降低最大跨越高度”。 ...
- Page 33 ______________________________________________________________________________________________________________________________________________ 故障 可能的原因和解决方法 智能吸尘器无反应。 智能吸尘器已关闭。 开启吸尘器(按压 I/0 开关至 I)。 遥控器电池装错。 确保电池极性正确。 遥控器电池没有电。 请更换电池。 吸尘器上红外发射器与遥控器之间信号断开。 请用干的软布小心清洁智能吸尘器前部和遥控器 顶部,确保没有任何物品阻挡它们之间的信号。 遥控器距离智能吸尘器过近或过远。 请增加或减小遥控器距离,使用遥控器时应将其 对准智能吸尘器。...
-
Page 34: 故障信息
______________________________________________________________________________________________________________________________________________ 故障信息 在解决智能吸尘器的任何故障前先将其关闭。将智能吸尘器侧面的 I/0 开关滑至 0 以关机。 显示屏指示区显示故障信息。 如果 I_ _I 上下滚动显示,必须清空并清洁集尘盒。 故障 可能的原因和解决方法 “轮子过高” 将吸尘器放在平整的地板表面。 “传感器变脏” 清洁传感器。如果启动智能吸尘器,倾翻保护传感 器位于空地上方时,该故障信息也会出现。将智能 吸尘器从边缘处移开。 “未检测到过滤网” 将带空气过滤网的集尘盒插入智能吸尘器。 “驱动轮过载” 检查驱动轮是否已变脏,去除所有线头和毛发。如 果智能吸尘器堵塞,该故障信息也会出现。 “毛刷过载” 检查滚筒刷和边刷是否已变脏,清洁滚筒刷和边 刷。如果智能吸尘器有物品堵塞,该故障信息也会 出现。 “风扇电机过载” 清空并清洁集尘盒。清洁或更换空气过滤网。... - Page 35 ______________________________________________________________________________________________________________________________________________ 故障 可能的原因和解决方法 内部系统故障或智能吸尘器外部故障(允许室内运行 温度)。 关闭智能吸尘器后再次打开(I/0 开关)。 “前轮变脏” 检查前轮、盖子或凹处是否变脏。去除所有线头和 毛发,清洁前轮、盖子和凹处。 解决问题后重置故障 您可以通过以下方式重置以上故障信息 信息 关闭智能吸尘器后再次打开(I/0 开关)。 — 按压遥控器上的 Power(电源)按钮。 — 按压显示屏上的感应键至少三秒。...
-
Page 36: 电气连接
______________________________________________________________________________________________________________________________________________ 电气连接 所有电气作业都必须由适当的具备 资质的人员操作。 吸尘器底部铭牌上 标有电压和功率, 请确保这些参数与 家用电源匹配。 插头上标有保险丝额 定值。 本电器采用带模制插头的电源 线,连接至 220-240 V / 50 Hz 单相 交流电源。 该产品执行国家标准: GB4706.1-2005; GB4706.7-2014; GB4343.1-2009; GB17625.1-2012... -
Page 37: 版权及许可
________________________________________________________________________________________________________________________________ 版权及许可 Miele运用软件操作和控制本智能吸尘器。 Miele和其它相关软件供应商的版权授权必须受到尊重。 Miele及其供应商保留对软件部件的权利。 特别禁止以下事项: - 复制和经销 - 修改和衍生 - 反编译、逆向工程、拆卸以及其它软件还原。 GNU 通用公共许可证以及开源许可证下的零部件均集成于软件。 集成于开源软件的零部件概览和当前许可证副本可通过网站 www.miele.com/device-software-license获得。需要输入特定产品名称。... - Page 38 Contents Warning and Safety instructions................ 4 Guide to the appliance .................. 10 Caring for the environment ................ 14 Functions and features of the robot vacuum cleaner ........ 15 Accessories supplied .................. 15 Preparing for use .................... 15 Use........................ 18 Switching on and off ..................... 18 Starting vacuuming ....................
- Page 39 Contents Cleaning and care .................... 29 After sales service.................... 30 Contact in case of malfunction ................30 Warranty ........................ 30 Problem solving guide .................. 31 Error messages .................... 34 Electrical connection .................. 36 Copyright and licences .................. 37...
-
Page 40: Warning And Safety Instructions
Warning and Safety instructions This robot vacuum cleaner complies with all current local and national safety requirements. Incorrect use can, however, lead to personal injury and damage to property. Please read the operating instructions before using the robot vacuum cleaner for the first time. They contain important information on the safety, use and maintenance of the robot vacuum cleaner. - Page 41 Warning and Safety instructions Safety with children Danger of suffocation. Packaging, e.g. plastic wrappings, must be kept out of the reach of babies and children. Whilst playing, children could become entangled in packaging or pull it over their head and suffocate.
- Page 42 Miele authorised service technician. Otherwise the warranty will be invalidated. Repairs should only be carried out by a Miele authorised service technician. Repairs and other work by unqualified persons can cause considerable danger to users.
- Page 43 Items that have been dropped or damaged should not be used for safety reasons. Miele can only guarantee the safety of the appliance when genuine original Miele replacement parts are used. Faulty components must only be replaced by Miele spare parts.
- Page 44 Handling the rechargeable battery and remote control batteries: Please contact Miele Service before sending the rechargeable battery. Do not drop or throw the rechargeable battery. For safety reasons do not continue to use a rechargeable battery which has been dropped or damaged.
- Page 45 Only use genuine accessories with the „ORIGINAL Miele“ logo on them. The manufacturer cannot otherwise guarantee the safety of the product. Miele cannot be held liable for damage caused by incorrect use or operation or by non-compliance with these Warning and Safety instructions.
-
Page 46: Guide To The Appliance
Guide to the appliance A – Robot vacuum cleaner top and bottom... - Page 47 Guide to the appliance a Display b Time mode display (am/pm) c Start/Pause sensor field () d Cameras e Impact protection f On/Off switch (I/0) g Depression to open the storage compartment h Silent vacuuming mode sensor field i Turbo vacuuming mode sensor field j Base sensor field k Spot vacuuming mode sensor field l Auto standard vacuuming mode sensor field...
- Page 48 Guide to the appliance B – Base station and remote control Base station a Cable rewind b Cable runs c Socket for the power supply plug (not visible in the figure) d Charging contacts Remote control a Power button (switch on and off) b Base button (direct vacuum cleaner to base station) c OK confirmation button with direction buttons around it d Start/Pause button () (start/stop vacuuming)
- Page 49 Guide to the appliance j Battery compartment (at the back) C – Dust box a Handle b Cleaning tool with wiper c Wiper button d Lid e Release buttons for the lid f Dust compartment g Pre-filter h Exhaust filter i Exhaust filter compartment lid...
-
Page 50: Caring For The Environment
Please dispose of it at your local and rechargeable batteries separately community waste collection / recycling makes them easier to handle and centre or contact your Miele Service recycle. Department for advice. Ensure that it presents no danger to children while being stored for disposal. -
Page 51: Functions And Features Of The Robot Vacuum Cleaner
Functions and features of the robot vacuum cleaner The robot vacuum cleaner is suitable for the daily cleaning of short pile carpets and fitted carpets, as well as hard Press the two side brushes carefully flooring. onto their pins until they audibly engage. - Page 52 Switching on the robot vacuum cleaner Insert the supplied power supply plug into the socket at the back of the base station. You can wind excess Press the I/0 switch on the side of the cable around the cable rewind. Guide robot vacuum cleaner to the I the cable through one of the two position.
- Page 53 Connect the robot vacuum cleaner Briefly press the Clock button. correctly to the charging contacts on 24h will appear in the display. the connected base station. Press the OK button if you want a 24 As the rechargeable battery charges, hour clock.
-
Page 54: Use
Option 2 (Display) Adhesive strips are supplied for permanent fixing. Additional magnetic strips are available to order from the Miele webshop. Press the sensor. Always observe the robot The area to be vacuumed will be vacuum cleaner during the first cleaned. -
Page 55: Finishing Vacuuming If Vacuuming Started From Somewhere In The Room
Finishing vacuuming if vacuuming The original vacuuming process will started from somewhere in the room continue running. The robot vacuum cleaner will return to Interrupting vacuuming its starting point and switch into standby after approx. 60 seconds. The robot vacuum cleaner will stand still when there is low battery capacity. -
Page 56: Directing The Robot Vacuum Cleaner To The Base Station
Press and hold one of the direction You can switch the robot vacuum buttons. cleaner into standby before 60 seconds is up by pressing the The robot vacuum cleaner will travel in Power button again. the desired direction without vacuuming. The robot vacuum cleaner is reactivated by pressing any button on the remote You cannot direct the robot vacuum... -
Page 57: Select Operating Mode
Select operating mode To finish using the current operating mode Press the Power button on the remote control. There are two ways of selecting the vacuuming mode. Press the Power button on the Option 1 (Remote control) remote control or the sensor on the display. -
Page 58: Deactivating The Timer
Press the OK button to confirm your selection. Press the Timer button briefly. The timer indicator flashes in the Press the Mode button repeatedly display and the hour display flashes in until the symbol for the operating the indicator field. -
Page 59: Activating The Timer / Displaying A Set Start Time
Original Miele accessories are available 17 mm as standard. It is therefore able from the Miele Webshop, Miele Service to vacuum carpets, move over door thresholds, etc. and your Miele supplier. Original Miele accessories are identified by the “ORIGINAL Miele” logo on the packaging. -
Page 60: Emptying The Dust Box
Press one or both release buttons in the direction of the arrow and remove the dust box lid. Empty the dust box. The contents of the container can be disposed of with normal domestic waste, providing they consist of general Emptying the dust box household dust only. -
Page 61: Cleaning The Side Brushes
The exhaust filter compartment is Cleaning the side brushes located in the dust box. Clean the side brushes as required. For this you will require the cleaning tool Remove the lid from the dust box. which is located at the top of the dust box lid. -
Page 62: Cleaning The Roller Brush
Cut any threads or hairs that have In order to continue to achieve the wound themselves around the roller best possible cleaning results brush with a pair of scissors. replace the side brushes with new ones after approx. one year. Cleaning the roller brush Clean the roller brush as required. -
Page 63: Cleaning The Dust Box Seals
Refit both side brushes, see previous Insert the new seal unit so that the arrow points to the symbol. description „Cleaning the side brushes“. Lock the seal unit, making sure it clicks into position. In order to continue to achieve the best possible cleaning results, The arrow points to the ... -
Page 64: Replacing Batteries In The Remote Control
Insert the plug of the new Replacing the rechargeable battery rechargeable battery into the You will require an original Miele lithium- counterpart, making sure it clicks into ion rechargeable battery: place. – YCR-M05 for Scout RX2 ... -
Page 65: Storage/Factory Default Settings
Store the plug connection in the slot Factory default settings at the side. The robot vacuum cleaner can be reset to its factory default settings. Have the remote control to hand. Carefully refit the cover of the rechargeable battery compartment and close it, making sure it clicks into place. -
Page 66: After Sales Service
To switch it off, press the I/0 contact Miele Customer Service. See switch on the side of the robot end of this booklet for contact details. vacuum cleaner to the 0 position. -
Page 67: Problem Solving Guide
Problem solving guide Many malfunctions and faults that can occur in daily operation can be easily remedied. Time and money will be saved because a service call will not be needed. The following guide may help you to find the reason for a malfunction or a fault, and to correct it. - Page 68 Problem Cause and remedy The robot vacuum The Auto standard vacuuming mode was started cleaner does not return somewhere in the room. to the base station after The robot vacuum cleaner will return to its starting vacuuming. point. The Spot vacuuming mode has been selected. ...
- Page 69 Problem Cause and remedy The robot vacuum The robot vacuum cleaner is switched off. cleaner does not react. Switch it on (press I/0 to I). The batteries in the remote control have been inserted incorrectly. Take care with the polarity. The batteries in the remote control are dead.
-
Page 70: Error Messages
Error messages Switch the robot vacuum cleaner off before dealing with any errors. To switch it off, press the I/0 switch on the side of the robot vacuum cleaner to the 0 position. Error messages are shown in the indicator field in the display. If “l_ _l”... - Page 71 Problem Cause and remedy Internal system error or fault with the robot vacuum cleaner outside of its permitted ambient operating temperature. Switch the robot vacuum cleaner off and on again (I/0 switch). „Front wheel dirty“ error Check whether the front wheel, the cover or the slot depression have become dirty.
-
Page 72: Electrical Connection
Electrical connection All electrical work should be carried out by a suitably qualified and competent person. The voltage and frequency are given on the data plate located underneath the vacuum cleaner. Please ensure that these match the household mains supply. The fuse rating is quoted on the plug. -
Page 73: Copyright And Licences
Copyright and licences Miele uses software to operate and control the robot vacuum cleaner. The copyright authorisation from Miele and other relevant software suppliers must be respected. Miele and their suppliers reserve the rights to the software components. In particular the following are prohibited: –... - Page 75 Miele SJ/T 11364 Cr (VI) PBDE Pb = Hg = Cd = Cr (VI) = PBB = PBDE = GB/T 26572 GB/T 26572 (EFUP EFUP...
- Page 76 美诺电器有限公司 上海市静安区石门一路 82 号 邮编:200040 电话:+86 21 6157 3500 传真:+86 21 6157 3511 Miele Electrical Appliances Co., Ltd. No. 82 Shi Men Yi Road Jing An District Shanghai 200040, PRC Tel.: +86 21 6157 3500 Fax: +86 21 6157 3511 美诺中国售后服务...