Table of Contents
Advertisement
Advertisement
Table of Contents

Related Manuals for Plustek OpticFlim 8300i


Summary of Contents for Plustek OpticFlim 8300i
- Page 1 Scanner User’s Guide OpticFlim 8300i ...
- Page 2 Trademarks © 2021 Plustek Inc. All rights are reserved. No portion of this document may be reproduced without permission. All trademarks and brand names mentioned in this publication are property of their respective owners. Liability While all efforts have been made to ensure the accuracy of all contents in this ...
-
Page 3: Table Of Contents
Table of Contents INTRODUCTION..........................1 A N ...........................1 OTE ABOUT CONS SAFETY PRECAUTIONS........................2 .............................3 AINTENANCE PRODUCT OVERVIEW ......................... 4 ............................4 OX ONTENTS .............................5 CANNER VERVIEW BEFORE INSTALLING THE SCANNER..................... 6 ....................6 ONNECTING THE CANNER TO OUR OMPUTER INSTALLING THE SCANNER ......................... 7 ... -
Page 4: Introduction
Introduction Welcome to the world of Plustek scanners – the ultimate in computer imaging. Your new scanner will improve the professionalism of your day‐to‐day computing tasks by allowing you to input images into your computer system. Like all of our products, your new scanner is thoroughly tested and backed by our reputation for unsurpassed dependability and customer satisfaction. Thank you for choosing us as your scanner supplier. We hope you will continue to turn to us for additional quality products as your computing needs and interests grow. A Note about Icons This guide uses the following icons to point out information that deserves special ... -
Page 5: Safety Precautions
Safety Precautions Before using this device, please read the following important information to eliminate or reduce any possibility of causing damage and personal injury. 1. Usage, the product is for indoor use in dry locations. Moisture condensation may occur inside this device and cause malfunction at these conditions: • when this device is moved directly from a cold to a warm location; • after a cold room is heated; • when this device is placed in a damp room. To avoid the moisture condensation, you are recommended to follow the procedure: i. Seal this device in a plastic bag for it to adapt to room conditions. ii. Wait for 1‐2 hours before removing this device from the bag. 2. Do use the power adapter and USB cable provided with the scanner. Use of other power adapter and cables may lead to malfunction. 3. Keep the space around the AC adapter clear in case you need to quickly unplug the AC adapter during emergencies. 4. Damaged wire could cause fire or electrical shock. Keep the power cord straight and without being twisted, bended, or scraped. 5. Unplug this device if you don’t need to use for a certain period of time, such as, during night or long weekend, to avoid any risks of causing fire. 6. ... -
Page 6: Maintenance
Maintenance To keep your scanner working smoothly, take a moment to review Caution the following maintenance tips. Avoid using the scanner in a dusty environment. When it is not in use, keep the scanner covered. Dust particles and other foreign objects may damage the unit. Do not attempt to disassemble the scanner. There is danger of an electrical shock and opening your scanner will void your warranty. Do not subject the scanner to excessive vibration. It may damage the internal components. ° ° ° °... -
Page 7: Product Overview
Product Overview Box Contents Scanner Padded carrying bag Mounted Slide Holder and Filmstrip Holder USB Cable Power Adapter Quick Guide Setup / Application USB stick Activation card 35 mm IT‐8 Target (35 mm IT‐8 Target is not included in all scanner models) You may find the scanner hardware serial number Attention on the activation card, please keep the card in a safe place. Save the box and packing materials in case you need to transport this scanner in the future. Box contents may change at any time without prior notice. 4 ... -
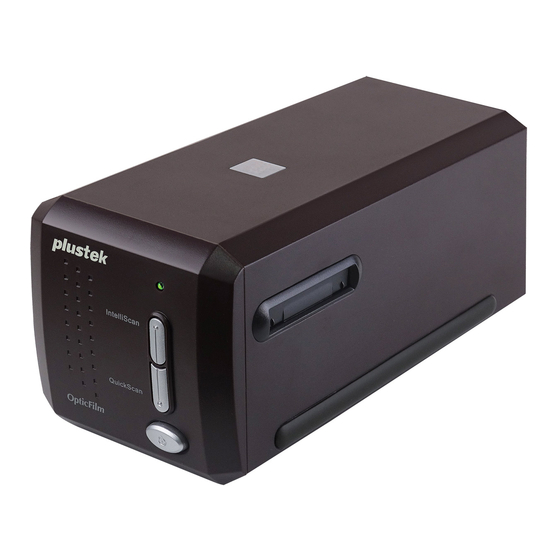
Page 8: Scanner Overview
Scanner Overview Film Holder Slot: Insert the film holder into the scanner through dust cover. The film holder can be inserted from either side. The film holder will index at each frame using the notches on its side rails. Power LED: It indicates the scanner status. Light Status On The scanner is turned on, ready to scan images. The scanner is off, either because the power is not turned Off ... -
Page 9: Before Installing The Scanner
Before Installing the Scanner Connecting the Scanner to Your Computer Plug the power adapter into the scanner’s power receptor. Plug the other end of the power adapter into a standard AC power outlet. Plug the square end of the included USB cable to the USB port at the rear of the scanner. Plug the rectangular end of the USB cable to the USB port on the back of your computer. Note: If there is another USB device connected to the computer, connect the scanner to an available USB port. ... -
Page 10: Installing The Scanner
Installing the Scanner Please follow the step‐by‐step procedures described below to install the USB scanner. *You may find the latest driver on our official website www.plustek.com ‐> Support & Download ‐> Drivers and Downloads Installing Scanner Driver Power on the Scanner 7 ... -
Page 11: Installing Scanner Driver
Installing Scanner Driver 1. Insert the Setup / Application USB stick into your computer. 2. Install the scanner driver by the following path: Mac OS X: OPTICFILM > Mac > Plustek OpticFilm 8300i > Setup.dmg Windows OS: OPTICFILM > Windows > Plustek OpticFilm 8300i > Setup.exe 3. Follow the on‐screen instructions to complete the installation. You may download the latest version driver from our official Attention website plustek.com/of8300i. 8 ... -
Page 12: Power On The Scanner
Power on the Scanner Press the Power button to turn the scanner ON. Attention Press the Power button again to turn the scanner OFF. 9 ... -
Page 13: Film Holders
Film Holders Two film holders are included in the package. They guarantee correct scanning results. A. For scanning 35mm mounted slides (max. 4 slides) B. For scanning 35mm filmstrips (max. 6 frames) Using Mounted Slide Holder Using filmstrip holder Insert the Film Holder 10 ... -
Page 14: Mounted Slide Holder
Mounted Slide Holder Insert mounted slides into slots with emulsion (non‐glossy) side down. There are arrows and illustrations on the frame of each slot. Please follow illustrations to insert mounted slides. 11 ... -
Page 15: Using Filmstrip Holder
Using filmstrip holder Place filmstrip in the film holder with emulsion (non‐glossy) side down, then snap the film holder cover closed. For correct scan results, always turn the film with the top of the image facing towards the back of the scanner (where power cord and USB cord are located) and keep emulsion (non‐glossy) side down. There is text on the top and bottom of the film, such as manufacturer, ... -
Page 16: Insert The Film Holder
Insert the Film Holder Insert the film holder into the scanner through dust cover. The film holder can be inserted from either side. The film holder will index at each frame using the notches on its side rails. Please allow about 40 cm of space on both sides of the scanner to insert and remove the film holder. You can feel the film holder stop in its index position. However, before performing scan, please gently push and pull the film holder to make sure the film holder is in correct position. ... -
Page 17: Scan With Quickscan Plus Application
Scan with QuickScan Plus Application Launch QuickScan Plus using the QuickScan Plus shortcut on your Desktop. Adjust the scan settings. Please refer to the QuickScan Plus on‐line help for more information about available scan settings. Mac OS X Windows OS 14 ... -
Page 18: The Main Screen
The Main Screen [View] screen [Edit] screen [Scan] screen Reset to default [Preference] settings The user interface contains the following components: Scan : The [Scan] screen is where you set your scanning parameters. The [ ] screen View : The [View] screen is where you select one or multiple images The [ ] screen to edit, share or delete. Edit : The [Edit] screen is where you can apply various filter effects The [ ] screen and make more detailed adjustments to your images. 15 ... -
Page 19: The [Scan ] Screen
The [Scan] Screen The [Scan] screen is where you set your scanning parameters. These scanning parameters will also be used when you initiate a scan using the physical button on your scanner. Scan mode Selected by clicking on the respective button on the left side, you can choose between [Positive], [Negative] and [Custom]. Basically this allows you to create 3 scan profiles; one for positives, one for negatives and one for either positives or negatives. You may click [Restore] button to reset all settings to default. Attention Click on button to access online help and adjust Preference settings. ... - Page 20 [Color]: Select a desired color mode from the drop‐down list. [File name]: Enter the desired file name into the field. The default uses your computer's date and time. [Save path]: Click on the [Browse] button and use the dialog to select the folder where you wish to store your scanned images. The default saving path: Mac OS X: Users > UserName > Document > QuickScanPlus_Doc. Windows OS: Users > Public > Pictures > Plustek Photo. [Format]: Select the desired bit rate and file format you wish to use from the drop‐down lists. The higher the bit rate, the more detailed the scan and the larger the resulting file will be. Available format options are: JPEG, TIFF, PNG, Windows Bitmap. *If you select 48‐bit, the output format can only be TIFF. [Film] (Custom mode only): Select the desired film type from the drop‐down list. Scan button Insert your film tray and click on the [Scan] button when you are ready to scan. 17 ...
-
Page 21: The [View ] Screen
The [View] Screen After the scan is completed, the [View] screen will be shown. You may click [ Scan] button to scan more images. You may select one or multiple images to delete, rotate or share at the same time. Selected images will be highlighted with a gray Attention rectangle around the images. Simply click an image to remove a picture from your selection. 18 ... - Page 22 Click on the [ Save] button, your images are already saved and can be found in the folder you set under [Save path] on the [Scan] screen. Other function buttons on the toolbar are as following: Delete: Click on this button to delete the selected images. Rotate counterclockwise: Click on this button to rotate the selected images in a counterclockwise direction. Rotate clockwise: Click on this button to rotate the selected images in a clockwise direction. Share to Facebook: Click this button to launch the Facebook website in a dialog within QuickScan Plus. Share to flickr: Click this button to launch the flickr website in a dialog within QuickScan Plus. Share to Google Drive: Click this button to launch the Google Drive website in a dialog within QuickScan Plus. ...
-
Page 23: The [Edit ] Screen
The [Edit] Screen The Edit screen is where you can apply various filter effects and make more detailed adjustments to your images. Click on the [Edit] button above the frames to switch to the [Edit] screen to apply various filter effects and make more detailed adjustments to your images. Function buttons on the toolbar are as following: Save: Click on this button to save any changes you have made to the selected images. Reset: Click on this button to reset the selected image to their original state. ... - Page 24 Share to Twitter: Click this button to launch the Twitter website in a dialog within QuickScan Plus. Help & Tools: Click on this button to open a context menu with the following items: o [Help]: Select this item to launch the on‐line help file. o [Preference]: Select this item to open the [Preference] dialog. o [About]: Select this item to open the program information dialog. Zoom out: Click this button to zoom out of the currently selected image. You can also use mouse wheel down to perform the same action. Zoom in: Click this button to zoom in on the currently selected image. You can also use mouse wheel up to perform the same action. ...
-
Page 25: [Preference] Settings
[Preference] Settings Click on button and select [Preference] to open the [Preference] settings dialog. You may also find this button on [View] screen and [Edit] screen. [View] screen Attention [Edit] screen 22 ... - Page 26 [Save image files after hardware scan]: Activate this checkbox, you may press [QuickScan] button on the scanner panel to perform [Custom] scan directly. Please adjust [Custom] mode scan settings, especially the [Film] type setting before scanning. [Export to third‐party image editing software]: Activate this checkbox to export the scanned images to third‐party image editing software for further editing. The scanned images will be opened directly on third‐party image editing software. Note: ...
- Page 27 If you activate this checkbox, the main window will appear as following: Click the button to add desired applications, for example: Attention Photoshop, GIMP. You may add up to 5 applications. • [App Name]: Enter the application name. • [App Location]: Click on the button to browse to the desired program folder and select the executable file (*.exe) of the desired application. •...
-
Page 28: Silverfast Software
SilverFast Software Your scanner comes with the advanced and feature rich scanning application SilverFast, it’s an optional bundled software for you to install on your system. You may get familiar first with your OF 8300i, then choose to install the SilverFast software. It takes about 10 mins to install SilverFast software. You have to create and login with a MySilverFast account. Attention Please make sure there is internet connection while you’re installing SilverFast software. Request for SilverFast License Installing SilverFast Software Scan with the SilverFast application 25 ... -
Page 29: Request For Silver Fast License
Request for SilverFast License 1. Visit the website www.silverfast.com/activation‐plustek and follow the instructions. You will need your scanner 12‐digit hardware serial number. *The webpage content may subject to change without prior notifications. Select your scanner model. Enter the scanner serial number. Click the [Check] button. 26 ... - Page 30 2. Enter the necessary information to create a MySilverFast account. You have to login to the SilverFast software with this MySilverFast account later. *The webpage content may subject to change without prior notifications. 27 ...
- Page 31 3. If the registration is completed, you will receive an email to inform you that the license has already been added to your MySilverFast account. 28 ...
-
Page 32: Installing Silver Fast Software
Installing SilverFast Software You can install SilverFast from your MySilverFast portal (page 30) or from USB stick: 1. Insert the Setup / Application USB stick into your computer. 2. Install the SilverFast software by the following path: Mac OS X: OPTICFILM > Mac > SilverFast > SF‐Installer.dmg Windows OS: OPTICFILM > Windows > SilverFast > SF‐Installer.exe 3. Follow the on‐screen instructions. 4. After the installation finishes, click on [Done] to exit the installer. 29 ... - Page 33 You may download the SilverFast software from your MySilverFast account. 1. Log in to your MySilverFast portal and click [Manage licenses] 2. Click [Download] button to download the SilverFast software. Attention 3. When the download is completed, run the installer and follow the on‐screen instructions. After the installation finishes, click on [Done] to exit the installer. y 30 ...
-
Page 34: Scan With The Silver Fast Application
Scan with the SilverFast application Launch the SilverFast launcher using the SilverFast shortcut on the Desktop. Login to the SilverFast software with your MySilverFast account, then click on [Start] to launch the program. Please make sure there is internet connection while login to the Attention SilverFast software. Adjust the scan settings. Please refer to the SilverFast manual for more information about available scan settings. 31 ... -
Page 35: Operating The Scanner
Operating the Scanner There are different ways to operate the scanner: Using SilverFast Launcher by pressing [IntelliScan] button. This stand alone program allows you to perform advanced scanning features. For further information, please refer to SilverFast User's Manual. Using QuickScan Plus Launcher by pressing [QuickScan] button. The QuickScan Plus program is automatically installed as your scanner software. Using [IntelliScan] Button Using [QuickScan] Button 32 ... -
Page 36: Using [Intelliscan] Button
Using [IntelliScan] Button The [IntelliScan] button enables you to activate bundled SilverFast, which performs advanced scan features, such as Dust and Scratch Removal, Grain and Noise Elimination, Negative Optimization…etc. This button is only available when the SilverFast software is installed on your computer. Attention For detailed settings and features about SilverFast, please refer to SilverFast User’s Manual. ... -
Page 37: Using [Quickscan] Button
Using [QuickScan] Button The [QuickScan] button enables you to launch QuickScan Plus software. If the [Save image files after hardware scan] option is checked in the [Preference] settings dialog, this [QuickScan] button can conveniently scan images and save them automatically to the album. Simply press the [QuickScan] button on the front of your scanner and the scanner will start scanning your transparencies or negatives with [Custom] scan mode. Before performing your first scan via the [QuickScan] button, you are recommended to configure the QuickScan Plus settings to your needs and preferences first. Please refer to the QuickScan Plus on‐line help for more Attention information about available scan settings. 34 ... -
Page 38: Appendix A: Troubleshooting
2. Click [Browse my computer for driver software] in the window that appears, and click the [Browse] button. In the [Browse For Folder] window, select the folder that contains this scanner’s driver and click the [OK] button to return to the previous screen. Click the [Next] button and click [Install this driver software anyway] if the [Windows Security] window appears. 3. Browse your USB stick and manually run the [Setup.exe] file from OPTICFILM > Windows > Plustek OpticFilm 8300i. Click on the [Yes] button if the [User Account Control] dialog pops up. Follow the on‐screen instructions to install all software that your new USB scanner requires. 35 ... -
Page 39: Scanning Problems
Scanning Problems Most problems are easily solved, and some of the most common questions and their recommended solutions are listed below. *Always make sure that you are using the latest software of Plustek and SilverFast. Symptom Cause & Solution The Scanner source is The scanner is not detected by the OS. blank Please refer to the solutions of the following “The scanner cannot be found”. The scanner cannot be The USB cables are not connected properly found Make sure that the cables are connected tightly and to the proper port. The USB cable might be too long Please use the USB cable that comes with your scanner. The scanner’s power cord is not connected properly Make sure that the AC adapter is connected to an outlet. If the scanner is connected to a Surge Protector, make sure that the Surge Protector is turned on. The scanner is not power on. Press the Power button to turn the scanner ON. Windows didn’t detect the scanner 1) Please open [Start] > [Control Panel] > [System] > [Hardware] > [Device Manager]. 2) Please check if your scanner is properly listed under [Imaging Devices]. If it is not listed there or the device icon has an exclamation mark, please refer to “Manually Installing the Software” to install the device drivers. 36 ... - Page 40 The scanned image looks Your video mode is not set to show more than grainy on the screen 256 colors We recommend that you set your video mode to 16 bits per pixel (65536 colors) or higher. Please consult your video card, computer or Windows documentation to change the video mode. The scanner scans very You are running other applications in the slowly background Close all the other applications that are running in the background. You are scanning at a high resolution (DPI) Reduce the resolution. The image looks good in Different imaging programs use different the software that came Monitor Gamma settings with the scanner but it Change the Monitor Gamma settings in either of the doesn’t look good when programs so that they match. Please consult the I export the image to help files for each program to find out how to adjust another program the Monitor Gamma. The image looks good on The Monitor Gamma Settings or the scanner screen but very dark brightness settings are not set properly when printed 1) Change the Monitor Gamma to a value between 1.0 and 1.5. Please consult your help file for information on how to adjust the Monitor Gamma. 2) Adjust the brightness control in the TWAIN window before scanning. The printer brightness setting is not set properly Adjust the brightness in the printer. Some printers ...
- Page 41 A “Disk is full” error is Your computer is running low in resources. displayed when I click on Your computer hard disk drive does not have the scan button enough space to process the image. This may be because you are scanning at too high of a resolution Obtain a larger hard disk or rescan at a lower resolution. A “Disk I/O error” This error is caused if the hard disk drive does message is displayed not have enough space available to process the image Make some space available in the hard disk drive by deleting any programs or files that you do not need Your hard disk drive might be heavily fragmented or it might contain some bad sectors Run the Scan Disk utility that came with your Windows computer. Please consult your computer documentation or the Windows help files on how to run the Scan Disk Utility 38 ...
-
Page 42: Appendix B: Specifications
Appendix B: Specifications OpticFilm 8300i Ai Image Sensor CCD Light Source LED Hardware Resolution 7200 dpi Color: 48‐bit input, 24/48‐bit output Scan Modes Grayscale: 16‐bit input, 8/16‐bit output Dynamic Range 3.6 Infrared Built‐in 3600 dpi: Approx. 20 sec & 40 sec with IR scanning Scanning Speed 7200 dpi: Approx. 40 sec & 120 sec with IR scanning 36.8 mm x 25.4 mm (1.45" x 1") Scanning Area (W x L) Remark: 35mm film IT8 Target Bundled Action Button IntelliScan, QuickScan Power Supply 15 Vdc / 1.2 A Interface USB 2.0 Net Weight 1.6 Kgs (3.5 Lbs) Dimensions (W x D x H) 120 x 272 x 119 mm (4.73” x 10.7” x 4.7”) Windows 7 X64/ 8 X64/ 10 X64 OS Mac 10.13.x and later Windows PC & Mac Intel i5 CPU or faster ... - Page 43 OpticFilm 8300i SE Image Sensor CCD Light Source LED Hardware Resolution 7200 dpi Color: 48‐bit input, 24/48‐bit output Scan Modes Grayscale: 16‐bit input, 8/16‐bit output Dynamic Range 3.6 Infrared Built‐in 3600 dpi: Approx. 20 sec & 40 sec with IR scanning Scanning Speed 7200 dpi: Approx. 40 sec & 120 sec with IR scanning 36.8 mm x 25.4 mm (1.45" x 1") Scanning Area (W x L) Remark: 35mm film Action Button IntelliScan, QuickScan Power Supply 15 Vdc / 1.2 A Interface USB 2.0 Net Weight 1.6 Kgs (3.5 Lbs) Dimensions (W x D x H) 120 x 272 x 119 mm (4.73” x 10.7” x 4.7”) Windows 7 X64/ 8 X64/ 10 X64 OS Mac 10.13.x and later Windows PC & Mac Intel i5 CPU or faster Hardware Requirements 4 GB RAM main memory (8 GB RAM recommended) 20 GB free space on the hard disk drive Internet connection ...
-
Page 44: Appendix C: Customer Service And Warranty
Appendix C: Customer Service and Warranty If you encounter problems with your scanner, please review the installation instructions and troubleshooting suggestions contained in this guide. Visit our website www.plustek.com for more customer service information. To avoid delays, please have the following information available: Scanner name and model number Scanner serial number (located at rear of scanner near port connectors) A detailed description of the problem Your computer manufacturer and its model number The speed of your CPU Your current operating system and BIOS (optional) Name of software package(s), version or release number and manufacturer of the software Other USB devices installed Service & Support Information (For EU country only) Where appropriate, the period of availability of spare parts and the possibilities of ... - Page 45 The manufacturer warranty includes all parts and labor, and is not valid without the receipt of original purchase. To obtain warranty service, you may contact the authorized dealer or distributor, or visit our website to check out the available service information, or send a request via E‐mail for further help. If you transfer this product to another user, warranty service is available to that user for the remainder of the warranty period. You should give your proof of purchase and this statement to that user. We warrant that this machine will be in good working order and will conform to its functional ...
-
Page 46: Fcc Radio Frequency Statement
To obtain the warranty service, you may: contact the authorized dealer or distributor. visit our website to check out the up‐to‐date service. send a request via E‐mail for further help. FCC Radio Frequency Statement This equipment has been tested and found to comply with the limits for a Class B digital device, pursuant to part 15 of the FCC rules. These limits are designed to provide reasonable protection against harmful interference in a residential installation. This equipment generates, uses and can radiate radio frequency energy and, if not installed and used in accordance with the instructions, may cause harmful interference ...
Need help?
Do you have a question about the OpticFlim 8300i and is the answer not in the manual?
Questions and answers