Table of Contents
Advertisement
Quick Links
Advertisement
Table of Contents
Troubleshooting

Related Manuals for Plustek MOBILEOFFICE D600


Summary of Contents for Plustek MOBILEOFFICE D600
- Page 1 Installation Usage & Maintenance Troubleshooting...
- Page 2 © 2009. All rights are reserved. No portion of this document may be reproduced without permission. All trademarks and brand names mentioned in this publication are property of their respective owners. While all efforts have been made to ensure the accuracy of all contents in this manual, we assume no liability for errors or omissions or by statements of any kind in this manual, whether such errors are omissions or statements resulting from negligence, accidents, or any other cause.
-
Page 3: Table Of Contents
Document Scanning ......................14 Scanning Methods ....................14 Scanning via TWAIN Interface ................... 15 Scanning from Plustek DI Capture Program ..............18 Scanning from the Scanner’s Panel or On-screen DocAction's Execute Menu....19 Scanning Tips ......................21 Scanner Connection ....................22 III.C... -
Page 4: Introduction
3) By printing out and mailing the registration card directly to the Plustek office nearest you. See the last page of this user’s guide for a complete list of Plustek offices worldwide. As a registered customer, you will receive customer support, new product information and software upgrades. -
Page 5: Conventions Of This Guide
Chapter II and III describes how to use, maintain and clean your scanner. Appendix A contains technical support information that can help you solve simple problems. Before calling for help, please read through Appendix A: Troubleshooting. Appendix B contains the Specifications of the scanner you purchased. Appendix C contains our limited warranty agreement and FCC statement concerning the product. -
Page 6: System Requirements
2. Do use the AC adapter and USB cable provided with the scanner. Use of other cable may lead to malfunction. 3. Avoid using the scanner in a dusty environment. Dust particles and other foreign objects may damage the unit. If you will not use the scanner for some time, please place it in the travel pouch. -
Page 7: Box Contents
Box Contents 1. Scanner 2. USB Cable 3. AC Adapter 4. Calibration Sheet 5. Cleansing cloth 6. Travel Pouch 7. Quick Guide 8. Setup/Application CD-ROM Save the box and packing materials in case you need to transport this scanner in the future. The product packaging can be recycled. -
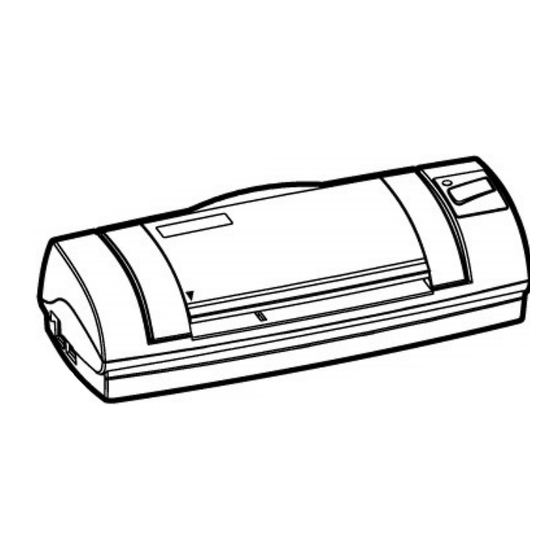
Page 8: The Scanner's Features
The Scanner’s Features 1. Power Receptor: Connects the scanner to a standard AC power outlet by the included AC adapter. 2. USB Port: It connects the scanner to a USB port on your computer by the included USB cable. 3. Alignment Mark: Always align the edges of your documents to this arrow sign. 4. -
Page 9: Chapter I. Installing The Scanner
Chapter I. Installing the Scanner Before installing your scanner, please verify that you have all of the proper components. A list of the package contents is provided in the Box Contents section of this guide. Software Installation Requirements Your scanner comes with the OCR software (ABBYY FineReader 6.0 Sprint Plus), the scanner’s driver and the DocAction software. -
Page 10: Installing And Setting Up The Scanner
Installing and Setting up the Scanner Please follow the step-by-step procedures described below to install the Plustek scanner. Please make sure the scanner is turned OFF before you plug or unplug the scanner power adapter. Attention 1. Plug the AC adapter into the scanner’s power receptor. - Page 11 automatically detect the scanner causing the “Add New Hardware Wizard” or “Found New Hardware Wizard” to be launched. Note: If your computer was off when you connected the scanner, the “Add New Hardware Wizard” message will be displayed when you turn the computer on and when Windows starts.
-
Page 12: Step 3. Testing The Scanner
d. During the process of the installation, a message “Windows can’t verify the publisher of this driver software” might be prompted. Please ignore it, and click on [Install this driver software anyway] to continue the installation without any misgiving at your scanner functioning. 5. -
Page 13: Software Setup Troubleshooting
Right-click the DocAction icon in the Windows system tray, and then choose Button Configuration… in the pop-up menu that opens. 2. In the Button Configuration window, choose from the dropdown list of Button Template to select “File Utility”, and keep in mind the default saving folder show in the “Saving folder”... -
Page 14: Installing Additional Software
To reinstall your scanner’s software, click “Start”, “Run”, then type “D:\Install (where D represents the letter of your CD-ROM drive)”. Carefully follow all the installation instructions presented in the Setup Wizard. Reboot your computer when prompted, and plug the USB cable back into the scanner while your computer is still turned on. Installing Additional Software Your scanner is TWAIN compliant and functions with virtually all available TWAIN compatible software. -
Page 15: Chapter Ii. Scanning
Chapter II. Scanning Your scanner needs to be driven by certain type of software program. Since all documents or images (whether text or pictures) that are acquired from the scanner are treated by your computer as images, most scanning will probably be done from an image-editing program where you can view, edit, save and output the scanned images. -
Page 16: Card Scanning
Scan Button To use the button, ensure you have installed the relevant software (e.g., the printer driver is required for using the printer function) beforehand. Attention This is the special design for plastic card scan. Besides A6 documents, you can insert up to 1.2mm thickness plastic card for scanning. -
Page 17: Document Scanning
2. The steps 2 to 4 please refer to the same steps of the “Plastic card scanning”. Actually, document scanning is similar with the card scanning, however, we’ll describe the steps simply for you: 1. Please change the button setting from the DocAction window. Align the document to the arrow sign on the left of the scanner. -
Page 18: Scanning Via Twain Interface
Before you start scanning, check the following: 1. The power of both your computer and scanner is turned on. Attention 2. The icon appears on the Windows system tray. 3. Paper is appropriately loaded into the scanner. The TWAIN program is a very important piece of software that comes with your scanner. - Page 19 4. Adjust the scanning settings. For Sheet Feeder (Duplex) scan, you can tailor settings individually for front and rear sides of the documents. Click Front Side button to adjust the scanning settings of document front side and then click Rear Side button to adjust the scanning settings of document rear side. You can enable the function of Merge Pages only when you select Sheet Feeder (Duplex) as Scan type and Automatic Size as Page Size to output the scan images of both front and rear sides in one image.
- Page 20 3. In the TWAIN window that opens, select Sheet Feeder (Front Side) as the Scan Type if you want to scan single-sided documents, or select Sheet Feeder (Duplex) to scan double-sided documents. 4. Adjust the scanning settings. For Sheet Feeder (Duplex) scan, you can tailor settings individually for front and rear sides of the documents.
-
Page 21: Scanning From Plustek Di Capture Program
scan images of both front and rear sides in one image. After the function of Merge Pages is enabled, you can make the selection of Horizontally to generate both front and rear image data horizontally in a joined image (the rear image will be placed at the right side next to the front image), or make the selection of Vertically to generate both front and rear image data vertically in a joined image (the rear image will be placed below the front image). -
Page 22: Scanning From The Scanner's Panel Or On-Screen Docaction's Execute Menu
Alternatively you may click the Scan Wizard button from the toolbar to let Scan Wizard guide you through the entire scan process. You may also tailor your own user interface of DI Capture such as the toolbar buttons, Viewer Pane, Browser Pane, etc. Refer to the online help of DI Capture to explorer more about DI Capture! ’... - Page 23 Press the button from the scanner's panel. Right-click the icon in the Windows system tray, and then choose Execute in the pop-up menu that opens. Click the Custom button function item in the pop-up menu. The scanner starts to scan immediately and carry out the corresponding action according to the settings you have set up in the Button Configuration window.
-
Page 24: Scanning Tips
automatically saved on your disk drive too. Microsoft Outlook and Outlook Express are the default e-mail programs to support this scanning function. BCR -- BCR application program is a valuable business tool to input, retrieve and manage business cards. With this tool, input, recognizing and managing processes of name cards can be easily finished. -
Page 25: Scanner Connection
screen of about 150. Therefore, an optimal scanning resolution would be 200 or 300 dpi. Scanner Connection The first step to take when troubleshooting connection problems with your scanner is to check all physical connections. The DocAction icon , located on the Windows system tray, indicates if the scanner software is properly launched and the scanner and computer are communicating with each other. -
Page 26: Chapteriii.clean And Maintenance
ChapterIII.Clean and Maintenance Your scanner is designed to be maintenance-free. However, constant care and maintenance can keep your scanner working smoothly. Clean the Scanner Paper powder, dust, ink and toner from paper being scanned may make the inner scanner dirty, which leads to poor image quality or document-feeding errors. Often clean your scanner could ensure your scanning better efficiency. -
Page 27: Calibrating The Scanner
2. Wipe the Feed Roller from side to side and then roll it. 3. Clean the glass side to side. Repeat this until its entire surface is cleaned. Do not spray cleaner directly onto the scanner glass. Excess liquid residue may fog or damage the scanner. Attention 4. -
Page 28: Usage & Maintenance Tips
Please insert the special calibration sheet included with the scanner. Alternatively you may also use any plain white sheet of paper sized in A6 (105 x 148 mm) instead; however, the calibration effect may be less Attention good than the special calibration sheet. 2. -
Page 29: Appendix A: Troubleshooting
Appendix A: Troubleshooting Scanning Problems Most problems are easily solved, and some of the most common questions and their recommended solutions are listed below. Symptom: After following the installation instructions, my computer cannot find the scanner. Cause 1: Your software may have not been successfully installed. Solution 1: Please insert the CD-ROM and reinstall the scanner software. - Page 30 Solution1: Close all the other applications that are running in the background. Cause 2: You are scanning at a high resolution (DPI). Solution 2: Reduce the resolution. Symptom: The scanned document comes out as strange characters on the screen after the OCR process is completed. Cause 1: Text page was scanned upside down.
- Page 31 Cause: Different imaging programs use different Monitor Gamma settings. Solution: Change the Monitor Gamma settings in either of the programs so that they match. Please consult the help files for each program to find out how to adjust the Monitor Gamma. Symptom: The image looks good in the screen but is very dark when printed.
-
Page 32: Common -How-To- Questions
Solution 2: Run the Scan Disk utility that came with your Windows computer. Please consult your computer documentation or the Windows help files on how to run the Scan Disk Utility. Symptom: The error “Scanner not Found” that is displayed. Cause 1: The USB cables are not connected properly. - Page 33 Start the program and open the document where you want to paste your image. Click on [Edit]. Click on [Paste]. Please consult your program documentation on how to Cut and Paste if you have any more questions. Symptom: How do I place a scanned image into my word processor? Solution: Find out what formats are supported by your word processor.
-
Page 34: Appendix B: Specifications
Appendix B: Specifications Plustek MobileOffice D600 Technology Color Contact Image Sensor (CIS) Hardware Resolution 600 dpi Color: Input 48-bit; Output 24-bit Scan Modes Grayscale: Input 16-bit; Output 8-bit Black & White: 1-bit Scan Method Single Pass Simplex Scan: 3.1 sec / page @ 300 dpi, color mode 1.1 sec / page @ 300 dpi, grayscale mode... -
Page 35: Appendix C: Customer Service And Warranty
Appendix C: Customer Service and Warranty If you encounter problems with your scanner, please review the installation instructions and troubleshooting suggestions contained in this guide. For further assistance call our customer support phone number listed on the last page of this guide. One of our representatives will be happy to assist you from Monday through Friday in office working hours as shown below: Europe 9:00 a.m. -
Page 36: Fcc Radio Frequency Statement
This Limited Warranty service does not provide for carry-in exchange when the problem results from accident, disaster, vandalism, misuse, abuse, unsuitable environment, programme modification, another machine or non-vendor modification for this product. If this product is an optional feature, this Limited Warranty applies only when the feature is used in a machine for which it was designed. - Page 37 Increase the separation between the equipment and receiver. Connect the equipment to an outlet on a circuit different from that which the receiver is connected. Shielded interconnect cables and shielded power cord which are supplied with this equipment must be employed with this equipment to ensure compliance with the pertinent RF emission limits governing this device.
-
Page 38: Contacting Plustek
Contacting Plustek Europe: Plustek Technology GmbH Gutenbergring 38 22848 Norderstedt Germany Tel.: +49 (0) 40 523 03 130 Fax: +49 (0) 40 523 03 500 E-mail: support@plustek.de Website: www.plustek.de North America: Plustek Technology Inc. 17517 Fabrica Way, Suite B Cerritos, CA 90703 U.S.A.
Need help?
Do you have a question about the MOBILEOFFICE D600 and is the answer not in the manual?
Questions and answers