Advertisement
Quick Links
Advertisement

Related Manuals for Timeguard ELU56


Summary of Contents for Timeguard ELU56
- Page 1 16 Amp Electronic 24 Hour/7 Day Time Controller Model: ELU56...
-
Page 2: General Information
1. General Information These instructions should be read carefully and retained for further reference and maintenance. 2. Safety • Before installation or maintenance, ensure the mains supply to the time controller is switched off and the circuit supply fuses are removed or the circuit breaker turned off. -
Page 3: Technical Specifications
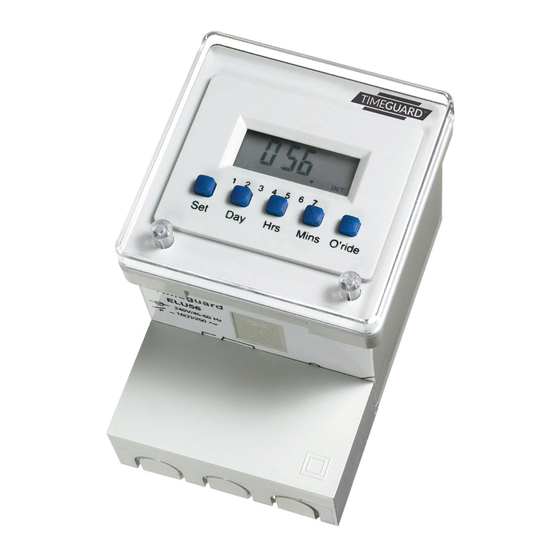
Conforms to latest directives • Contacts: Voltage free, change over 4. General The ELU56 is a 24 hour/7 day digital timeswitch with a 16 amp resistive switching capacity suitable for general applications where a comprehensive weekly timing routine is required. - Page 4 Setting buttons for Output status days, hours and showing either ON minutes or INT (OFF) 24 hour digital display Day indicator Set button selects 1 = Monday ON and OFF times 7 = Sunday and clock time for review and programming Override button Transparent...
-
Page 5: Installation
The unit has a transparent front cover to protect the controls from accidental change. 5. Installation The ELU56 may be mounted in three different ways – wall, panel or rail. The unit is normally wall mounted on the base plate provided. For panel mounting you will require the panel mounting bracket AK.305... - Page 6 of having voltage free contacts (see fig 2). Refer to (fig 3) for voltage free contacts wiring. Ensure that all bare conductors are sleeved and that correct polarity is observed. Fig 2 Fig 3 6. Refit the terminal cover and plug the timeswitch into the base plate.
- Page 7 9. The programmes and clock time can now be set. If display was blank prior to switching on power, allow the battery to charge for at least 2 to 4 hours prior to programming. 10. Replace transparent front cover. 5b Panel Mounting 1.
- Page 8 7. The programmes and clock time can now be set. If display was blank prior to switching on power, allow the battery to charge for at least 2 to 4 hours prior to programming. 8. Replace transparent front cover. Rail Mounting For rail mounting use the quick fixing Part No.
- Page 9 6a Setting the Clock Time • To set the clock time press the Set button briefly and release, the display will show “C” 0:00 with flashing at the right of the display. • Press the Day button until the black indicator shows the desired day of the week (1-7) i.e.
- Page 10 • Important: After setting a clock time which falls within a programmed “ON” period, the unit will not switch “ON” The programmed time must be after the current time on the clock for the programme to be switched on. If you require the programme to be “ON”...
- Page 11 ELU56 20:00 0:00 0:00 6:00 6c Setting Programme 1 • Press the Set button and hold it down for about 3 seconds until the display shows with a flashing “1” (indicating programme 1) appearing underneath the “ON” indicator and the day indicator will point to day 1.
- Page 12 • The First “OFF” time for day 1 can now be programmed by using the Hrs and Mins buttons. • Press the Set button briefly and the display will show and the programme 2 “ON” time can be entered as for programme 1. Note: Pauses of 15 seconds or more during programming will result in an automatic return to the operating condition.
- Page 13 • Press the Day button again briefly and the day indicator will move above day 2. In either case the display will change to with a flashing 1 (indicating programme 1 on day 2) appearing underneath the “ON” indicator. • The required programmes can now be set for day 2 in the same way as for day 1.
- Page 14 • Press the O’ride button. A black “X” will appear indicating that both the “ON” and “OFF” times for this programme have been suspended until reinstatement by the user. There is no limit to the number of programmes you can suspend. •...
-
Page 15: Year Guarantee
020 8450 0515. Note: A proof of purchase is required in all cases. For all eligible replacements (where agreed by Timeguard) the customer is responsible for all shipping/postage charges outside of the UK. All shipping costs are to be paid in advance... - Page 16 If you experience problems, do not immediately return the unit to the store. Telephone the Timeguard Customer Helpline; HELPLINE 020 8450 0515 or email helpline @ timeguard.com Qualified Customer Support Co-ordinators will be on-line to assist in resolving your query.
Need help?
Do you have a question about the ELU56 and is the answer not in the manual?
Questions and answers