Table of Contents
Advertisement
Quick Links
Advertisement
Table of Contents

Related Manuals for Keysight DCA-X Series


Summary of Contents for Keysight DCA-X Series
- Page 1 Keysight N1000A DCA-X Series Wide-Bandwidth Oscilloscope Quick Start Guide...
- Page 2 Copyright Notice Technology Licenses pursuant to the FAR and the © Keysight Technologies, Inc. 2019 DFARS and are set forth specifically The hardware and/or software - 2021 in writing elsewhere in the EULA.
-
Page 3: Table Of Contents
Contents Contents Introduction N1000A Includes a PC Front-Panel Features Rear-Panel Features Modules Compatible Products Connector Care Cleaning the N1000A Accessories Optional Accessories Optional Adapters for Electrical Channel Inputs Optional Adapters for Optical Channel Inputs N1000A Safety Information Installing the N1000A Step 1. - Page 4 (dates and editions are cited in the Declaration of Conformity): COMPLIANCE WITH CANADIAN EMC REQUIREMENTS South Korean Class A EMC Declaration: Acoustic statement: (European Machinery Directive) Contacting Keysight Returning the Instrument for Service Index N1000A Quick Start Guide...
-
Page 5: Introduction
N1000A Quick Start Guide Introduction N1000A Includes a PC Front-Panel Features Rear-Panel Features Modules Connector Care Cleaning the N1000A Accessories N1000A Safety Information This chapter introduces you to the N1000A and contains important safety information. To install your N1000A, refer to Chapter 2 , Installing the N1000A, page 17. -
Page 6: N1000A Includes A Pc
Never connect a pen drive or external memory device to the N1000A that has not been tested for viruses or malware. Follow the advice of you company’s IT department. For N1000A firmware upgrades, go to https://www.keysight.com/find/flexdca_download. N1000A Quick Start Guide... -
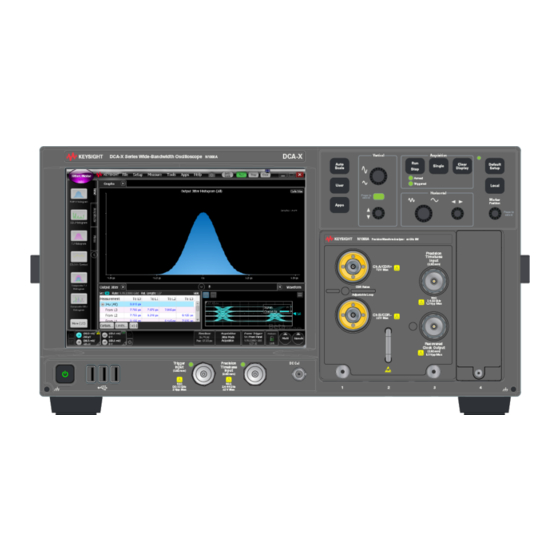
Page 7: Front-Panel Features
1 Introduction Front-Panel Features Figure 3. Front-Panel Features N1000A Quick Start Guide... -
Page 8: Rear-Panel Features
1 Introduction Rear-Panel Features Figure 4. Rear-Panel Features N1000A Quick Start Guide... -
Page 9: Modules
1 Introduction Modules To complete the N1000A, an electrical or optical input module must be purchased and installed. Figure 5 shows an installed module. The N1000A's module bay has four slots which can accommodate many combinations of modules that have different slot widths: One four-slot module. - Page 10 1 Introduction include the N1090/2/4-series oscilloscopes and the N107x series clock recovery DCA-Ms. N1000A Quick Start Guide...
-
Page 11: Connector Care
1 Introduction Connector Care Damage to N1000A electrical and fiber-optic input connectors can cost thousands of dollars, not to mention lost time! To learn how to avoid damaging the connectors, read the Connector Care topics located in the Help. 1. Turn on the N1000A and click Help > User's Guide to open the help. 2. -
Page 12: Cleaning The N1000A
Clean the N1000A using a soft cloth slightly dampened with a mild soap and water solution. To prevent electrical shock, disconnect the Keysight Technologies Model N1000A from mains before cleaning. Use a dry cloth or one slightly dampened with water to clean the external case parts. Do not attempt to clean internally. -
Page 13: Accessories
For more information on options and licenses, including the transportable licenses, refer to the www.keysight.com. If anything is missing or defective, refer to Chapter 5 , Contacting Keysight, on page 44. - Page 14 1 Introduction Table 1. Front-Panel Fiber-Optic Adapters for Optical Channels Fiber-Optic Adapters Description Keysight Part Number Diamond HMS-10 81000AI FC/PC 81000FI 81000KI 81000SI 81000VI N1000A Quick Start Guide...
-
Page 15: N1000A Safety Information
Mains isolated. CAT II: Line voltage in appliance and to wall outlet. CAT III: Line voltage behind wall outlet to next level of distribution. Only Keysight approved accessories shall be used. This is a Safety Protection Class I Product (provided with a protective earthing ground incorporated in the power cord). - Page 16 10°C from the lowest, of the maximum operating temperature of a single instrument. If there are any concerns or special requirements an Keysight Field Engineer should be consulted to assure instrument(s) temperature compliance and performance.
-
Page 17: Installing The N1000A
N1000A Quick Start Guide Installing the N1000A Step 1. Inspect the Shipment Step 2. Work at a Static-Safe Workstation Step 3. Position the N1000A Step 4. Install the Modules Step 5. Connect the Keyboard and Mouse (optional) Step 6. Connect the Power Step 7. -
Page 18: Step 1. Inspect The Shipment
The N1000A and some modules may come with adapters or connector savers either pre-installed or in their own packaging. Package Contents N1000A DCA-X Series Wide-Bandwidth Oscilloscope Keyboard, USB Mouse, USB Power cord Module bay filler panel (Qty. - Page 19 Partial TDECQ Measurement and Equalizer TDECQ Measurement and Equalizer Unrestricted Data File Import User Defined Measurements and Opterators Keysight Arbitrary Waveform Generator Control N1010200A Manufacturing Software Package. Provides the following features that, on the 86100D, were included in options: Data Analytics Web Service Software...
-
Page 20: Step 2. Work At A Static-Safe Workstation
2 Installing the N1000A Step 2. Work at a Static-Safe Workstation Electrostatic discharge (ESD) can damage or destroy electronic components. All work on instruments and electronic components should be performed at a static-safe workstation as shown in Figure 6. The static-safe workstation uses two types of ESD protection: Conductive table-mat and wrist-strap combination. -
Page 21: Grounding Receptacle
2 Installing the N1000A Only the table-mat and wrist-strap combination provides adequate ESD protection when used alone. To ensure your safety, the static-safe accessories must provide at least 1 MΩ of isolation from ground. Purchase acceptable ESD accessories from your local supplier. Electrical channel input circuits and the trigger input circuit can be damaged by electrostatic discharge (ESD). - Page 22 2 Installing the N1000A 6. Visually check that all ESD sensitive parts, assemblies, or products are com- pletely inside closed conductive containers. 7. Make sure that all shielding containers have an approved static attention label on the outside. 8. Make sure that all cleaners, solvents, coatings, and sprays used at your workstation are types approved by your ESD Coordinator.
-
Page 23: Step 3. Position The N1000A
(9.23 inch x 16.76 inch x 24.1 inch) 1. Samples of this product have been type tested in accordance with the Keysight Environmental Test Manual and verified to be robust against the environmental stresses of Storage, Transportation and End-use; those stresses include but are not limited to temperature, humidity, shock, vibration, altitude and power line con- ditions. - Page 24 The official and complete specifications are located in the N1000A’s help system. In FlexDCA, click Help > Specifications…. Use Keysight supplied power cord or one with same or better electrical rating. To avoid injury, use a cart or similar device when transporting the instrument.
-
Page 25: Step 4. Install The Modules
2 Installing the N1000A Step 4. Install the Modules 1. Slide your modules into the front-panel module bay. Single-slot modules can be installed in any of the four slots. Two-slot modules can be installed in slots 1/2 or 3/4 but not 2/3. Three-slot modules can be installed in slots 1/2/3 only. -
Page 26: Step 5. Connect The Keyboard And Mouse (Optional)
2 Installing the N1000A Step 5. Connect the Keyboard and Mouse (optional) If you want to use a mouse or keyboard, connect the supplied USB mouse and keyboard or provide your own. Since the N1000A has a touch screen, the use of these devices is optional. -
Page 27: Step 6. Connect The Power
Connect the line cord as shown in the figure below. The N1000A auto- matically adjusts for line input voltages. There is no voltage selection switch. The line cord provided is matched by Keysight to the country in which the order originates. -
Page 28: Step 7. Turn On The Instrument
2 Installing the N1000A Step 7. Turn On the Instrument Before switching on this instrument, make sure the supply voltage is in the specified range. Refer to Table 3 on page 1. Press the ON/Standby switch. Figure 11. Location of ON/Standby Button 2. -
Page 29: User Accounts
2 Installing the N1000A Figure 12. FlexDCA Application in Oscilloscope Mode Avoid touching the screen with a sharp object, as this could result in damage to the display. Instead, use your finger. To ensure proper operation of the N1000A, open the instrument’s help system. Click under Safety, click Introduction and, in the displayed topic, click the Windows OS tab. -
Page 30: Step 8. Configure A Lan Connection (Optional)
2 Installing the N1000A Step 8. Configure a LAN Connection (Optional) You can configure the N1000A on a local area network (LAN) for remote control, file sharing, and using network printers. 1. Connect your LAN cable to one of two rear-panel RJ-45 connectors. Figure 13. -
Page 31: Step 9. Install A Feature License (Optional)
2 Installing the N1000A Step 9. Install a Feature License (Optional) If you ordered an optional license with your N1000A, it was probably installed at the factory. If you ordered it, but it wasn’t installed, you received a Software Entitlement Certificate that you must use to install the license on your N1000A. Refer to the instrument’s help system for information on installing licenses. -
Page 32: Step 11. Connect An External Display (Optional)
2 Installing the N1000A Step 11. Connect an External Display (Optional) 1. Connect your display to the rear-panel Display Port or VGA connector. 2. Refer to Windows Help for information on using a Windows second desktop feature. Figure 15. External Display Connections N1000A Quick Start Guide... -
Page 33: Step 12. Calibrate The Modules
2 Installing the N1000A Step 12. Calibrate the Modules A module calibration establishes calibration factors that compensate for imperfections in the measurement system such as variations due to ambient temperature. Calibration is easy and quick to perform and will result in the best instrument precision. - Page 34 2 Installing the N1000A 3. Remove all external devices and signals from the module. The module cal- ibration uses known signal levels in the instrument. Introducing an outside signal source interferes with the calibration factors and decreases cal- ibration accuracy. 4.
-
Page 35: Step 13. Learn How To Use And Program The N1000A
2 Installing the N1000A Step 13. Learn How to Use and Program the N1000A Three help systems provide the N1000A’s documentation. To access the help, turn on the N1000A and on FlexDCA's menu click: Help > User's Guide… to open learn how to use the instrument. Help >... -
Page 36: Removable Hard Disk
Because calibration data is stored on an internal EPROM and not on the hard disk, the hard disk with its sensitive data never has to leave your site. Keysight does not need your hard disk to perform the calibration. - Page 37 3 Removable Hard Disk To Remove the Hard Disk 1. Press the ON/Standby switch to the standby position. 2. Remove the power cord. 3. Locate the hard disk on the N1000A's rear panel as shown in Figure Figure 18. Removable Hard Disk 4.
- Page 38 3 Removable Hard Disk To Declassify Instrument Memory All sensitive instrument information is written to the instrument’s hard disk. To declassify instrument memory: 1. Optional. Press the Clear button in the N1000A’s Calibration dialog box to clear mainframe user timebase calibration data and optical dark level cal- ibration data.
- Page 39 3 Removable Hard Disk N1000A Quick Start Guide...
-
Page 40: Instrument Markings And Regulatory Information
N1000A Quick Start Guide Instrument Markings and Regu- latory Information The table below lists the definitions of markings that may be on or with the product. N1000A DCA-X Instrument Markings The table below lists the definitions of markings that may be on the instrument. Table 4. - Page 41 UK conformity mark is a UK government owned mark. When affixed to the product is declaring all applicable Directives and Regulations have been met in full. The Keysight email address is required by EU directives applicable to our product. Rear-panel AC LINE label...
-
Page 42: N1000A Regulatory Information
4 Instrument Markings and Regulatory Information N1000A Regulatory Information To find a current Declaration of Conformity for a specific Keysight product, go http://www.keysight.com/go/conformity SAFETY: Complies with the essential requirements of the European Low Voltage Directive as well as current editions of the following standards (dates... -
Page 43: Acoustic Statement: (European Machinery Directive)
4 Instrument Markings and Regulatory Information Acoustic statement: (European Machinery Directive) Acoustic noise emission LpA < 70 dB Operator position Normal operation mode per ISO 7779 N1000A Quick Start Guide... -
Page 44: Contacting Keysight
N1000A Quick Start Guide Contacting Keysight For technical assistance with the, contact your local Keysight Call Center. In the Americas, call 1 (800) 829-4444 In other regions, visit http://www.keysight.com/find/assist... -
Page 45: Returning The Instrument For Service
If the instrument is no longer under warranty or is not covered by a maintenance plan, Keysight Technologies will notify you of the cost of the repair after examining the unit. - Page 46 They may also cause instrument damage by generating static electricity. 3. Pack the instrument in the original shipping containers. Original materials are available through any Keysight Technologies office. Or, use the following guidelines: Wrap the instrument in anti-static plastic to reduce the possibility of damage caused by electrostatic discharge.
- Page 47 5 Contacting Keysight N1000A Quick Start Guide...
-
Page 48: Index
Index Index instrument markings wrist strap ISM1-A adapters, electrical APC 3.5 (f-f) keyboard 18, SMA (f-f) adapters, optic airflow LAN, connecting to licenses, installing line cord calibration modules certificate of authenticity markings, instrument cleaning memory, declassify fiber-optic connections modules instrument calibration cleaning connections installing...
Need help?
Do you have a question about the DCA-X Series and is the answer not in the manual?
Questions and answers