Table of Contents
Advertisement
Quick Links
TROUBLESHOOTING TIPS
Write the model and serial
numbers here:
Model # _________________
Serial # _________________
You can find them on the rating
label on the front side of your
water heater.
GE is a trademark of the General Electric Company. Manufactured under trademark license.
. . . . . . . . . . 3
OWNER'S MANUAL
. . . . 5
. . . . . . . . . . . 5
. 6
. . . . . 8
9
. . . . . . . 17
. . . . . . . . . . . . . . 17
. . . . . . . . . . . . 21
. . . . . . . . . . 22
instrucciones, visite nuestro sitio de
49-6000243 Rev. 0 01-21 GEA
GE Branded Electronic
GE04SNLPDG
GE06SNHPDG
GE08SNHPDG
GE11SNHPDG
GE15SNHPDG
GE18SNHPDG
GE24DNHPDG
GE27DNHPDG
ESPAÑOL
Para consultar una version en
español de este manual de
internet GEAppliances.com.
Advertisement
Table of Contents

Related Manuals for GE GE04SNLPDG


Summary of Contents for GE GE04SNLPDG
-
Page 1: Table Of Contents
You can find them on the rating instrucciones, visite nuestro sitio de label on the front side of your internet GEAppliances.com. water heater. GE is a trademark of the General Electric Company. Manufactured under trademark license. 49-6000243 Rev. 0 01-21 GEA... - Page 2 THANK YOU FOR MAKING GE APPLIANCES A PART OF YOUR HOME. Whether you grew up with GE Appliances, or this is your first, we’re happy to have you in the family. We take pride in the craftsmanship, innovation and design that goes into every GE Appliances product, and we think you will too.
-
Page 3: Safety Information
IMPORTANT SAFETY INFORMATION READ ALL INSTRUCTIONS BEFORE USING THE APPLIANCE WARNING For your safety, the information in this manual must be followed to minimize the risk of fire or explosion, electric shock, or to prevent property damage, personal injury, or loss of life. Be sure to read and understand the entire Owner’... - Page 4 IMPORTANT SAFETY INFORMATION READ ALL INSTRUCTIONS BEFORE USING THE APPLIANCE WATER TEMPERATURE ADJUSTMENT Safety, energy conservation, and hot water capacity are factors to be considered when selecting the water temperature setting of the water heater. Water temperatures above 125°F can cause severe burns or death from scalding.
-
Page 5: Operating Instructions
Operating Instructions Water Heater Capacity and Increasing Temperature Extended Shutdown Periods Setpoint (For Water Heaters without an Integrated If the water heater is to remain idle for an extended Mixing Valve): period of time, the power and water to the appliance should be turned off and the water heater drained to The water heater temperature setting strongly impacts conserve energy and prevent a buildup of dangerous... -
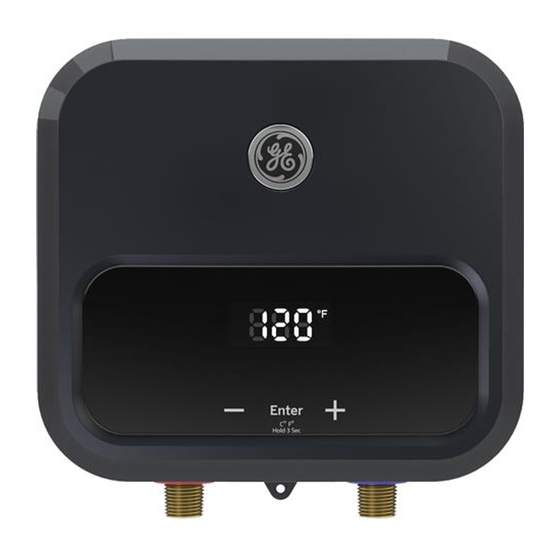
Page 6: About The Control Panel
About the Control Panel Models: GE04SNLPDG, GE06SNHPDG, GE08SNHPDG, GE11SNHPDG, GE15SNLPDG Displaying Temperature Setpoint To Adjust the Temperature The control will display the temperature setpoint anytime Follow these steps: a button on the control is pressed. After 30 seconds of 1. Press the + or - button on the control panel key pad to inactivity, the display will go blank. - Page 7 About the Control Panel Models: GE18SNHPDG, GE24DNHPDG, GE27DNHPDG Displaying Temperature Setpoint To Adjust the Temperature The control will display the temperature setpoint anytime Follow these steps: a button on the control is pressed. After 30 seconds of 1. Press the + or - button on the control panel key pad to inactivity, the display will go blank.
-
Page 8: About Remote Control
About the REMOTE CONTROL For Applicable Models Operating the Remote Control 1. Display Maintaining the Remote Control 2. + Select Button Remove the back of the controller and insert two AAA batteries. Replace batteries after 6 months of use or Use these buttons to increase the temperature setting or when remote control starts to lose power. -
Page 9: Installation Instructions
Installation Instructions LOCATION (Cont). The location chosen for the water heater must take into consideration the following: Avoid locations that are prone to dampness, high humidity, moisture, or dust. LOCAL INSTALLATION RECOMMENDED CLEARANCES: REGULATIONS There must be sufficient clearance between any This water heater must be installed in accordance object and the top, rear and sides of the water with these instructions, local codes, utility codes,... - Page 10 (One set of wire and ground) electrician in accordance with all applicable national, state, and local electrical codes. GE04SNLPDG, GE06SNHPDG, GE08SNLPDG, GE11SNHPDG, GE15SNHPDG Under no circumstances should you attempt to The following models require two dedicated circuits.
- Page 11 5. Remove power cord clamp. Route power cord through opening for clamp. 6. Install electrical connections according the your model water heater and diagram above. GE04SNLPDG: install L1 to L1, Neutral to Neutral, and Ground to Ground. GE06SNHPDG: install L1 to L1, L2 to L2, and Ground to Ground.
- Page 12 Installation Instructions ELECTRICAL CONNECTIONS To establish electrical connections for the water heater, reference the following diagrams for each applicabel model. NOTE: Model number can be found on the product rating label. Make sure you are referencing the correct diagram for your model of water heater. Tools required: •...
- Page 13 Installation Instructions ELECTRICAL CONNECTIONS To establish electrical connections for the water heater, reference the following diagrams for each applicabel model. NOTE: Model number can be found on the product rating label. Make sure you are referencing the correct diagram for your model of water heater. Tools required: •...
- Page 14 Installation Instructions Mounting Your Water Heater To mount your water heater NOTE: Model number can be found on the product rating label. Make sure you are referencing the correct diagram for your model of water heater. The water heater should be mounted on a surface using the screw slots located on the rear case of the water heater with a minimum of 4 screws (provided with the product).
- Page 15 Installation Instructions Plumbing Connections NOTICE: It is recommended that this water heater be installed by a licensed and qualified plumber in accordance with all applicable national, state, and local plumbing codes. Important Notes for all Models: DO NOT apply heat to the HOT or COLD water connections. If sweat connections are used, sweat tubing to adapter to the cold water connections on heater.
- Page 16 Installation Instructions Plumbing Connections To make plumbing connections for water heater, reference the following diagrams for each applicable model. NOTE: Model number can be found on the product rating label. Make sure you are referencing the correct diagram for your model water heater. Tools required: •...
- Page 17 Reduce flow rate. Voltage less than 240 VAC (120 The heating elements on your water heater are designed for 240 VAC VAC for GE04SNLPDG) applications. When used a lower voltage, the water heater will produce less hot water. No power or incorrect wiring Check breakers at main electrical panel to ensure it is not tripped.
- Page 18 Notes 49-6000243 Rev. 0...
-
Page 19: Wiring Diagrams
Wiring Diagram Models: Models: 49-6000243 Rev. 0... - Page 20 Wiring Diagram Models: Models: 49-6000243 Rev. 0...
-
Page 21: Limited Warranty
This limited warranty is extended to the original purchaser and any succeeding owner for products purchased for home use within the USA. If the product is located in an area where service by a GE Appliances Authorized Servicer is not available, you may be responsible for a trip charge or you may be required to bring the product to an Authorized GE Appliances Service location for service. -
Page 22: Consumer Support
• Review the Troubleshooting Tips or Care and Cleaning sections of this Owner’s Manual. • Contact your local installer, plumbing contractor, or call GE Appliances Service and Support at 1-800-943-8186. NOTE: Your installer phone number may be located on the product label.