Table of Contents
Advertisement
Advertisement
Table of Contents

Related Manuals for NextBase NBDVR222


Summary of Contents for NextBase NBDVR222
- Page 1 User Manual...
-
Page 2: Introduction To Using Your Dash Cam
1.5 To improve dash board glare, a Nextbase™ Polarising Filter can be purchased. Your Nextbase™ Dash Cam is set to record video, in files of just 1 minute in length. This means that each video file is a manageable size should you need to download and send to your insurance company. -
Page 3: Table Of Contents
USAGE PRECAUTIONS / NOTICES / CANADA COMPLIANCE MYNEXTBASE CLOUD™ FCC STATEMENT PC CONNECTION / FIRMWARE UPDATE INFORMATION FCC- SUPPLIER’S DECLARATION OF CONFORMITY NEXTBASE™ SD CARDS / CE MARK INFORMATION PRODUCT SPECIFICATION FREQUENTLY ASKED QUESTIONS (PAGE 1) PACKAGE CONTENTS / PRODUCT FEATURES FREQUENTLY ASKED QUESTIONS (PAGE 2) CAMERA PARTS &... -
Page 4: Precautions / Cautions On Using This Product
IT IS THE USER'S RESPONSIBILITY TO MOUNT THE DEVICE IN COMPLIANCE WITH ALL APPLICABLE LAWS AND ORDINANCES. Always mount your Nextbase Dash Cam in a location that does not obstruct the driver's view of ™ the road. Nextbase does not assume any responsibility for any fines, penalties, or damages ™... -
Page 5: Product Warnings
Do not place the Dash Cam in front of or above any airbag. Battery Warnings Lithium-ion batteries are used in most Nextbase™ Dash Cams. If these guidelines are not followed, batteries may experience a shortened life span or may present a risk of damage to the Dash Cam, fire, chemical burn, electrolyte leak, and/or injury. -
Page 6: Usage Precautions / Notices / Canada Compliance
Nextbase™ does not assume any responsibility for any fines, penalties, or damages that may be incurred as a result of any state or local law or ordinance relating to the use of your Nextbase™ Dash Cam. This device complies with Innovation, Science and Economic Development Canada license-exempt Camera Legal Requirements Precaution RSS standard(s). -
Page 7: Fcc Statement
This product does not contain any user-serviceable parts. Repairs should only be made by an authorised Nextbase™ service centre. Unauthorized repairs or modifications could result in permanent damage to the equipment, and void your warranty and your authority to operate this device... -
Page 8: Fcc- Supplier's Declaration Of Conformity
2. Product Info 8. Responsible party in US. Product Name : Dash Cam Company name: Tank Design Model No. : NBDVR222 Mailing Address: 158 Sidney Street, Cambridge, MA 02139, United States Brand Name : Nextbase Contact person : Mr Scott Watts Signature: 3. -
Page 9: Product Specification
Product Specification Model Number / Name NBDVR222 Power Requirements 5V / 1.5A Power Supply 12-24Vdc Car Power Cable (supplied) Fuse Type: 32mm / 2A Output: 5Vdc Hardwire Kit also available to purchase for a hidden, permanent power supply. Sensor Resolution 2.12M Pixel (1936 x 1097) -
Page 10: Package Contents / Product Features
View and share your footage online using the MyNextbase Cloud™ service. Upload your video to the Nextbase™ server to get a shareable link to send to friends, insurers, and social media. Upload your videos via the file upload area on Mynextbase.com... -
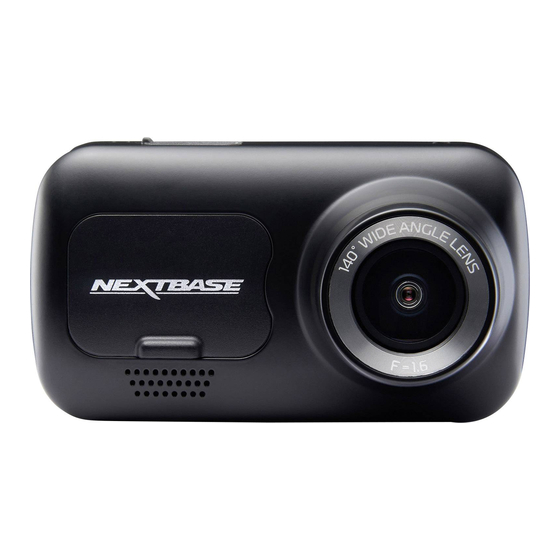
Page 11: Camera Parts & Controls
Camera Parts and Controls See below to identify the parts and controls of your Dash Cam LEDs Dust Cover Right: Blue Mounting point located under the dust cover. - The Blue LED will be on while the Dash Cam is charging. It will turn off when charging is complete, even if the Dash Cam is still plugged in. -
Page 12: Camera Parts & Controls (Cont.)
Camera Parts and Controls (cont.) See below to identify the parts and controls of your Dash Cam USB Cover MicroSD Card Slot USB-PC port located under the dust cover. Insert the MicroSD card here, taking care that the gold contacts are facing towards the screen side of the Dash Cam. -
Page 13: In Vehicle Installation
Take care that card has 'clicked' into place, a second push inwards will release the memory card. - For best results, we recommend using Nextbase™ branded SD cards. - Do not remove or insert the memory card when the Dash Cam is turned on. - Page 14 Also available to purchase is a Nextbase Hardwire Kit. This connects your Dash Cam directly to the vehicle’s fusebox to power it leaving your 12Vdc outlet available for Phone / Sat Nav charging.
- Page 15 In Vehicle Installation (cont.) 6 Remove the adhesive cover layer Peel back the red cover layer to expose the adhesive surface, ready to mount on your windscreen. 7 Straighten the Dash Cam Ensure that the Dash Cam is horizontal and faces straight out of the windscreen. Ensure that objects on the Dash Cam display appear level, and adjust as required.
- Page 16 In Vehicle Installation (cont.) 9 Adjusting the Dash Cam With the mount attached to the windscreen, ensure that objects on the Dash Cam display are level and adjust as required. Ensure that the road ahead is at the centre of the image, in the central third of the display.
-
Page 17: Positioning Your Dash Cam / Accessories
Nextbase™ does not assume any responsibility for any fines, penalties, or damages that may be incurred as a result of any state or local law or ordinance relating to the use of your Nextbase™ Dash Cam. As per the installation instructions, you must install the Dash Cam so it does NOT obstruct the driver’s view Accessories of the road (red, above), preferably on the passenger side of the vehicle and behind the rear view mirror. -
Page 18: Changing Mounts
Changing Mount Attachments Removing Adhesive Residue Follow the instructions below to switch between mounts attachments; 3M adhesive or suction. To attach each mount, align the pins on the mount with the holes on the adhesive/suction attachment and slide If you wish to remove the adhesive mount from your windscreen, use hot soapy water or an alcohol firmly to the right until you hear the pieces click into place. -
Page 19: First Time Use
First Time Use To ensure the set up of this Dash Cam is as quick and simple as possible, there is an easy to follow ‘First Time Use’ menu. First Time Use Screens Language This menu is used to set Language, Time, and Date. English Dansk This menu will appear when:... -
Page 20: Menu / Video Menu Options
Menus Video Menu Options Resolution Press the ‘Menu’ button to enter the Dash Cam’s ‘Video Menu’ system. Change your Dash Cam’s recording resolution Options: 1080pP, 720P, 720P @ 60FPS Default: 1080P Video Menu Exposure Resolution Adjust the exposure level for different lighting conditions. Exposure Audio Recording Options: Values range from -6 to +6... -
Page 21: Menu / Setup Menu Options
Menus (cont.) Press the ‘Menu’ button again when in ‘Video Menu’ to enter the Dash Cam’s ‘Setup Menu’ system. Device Sounds Turn On/Off the beep that sounds when a button is pressed. Start up sound is NOT muted. Options: On and Off Setup Menu Default: On Format SD Card... -
Page 22: Setup Menu Options
Setup Menu Options (cont.) Recording History Keep User Settings Turn this On in order to keep your preferred In some territories, there are laws prohibiting the individual user settings during the Dash Cam amount of footage your Dash Cam can store. update process. -
Page 23: Video Mode / Photo Mode / Playback Mode
Playback Mode Audio Recording ON Can be switched OFF in the Dash Cam Setup Menu. Nextbase Logo Stamp The key below explains the various information displayed Parking Mode ON on the screen when your Dash Cam is in Playback mode. -
Page 24: Playback Mode Menus - Protect & Delete Functions
Playback Mode Menus If the Menu button is pressed while scrolling through your videos, you will open the Playback Menu, How to Protect/Unprotect Files Using the Up and Down arrows, select ‘Protect Files’ giving you the option to protect, unprotect, or delete files. You can use the Menu button as a back button On the next page, you will be asked if you want to Protect or Unprotect while in the menu system. -
Page 25: Mynextbase Player
Add Video Update Dash Cam Snapshot Edit Video Share Video Settings Help for updates, Nextbase™ website, help & support, send diagnostics, register your Dash Cam, Add Video Remove Save contact us, and about. 190430_111804_009.MP4 Playback Window Displays Dash Cam videos playing in MyNextbase Connect™. -
Page 26: Mynextbase Player™ - Editing
Bring to Front your video will pause at the specified frame and Bring Forwards Videos can also be upload to the Nextbase server; you will be e-mailed a secure link to view or ™ Bring Backwards display any annotations that you have added. -
Page 27: Mynextbase Cloud
MyNextbase Cloud™ is our free online video sharing service where you can safely and securely store your Dash Cam files. Upload your file to the Nextbase™ Server using the ‘Share Video’ function on either MyNextbase Player™, or the MyNextbase Connect™ app. Please note Upload To that upload times are dependent on video file size. -
Page 28: Pc Connection / Firmware Update Information
Dash Cam, including what firmware version is currently active (i.e R05.3). appear, e.g. NEXTBASE (D:) and you will be able to view / manage the stored files upon the MicroSD card within the Dash Cam. You will be able to view your files using your system’s default media player. -
Page 29: Nextbase™ Sd Cards / Ce Mark Information
Nextbase SD Cards ™ CE Mark Information (Conformité Europénne) For best results, we recommend using our Nextbase branded SD cards with your Dash Cam, available ™ The CE (Conformité Européenne) mark is a symbol (below) printed on products to indicates it’s to purchase online from nextbase.com... -
Page 30: Frequently Asked Questions (Page 1)
Video Image is blurred. FIlter has been set properly; see the Accessories Manual (available from www.nextbase.com) for instructions on how to set up the Lens. MicroSD cards are very small and require delicate use. Align the card with the diagram shown upon the Dash Cam and insert the card until you feel a slight spring resistance. -
Page 31: Frequently Asked Questions (Page 2)
It is normal for the camera to feel warm during typical use, especially when it’s recording high definition video or communicating via Wi-Fi. Reset the Dash Cam to the default settings within the Setup Menu and try again. Should the problem persist call the UK helpline (02920) 866429 or call your local support centre, found at www.nextbase.com Unresolved Issues Alternatively email: support@nextbase.com... -
Page 32: Software License Agreement
By using the device, you agree to be bound by the terms and conditions of the following software licence agreement. Nextbase™ grants to you for the period for which you possess the relevant device a non-exclusive, non-transferrable (save in circumstances where you sell or transfer the relevant device to another person –... -
Page 33: Warranty / Online & International Purchases
If the unit sent in is still under its original warranty, then the new warranty is 30 days or to the end of state to state (or by country or province). Nextbase™ does not exclude, limit or suspend other legal rights the original 1 year warranty, whichever is longer. -
Page 34: More Nextbase Products
MyNextbase Connect™ MyNextbase Player™ Accessories Ready for the Drive Everything you might need for video storage, Dash Cam protection, and more. For more details on our full range of Dash Cams and Accessories, download the Nextbase™ Accessories Manual, available from www.nextbase.com... -
Page 35: Dash Cam Functions
Dash Cam Functions Nextbase ™ Emergency Response Nextbase ™ Module Cam Compatible (Rear Cam, Rear Facing Cam) Nextbase Cloud ™ Storage MyNextbase Player ™ MyNextbase Connect ™... - Page 36 NBDVR222-ENG-R2...
Need help?
Do you have a question about the NBDVR222 and is the answer not in the manual?
Questions and answers