
Related Manuals for Tchibo 377042


Summary of Contents for Tchibo 377042
- Page 1 Fully Automatic Coffee Machine Esperto Latte Original instructions for use and warranty Tchibo GmbH D-22290 Hamburg · 17858HBNW · 2019-05...
-
Page 2: Table Of Contents
Contents Dear Customer About these instructions Customising the The fully automatic coffee machine by Tchibo allows you to enjoy the perfect automatic rinse espresso, caffè crema and delicious milk specialities such as cappuccino and Intended use Adjusting the grind setting latte macchiato. -
Page 3: About These Instructions
About these instructions Intended use This product is equipped with safety features. Nevertheless, read the safety The coffee machine has been designed for the following warnings carefully and only use the product as described in these instructions purposes: to avoid accidental injury or damage. Keep these instructions for future Preparing espresso and caffè... -
Page 4: Safety Warnings
Safety warnings DANGER due to electricity Never immerse the machine, the mains plug or the DANGER to children and people with restricted • connection cable in water, as this could cause an electric capabilities of operating appliances shock. Never touch the mains plug with wet hands. Children are not permitted to use this machine. - Page 5 If the connection cable of this machine becomes damaged, Use only the cleaning and descaling agents listed in these • • it must be replaced by the manufacturer, its customer instructions as well as the relevant cleaning utensils to service or a similarly qualified person in order to avoid clean the machine.
- Page 6 CAUTION – risk of injuries or material damage Keep all cards with magnetic strips, such as credit cards, • debit cards, etc., away from the drip tray and the cover for Only use the machine with the container for the coffee •...
-
Page 7: Removing Protective Films And Packaging Materials
Removing protective films and packaging materials 4. Remove the transport protection piece underneath the water tank. 1. Take the machine out of 5. Clean the water tank with a little the packaging. washing-up liquid. Then rinse it 2. Pull all protective films off out thoroughly under running the machine and remove water and dry it. -
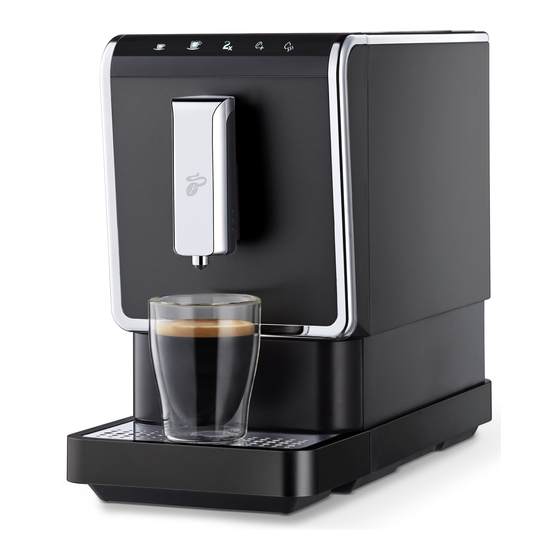
Page 8: At A Glance (Delivery Contents)
At a glance (delivery contents) Opening for the water tank Grind adjuster Cover for the coffee bean Coffee bean compartment (160 g) Water tank compartment Control panel Steam wand Frother nozzle Container for coffee grounds Filter (for filtering Brewing unit out limescale or other particles) On/Off button... - Page 9 Control buttons (white) The control buttons are only visible when the machine is switched on. Extension for the coffee bean compartment Double Make Make beverage espresso caffè crema amount Froth milk / Intense dispense Connection cable function hot water Warning lights (orange) The warning lights only light up when the machine requires maintenance.
-
Page 10: Initial Operation - Prior To First Use
Initial operation – prior to first use 3. Pull the water tank up and out of the machine. Set up the machine..on a level worktop or surface that is not sensitive to moisture..close to a wall socket. The length of the connection cable is approx. -
Page 11: Adjusting The Height Of The Coffee Spout
7. Place the lid back on the coffee 11. Pour out the water in the drip bean compartment. Press the lid tray if necessary. all the way on so that the aroma protection seal can optimally protect the aroma of the coffee beans. -
Page 12: Making Coffee
Making coffee 4. Press the button for the type of coffee you would like: 1. Press the On/Off button to switch on the machine. Espresso or Caffè Crema. The coffee buttons will flash and the machine will begin to heat up. The grinding and brewing process starts and stops automatically. -
Page 13: Preheating The Cup
5. Empty the leftover water tray, Preheating the cup the container for the coffee Fill the cup with hot water and then pour it away shortly before using the cup. grounds and the drip tray This will help your espresso or caffè crema taste their best. regularly: The hot water that is dispensed is only suitable for heating the cup. -
Page 14: Frothing Milk
Frothing milk The LED ring on the steam wand will flash and the heating WARNING - risk of scalds/burns process for frothing milk will begin. • Hot steam and hot water can cause scalding. Never expose any part of the body to the steam or hot water jet. Do not touch any hot Press the steam button again to parts of the machine, such as the steam wand or the metal on interrupt the heating process. -
Page 15: Double Beverage Amount
If you do not press the steam button again, it will stop automatically after Adjusting the strength of the coffee - approx. 90 seconds. The milk froth is now ready to use. You can make your Intense technology coffee right away. If you wish to make the coffee Cleaning the frother nozzle stronger, press the “Intense... -
Page 16: Customising The Automatic Rinse
3. As soon as the coffee starts Customising the automatic rinse being dispensed, press and The default setting of the machine is for the automatic rinse to only start when hold the coffee button. the machine is cold. If the machine was used shortly before it is switched on, and 4. -
Page 17: Adjusting The Grind Setting
Adjusting the grind setting Increasing the coarseness of the grind Increase the coarseness of the grind when you want the coffee to flow through more quickly, for example if the coffee is too strong for your taste. CAUTION – material damage 5. -
Page 18: Standby Mode
Standby mode Extension for the coffee bean compartment Always switch the machine to standby mode after use by pressing the On/Off You can increase the capacity of the coffee bean compartment from button. The machine will then consume very little energy. If no button is pressed 160 g to 300 g. -
Page 19: Cleaning
Cleaning 3. Then reinsert it into the opening in the water tank, pressing it in DANGER – risk of fatal electric shock as far as it will go. • Remove the mains plug from the wall socket before cleaning Rinse the water tank under running water daily. This will prevent lime- the machine. - Page 20 5. Reinsert all parts into 3. Firmly press and hold the two the machine. orange-coloured buttons and pull the brewing unit straight forwards out of the machine. Cleaning the brewing unit 4. Rinse the brewing unit under warm, running water. You should clean the brewing unit once a week.
-
Page 21: Descaling
Cleaning the steam wand and frother nozzle 7. Slide the frother nozzle onto the steam wand as far as it will WARNING - risk of burns due to hot machine parts go and then turn it anticlockwise • The steam wand and frother nozzle remain hot after use. as far as it will go. - Page 22 1. Press the On/Off button to switch 5. Press the On/Off button to the machine off if necessary. switch on the machine. 2. Pull the water tank up and out of the machine. 6. Wait until the machine heats up and all buttons light up continuously.
- Page 23 10. Pour out the discaling solution in 14. Fill the water tank with cold tap time to ensure that the container water up to the MAX mark. does not overflow. 15. Reinsert the water tank into the machine and push it down as far Once the process is as it will go.
-
Page 24: During A Long Period Of Non-Use
During a long period of non-use 6. Remove the water tank from the machine. If you will not be using the machine for a longer period of time, e.g. when you go on holiday, we recommend for reasons of hygiene that you clean the machine as The pump transports the described in the “Cleaning”... - Page 25 The “Empty coffee grounds” symbol is lit up or flashing. The coffee flows very slowly out of the coffee spout. Is the container for the coffee grounds full? Adjust the grinder to a coarser setting. Empty the container for the coffee grounds as well as the leftover water When hot water is required, a large amount of steam is emitted tray and then place them back in the machine (see steps 5 to 7 in the from the frother nozzle before hot water dispensed.
-
Page 26: Technical Specifications
Technical specifications Declaration of Conformity Product number: 377 042 Tchibo GmbH hereby declares that this product complies with all basic require- ments and the remaining relevant regulations of the following guidelines at the Mains voltage: 220-240 V ~ 50-60 Hz... -
Page 27: Disposal
In order for the warranty to be granted, all warranty claims must be with household waste! accompanied by proof of purchase from Tchibo or from an authorised Tchibo distribution partner. This warranty is valid within the EU, Switzerland and Turkey. -
Page 28: Service Form
Service Form Please fill out the form in capital letters and send it along with the product. Product number (please fill in) Surname, first name _ _ _ _ _ _ Street, no. Return checklist: • Package the product well so that the machine is sufficiently protected.
Need help?
Do you have a question about the 377042 and is the answer not in the manual?
Questions and answers