
Related Manuals for Holy Stone HS165


Summary of Contents for Holy Stone HS165
- Page 1 Instructions For Use Gebrauchsanweisung V 1.1 Contents English 1-40 日本語 41-71 Deutsch 72-109 HS165 eu@holystone.com (EU) usa@holystone.com (USA) ca@holystone.com (CA) jp@holystone.com (JP) 1(855) 888-6699 www.holystone.com...
-
Page 2: Table Of Contents
Contents 1.0 Disclaimer&Warning ..............2.0 Safety Guidelines ................3.0 Maintenance .................. 4.0 Package Contents ................ 5.0 Drone’s Details ................6.0 Transmitter Details ............... 7.0 Joystick Mode ................8.0 Charging the Battery Drone’s Battery ................Transmitter Battery ................ 9.0 Drone’s Battery Installation ............10.0 Operation Guide Download APP ................ -
Page 3: Disclaimer&Warning
- - - - - - - - - - - - - - - - - - - - - - - - - - - - - - - - - - - - - - - - - - - - - - - - - - - - - - - - - - - and all other adverse events caused by the violation of the safety instructions or due to any other factor, WILL NOT be Holy Stone’s responsibility. - Page 4 2.3 Operation Requirements: ⑥ If the device is not going to be used for an extended period of time, remove batteries to prevent potential damage from battery ① Please don’t use this product to follow any moving vehicles . leakage. ②...
-
Page 5: Maintenance
×1 ×1 ×4 USB Charging USB Charging Cable Spare Propellers Cable for Transmitter Instructions For Use V 1.1 HS165 usa@holystone.com (USA) eu@holystone.com (EU) ca@holystone.com (CA) jp@holystone.com (JP) 1(855) 888-6699 ×1 ×1 www.holystone.com ×4 Instructions... -
Page 6: Drone's Details
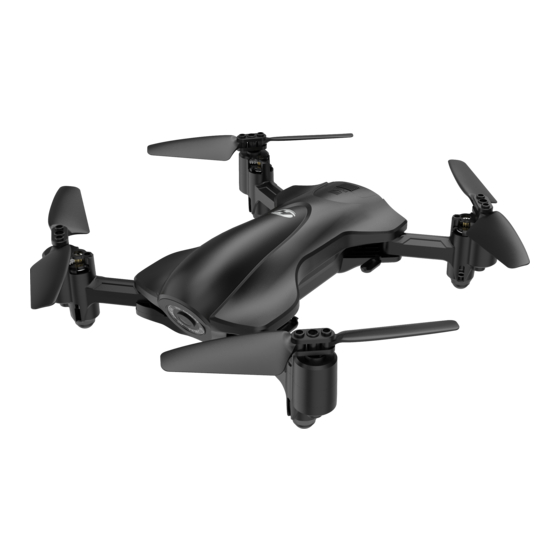
5.0 DRONE’S DETAILS 6.0 TRANSMITTER DETAILS Propeller A Propeller B Phone Holder Right Joystick Left Joystick GPS / Charging Power Indicator Indicator Light Turn On/Turn Off GPS Mode Switch One Key Takeoff/ Headless Mode Landing Propeller B Propeller A HD Camera Trimmer Button Return-to-Home (long press) -
Page 7: Joystick Mode
8.0 CHARGING THE BATTERY 7.0 JOYSTICK MODE 7.1 MODE 2 8.1 Drone’s Battery (Left hand throttle MODE 2 will be default setting.) Right Joystick Left Joystick Forward Ascend USB Adapter (5V/0.5-2.0A) Descend Down Down Backward Power Bank Left Right Left Right Turn Left Turn Right... -
Page 8: Transmitter Battery
9.0 DRONE’S BATTERY INSTALLATION 8.2 Transmitter Battery Please charge the transmitter when the power is off. USB Adapter Charging (5V/0.5-2.0A) interface Power Bank Push the battery into the battery compartment, make sure that the battery is firmly installed. Computer USB Port 1) Connect USB charging cable and transmitter charging interface. -
Page 9: Operation Guide Download App
10.0 OPERATION GUIDE 10.3 Pairing 10.1 Download APP All of the following operations on this manual takes MODE 2 for example. HEAD ① Long press the Power Switch button on the bottom of the drone to turn it on. Android APP on Google play Scan the QR code, connect to the App Store™... -
Page 10: Calibrating The Compass
10.4 Calibrating the Compass 10.5 GPS Searching ( DO NOT use GPS Mode indoors ) Only calibrate the compass when the drone is used for the first time or the drone is subject to geomagnetic interfer- ence. Step 1: Simultaneously push the left stick Place the drone on a flat and dry surface and in an unobstructed to top right corner and the right and lit area. -
Page 11: Connect Wi-Fi Networks
10.7 Calibrating the Gyro 10.6 Connect Wi-Fi Networks Phone Holder Simultaneously push the left stick and the right stick to the bottom left corner. When the drone's front white indicator light and rear As shown above, open the phone holder and put the phone. Then blue indicator light change from quick flash to solid, and the you can use the FPV real-time transmission function. -
Page 12: Take-Off / Landing
11.0 FUNCTIONS DETAILS 10.9 Take-off / Landing 11.1 Trimmer Function (Trim under NO GPS Mode) Take-off: ● Please unlock the motor before take-off. Take-off Method 1 Method 2 F/B Sideways Drift Trim: If the drone drifts forward, press the Trimmer button ( ) and push the right joystick down at the same Method 1: Push the left joystick up and the drone will take off from time to re-balance the drone. -
Page 13: Speed Switch
11.2 Speed Switch 11.4 Headless Mode 1. Press the Headless Mode button ( ) on the transmitter to enter the Headless Mode. The transmitter will beep every 3 seconds to indicate that drone is in Headless Mode. 2. Press the Headless Mode button again, you will hear a single beep, that indicates the drone has exited the Headless Mode. -
Page 14: Return-To-Home
11.5 Return-to-Home (RTH) 11.7 Failsafe RTH Press the RTH button ( ) to start the Return-to-Home procedure. If the GPS signal is available (At least 7 satellites) and the Home The transmitter will “Di Di” to indicate that the drone is entering RTH Point is recorded previously. -
Page 15: Take Photo / Video
12.0 REPLACE THE PROPELLER 11.8 Take Photo / Video Blade Fixed Cover Screws Propeller Pic.1 Pic.2 ① Take Photo: Short press the Photo / Video button on the transmitter to take pictures. When one beep is heard from the As shown above, use a screwdriver to remove the Screws in the transmitter, this indicates the camera has successfully taken a picture. -
Page 16: Application Functions
13.0 APPLICATION FUNCTIONS Flight Mode Switch: Click on this icon to select Waypoint Mode, Follow Me Mode, or Circle Fly. Exit Flight Mode: Click this icon to exit Tapfly, Follow Me Mode, or Circle Fly. Waypoint Mode: Operator can set any points on the map to draw the flight path, and then the drone will fly ( 29) along this route. - Page 17 13.2 Follow Me 13.1 Waypoint Mode When using Waypoint Mode, it is recommended to enlarge the When the Follow Me function is enabled, the drone will follow the map. GPS in your smart phone to follow you wherever you go. Draw the route Point Delete...
-
Page 18: Drone Status Indicator
14.0 DRONE STATUS INDICATOR 13.3 Circle Fly When using Circle Fly, it is recommended to enlarge the map. Indicator Status Drone Status Compass is disturbed / Front blue lights, back white Enter the Second Low lights flash quickly. Voltage RTH Delete Search for GPS signal Front blue lights, back white... -
Page 19: Specification
15.0 SPECIFICATIONS CAMERA DRONE Camera frequency: 5G Model: HS165 Video / Photo Resolution: Weight: 171 g / 6 oz HD1920×1080p (stored in TF card) Flight Time: 13~15 minutes HD1280×720p (stored on mobile phone) Motor Model: 8620 Lens: FOV 90° Operating Temperature Range: 32° to 104°F... -
Page 20: Contact Us
17.0 GENERAL INFORMATION 16.0 CONTACT US Please do not hesitate to contact us if you need further support. FCC Notice: This device complies with Part 15 of the FCC Rules. usa@holystone.com (America) Operation is subject to the following two conditions: ca@holystone.com (Canada) (1) This device may not cause harmful interference. - Page 21 CAN NMB-3 (B) RF Exposure RF Exposure The equipment complies with FCC radiation exposure limits set Radiation Exposure Statement: forth for an uncontrolled environment. This device should be This equipment complies with IC radiation exposure limits set forth installed and operated with minimum distance 20cm between the for an uncontrolled environment.
- Page 22 Product Name: Remote control four axis series 9. Always keep it out of reach of children. Model/Mark : HS165/HOLYSTONE 10. Improper battery use may result in a fire, explosion or other hazard. The Statement of compliance is available at the following address: 11.
Need help?
Do you have a question about the HS165 and is the answer not in the manual?
Questions and answers