
Related Manuals for Holy Stone HS160


Summary of Contents for Holy Stone HS160
- Page 1 INSTRUCTIONS FOR USE 2.4GHz FPV real-time video and image transmitter drone HS160 usa@holystone.com (America) +1(855) 888-6699 ca@holystone.com (Canada) eu@holystone.com (Europe) jp@holystone.com (Japan)
-
Page 2: Table Of Contents
CONTENTS 1. Preface ................1 2. Warnings ................2 3. Maintenance ..............4 4. Package Contents ............5 5. Specification ..............6 6. Transmitter Functions ..........8 7. Drone’s Details............... 9 8. Transmitter Battery Installation ........ 9 10. Drone Parts Installation ..........10 11. -
Page 3: Preface
3. Use and maintain the product according to the instructions for use: a. Operate this device legally in accordance with instructions provided and with local laws and regulations. b. Always use original parts manufactured by Holy Stone for maintenance and repair. 4. Do not operate the device alone. -
Page 4: Warnings
Always keep at least 2 meters between the user or viewers and the model to avoid risk of injury. Pay attention to the device at all times while flying. 4. Neither Holy Stone nor any distributors or agents accepts any responsibility for loss, injury or damage caused by incorrect operation of the drone. - Page 5 12. You can access the transmitter battery compartment by unscrewing the screws on the battery cover. Insert batteries ensuring they are in the right orientation. Always put battery cover back and tighten the screw to secure before use. 13. Only use the charger provided with your drone for safety. 14.
-
Page 6: Maintenance
<MAINTENANCE> 1. Clear the product after each use with a clean, soft cloth. 2. Avoid prolonged exposure to direct sunlight and avoid buildup of heat on the drone. 3. This device is not waterproof and must not be submerged in water under any circumstance. -
Page 7: Package Contents
Package Contents Part Name Picture Quantity Drone 2.4G Transmitter 3.7V 500mAh Li-Ion Battery Additional Propellers USB Charging Cable Screwdriver Instructions For Use INSTRUCTIONS FOR USE 2.4GHz FPV real-time video and image transmitter drone Dustproof Bag Joysticks Phone Holder... -
Page 8: Specification
<SPECIFICATION> Drone Model: HS160 Weight: 82.6g / 2.91oz Flight Time: 6~8 minutes WIFI Distance: 30 m (Outdoor And Unobstructed) Motor Model: 701855 Hovering: Enabled Operating Temperature Range: 32° to 104°F (0° to 40°C) CAMERA Still Photography Modes : Single Shot... - Page 9 <SPECIFICATION> TRANSMITTER Operating Frequency: 2.4 GHz Max Transmission Distance: 50 m (outdoors and unobstructed) Operating Temperature Range: 32° to 104°F (0° to 40°C) Battery: 4×1.5 V Alkaline batteries AA Mobile Device Holder: Smart phones FLIGHT BATTERY Capacity: 500 mAh Voltage: 3.7 V Battery Type: LiPo Energy: 1.85 Wh Net Weight: 19.9 g / 0.7 oz...
-
Page 10: Transmitter Functions
<TRANSMITTER FUNCTIONS> Mode 2(Recommend!) Left hand throttle Mode 2 will be default setting. Phone Holder .......... Take Photo Speed Switch ............. Power On/Off ............ Throttle: Ascend/Descend; ......Direction: Fly to Forward/ ........ Rotate to Left/Right Backward/Left/Right Short press: Headless Mode ............ -
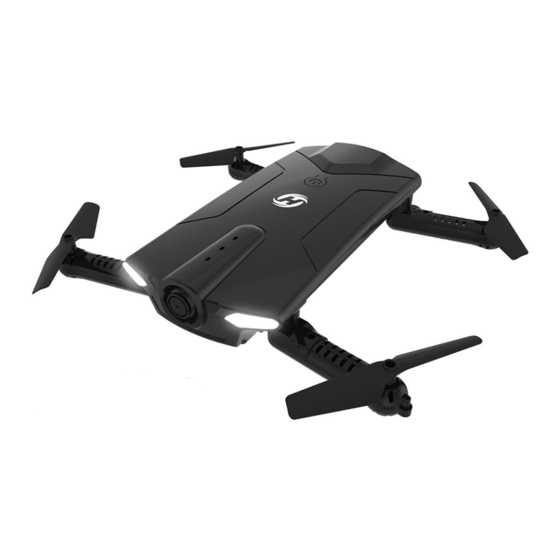
Page 11: Drone's Details
<DRONE’S DETAILS> Power Button Propeller A Propeller B Collapsible Arm Body Frame Propeller A Motor Base Propeller B HD Camera (Adjustable up/down by hand) Please note that all propellers must be installed in the correct orientation.(Pay attention to the letter “A” or “B” printed on each propeller when installing.) <... -
Page 12: Drone Parts Installation
<DRONE PARTS INSTALLATION> Install the Joysticks Tighten Joysticks with screws Install two joysticks into the bracket slot on the transmitter, and tighten them with screws. Install the Phone Holder (Install the phone holder) This model uses Wi-Fi and HD camera to display real-time images on smartphones. -
Page 13: Charge And Install The Drone Battery
< CHARGE AND INSTALL THE DRONE BATTERY> 1. Balanced charging: Connect the USB charging cable to a computer or a USB adapter(5V/2A recommended). The red indicator lights turn on when the USB charging cable is connected to the power supply. The red indicator light turns off when the battery connect to the USB charging cable. - Page 14 2. Press the battery lock, and push the battery backward at the same time to take battery out. Press battery lock CAUTIONS 1) Don’t use or charge the battery if it shows signs of swelling, punctures, or damage in any way. 2) Don’t charge the battery directly after use.
-
Page 15: Fly Safe Informations
Fly Safe Information Fly in Open Areas Maintain Line Fly Below of Sight 150 feet (50 m) - - - - - - - - - - - - - - - - - - - - - - - - - - - - - - - - - - - - - - - - - - - - - - - - - - - - - - - - - - - Avoid flying over or near obstacles, crowds, high voltage power lines, trees, airport or bodies of water. -
Page 16: Flight
<FLIGHT> Rotating propellers can be dangerous. Do not start ● the motors when there are people nearby. Always keep your hands on the transmitter so long ● as the motor is still spinning. Only stop motors mid-flight in emergency situations ●... -
Page 17: Calibrate The Drone
TAIL ③ Place the drone on a level ④ Push throttle joystick up surface. Make sure the head then down to pair the drone of the drone faces forward and the transmitter. The LED and the tail of the drone indicators on the drone will be faces toward pilot. -
Page 18: Start The Drone
Start the Drone ⑥ After pairing the drone, there are three ways to start the drone: (The first way) a. Press the One Key Start/Lading button to start the drone. (The second way) b. Push the left joystick to the bottom left; push right joystick to the bottom right at the same time to start the drone. -
Page 19: Flight Control
Flight Control ⑦ Throttle Joystick ⑧ Direction Joystick ⑨ L/R Sideward Fly Trim : When the drone drifts left or right, press Left/Right Trimmer button to re-balance the drone. (Trim left if it drifts right; trim right if it drifts left). -17-... -
Page 20: Emergency Stop
⑩ F/B Sideward Fly Trim : When the drone drifts forward or backward, press Forward/Backward Trimmer button to re-balance the drone. (Trim forward if it drifts backward; trim back if it drifts forward). Emergency Stop Only stop motors mid-flight in emergency situations when doing so can reduce the risk of damage or injury. -
Page 21: Altitude Hold
<ALTITUDE HOLD> This drone equipped with Altitude Hold function, means this drone will keep in a steady altitude. When flight, altitude hold function allows you to release the throttle joystick, and the drone will keep hovering at the current height. Reliable communication range communication between the drone and the transmitter is around 50 meters depending on terrain and conditions. -
Page 22: Headless Mode
<HEADLESS MODE> Do not use the Headless Mode until you totally comprehend the instruction for use. Flying in Headless Mode without sufficient experience might result in loss or damage of the device. HEAD TAIL 1. Place the drone in front of the pilot before pairing the drone to transmitter. - Page 23 <HEADLESS MODE> The direction of control when pair the drone. Don’t turn your direction Don’t turn your direction Under Headless Mode, the forward direction is the direction the pilot faces when the pilot pairs the drone with the transmitter. If the pilot pushes the direction joystick forward, the drone will fly away from you.
-
Page 24: Wi-Fi Camera Function
<Wi-Fi CAMERA FUNCTION > APP Installation This drone is equipped with FPV real-time camera function as well as gravity sensor control function. Please download the “HS-D2”App to use these functions. Registered trademarks APP Store is a trademark of Apple Inc. Google Play is a trademark of Google Inc. -
Page 25: Wi-Fi Connection
<Wi-Fi CAMERA FUNCTION > Wi-Fi Connection 1. Power on your drone, then go into your phone settings, select Wi-Fi, then connect to “HolyStoneFPV***” siginal. 2. Input the Wi-Fi password: 6264657134 3. Once the drone is successfully connected, exit the settings menu on your phone, and open the“... -
Page 26: Trouble Shooting
< TROUBLE SHOOTING > THE PROBLEM REASON SOLUTION 1. Refer to the preparation The indicator lights of the 1. Communication between the for FLIGHT and pair again. drone are flashing and does drone and transmitter is bad. 2.Recharge the battery. not respond to the transmitter. -
Page 27: General Information
GENERAL INFORMATION FCC Notice: This device complies with Part 15 of the FCC Rules. Operation is subject to the following two conditions: (1) This device may not cause harmful interference. (2) This device must accept any interference received, including interference that may cause undesired operation. NOTE: This equipment has been tested and found to comply with the limits for a Class B digital device, pursuant to Part 15 of the FCC Rules. - Page 28 RF Exposure The equipment complies with FCC radiation exposure limits set forth for an uncontrolled environment. This device should be installed and operated with minimum distance 20cm between the radiator & your body. IC Notice: This device complies with Canada Industry licence-exempt RSS standard(s).
- Page 29 Déclaration d'exposition aux radiations: Cet équipement est conforme aux limites d'exposition aux rayonnements IC établies pour un environnement non contrôlé. Cet équipement doit être installé et utilisé avec un minimum de 20 cm de distance entre lasource de rayonnement et votre corps. HOW TO RECYCLE THIS PRODUCT This symbol on the product or its documentation indicates that it must not be disposed of with household waste.
- Page 30 6.Never charger on a flammable surface, near flammable products or inside a vehicle (perferably place the battery in a non-flammable and non-conductive container). 7.Never leave the battery unattended during the charging process. Never disassemble or modify the housing’s wiring, or puncture the cells.
- Page 31 EU and Safety Directive 2009/48/EC have been fully fulfilled on our product with indication below: Product Name: Remote control four axis series Model /Trademark: HS160/HOLY STONE The Statement of compliance is available at the following address: http://www.holystone.com/Download/CE/HS160_EU_DOC.pdf This product can be used across EU member states.
Need help?
Do you have a question about the HS160 and is the answer not in the manual?
Questions and answers