Table of Contents
Advertisement
Advertisement
Table of Contents

Related Manuals for Pakon F-235 Series


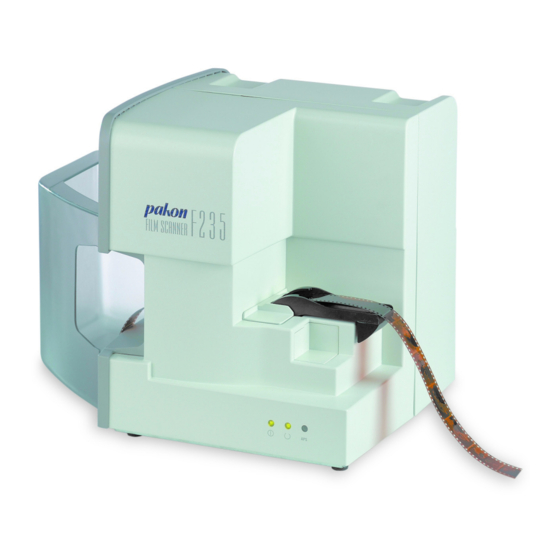
Summary of Contents for Pakon F-235 Series
- Page 1 F-235 Series User Manual...
-
Page 2: Scanner Specifications
6ft. USB 2.0 Cable • Software and User Manual CD • Power Cord Size • 17.3”W x 13.6”H x 12.6”D with cover on Resolutions There are three supported resolutions. 4Base 1000 x 1500 8Base 1400 x 2100 Pakon Part#124603-F February 24, 2004... -
Page 3: Light Source
35mm DX codes are read using the ISO 1007 specifications and are used by the host manager. • APS encoding will only be read by a full roll of film, and will not be read from an APS strip. Pakon Part#124603-F February 24, 2004... - Page 4 3. Connect the USB 2.0 cable to the back of the scanner. 4. Connect the USB 2.0 cable to the back of the computer, in a USB 2.0 port. Do not plug in to a USB 1.0 connector! Pakon Part#124603-F February 24, 2004...
- Page 5 6. Insert F-235 Software CD. The computer will prompt the user to locate the driver software. This driver software is located in the C:\Program Files\Pakon\F235Driver folder. 7. The install will ask for authorization to install the driver despite it not having been “digitally signed.”...
-
Page 6: Bios Configuration
PXE Boot to Lan Disable PCI to DRAM Prefetch Disable SCSI BIOS Configuration These settings should be followed in the SCSI BIOS of the SCSI card used in the Pakon computer system, if SCSI is present. Option Setting Sync. Transfer Rates... -
Page 7: Hard Disk Configuration
2. Click on “Disk Management” to begin configuring the drives. 3. Right-click on the un-allocated space on disk 1, which should be the secondary master drive. 4. The “Create Partition Wizard” will open. Click “Next” to begin. Pakon Part#124603-F February 24, 2004... - Page 8 6. Use the full size of the drive, unless making a Disaster Recovery partition. A “Disaster Recovery” partition is used by Pakon, to back-up the C:\ to make a system recovery option available. If no system back-up drive will be used, use the full size of the secondary drive for the scanner buffer drive.
- Page 9 7. Assign this drive to be N:. Select N: and click “Next.” 8. It is imperative to NOT format this partition. Select “Do not format this partition.” 9. Review the settings on the new drive, to finish click “Next.” Pakon Part#124603-F February 24, 2004...
- Page 10 10. Verify that the Disk Management screen looks correct before closing the program. Pakon Part#124603-F February 24, 2004...
-
Page 11: Operational Information
The F-235C scanner has the ability to scan film from an APS cartridge without having to manually remove the film from the cartridge. 1. Open the MOF door by pressing down on the button to the right of the door itself. Pakon Part#124603-F February 24, 2004... - Page 12 2. Insert the cartridge with the film door facing the film track entrance. Pakon Part#124603-F February 24, 2004...
- Page 13 The film gate opens and closes depending on the size of the film being scanned. It will open for 35mm film and close for APS film. This gate will open or close automatically when a different film size is selected. Pakon Part#124603-F February 24, 2004...
-
Page 14: Led Indicator Lights
•Use a lint-free cloth daily to clean the cover of the scanner and the surface of the table it is positioned on. •Clean or replace the air filter on the back of the scanner once per week. Pakon Part#124603-F February 24, 2004... -
Page 15: Operator Maintenance
Cleaning the Illuminator with Compressed Air 1. Turn off the scanner. 2. Disconnect the USB and power cables. 3. Gently remove the side panel of scanner, by pulling back on it. It should snap out of place. Pakon Part#124603-F February 24, 2004... - Page 16 5. Turn the scanner on. 6. Remove the small film path cover. 7. Aim the hose of a can of compressed air into the film path--aiming for the clear piece of glass in the middle. Pakon Part#124603-F February 24, 2004...
- Page 17 2. Gently remove the side cover. 3. Using a long cotton swab, dabbed in isopropyl alcohol, clean the illuminator bar inside the film track assembly. (The illuminator bar is a small piece of glass, sitting upright.) Pakon Part#124603-F February 24, 2004...
- Page 18 CAUTION: Use gloves when replacing the scanner light bulb. Fingerprints can damage the light bulb. VORSICHT: Die Lampe kann heiß sein. Lassen Sie die Glühlampe abkühlen, bevor Sie sie austauschen. Berühren Sie die Scanner-Glühlampe nur mit Handschuhen. Fingerabdrücke können die Glühlampe beschädigen. Pakon Part#124603-F February 24, 2004...
- Page 19 3. Disconnect the USB and power cables. 4. Gently remove the side cover by pulling on it. It will snap out of place. 5. Gently pull off the back cover. It should snap off much like the side cover. Pakon Part#124603-F February 24, 2004...
- Page 20 11. Rest the wide end of the bulb on the top edge of the wire harness, do not push or force it downward. 12. Spin or rotate the bulb so that the two prongs line up with the grooves in the lamp ballast. Pakon Part#124603-F February 24, 2004...
-
Page 21: Cleaning The Fan Filter
VORSICHT: Berühren Sie keine Bauteile, mit Ausnahme des Ventilators und der Filter. Zahlreiche Bauteile an der Rückseite des Scanners sind heiß und dürfen daher nicht berührt werden. Pakon Part#124603-F February 24, 2004... - Page 22 7. Pull straight back on the plastic fan cover until it comes free from the scanner housing. 8. Remove the filter from inside the cover, and rinse with tap water; replace if necessary. Replace the filter only after it has dried completely. Pakon Part#124603-F February 24, 2004...
- Page 23 3. Position the tip of the compressed air hose on both sides of the film track exit, and blow. 4. After cleaning the film track, run the ‘Film Track Test’ in the client interface program. 5. Verify the scanner is properly reading DX codes by scanning a roll of film. Pakon Part#124603-F February 24, 2004...
- Page 24 APS films. 1. Remove the film guide assembly piece shown below: 2. Pinching the tab on both sides of the film guide assembly. 3. This will expose the MOF heads on the scanner. Pakon Part#124603-F February 24, 2004...
-
Page 25: Exterior Surface Cleaning
Clean surfaces with lint-free cloths or mild, non-abrasive spray type cleaners, where the cleaner is sprayed onto the cleaning cloth and not directly onto the equipment. Perform this type of cleaning only with the equipment disconnected and powered down. Pakon Part#124603-F February 24, 2004... -
Page 26: Regulatory Information
Operation of this equipment in a residential area is likely to cause harmful interfer- ence in which case the user will be required to correct the interference at his own expense. Note: Taiwan: Pakon Part#124603-F February 24, 2004... - Page 27 Humidity: 30%-90% (non-condensing) Fuse Ratings Only Pakon service technicians are qualified to replace fuses in the F-235 Scanner. Die Sicherungen im Scanner F-235 dürfen nur von Pakon-Servicetechnikern ausgetauscht werden. Seuls les techniciens du service d'entretien de Pakon sont qualifiés pour remplacer les fusibles du scanner F-235.
- Page 28 Light Bulb Replacement 12 Light Source 3 Minimum Host Computer Specifications 2 Mounted slides 3 Operation 7 power cord 4 Power LED 8 Regulatory Information 17 Replacing the Fan Filter 16 Status LED 8 Surface Cleaning 15 Pakon Part#124603-F February 24, 2004...
- Page 29 USB 2.0 hub 2 Pakon Part#124603-F February 24, 2004...
Need help?
Do you have a question about the F-235 Series and is the answer not in the manual?
Questions and answers