
Related Manuals for Extech Instruments EasyView 10


Summary of Contents for Extech Instruments EasyView 10
- Page 1 User's Guide EasyView Dual K Thermometer Model EA10 GlobalTestSupply www. .com Find Quality Products Online at: sales@GlobalTestSupply.com...
-
Page 2: Meter Description
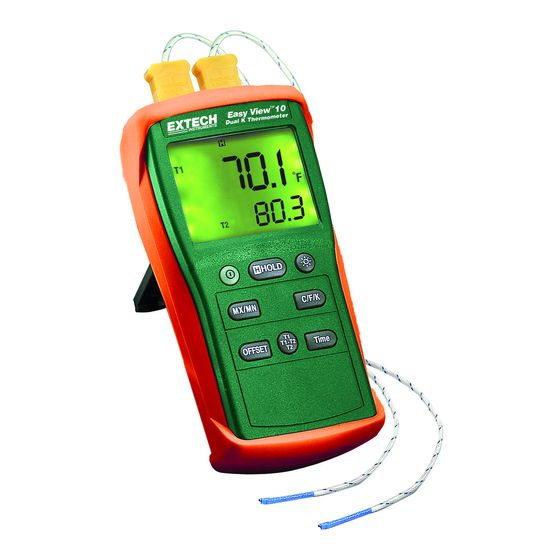
Introduction Congratulations on your purchase of the Extech EasyView Dual K Thermometer. This device offers dual thermocouple inputs with multifunction LCD display. This meter is shipped fully tested and calibrated and, with proper use, will provide years of reliable service. Meter Description LCD display Data HOLD button Power button Max/Min button OFFSET button Backlite button C/F/K units select button Elapsed TIME button T1 or T1‐T2 or T2 display select button 10. -
Page 3: Operation
Operation Connecting thermocouples 1. This meter accepts two type K thermocouples with spade plugs (sub‐miniature type with one spade wider than the other). 2. Plug the thermocouple(s) into the meter's T1 and/or T2 thermocouple input jack(s). Turn Power ON 1. Press the button to turn power on. The meter will perform a short self‐test. 2. If a probe is not inserted to the meter, an “OL” indication will appear on the display. Selecting °C, °F or °K units of measure Press the C/F/K button to select the desired temperature unit of measure. Selecting T1, T2, and T1‐T2 Displays Press the T1 T2 T1‐T2 button to step through and select a display of: T1 (thermocouple 1) displays in the upper large display and T2 (thermocouple 2) temp. displays in the lower small display. T1 plus T2 T1‐T2 plus T1 T1‐T2 plus T2 MIN, MAX, AVG Recording Function with Timer Press the MX/MN button to begin capturing the Minimum (MN), Maximum (MX), and Average (AVG) temperature values. The Elapsed Time clock will appear on the lower left of the display and the lower display will indicate the MAXIMUM (MX) value captured since the MX/MN button was pressed. Press the MX/MN button to change the lower display to reflect the stored MX to MN and then AVG value of the input selected in the upper display (T1, T2 or T1‐T2). Each reading will be accompanied by a Timer value indicating the time when each reading was recorded. Press the Time button to change the elapsed time format from min:sec to hour:min. Press and Hold the MX/MN button until the display returns to standard operation to exit the MX/MN function. Data Hold Press the HOLD button to freeze the reading in the display. The 'H' hold icon will appear on the upper left‐hand side of the display. Press the HOLD button again to return to normal operation (the 'H' hold icon will disappear). Offset The Offset Mode permits the user to store the temperature reading as a reference value and compare this reference value to subsequent temperature readings. In Offset mode, the meter displays the actual measured temperature minus the stored reference value. ... -
Page 4: Auto Power Off
Backlight Press the backlight button to turn on the LCD display backlight. The backlight will automatically turn off after one minute or press the button again to turn the light off. Auto Power OFF The meter will automatically turn off after 30 minutes if no keys are pressed during this period. Auto power off is disabled in the max/min recording mode. Turning Power OFF Press the button to turn power off. EA10–en-US_V2.2 5/16 GlobalTestSupply www. .com Find Quality Products Online at: sales@GlobalTestSupply.com... -
Page 5: General Specifications
Specifications Measurement Range ‐200 to 1999 F (‐200 to 1360 C) o o Resolution F <200 , 1 F >200 Accuracy ±(0.3% reading + 2 F) @ ‐200 F to 1831.9 F (@23 ± 5 C) ±(0.5% reading + 2 F) @ 1832 F to 1999 F ±(0.3% reading + 5 C) @ ‐200 C to ‐93.1 C ±(0.3% reading + 1 C) @ ‐93 C to 999.9 C ±(0.5% reading + 1 C) @ 1000 C to 1360 C Temperature Coefficient 0.1 times the applicable accuracy specifications per C from 0 C to C and 28 C to 50 C (32 F to 64...
Need help?
Do you have a question about the EasyView 10 and is the answer not in the manual?
Questions and answers