Table of Contents
Advertisement
Quick Links
Ambient Weather WS-5000 Wi-Fi Ultrasonic Solar Powered Wireless
Table of Contents
1.
Introduction ................................................................................................................................................................. 3
2.
Warnings and Cautions ............................................................................................................................................... 3
3.
Quick Start Guide ....................................................................................................................................................... 3
4.
Pre-Installation Checkout and Site Survey ................................................................................................................. 3
4.1
Pre Installation Checkout .................................................................................................................................... 3
4.2
Site Survey .......................................................................................................................................................... 3
5.
Getting Started ............................................................................................................................................................ 4
5.1
Parts List ............................................................................................................................................................. 4
5.2
Recommend Tools ............................................................................................................................................... 5
5.3
Sensor Array Set Up ............................................................................................................................................ 5
5.3.1
Install the Batteries in the Sensor Array ......................................................................................................... 5
5.3.2
Sensor Array Mounting .................................................................................................................................. 6
5.4
Rain Gauge Setup ............................................................................................................................................. 10
5.4.1
Install the Batteries in the Rain Gauge ......................................................................................................... 10
5.4.2
Rain Gauge Mounting .................................................................................................................................. 10
5.4.3
Install the Funnel Coil Filter ........................................................................................................................ 11
5.5
Indoor-Outdoor Thermo-Hygrometer-Barometer Transmitter .......................................................................... 12
5.6
Optional Sensors ............................................................................................................................................... 13
5.7
8-channel Indoor/Outdoor Thermo-Hygrometer (optional) .............................................................................. 13
5.8
PM2.5 Air Quality Sensor (optional) ................................................................................................................ 15
5.9
Sensor Placement .............................................................................................................................................. 15
5.10
Best Practices for Wireless Communication ..................................................................................................... 16
5.11
Display Tablet ................................................................................................................................................... 17
6.
Display Tablet Operation .......................................................................................................................................... 18
6.1
Initial Display Tablet Operation ........................................................................................................................ 18
6.2
Home Screen Display........................................................................................................................................ 19
6.3
Display Buttons ................................................................................................................................................. 20
6.4
Multi-Chanel and Scroll Mode for Optional Sensors ........................................................................................ 20
6.5
Other Console Features ..................................................................................................................................... 21
6.5.1
Weather Forecasting ..................................................................................................................................... 21
6.5.2
Wireless Signal Quality Icon ........................................................................................................................ 21
6.5.3
Weather Forecasting Description and Limitations ....................................................................................... 21
6.5.4
Lightning Icon .............................................................................................................................................. 21
6.5.5
PM2.5 Sensor (optional) .............................................................................................................................. 22
6.6
History Mode .................................................................................................................................................... 22
6.6.1
Min/Max ...................................................................................................................................................... 22
6.6.2
Archive Memory Mode ................................................................................................................................ 23
6.6.3
Graph ............................................................................................................................................................ 25
6.7
Set Mode ........................................................................................................................................................... 26
6.7.1
Set Date and Time ........................................................................................................................................ 26
6.7.2
Set Time Format ........................................................................................................................................... 28
6.7.3
Set Date Format ........................................................................................................................................... 28
6.7.4
Temperature Units of Measure ..................................................................................................................... 28
6.7.5
Barometer Units of Measure ........................................................................................................................ 28
6.7.6
Wind Speed Units of Measure...................................................................................................................... 28
6.7.7
Rainfall Units of Measure ............................................................................................................................ 28
6.7.8
Solar Radiation Units of Measure ................................................................................................................ 29
6.7.9
Multi-Channel Sensor .................................................................................................................................. 29
6.7.10
Backlight Display..................................................................................................................................... 30
Version 1.10
Weather Station User Manual
©Copyright 2020, Ambient LLC. All Rights Reserved.
Page 1
Advertisement
Table of Contents

Related Manuals for Ambient Weather WS-5000


Summary of Contents for Ambient Weather WS-5000
-
Page 1: Table Of Contents
Ambient Weather WS-5000 Wi-Fi Ultrasonic Solar Powered Wireless Weather Station User Manual Table of Contents Introduction ................................. 3 Warnings and Cautions ............................... 3 Quick Start Guide ............................... 3 Pre-Installation Checkout and Site Survey ......................... 3 Pre Installation Checkout ............................ 3 Site Survey ................................ - Page 2 6.7.11 Longitude and Latitude ..........................31 6.7.12 Barometer Display ........................... 32 6.7.13 Rainfall Season ............................33 6.7.14 Archive Interval ............................33 6.7.15 Weather Server ............................33 6.7.16 Wi-Fi Scan ............................... 38 6.7.17 Background .............................. 40 6.7.18 More ................................. 40 6.7.19 Soil Moisture Calibration .........................
-
Page 3: Introduction
1. Introduction Thank you for your purchase of the Ambient Weather WS-5000 Wi-Fi Ultrasonic Solar Powered Wireless Weather Station. The following user guide provides step by step instructions for installation, operation and troubleshooting. To download the latest manual and additional troubleshooting tips, please visit: https://help.ambientweather.net/product/ws-5000/... -
Page 4: Getting Started
8. Visit Ambient Weather Mounting Solutions for assistance and ideas for mounting your weather station: http://www.ambientweather.com/amwemoso.html 5. Getting Started The Ambient Weather WS-5000 Ultrasonic Wi-Fi Personal Weather Station consists of one indoor display tablet (RF receiver + Wi-Fi transmitter), one ultrasonic sensor array, one rain gauge, one indoor thermo-hygrometer barometer, and one user manual: 5.1 Parts List... -
Page 5: Recommend Tools
Note: Batteries are not included. We recommend Alkaline (which operate to 4 °F) or Lithium batteries (for operation to -40 °F) are recommended. Note: AC adapter is included. The adapter is a switching-type adapter and can generate a small amount of electrical interference with the RF reception in the tablet, when placed too close to the tablet. -
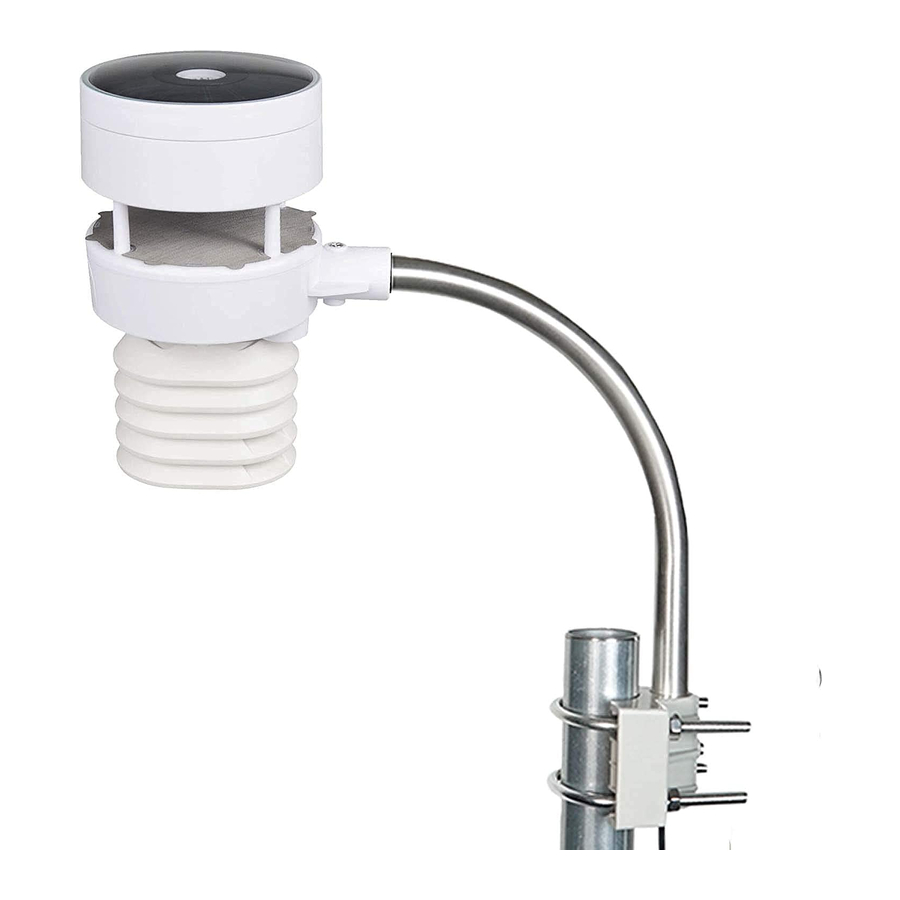
Page 6: Sensor Array Mounting
Figure 2 If the LED does no light up or flash, make sure the battery polarity is correct. Press the reset button. 5.3.2 Sensor Array Mounting Install the sensor array plastic mounting bracket to your 1” to 2” diameter pole, as shown in Figure 3 . Figure 3 If the optional ultrasonic heater was purchased, and the heater cable is required, untie and snake the heater cable through the mounting arm, as shown in Figure 4. - Page 7 Figure 4 Attach the mounting arm to the sensor array, as shown in Figure 5 . Figure 5 Pass the heater cable through the mounting bracket, as shown in Figure 6. Insert the arm into the base. Align the hole in the base with the hole in the mounting arm and inset the machine screw.
- Page 8 Figure 6 If the optional ultrasonic heater is used, connect the heater cable to the heater, and connect to AC power. Version 1.10 ©Copyright 2020, Ambient LLC. All Rights Reserved. Page 8...
- Page 9 Figure 7 Locate the North marker on the base of the senor array, as shown in Figure 8. Point this marker in the direction of North, according to your GPS or compass. Figure 8 Version 1.10 ©Copyright 2020, Ambient LLC. All Rights Reserved. Page 9...
-
Page 10: Rain Gauge Setup
5.4 Rain Gauge Setup Figure 9 Description Description Rain collector and funnel Battery door LED indicator Screw hole Bubble level U-Bolt installation hole 5.4.1 Install the Batteries in the Rain Gauge Insert 1 x AA battery into the battery compartment. Alkaline (> 4 °F) or Lithium batteries for cold weather climates (>... -
Page 11: Install The Funnel Coil Filter
Figure 11 To mount to a wooden post or flat surface, use the two included mounting screws, as shown in Figure 122. Figure 12 Use the bubble level next to the rain sensor to make sure the sensor array is completely level. Note: If you cannot read the bubble level due to mounting constraints, place straddle a line or ruler level across the top of the rain gauge for easier viewing. -
Page 12: Indoor-Outdoor Thermo-Hygrometer-Barometer Transmitter
5.5 Indoor-Outdoor Thermo-Hygrometer-Barometer Transmitter Remove the battery door on the back of the sensor, as shown in Figure 14. Figure 14 1. Insert two AA batteries. 2. After inserting the batteries, the remote sensor will display temperature, humidity and barometric pressure on the display, as shown in Figure 15. -
Page 13: Optional Sensors
Figure 16 5.7 8-channel Indoor/Outdoor Thermo-Hygrometer (optional) The WS-5000 supports up to 8 additional thermo-hygrometer sensors ( WH31) , which can be viewed on the display tablet and Internet. Note: Do not use rechargeable batteries. We recommend fresh alkaline batteries for outdoor temperature ranges between -4 °F and 140 °F and fresh lithium batteries for outdoor temperature ranges between -40 °F and 140 °F. - Page 14 2. BEFORE inserting the batteries, locate the dip switches on the inside cover of the lid of the transmitter. 3. Channel Number: The WS-5000 supports up to eight transmitters. To set each channel number (the default is Channel 1), change Dip Switches 1, 2 and 3, as referenced in Figure 18.
-
Page 15: Pm2.5 Air Quality Sensor (Optional)
8. Repeat for the additional remote transmitters, verifying each remote is on a different channel. 5.8 PM2.5 Air Quality Sensor (optional) The WS-5000 supports one indoor (PM25IN) and one outdoor (PM25) PM2.5 Air Quality sensors. For more information, please visit: https://ambientweather.net/product/pm25... -
Page 16: Best Practices For Wireless Communication
Figure 19 5.10 Best Practices for Wireless Communication Wireless communication is susceptible to interference, distance, walls and metal barriers. We recommend the following best practices for trouble free wireless communication. 1. Electro-Magnetic Interference (EMI). Keep the tablet several feet away from computer monitors and TVs. 2. -
Page 17: Display Tablet
5.11 Display Tablet Figure 20 Connect the display tablet power jack to AC power with the power adapter (included), as shown in Figure 21. Place the sensor array and indoor thermo-hygrometer transmitter about 5 to 10 feet from the display tablet and wait several minutes for the remote sensors to synchronize with the display tablet. -
Page 18: Display Tablet Operation
6. Display Tablet Operation Note: About This Section. The display tablet includes buttons at the bottom with icons signifying the menu functions. This manual includes “quick menu boxes” as shown below, signifying how to access a setting from home screen. For example, to access calibration panel, from the home screen, press the Set Key three times to view the calibration panel. -
Page 19: Home Screen Display
6.2 Home Screen Display The display tablet home screen layout is shown in Figure 23. Figure 23 Description Description WeatherUnderground.com connection icon Channel indicator AmbientWeather.net connection icon Rain rate, daily, hourly, weekly, monthly and yearly rain Wi-Fi signal strength icon. Forecast icon based on rate of change of pressure An exclamation point ! indicates the display is connected to Wi-Fi but not the Internet. -
Page 20: Display Buttons
6.3 Display Buttons Icon Description Brightness control key Press this key to enhance the brightness Brightness control key Press this key to decrease the brightness Backlight on/off key Press this key to turn on/off the display Background key Press this key to choose between dark background display and light background display Pressure display key Press this key to choose the display between Absolute pressure and Relative pressure. -
Page 21: Other Console Features
6.5 Other Console Features 6.5.1 Weather Forecasting The five weather icons are Sunny, Partly Cloudy, Cloudy, Rainy and Stormy. The forecast icon is based on the rate of change of barometric pressure. Please allow at least one month for the weather station to learn the barometric pressure over time. -
Page 22: Pm2.5 Sensor (Optional)
6.5.5 PM2.5 Sensor (optional) An optional PM2.5 sensor is available for the WS-5000. The display shows the current PM2.5 measurement, and the 24-hour running average, which is a better indication of the accumulative effect of particulates on overall health. The display features a color-coded icon with the following breakpoints:... -
Page 23: Archive Memory Mode
Press the Return Key to return to the main screen. Refer to Factory 6.10 to clear all of the highs and lows at Midnight, or manually clearing all of the highs and lows at once. 6.6.2 Archive Memory Mode You can view and clear archived memory from the Archive Memory Mode. View archive memory for all parameters, based on the date and time. - Page 24 Figure 30 To scroll to a specific page, press the Recall Page button Press the left https://ambientweather.net/help/does-not-update-ambientweather-net-osprey-series/ or right button to select a digit in the page number, press Plus or Minus button to change the number up or down. Press to change the activated option field, toggle OK or Cancel then press key to confirm.
-
Page 25: Graph
Figure 26 6.6.3 Graph Graph memory for all parameters, based on the date and time. Figure 32 Version 1.10 ©Copyright 2020, Ambient LLC. All Rights Reserved. Page 25... -
Page 26: Set Mode
Change x-axis time between Change graph parameters Switch to Min/Max display return home 12, 24, 48 and 72 hours. 6.7 Set Mode The Set Mode allows you to customize your display, manage archive data, and connect your display tablet to the Internet. - Page 27 to select month, day or year. Press to increase or decrease the value. 3. Set Time Zone. Press to set the time zone. Press to increase the time zone and decrease the time zone. With time zone highlighted, press to set Daylight Savings Time (DST). Press to toggle ON or OFF.
-
Page 28: Set Time Format
6.7.2 Set Time Format Press to change the time format between hour:minute:second (h:mm:ss), AM hour:minute:second (AM h:mm:ss) and hour:minute:second AM (h:mm:ss AM). 6.7.3 Set Date Format Press to change the date format between MM-DD-YYY, DD-MM-YYYY and YYYY-MM-DD. 6.7.4 Temperature Units of Measure Press to change the temperature units of measure between °F and °C. -
Page 29: Solar Radiation Units Of Measure
6.7.8 Solar Radiation Units of Measure Press to change the solar radiation units of measure between W/m^2, lux and fc. 6.7.9 Multi-Channel Sensor Press to view, check the status, re-register and modify the name of optional sensor channels 1-8. Figure 29 To edit the channel name, press key to select the channel name. -
Page 30: Backlight Display
Figure 30 6.7.10 Backlight Display x 10 k ey to automatically turn on and off the backlight or adjust the brightness based on the time of Press the Plus day. Figure 31 Version 1.10 ©Copyright 2020, Ambient LLC. All Rights Reserved. Page 30... -
Page 31: Longitude And Latitude
adjust up or check adjust down or uncheck scroll left scroll right scroll up scroll down return home 6.7.11 Longitude and Latitude x 11 k ey to Set longitude and latitude for your location. This calculation is used for the sunrise and Press the Plus sunset calculation. -
Page 32: Barometer Display
To determine your longitude and latitude, we recommend the following website: www.bing.com/maps Reference Figure below: 1. Enter your address and select the search button 2. The latitude (first number) and longitude (second number) are returned. In this example: Latitude = 33.2981181889772 Longitude = -111.960209459066 The table below defines the hemisphere based on the positive or negative sign: Position... -
Page 33: Rainfall Season
Note: The weather station tablet displays two different pressures: absolute (measured) and relative (corrected to sea-level). To compare pressure conditions from one location to another, meteorologists correct pressure to sea-level conditions. Because the air pressure decreases as you rise in altitude, the sea-level corrected pressure (the pressure your location would be at if located at sea-level) is generally higher than your measured pressure. - Page 34 Figure 40 scroll value up scroll value down Scroll field up Scroll field down return to Setup 1. Set Station ID. Press to highlight the Station ID. Enter your station ID obtained from Wunderground.com. Press to display the keyboard. Press to scroll to the character and press to select the character.
- Page 35 Figure 321 6.7.15.1 Registering on Wunderground.com Note: The Weather Underground website is subject to change. 1. Visit Wunderground.com, and select the Join link in the upper right and corner and create a Free Account. 2. From the menu, Select More | Add a Weather Station, or visit: https://www.wunderground.com/member/devices/new 3.
- Page 36 Register an account on AmbientWeather.net (email address and password). Once registered, select the dashboard to view your data, as shown in Figure 36. Figure 36 For a complete list of Ambient Weather apps, visit: https://ambientweather.net/help/community/ Version 1.10 ©Copyright 2020, Ambient LLC. All Rights Reserved.
- Page 37 AmbientWeather.net. Enable the skill and get started: say "Alexa, ask Ambient Weather for a weather report.". This will provide you with your outdoor weather report, but you can ask for your indoor weather report as well by saying, "Alexa, ask Ambient Weather about the indoor conditions."...
-
Page 38: Wi-Fi Scan
6.7.16 Wi-Fi Scan x 16 Press to perform a Wi-Fi Scan. Your wireless router will appear. Press to select your wireless network. Press to enter the password. Press scroll to the character and press to select the character. Press OK when complete. Press to return to the Wi-Fi Network setup page. - Page 39 6.7.16.1 Hidden SSID If the Wi-Fi network you are connecting to is hidden, please follow below steps to connect: 1) Press to select Hidden SSID setup and press key to enter. 2) Press to highlight the SSID. Press to display the keyboard and enter your SSID (not that this is case sensitive).
-
Page 40: Background
Figure 48 6.7.17 Background x 17 Press Plus to toggle between Light Mode and Dark Mode. 6.7.18 More x 18 Press Plus to view additional settings. Note: You must be running Firmware Version 1.5.3 or greater. Version 1.10 ©Copyright 2020, Ambient LLC. All Rights Reserved. Page 40... -
Page 41: Soil Moisture Calibration
Select field Scroll field up Scroll field down return to Setup Figure 38 6.7.19 Soil Moisture Calibration The soil moisture sensor provides for optional two-point linear calibration. This is important due to different soil types and density. The calibration equation is defined as: % Soil Moisture (calibrated) = (Now AD –... -
Page 42: Multi-Channel Temperature And Humidity Calibration
Customize to OFF. Select Reset to restore to factory default. Increase value Decrease value Select value Select value Scroll field up Scroll field down return to home Figure 50 To adjust the parameter, press to scroll to the parameter you wish to change. Press to highlight the sign (positive vs. - Page 43 Increase value Decrease value Select value Select value Scroll field up Scroll field down return to home Figure 39 The calibrated temperature and humidity equations are as follows: Calibrated Temperature = Measured Temperature + Temp. Offset Calibrated Humidity = Measured Humidity + Humidity Offset To adjust the parameter, press to scroll to the parameter you wish to change.
-
Page 44: Pm2.5 Air Quality Sensor Calibration
The console supports multiple sensors and sensor arrays. You can disable or enable specific sensors. To view a complete list of sensor IDs, visit: https://help.ambientweather.net/help/sensor-abbreviations-for-ws-2000-c-display-console/ For the WS-5000 weather station, the following sensor IDs are assigned: WS80BN: Ultrasonic sensor array WH40E: Rain gauge WH32B: Indoor thermo-hygrometer-barometer Version 1.10... - Page 45 Select field Scroll field up Scroll field down return to Setup Figure 40 button to edit and save settings. To register, disable or select a specific sensor, press the Figure 41 Version 1.10 ©Copyright 2020, Ambient LLC. All Rights Reserved. Page 45...
-
Page 46: Alarm Mode
Figure 55 6.8 Alarm Mode Press to Enter the Alarm Mode The upper alarm is displayed on the right and the lower alarm is displayed on the left. If the measured value is greater than the maximum alarm setting, the alarm will sound. If the measured value is less than the minimum alarm setting, the alarm will sound. -
Page 47: Calibration Mode
Figure 56 Increase alarm Decrease alarm Select value Select Scroll Scroll field Enter sub-setup return limit values limit values value field up down mode to home 6.9 Calibration Mode Press to Enter the Calibration (Correct) Mode Version 1.10 ©Copyright 2020, Ambient LLC. All Rights Reserved. Page 47... - Page 48 Figure 57 Increase Decrease Select Select Scroll field Scroll field Enter sub-setup return to calibrated value calibrated value value value down mode home To adjust the parameter, press to scroll to the parameter you wish to change. Press to highlight the sign (positive vs.
- Page 49 Without a calibrated source, wind speed can be difficult to measure. We recommend using a calibrated wind meter (available from Ambient Weather) and a constant speed, high speed fan. (7) The rain collector is calibrated at the factory based on the funnel diameter. The bucket tips every 0.004” of rain (referred to as resolution).
-
Page 50: Factory And Data Export
http://www.ambientweather.com/stprraga.html Make sure you periodically clean the rain gauge funnel. Note: The purpose of calibration is to fine tune or correct for any sensor error associated with the devices margin of error. Errors can occur due to electronic variation (example, the temperature sensor is a resistive thermal device or RTD, the humidity sensor is a capacitance device), mechanical variation, or degradation (wearing of moving parts, contamination of sensors). - Page 51 thermo-hygrometer-barometer. Press to highlight this field. Press key to select re-register indoor transmitter. Press key to popup the Message Box” Are you sure you want to register the new indoor transmitter?” Press to select Yes or No. Press the key or key to confirm the selection.
-
Page 52: Exporting Data File Format (Data Logging)
data to SD card? Press to select OK or Cancel. Press key to confirm the selection. The data is stored in comma separated value (csv) file format, which can be opened in Microsoft Excel. The TF card can be read by a computer with an SD card adaptor. It may take several minutes to write the data to the SD Card. -
Page 53: Exporting Channel 1-8 Data
17 Event Rain (in) 18 Daily Rain (in) 19 Weekly Rain (in) 20 Monthly Rain (in) 21 Yearly Rain (in) Figure 44 6.10.2 Exporting Channel 1-8 Data The SD Card must be inserted into the console and remain inserted to record channel 1-8 sensor data. Whenever there is a new data set recorded, it will be added to this file. - Page 54 Term Definition Dew Point The dew point is the temperature at which a given parcel of humid air must be cooled, at constant barometric pressure, for water vapor to condense into water. The condensed water is called dew. The dew point is a saturation temperature. The dew point is associated with relative humidity.
-
Page 55: Specifications
8. Specifications 8.1 Wireless Specifications • Line of sight wireless sensor array RF transmission (in open air): 1,000 feet, 300 feet under most conditions • Line of sight Wi-Fi RF transmission (in open air): 80 feet • Update Rate: Outdoor Sensor: 4.9 seconds, Indoor Sensor: 49 seconds •... -
Page 56: Troubleshooting Guide
5. In snowy environments, spray the top of the weather station with anti-icing silicon spray to prevent snow build 10. Troubleshooting Guide If your question is not answered here, you can contact us as follows: 1. Online Support: https://ambientweather.net/product/ws-5000 2. Email Support: support@ambientweather.com 3. Technical Support: 480-346-3380 (M-F 8am to 4pm Arizona Time) - Page 57 Problem Solution power, wait 10 seconds, and reinsert AC power). Temperature sensor reads Make certain that the sensor array is not too close to heat generating sources or strictures, too high in the daytime. such as buildings, pavement, walls or air conditioning units. Use the calibration feature to offset installation issues related to radiant heat sources.
-
Page 58: Accessories
5. The tablet does not support guest networks. Exclamation point ! next If there is an exclamation point ! next to the Wi-Fi icon on the WS-5000 display, it means to the Wi-Fi icon the display is connected to Wi-Fi but the Wi-Fi is not connected to the Internet Make sure the 2.4 GHz band on your router is connected to the Internet. -
Page 59: Warranty Information
15. California Prop 65 WARNING: Use of the Ambient Weather Products can expose you to chemicals, including lead and lead compounds, which are known to the State of California to cause cancer and bisphenol A (BPA), and phthalates DINP and/or DEHP, which are known to the State of California to cause birth defects or other reproductive harm. - Page 60 Proposition 65 does not clarify whether exposure is to be measured only in normal operation, or in the event of misuse such as intentionally damaging, incinerating or consuming an Ambient Weather Product or component and Ambient Weather has not attempted to evaluate the level of exposure.
Need help?
Do you have a question about the WS-5000 and is the answer not in the manual?
Questions and answers
My weather information will not update on my phone app. In the “Batteries” box it says that my “Indoor Battery” is low. I don’t know what indoor battery it’s referring to.
The indoor battery referred to in the Ambient Weather WS-5000 when the app indicates it is low is related to the PM2.5 indoor sensor. Firmware updates have addressed false low battery alerts for this sensor.
This answer is automatically generated
My 5000 console is no longer scrolling thru my sensor readings. I just added 2 additional sensors… they show on AWS and app phone and iPad . But not on console as prior.