Table of Contents
Advertisement
Ambient Weather WS-1400-IP OBSERVER Solar Powered
Wireless IP Weather Station User Manual
Table of Contents
1.
Introduction ..................................................................................................................................... 2
2.
Warnings and Cautions ................................................................................................................... 2
3.
Quick Start Guide ............................................................................................................................ 2
4.
Pre-Installation Checkout and Site Survey...................................................................................... 2
4.1
Pre Installation Checkout ....................................................................................................... 2
4.2
Site Survey ............................................................................................................................. 2
5.
Getting Started ................................................................................................................................ 3
5.1
Parts List ................................................................................................................................. 3
5.2
Recommend Tools .................................................................................................................. 5
5.3
Sensor Array Set Up ............................................................................................................... 5
5.3.1
Install Wind Vane ............................................................................................................... 6
5.3.2
Install Mounting Pole ......................................................................................................... 7
5.3.1
Install Batteries................................................................................................................... 9
5.3.2
Mount Weather Station ..................................................................................................... 11
5.3.3
Reset Button and Transmitter LED .................................................................................. 13
5.4
Indoor Thermo-Hygrometer-Barometer Transmitter ............................................................ 14
5.5 Best Practices for Wireless Communication ............................................................................ 15
5.6
ObserverIP Receiver ............................................................................................................. 15
5.6.1
Hardware Requirements ................................................................................................... 15
5.6.2
Software Requirements .................................................................................................... 15
5.6.3
ObserverIP Connections ................................................................................................... 16
5.6.4
Finding the ObserverIP from your computer ................................................................... 17
5.6.5
Local Device Network Settings ........................................................................................ 19
5.6.6
Weather Network Settings ................................................................................................ 20
5.6.7
Station Settings ................................................................................................................. 23
5.6.8
Live Data .......................................................................................................................... 24
5.6.9
Calibration ........................................................................................................................ 25
6.
Updating Firmware ....................................................................................................................... 29
7.
Glossary of Terms ......................................................................................................................... 31
8.
Specifications ................................................................................................................................ 32
8.1
Wireless Specifications ........................................................................................................ 32
8.2
Measurement Specifications ................................................................................................. 33
8.3
Power Consumption ............................................................................................................. 33
9.
Maintenance .................................................................................................................................. 33
9.1
Advanced Rain Gauge Cleaning .......................................................................................... 34
10.
Troubleshooting Guide ............................................................................................................. 36
11.
Accessories ............................................................................................................................... 40
12.
Liability Disclaimer .................................................................................................................. 40
13.
FCC Statement .......................................................................................................................... 40
14.
Warranty Information ............................................................................................................... 41
Version 1.7
©Copyright 2015, Ambient LLC. All Rights Reserved.
Page 1
Advertisement
Table of Contents

Related Manuals for Ambient Weather WS-1400-IP OBSERVER


Summary of Contents for Ambient Weather WS-1400-IP OBSERVER
-
Page 1: Table Of Contents
Ambient Weather WS-1400-IP OBSERVER Solar Powered Wireless IP Weather Station User Manual Table of Contents Introduction ............................. 2 Warnings and Cautions ........................2 Quick Start Guide ..........................2 Pre-Installation Checkout and Site Survey..................2 Pre Installation Checkout ....................... 2 Site Survey ..........................2 Getting Started .......................... -
Page 2: Introduction
1. Introduction Thank you for your purchase of the WS-1400-IP OBSERVER Solar Powered Wireless WiFi Weather Station. The following user guide provides step by step instructions for installation, operation and troubleshooting. To download the latest manual, firmware upgrades and IP Finder Tools, visit: http://www.ambientweather.com/observerip.html... -
Page 3: Getting Started
Please take this into consideration when choosing ObserverIP receiver or mounting locations. Make sure your ObserverIP receiver is at least five feet away from any electronic device to avoid interference. 6. Visit Ambient Weather Mounting Solutions for assistance and ideas for mounting your weather station: http://www.ambientweather.com/amwemoso.html 5. - Page 4 Item Image Sensor Array Wind Vane 5V DC Adaptor Ethernet Cable Pole (straight and crimped) Pole mounting U-bolt Pole mounting clamps Pole mounting U-bolt nuts Allen wrench Version 1.7 ©Copyright 2015, Ambient LLC. All Rights Reserved. Page 4...
-
Page 5: Recommend Tools
Item Image User manual 5.2 Recommend Tools Precision screwdriver (for small Phillips screw on battery cover door) Adjustable wrench (for mounting pole) Compass or GPS (for wind direction calibration) 5.3 Sensor Array Set Up Figure 1 Description Description Wind Vane (measures wind direction) Reset button... -
Page 6: Install Wind Vane
Wind Speed Sensor (measures wind speed) Thermo-hygrometer Sensor (measures temperature and humidity) Solar collector Solar Radiation Sensor Rechargeable battery compartment Rain Collector (self emptying) LED transmission indicator (turns on for 4 Bubble Level seconds on power up, flashes once per 16 seconds) 5.3.1 Install Wind Vane Reference Figure 2. -
Page 7: Install Mounting Pole
5.3.2 Install Mounting Pole Reference Figure 3. Remove the mounting pole collar by rotating counter clockwise. Figure 3 Version 1.7 ©Copyright 2015, Ambient LLC. All Rights Reserved. Page 7... - Page 8 Reference Figure 4. Locate and align the groove on the sensor array and mounting pole. Figure 4 Version 1.7 ©Copyright 2015, Ambient LLC. All Rights Reserved. Page 8...
-
Page 9: Install Batteries
Reference Figure 5. Turn the mounting pole collar to lock the pole into place by rotating clockwise. Figure 5 5.3.1 Install Batteries Reference Figure 6. Locate the battery door on the bottom of the sensor array. Turn the set screw counter clockwise to open the battery compartment. - Page 10 Figure 6 Version 1.7 ©Copyright 2015, Ambient LLC. All Rights Reserved. Page 10...
-
Page 11: Mount Weather Station
B. Option 2: Swedged Pole Mount. Insert the swedged end of the included mounting pole into the open end of any standard mounting pole solution (1 3/8” diameter) available from Ambient Weather, as shown in Figure 8. For more information on mounting solutions, visit: http://www.ambientweather.com/amwemoso.html Version 1.7... - Page 12 Figure 8 1. Reference Figure 9. Locate the four wind vane compass rose indicators of N, E, S, W (representing North, East, South and West). Align the compass rose direction upon final installation with a compass or GPS. Figure 9 Version 1.7 ©Copyright 2015, Ambient LLC.
-
Page 13: Reset Button And Transmitter Led
2. Reference Figure 10. Make sure the sensor array is completely level upon final installation. Failure to do so will result in inaccurate rain gauge readings. Figure 10 5.3.3 Reset Button and Transmitter LED In the event the sensor array is not transmitting, reset the sensor array. With an open ended paperclip, press and hold the RESET BUTTON for three seconds to completely discharge the voltage. -
Page 14: Indoor Thermo-Hygrometer-Barometer Transmitter
5.4 Indoor Thermo-Hygrometer-Barometer Transmitter The indoor thermometer, hygrometer and barometer measures and displays the indoor temperature, humidity and pressure and transmits this data to the ObserverIP receiver. Figure 12 Note: Do not install the thermo-hygrometer-barometer transmitter outside. This will cause errors in the barometric pressure due to large variations in temperature (barometric pressure is temperature compensated for accuracy). -
Page 15: Best Practices For Wireless Communication
Figure 13 Best Practices for Wireless Communication Note: To insure proper communication, mount the remote sensor(s) upright on a vertical surface, such as a wall. Do not lay the sensor flat. Wireless communication is susceptible to interference, distance, walls and metal barriers. We recommend the following best practices for trouble free wireless communication. -
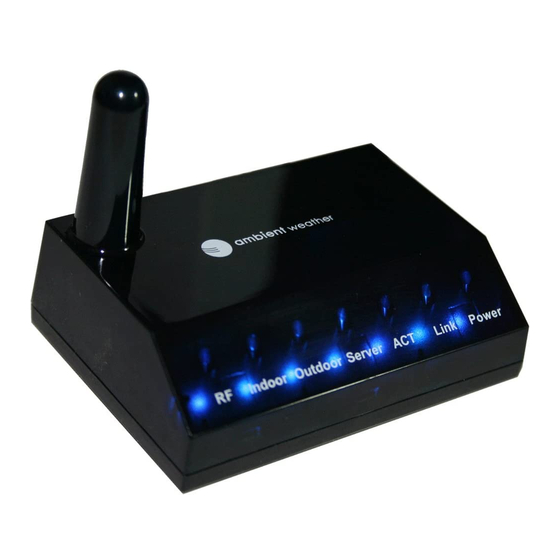
Page 16: Observerip Connections
5.6.3 ObserverIP Connections Connect the ObserverIP receiver power jack to AC power with the power adapter (included), as shown in Figure 15, reference 10. Connect the OberverIP receiver to your router using the Ethernet cable (included), as shown in Figure 15, reference 8. -
Page 17: Finding The Observerip From Your Computer
Ref. Description LAN connection (connect to router) Reset button AC Power connection Figure 15 5.6.4 Finding the ObserverIP from your computer 5.6.4.1 PC Users To find the ObserverIP receiver, launch the IP Tools application downloaded here: www.AmbientWeather.com/observerip.html The HostIP (your computers IP address) will be displayed. Press the OK button to continue. Figure 16 Select the Search button to find the ObserverIP on your local area network. - Page 18 Figure 17 Select the ObseverIP module on your network (the field will be highlighted), as shown in Figure 18, and select the Open button to view within your browser. Alternately, you can type the IP address in your web browser address bar (example, Figure 19): Figure 18 Figure 19 You are now communicating directly to the ObserverIP and can proceed to Section 5.6.5.
-
Page 19: Local Device Network Settings
is 00:0E:C6:00:00:19. We have included links to free IP Scan Tool applications here: www.AmbientWeather.com/observerip.html Figure 20 shows typical scan results. Locate the IP address of the ObserverIP by cross referencing the Mac address. In the example below, the IP address is 192.168.0.105. Figure 20 Type the IP address you located from the IP Scan Tool into your web browser (example, Figure 21): Figure 21... -
Page 20: Weather Network Settings
If you made any Static IP Address changes (not recommended), to confirm these changes, select Apply and Reboot. Note: If you incorrectly set the static IP settings and can no longer access the ObserverIP, press the reset button on the back of the module. Figure 22 5.6.6 Weather Network Settings Select the Weather Network tab to program the Weather Underground station settings. - Page 21 Note: How to create a Wunderground.com® account and station ID. 1. Join the Wunderground.com® Community. Visit: https://www.wunderground.com/members/signup.asp and sign up with Wunderground.com. 2. Join the Personal Weather Station (PWS) network. Visit: http://www.wunderground.com/personal-weather-station/signup or select More | Register Your PWS from the menu at the top of the WeatherUndeground.com website: Version 1.7 ©Copyright 2015, Ambient LLC.
- Page 22 Enter the Station ID obtained and password you entered into the ObserverIP Weather Server panel. Version 1.7 ©Copyright 2015, Ambient LLC. All Rights Reserved. Page 22...
-
Page 23: Station Settings
Note: If Wunderground.com® is not updating, make sure the Station ID and Password are correct. The Station ID is all capital letters, and the password is case sensitive. The most common issue is substituting an O for 0 in the Station ID. Example, You live in Phoenix, AZ and you are station number 11: Station ID: KAZPHOEN11, not KAZPH0EN11... -
Page 24: Live Data
Figure 24 5.6.8 Live Data Select the Live Data tab to view your live data from the weather station. To freeze the live data updates, select the Stop Refresh button. 5.6.8.1 Reset Rain During the installation of your weather station, you may report false rain do to vibration of the tipping mechanism. -
Page 25: Calibration
Figure 25 5.6.9 Calibration Select the Calibration tab to view your calibration data from the weather station. Select the Apply button to confirm changes. Calibration of most parameters is not required, with the exception of Relative Pressure, which must be calibrated to sea-level to account for altitude effects. - Page 26 5.6.9.1 Relative Barometric Pressure Calibration Example The following is an example of calibrating the relative pressure. Your results will vary. 1. The local relative pressure from TV, the newspaper or the internet for the official station in your area is 30.12 inHg. 2.
- Page 27 Parameter Type of Default Typical Calibration Source Calibration Temperature Offset Current Value Red Spirit or Mercury Thermometer (1) Humidity Offset Current Value Sling Psychrometer (2) Offset Current Value Calibrated laboratory grade Barometer barometer REL Barometer Offset Current Value Local airport (3) Wind Direction Offset Current Value GPS, Compass (4)
- Page 28 Without a calibrated source, wind speed can be difficult to measure. We recommend using a calibrated wind meter (available from Ambient Weather) and a constant speed, high speed fan. (7) The rain collector is calibrated at the factory based on the funnel diameter. The bucket tips every 0.01”...
-
Page 29: Updating Firmware
6. Updating Firmware You must own a PC to update the firmware. Sorry, Linux and Apple products are currently not supported. Ambient Weather will update your ObserverIP at no cost (appropriate shipping charges will apply). 1. Download the latest version of firmware at: http://www.ambientweather.com/observerip.html... - Page 30 Figure 28 5. Select the Upgrade Firmware button. Reference Figure 29. The dialog box will display Received a Read Request from the ObserverIP module. A green progress bar will provide you with the upgrade status. DO NOT OPERATE THE MOUSE OR KEYBOARD WHEN UPGRADING to prevent interruption of the upgrade.
-
Page 31: Glossary Of Terms
Figure 30 7. Wait about one minute for the ObserverIP module to reboot. You can now Exit the upgrade window, and access the module again, as referenced in Section 5.6.4. You may be required to enter some settings, so check all of the panels for completeness. 7. -
Page 32: Specifications
Term Definition as millibars (1 hPa = 1 mbar) Hygrometer A hygrometer is a device that measures relative humidity. Relative humidity is a term used to describe the amount or percentage of water vapor that exists in air. Inches of Mercury (inHg) Pressure in Imperial units of measure. -
Page 33: Measurement Specifications
8.2 Measurement Specifications The following table provides the specifications for the measured parameters. Measurement Range Accuracy Resolution Indoor Temperature 32 to 140 °F ± 2 °F 0.1 °F Outdoor Temperature -40 to 149 °F sensor ± 2 °F 0.1 °F -23 to 140 °F rechargeable battery range (alkaline) Indoor Humidity... -
Page 34: Advanced Rain Gauge Cleaning
Figure 31 2. Clean the solar radiation sensor every 3 months with water and towel. 3. Replace rechargeable batteries every 2 to 3 years. 9.1 Advanced Rain Gauge Cleaning If the rain gauge stops updating, it is possible for spiders and other insects to nest inside the sensor array housing and interfere with the rain gauge mechanism. - Page 35 Figure 33 Version 1.7 ©Copyright 2015, Ambient LLC. All Rights Reserved. Page 35...
-
Page 36: Troubleshooting Guide
10. Troubleshooting Guide If your question is not answered here, you can contact us as follows: 1. Email Support: support@ambientweather.com 2. Live Chat Support: www.ambientweather.com/chat.html (M-F 8am to 4pm Arizona Time) 3. Technical Support: 480-346-3398 (M-F 8am to 4pm Arizona Time) Problem Solution The maximum line of sight communication range is about 300’. - Page 37 Problem Solution The maximum line of sight communication range is about 300’. Move the Wireless remote (thermo-hygrometer) sensor assembly closer to the ObserverIP receiver. not reporting in to ObserverIP Receiver. Install a fresh set of batteries in the remote sensor(s). Make sure the remote sensors are not transmitting through solid metal (acts as an RF shield), or earth barrier (down a hill).
- Page 38 Problem Solution The maximum line of sight communication range is about 300’. Move the Wireless remote (thermo-hygrometer) sensor assembly closer to the ObserverIP receiver. not reporting in to ObserverIP Receiver. Install a fresh set of batteries in the remote sensor(s). Make sure the remote sensors are not transmitting through solid metal (acts as an RF shield), or earth barrier (down a hill).
- Page 39 Problem Solution The maximum line of sight communication range is about 300’. Move the Wireless remote (thermo-hygrometer) sensor assembly closer to the ObserverIP receiver. not reporting in to ObserverIP Receiver. Install a fresh set of batteries in the remote sensor(s). Make sure the remote sensors are not transmitting through solid metal (acts as an RF shield), or earth barrier (down a hill).
-
Page 40: Accessories
Solutions for weather stations, including tripods, pole extensions, pole mounting kits, guy wires, ground stakes and more. Ambient Weather Ambient Weather WS-1000-BATT 3 x AA Rechargeable Batteries for WS-1000-BATT 3 x AA WS-1000-WiFi Outdoor Sensor Array (replacement). Rechargeable Batteries for... -
Page 41: Warranty Information
NOTE: This equipment has been tested and found to comply with the limits for a Class B digital device, pursuant to Part 15 of the FCC Rules. These limits are designed to provide reasonable protection against harmful interference in a residential installation. This equipment generates, uses and can radiate radio frequency energy and, if not installed and used in accordance with the instructions, may cause harmful interference to radio communications.
Need help?
Do you have a question about the WS-1400-IP OBSERVER and is the answer not in the manual?
Questions and answers