Table of Contents
Advertisement
3930 Service Delivery Switch
Hardware Installation and Start-up Manual
What's inside...
Overview
Installation
Turning Up the System
Maintenance
LED Overview
Technical Specifications
Regulatory Compliance
Mounting Options
Reset Button
009-3223-001 - Standard Revision E
January 2014
©
Copyright
2012-2014 Ciena
®
Corporation. All rights reserved.
Advertisement
Table of Contents

Related Manuals for Ciena 3930 Series


Summary of Contents for Ciena 3930 Series
- Page 1 Hardware Installation and Start-up Manual What’s inside... Overview Installation Turning Up the System Maintenance LED Overview Technical Specifications Regulatory Compliance Mounting Options Reset Button 009-3223-001 - Standard Revision E January 2014 © ® Copyright 2012-2014 Ciena Corporation. All rights reserved.
- Page 2 While the information in this document is believed to be accurate and reliable, except as otherwise expressly agreed to in writing CIENA PROVIDES THIS DOCUMENT “AS IS” WITHOUT WARRANTY OR CONDITION OF ANY KIND, EITHER EXPRESS OR IMPLIED. The information and/or products described in this document are subject to change without notice.
- Page 3 Termination shall be without prejudice to any other rights or remedies Ciena may have. In the event of any termination you will have no right to keep or use the...
- Page 4 PROGRAMS, EVEN IF INFORMED OF THE POSSIBILITY OF SUCH DAMAGES IN ADVANCE 7. General. Ciena may assign this Agreement to any Ciena affiliate or to a purchaser of the intellectual property rights in the Software, but otherwise neither this Agreement nor any rights hereunder may be assigned nor duties delegated by either party, and any attempt to do so will be void.
- Page 5 Fundamentals — Optics information remains in Packet Networking Transceivers Reference (009-2011-602) — Orderable part number information removed. For ordering assistance please contact your Ciena representative. December 2012 • Revision B, Standard: — Updated to add 3930 Sync + External Timing system —...
- Page 6 January 2014 • Revision E, Standard : — Rebuilt the book to move the back cover to the end. 3930 Service Delivery Switch Hardware Installation and Start-up Manual 009-3223-001 Standard Revision E © ® Copyright 2012-2014 Ciena Corporation January 2014...
-
Page 7: Table Of Contents
Installing an Alarm Cable (Optional) 2-24 Installing a Sync Cable (Optional) 2-25 To Install a Pluggable Optic 2-26 To Remove a Pluggable Optic 2-27 3930 Service Delivery Switch Hardware Installation and Start-up Manual 009-3223-001 Standard Revision E © ® Copyright 2012-2014 Ciena Corporation January 2014... - Page 8 Local Management Port LEDs 5-7 Sync Port 5-9 Technical Specifications Regulatory Compliance Canada 7-4 CE Compliance 7-4 FCC Statement 7-4 3930 Service Delivery Switch Hardware Installation and Start-up Manual 009-3223-001 Standard Revision E © ® Copyright 2012-2014 Ciena Corporation January 2014...
- Page 9 Installing the 23” Frame Mount Bracket - 1 RU 8-10 Reset Button Creating a State Dump or Core Dump Log File 9-3 3930 Service Delivery Switch Hardware Installation and Start-up Manual 009-3223-001 Standard Revision E © ® Copyright 2012-2014 Ciena Corporation January 2014...
- Page 10 Contents 3930 Service Delivery Switch Hardware Installation and Start-up Manual 009-3223-001 Standard Revision E © ® Copyright 2012-2014 Ciena Corporation January 2014...
-
Page 11: About This Document
3930 installation personnel are required to read, understand, and observe the safety precautions described in the product manual. Related Documentation Additional supporting documentation is available through the Ciena website at http://www.ciena.com. The following list contains the names of the related documents in the suite: •... - Page 12 Packet Networking Glossary (009-3299-026) • Packet Networking Transceivers Reference (009-2011-602) Document Comments Ciena appreciates all comments that will help us improve our documentation quality. The user can submit comments through the Ciena website (http://www.ciena.com). Additional Product Information Additional product information can be obtained by contacting the local sales representative or Ciena through the contact numbers and/or e-mail addresses listed on the back of the front cover.
-
Page 13: Overview
3930, is contained in 39XX/51XX Product Fundamentals. The SDS units are designed to work with other products in the Ciena Corporation family to deliver complete, integrated service offerings from a single provider or multiple providers. The SDS devices incorporate advanced... - Page 14 • 10 MHz signal Note: The 1 PPS and 10 MHz signals require the use of SAOS software release 6.11 or higher. 3930 Service Delivery Switch Hardware Installation and Start-up Manual 009-3223-001 Standard Revision E © ® Copyright 2012-2014 Ciena Corporation January 2014...
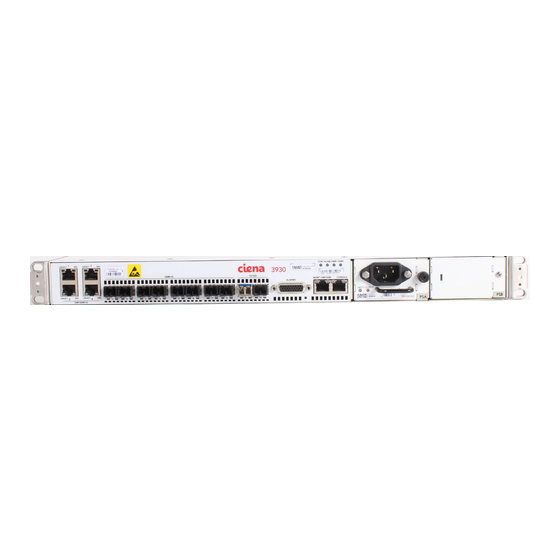
- Page 15 Front view of the 3930 (3930 Sync + External Timing system shown) 100/1000 Mbps Ports Power Modules MGMT 1/10 Gbps Ports Console SYNC Alarms 10MHz 1PPS 3930 Service Delivery Switch Hardware Installation and Start-up Manual 009-3223-001 Standard Revision E © ® Copyright 2012-2014 Ciena Corporation January 2014...
- Page 16 1-4 Overview 3930 Service Delivery Switch Hardware Installation and Start-up Manual 009-3223-001 Standard Revision E © ® Copyright 2012-2014 Ciena Corporation January 2014...
-
Page 17: Installation
8-32 x 5/16 length pan head screws used to attach the brackets to the side of the chassis. See Figure 8-2 on page 8-4.) 3930 Service Delivery Switch Hardware Installation and Start-up Manual 009-3223-001 Standard Revision E © ® Copyright 2012-2014 Ciena Corporation January 2014... -
Page 18: Required Tools And Supplies
1 PPS cable • 10 MHz cable Note: Ciena offers a coax to SMB cable for connection to the 1 PPS and 10 MHz ports. The same cable can be used for both ports. Required Tools and Supplies For rack mount installations you will also require the following tools: •... -
Page 19: Important Safety Information
WARNING: The chassis of the 3930 should never be opened under any circumstances. Opening the chassis will void the warranty. The system chassis must be returned to Ciena for service or replacement. Power supply modules and transceivers are field-replaceable, however, the modules or transceivers must be returned to Ciena for service or replacement. -
Page 20: Mounting The Device
19-inch and 23-inch equipment frames. “To Install 3930 in a Frame” on page 2-17 for a high level procedure. 3930 Service Delivery Switch Hardware Installation and Start-up Manual 009-3223-001 Standard Revision E © ® Copyright 2012-2014 Ciena Corporation January 2014... -
Page 21: Grounding
“Installing Supplemental Ground” on page 2-18 for a procedure. 3930 Service Delivery Switch Hardware Installation and Start-up Manual 009-3223-001 Standard Revision E © ® Copyright 2012-2014 Ciena Corporation January 2014... -
Page 22: Power Supply Modules
By default a filler plate is installed over the PSB slot on the right. You can relocate the filler plate to cover the PSA slot if desired. 3930 Service Delivery Switch Hardware Installation and Start-up Manual 009-3223-001 Standard Revision E © ® Copyright 2012-2014 Ciena Corporation January 2014... -
Page 23: Redundant Power
The AC socket outlet shall be installed near the equipment and WARNING: shall be easily accessible. 3930 Service Delivery Switch Hardware Installation and Start-up Manual 009-3223-001 Standard Revision E © ® Copyright 2012-2014 Ciena Corporation January 2014... -
Page 24: Dc Power Supplies
2-8 Installation Ciena offers the following AC power cables for the 3930: • AC Power Cord, IEC C13, Europe • AC Power Cord, IEC C13, North America • AC Power Cord, IEC C13, United Kingdom • AC Power Cord, C13, Universal “Installing an AC Power Supply”... -
Page 25: Transceivers
Figure 2-3 Pluggable Optic Modules 20-pin connector Bottom of module 3930 Service Delivery Switch Hardware Installation and Start-up Manual 009-3223-001 Standard Revision E © ® Copyright 2012-2014 Ciena Corporation January 2014... -
Page 26: Cable Installation And Guidelines
Use cable ties or Velcro tie wraps to secure cables. If staples are used, they must be hand installed or use a depth stop. • Use cable hangers and J-hooks. 3930 Service Delivery Switch Hardware Installation and Start-up Manual 009-3223-001 Standard Revision E © ® Copyright 2012-2014 Ciena Corporation January 2014... -
Page 27: Connecting Cables To The 3930
Ensure that both ends of the shielded cable are properly grounded. Connecting Cables to the 3930 When connecting cables to the 3930, always make only one connection at a time. Ciena recommends that cables be connected in the following order: • Synchronization cable first •... -
Page 28: Alarm Cable
Alarm sense return 5 BL/RD Alarm sense 2 OR/BK “Installing an Alarm Cable (Optional)” on page 2-24 for a procedure. 3930 Service Delivery Switch Hardware Installation and Start-up Manual 009-3223-001 Standard Revision E © ® Copyright 2012-2014 Ciena Corporation January 2014... -
Page 29: Synchronization Cable
Note: The BITS interface can be configured to be either BITS-IN or BITS- OUT. It cannot do both BITS-IN and BITS-OUT simultaneously. Ciena offers two optional cables for this interface that are 6 foot long shielded cables with the following specifications: •... -
Page 30: Gps/1Pps/Tod Cable
These ports cannot provide both input and output references simultaneously. Ciena offers a cable (170-0085-900) for connection to these ports. The cable is 6 feet long, with coax on one end and an SMB connector on the other. -
Page 31: Ethernet Cables
The use of copper or optical for Ports 1 to 4 is controlled through the software. Ciena requires the use of Cat 5 STP cables or better for the Management and copper ports. These interfaces are classified as intra-building only. The cable shield must be terminated at both ends. -
Page 32: To Install 3930 On A Wall
You have installed the 3930 on a wall. 3930 Service Delivery Switch Hardware Installation and Start-up Manual 009-3223-001 Standard Revision E © ® Copyright 2012-2014 Ciena Corporation January 2014... -
Page 33: To Install 3930 In A Frame
You have installed the 3930 in a frame. 3930 Service Delivery Switch Hardware Installation and Start-up Manual 009-3223-001 Standard Revision E © ® Copyright 2012-2014 Ciena Corporation January 2014... -
Page 34: Installing Supplemental Ground
• “Installing an AC Power Supply” on page 2-19 • “Installing a DC Power Supply” on page 2-21 3930 Service Delivery Switch Hardware Installation and Start-up Manual 009-3223-001 Standard Revision E © ® Copyright 2012-2014 Ciena Corporation January 2014... -
Page 35: Installing An Ac Power Supply
Plug the other end of the power cord(s) into a power source. The power supplies will turn on. 3930 Service Delivery Switch Hardware Installation and Start-up Manual 009-3223-001 Standard Revision E © ® Copyright 2012-2014 Ciena Corporation January 2014... - Page 36 This alarm will be cleared when the power supply is properly initialized. The power supplies have now been installed and the system has been powered on. 3930 Service Delivery Switch Hardware Installation and Start-up Manual 009-3223-001 Standard Revision E © ® Copyright 2012-2014 Ciena Corporation January 2014...
-
Page 37: Installing A Dc Power Supply
Table 2-1 on page 2-9 provides a summary of the DC lugs that are recommended for use with the 3930. 3930 Service Delivery Switch Hardware Installation and Start-up Manual 009-3223-001 Standard Revision E © ® Copyright 2012-2014 Ciena Corporation January 2014... - Page 38 7 step 8 to connect wires to the terminal block on the front of the second power supply. 3930 Service Delivery Switch Hardware Installation and Start-up Manual 009-3223-001 Standard Revision E © ® Copyright 2012-2014 Ciena Corporation January 2014...
- Page 39 This alarm will be cleared when the power supply is properly initialized. The power supplies have now been installed and the system has been powered on. 3930 Service Delivery Switch Hardware Installation and Start-up Manual 009-3223-001 Standard Revision E © ® Copyright 2012-2014 Ciena Corporation January 2014...
-
Page 40: Installing An Alarm Cable (Optional)
If desired, use a cable tie to secure the alarm cable to the cable support bracket or frame to further assist with cable retention. You have now installed the Alarm Cable. 3930 Service Delivery Switch Hardware Installation and Start-up Manual 009-3223-001 Standard Revision E © ® Copyright 2012-2014 Ciena Corporation January 2014... -
Page 41: Installing A Sync Cable (Optional)
RJ-45 connector on one end and the other end is un-terminated. When using this cable, the shield of the un-terminated end must be connected. The Ciena cables are 6 feet long. If a longer cable is needed a customer supplied cable should be used. The customer supplied cable must be shielded, the cable is CAT 5 or better and the shield is terminated at both ends. -
Page 42: To Install A Pluggable Optic
“Important Safety Information” on page 2-3 WARNING: This is a Class 1 laser product. Only optics that have been qualified by Ciena should be used in this product. See Packet Networking Transceivers Reference (009-2011-602) for the list of supported optics. -
Page 43: To Remove A Pluggable Optic
Pluggable optic installation instructions are provided in “To Install a Pluggable Optic” on page 2-26. 3930 Service Delivery Switch Hardware Installation and Start-up Manual 009-3223-001 Standard Revision E © ® Copyright 2012-2014 Ciena Corporation January 2014... - Page 44 2-28 Installation 3930 Service Delivery Switch Hardware Installation and Start-up Manual 009-3223-001 Standard Revision E © ® Copyright 2012-2014 Ciena Corporation January 2014...
-
Page 45: Turning Up The System
Note: The system turn-up process is similar across all systems using the SAOS software. As a result, this chapter may make reference to other products within the product family. 3930 Service Delivery Switch Hardware Installation and Start-up Manual 009-3223-001 Standard Revision E © ® Copyright 2012-2014 Ciena Corporation January 2014... - Page 46 Creating a New User Account The 3930 is preconfigured with default user accounts. The default user accounts are common to all Ciena Carrier Ethernet products and are not confidential. When you turn-up the system you need to configure new user accounts and delete the default accounts in order to protect the system.
- Page 47 You can install multiple licenses on a device. The names of the licenses and the devices on which they are supported are summarized in Table 3-2 on page 3-4. 3930 Service Delivery Switch Hardware Installation and Start-up Manual 009-3223-001 Standard Revision E © ® Copyright 2012-2014 Ciena Corporation January 2014...
- Page 48 IP subnet. For more information on provisioning commands for the remote interface, see the 39XX/51XX Command Reference. 3930 Service Delivery Switch Hardware Installation and Start-up Manual 009-3223-001 Standard Revision E © ® Copyright 2012-2014 Ciena Corporation January 2014...
- Page 49 Reset button. For a procedure see “Configuring the Local Management Interface” on page 3-14. 3930 Service Delivery Switch Hardware Installation and Start-up Manual 009-3223-001 Standard Revision E © ® Copyright 2012-2014 Ciena Corporation January 2014...
- Page 50 The following special characters are not allowed: “ % * ? ! For a procedure see “Setting the System Host Name” on page 3-16. 3930 Service Delivery Switch Hardware Installation and Start-up Manual 009-3223-001 Standard Revision E © ® Copyright 2012-2014 Ciena Corporation January 2014...
- Page 51 For a procedure see “Logging out of the System” on page 3-17. 3930 Service Delivery Switch Hardware Installation and Start-up Manual 009-3223-001 Standard Revision E © ® Copyright 2012-2014 Ciena Corporation January 2014...
-
Page 52: Logging In Through The Serial Console Port
Enter the default user name and password. username = su password = wwp You have logged in to the system. 3930 Service Delivery Switch Hardware Installation and Start-up Manual 009-3223-001 Standard Revision E © ® Copyright 2012-2014 Ciena Corporation January 2014... - Page 53 When you are finished creating user accounts, save and complete the process. configuration save You have created a user account. 3930 Service Delivery Switch Hardware Installation and Start-up Manual 009-3223-001 Standard Revision E © ® Copyright 2012-2014 Ciena Corporation January 2014...
- Page 54 When you are finished deleting user accounts, save and complete the process. configuration save You have deleted a user account. 3930 Service Delivery Switch Hardware Installation and Start-up Manual 009-3223-001 Standard Revision E © ® Copyright 2012-2014 Ciena Corporation January 2014...
-
Page 55: Managing Licenses
Partial License Detected - This means that one or more, but not all, operationally enabled modules have a key installed for this license. You have installed the license. 3930 Service Delivery Switch Hardware Installation and Start-up Manual 009-3223-001 Standard Revision E © ® Copyright 2012-2014 Ciena Corporation January 2014... -
Page 56: Configuring The Remote Management Interface
Validate that your changes were made. interface remote show Save and complete the process. configuration save You have configured the remote management interface. 3930 Service Delivery Switch Hardware Installation and Start-up Manual 009-3223-001 Standard Revision E © ® Copyright 2012-2014 Ciena Corporation January 2014... -
Page 57: Accessing The Cli Using Telnet
SAOS is True Carrier Ethernet TM software. Welcome to the shell. You have logged in to the CLI using Telnet. 3930 Service Delivery Switch Hardware Installation and Start-up Manual 009-3223-001 Standard Revision E © ® Copyright 2012-2014 Ciena Corporation January 2014... -
Page 58: Configuring The Local Management Interface
| MTU | 1500 +----------------------+-------------------+-----------------+-----------------+ Save and complete the process. configuration save You have configured the Local Management Interface. 3930 Service Delivery Switch Hardware Installation and Start-up Manual 009-3223-001 Standard Revision E © ® Copyright 2012-2014 Ciena Corporation January 2014... -
Page 59: Configuring An Interface Using Dhcp
| DHCP Server | :: +------------------------------------+---------------------+ Save and complete the process. configuration save You have configured an Interface using DHCP. 3930 Service Delivery Switch Hardware Installation and Start-up Manual 009-3223-001 Standard Revision E © ® Copyright 2012-2014 Ciena Corporation January 2014... -
Page 60: Setting The System Host Name
_alpha_MainSt_CO>: system set host-name 3930_Alpha_MainSt_CO Save and complete the process. configuration save You have set the System Host Name. 3930 Service Delivery Switch Hardware Installation and Start-up Manual 009-3223-001 Standard Revision E © ® Copyright 2012-2014 Ciena Corporation January 2014... -
Page 61: Logging Out Of The System
Remove the cable connecting the console port to the serial port on the terminal or PC. You have logged out of the system. 3930 Service Delivery Switch Hardware Installation and Start-up Manual 009-3223-001 Standard Revision E © ® Copyright 2012-2014 Ciena Corporation January 2014... - Page 62 3-18 Turning Up the System 3930 Service Delivery Switch Hardware Installation and Start-up Manual 009-3223-001 Standard Revision E © ® Copyright 2012-2014 Ciena Corporation January 2014...
-
Page 63: Maintenance
Note: If you have opted to power both DC power supplies from the same circuit, you will need to power down the system to replace a power supply. Ciena recommends that each power supply be fed from a separate circuit This chapter provides maintenance instructions related to the power supply modules. -
Page 64: Ac Power Supplies
If the DC power supplies are both powered off the same breaker, the power supply replacement will be a service impacting maintenance. As a result, Ciena recommends that each DC power supply be connected to a separate breaker. “Replacing a DC Power Supply” on page 4-4 for a procedure. -
Page 65: Replacing An Ac Power Supply
The power supply has now been replaced. 3930 Service Delivery Switch Hardware Installation and Start-up Manual 009-3223-001 Standard Revision E © ® Copyright 2012-2014 Ciena Corporation January 2014... -
Page 66: Replacing A Dc Power Supply
Note: The ground connection should be made first. Tighten the set screws on the terminal block with a Phillips screwdriver. 3930 Service Delivery Switch Hardware Installation and Start-up Manual 009-3223-001 Standard Revision E © ® Copyright 2012-2014 Ciena Corporation January 2014... - Page 67 PSB - Status LED is solid green, Input LED is solid green • PWR - solid green The power supply has now been replaced. 3930 Service Delivery Switch Hardware Installation and Start-up Manual 009-3223-001 Standard Revision E © ® Copyright 2012-2014 Ciena Corporation January 2014...
- Page 68 4-6 Maintenance 3930 Service Delivery Switch Hardware Installation and Start-up Manual 009-3223-001 Standard Revision E © ® Copyright 2012-2014 Ciena Corporation January 2014...
-
Page 69: Led Overview
LEDs proceed through the normal startup behavior with the STAT LED blinking green until the system has initialized. 3930 Service Delivery Switch Hardware Installation and Start-up Manual 009-3223-001 Standard Revision E © ® Copyright 2012-2014 Ciena Corporation January 2014... -
Page 70: Unit Status Leds
Unit Status LEDs on 3930 Standard and 3930 Sync systems Status LEDs Figure 5-2 Unit Status LEDs on a 3930 Sync + External Timing system Status LEDs 3930 Service Delivery Switch Hardware Installation and Start-up Manual 009-3223-001 Standard Revision E © ® Copyright 2012-2014 Ciena Corporation January 2014... - Page 71 1588, SyncE, etc). Blinking Green System is acquiring synchronization. Yellow System is in holdover timing mode. 3930 Service Delivery Switch Hardware Installation and Start-up Manual 009-3223-001 Standard Revision E © ® Copyright 2012-2014 Ciena Corporation January 2014...
-
Page 72: Power Supply Leds
• Output power is not within the specified limits. • System ordered power shutdown • Locally determined over-temperature condition. 3930 Service Delivery Switch Hardware Installation and Start-up Manual 009-3223-001 Standard Revision E © ® Copyright 2012-2014 Ciena Corporation January 2014... -
Page 73: 10 Gigabit Ethernet Port Leds
The port is currently receiving or transmitting Ethernet packets. Yellow Port speed is 1 Gbps. Green Port speed is 10 Gbps. 3930 Service Delivery Switch Hardware Installation and Start-up Manual 009-3223-001 Standard Revision E © ® Copyright 2012-2014 Ciena Corporation January 2014... -
Page 74: 10/100/1000 Mbps Port Leds
The port is currently receiving or transmitting Ethernet packets. Port speed is 10/100 Mbps. (Right LED) Yellow Port speed is 1000 Mbps. 3930 Service Delivery Switch Hardware Installation and Start-up Manual 009-3223-001 Standard Revision E © ® Copyright 2012-2014 Ciena Corporation January 2014... -
Page 75: Local Management Port Leds
MGMT LEDs on 3930 Standard and 3930 Sync systems LNK/ACT Figure 5-7 MGMT LEDs on a 3930 Sync + External Timing system LNK/ACT 3930 Service Delivery Switch Hardware Installation and Start-up Manual 009-3223-001 Standard Revision E © ® Copyright 2012-2014 Ciena Corporation January 2014... - Page 76 Blinking Green The port is currently receiving or transmitting Ethernet packets. Port speed is 10/100 Mbps. Yellow Not used. 3930 Service Delivery Switch Hardware Installation and Start-up Manual 009-3223-001 Standard Revision E © ® Copyright 2012-2014 Ciena Corporation January 2014...
-
Page 77: Sync Port
BITS-Out port is not provisioned or active. Green BITS-Out is provisioned and enabled. Blinking green BITS port is in maintenance state. 3930 Service Delivery Switch Hardware Installation and Start-up Manual 009-3223-001 Standard Revision E © ® Copyright 2012-2014 Ciena Corporation January 2014... - Page 78 5-10 LED Overview 3930 Service Delivery Switch Hardware Installation and Start-up Manual 009-3223-001 Standard Revision E © ® Copyright 2012-2014 Ciena Corporation January 2014...
-
Page 79: Technical Specifications
• Maximum Power 3930 Standard: 70 W Consumption 3930 Sync: 72 W 3930 Sync + External Timing: 95 W 3930 Service Delivery Switch Hardware Installation and Start-up Manual 009-3223-001 Standard Revision E © ® Copyright 2012-2014 Ciena Corporation January 2014... - Page 80 Outdoor Street Cabinets, huts and other Temperature unconditioned locations -40C to +65C (-40F to 149F) • Operating Humidity 5 - 95%, non-condensing 3930 Service Delivery Switch Hardware Installation and Start-up Manual 009-3223-001 Standard Revision E © ® Copyright 2012-2014 Ciena Corporation January 2014...
- Page 81 • The alarm will function normally if a resistance of 8.6K or less and a voltage of +/- 6.8 V or less is introduced into the loop. 3930 Service Delivery Switch Hardware Installation and Start-up Manual 009-3223-001 Standard Revision E © ® Copyright 2012-2014 Ciena Corporation January 2014...
- Page 82 6-4 Technical Specifications 3930 Service Delivery Switch Hardware Installation and Start-up Manual 009-3223-001 Standard Revision E © ® Copyright 2012-2014 Ciena Corporation January 2014...
-
Page 83: Regulatory Compliance
EN 55022 (2006) with amendment A1 (2006) EN 61000-3-2 (2006) FCC Part 15 (2009) (US) ICES-003 Issue 4 (2004) (Canada) Environmental RoHS 2002/95/EC WEEE 2002/96/EC 3930 Service Delivery Switch Hardware Installation and Start-up Manual 009-3223-001 Standard Revision E © ® Copyright 2012-2014 Ciena Corporation January 2014... - Page 84 Regulatory Approval Declarations for 3930 Sync + External Timing systems Issue Approval/Declaration Agency Marks CE (Europe) C-Tick (Australia and New Zealand) NRTL Listed VCCI (Japan) 3930 Service Delivery Switch Hardware Installation and Start-up Manual 009-3223-001 Standard Revision E © ® Copyright 2012-2014 Ciena Corporation January 2014...
- Page 85 CAN/CSA 22.2 No. 60950-1-07 (Canada) EN 60950-1: 2006, with A1: 2010 and A11: 2009 (EU) IEC 60950-1: 2005, with A1:2009 (International) 3930 Service Delivery Switch Hardware Installation and Start-up Manual 009-3223-001 Standard Revision E © ® Copyright 2012-2014 Ciena Corporation January 2014...
-
Page 86: Canada
If necessary, the user should consult the dealer or an experienced radio/ television technician for additional suggestions. Modifications to this product not authorized by Ciena could void the FCC approval and negate your authority to operate the product. VCCI - Japan This is a Class A product. -
Page 87: Mounting Options
Mounting Options Ciena has qualified some mounting brackets that can be used to mount the 1 rack unit products in the portfolio. This chapter contains the detailed mounting instructions for 1 RU products only. The instructions will also specify which products each bracket has been approved for. - Page 88 The installation procedure is essentially the same for all units. The main difference will be the location of the mounting holes on the sides of the units varies between equipment. 3930 Service Delivery Switch Hardware Installation and Start-up Manual 009-3223-001 Standard Revision E © ® Copyright 2012-2014 Ciena Corporation January 2014...
-
Page 89: 19" Frame Mount Bracket - 1 Ru
8-32 x 5/16 length pan head screws (used to attach the brackets to the side of the chassis). 3930 Service Delivery Switch Hardware Installation and Start-up Manual 009-3223-001 Standard Revision E © ® Copyright 2012-2014 Ciena Corporation January 2014... - Page 90 Two screws will be used to attach each bracket to the chassis. For a procedure see “Installing the 19” Frame Mount Bracket - 1 RU” on page 8-8. 3930 Service Delivery Switch Hardware Installation and Start-up Manual 009-3223-001 Standard Revision E © ® Copyright 2012-2014 Ciena Corporation January 2014...
-
Page 91: 23" Frame Mount Bracket - 1 Ru
Figure 8-2 on page 8-4. For a procedure see “Installing the 23” Frame Mount Bracket - 1 RU” on page 8-10. 3930 Service Delivery Switch Hardware Installation and Start-up Manual 009-3223-001 Standard Revision E © ® Copyright 2012-2014 Ciena Corporation January 2014... -
Page 92: Installing The Wallmount Bracket
5140 — beginning with hole 3, install screws in holes 3, 4 and 1. • 3920 — beginning with hole 5, install screws in holes 5, 6, 9 and 12. 3930 Service Delivery Switch Hardware Installation and Start-up Manual 009-3223-001 Standard Revision E © ® Copyright 2012-2014 Ciena Corporation January 2014... - Page 93 For detailed cabling information, see the hardware install manual for the unit. You have successfully mounted the unit. 3930 Service Delivery Switch Hardware Installation and Start-up Manual 009-3223-001 Standard Revision E © ® Copyright 2012-2014 Ciena Corporation January 2014...
-
Page 94: Installing The 19" Frame Mount Bracket - 1 Ru
8-32 screws provided in the kit. One screw is used per bracket. Figure 8-2 on page 8-4 shows the Cable Supports installed on the mounting bracket. 3930 Service Delivery Switch Hardware Installation and Start-up Manual 009-3223-001 Standard Revision E © ® Copyright 2012-2014 Ciena Corporation January 2014... - Page 95 For detailed cabling information, see the hardware installation manual for the unit. You have successfully mounted the unit. 3930 Service Delivery Switch Hardware Installation and Start-up Manual 009-3223-001 Standard Revision E © ® Copyright 2012-2014 Ciena Corporation January 2014...
-
Page 96: Installing The 23" Frame Mount Bracket - 1 Ru
3930, 3932, 3940, 3960, 5142 and 5160 — install screws in holes 5 and 6. • 3920 — install screws in holes 1 and 2. 3930 Service Delivery Switch Hardware Installation and Start-up Manual 009-3223-001 Standard Revision E © ® Copyright 2012-2014 Ciena Corporation January 2014... - Page 97 For detailed cabling information, see the hardware installation manual for the unit. You have successfully mounted the unit. 3930 Service Delivery Switch Hardware Installation and Start-up Manual 009-3223-001 Standard Revision E © ® Copyright 2012-2014 Ciena Corporation January 2014...
- Page 98 8-12 Mounting Options 3930 Service Delivery Switch Hardware Installation and Start-up Manual 009-3223-001 Standard Revision E © ® Copyright 2012-2014 Ciena Corporation January 2014...
- Page 99 Figure 9-1 Location of the 3930 Reset Button (3930 Standard and 3930 Sync systems) 3930 Service Delivery Switch Hardware Installation and Start-up Manual 009-3223-001 Standard Revision E © ® Copyright 2012-2014 Ciena Corporation January 2014...
- Page 100 Note 2: Pressing the reset button will also result in an LED indication. The LED behavior is described in “LED Overview” on page 5-1. 3930 Service Delivery Switch Hardware Installation and Start-up Manual 009-3223-001 Standard Revision E © ® Copyright 2012-2014 Ciena Corporation January 2014...
-
Page 101: Creating A State Dump Or Core Dump Log File
• Core dump log files: /tmp/corefiles/ These files can be used to assist with troubleshooting the system. 3930 Service Delivery Switch Hardware Installation and Start-up Manual 009-3223-001 Standard Revision E © ® Copyright 2012-2014 Ciena Corporation January 2014... - Page 102 9-4 Reset Button 3930 Service Delivery Switch Hardware Installation and Start-up Manual 009-3223-001 Standard Revision E © ® Copyright 2012-2014 Ciena Corporation January 2014...
- Page 104 Hardware Installation and Start-up Manual © ® Copyright 2012-2014 Ciena Corporation. All rights reserved. Publication: 009-3223-001 Document status: Standard Revision E Document release date: January 2014 CONTACT CIENA For additional information, office locations, and phone numbers, please visit the Ciena web site at www.ciena.com...
Need help?
Do you have a question about the 3930 Series and is the answer not in the manual?
Questions and answers