Hunter Douglas Silhouette Installation Operation Care
Window shadings softtouch motorization
Hide thumbs
Also See for Silhouette:
- Installation operation and care (24 pages) ,
- Installation operation care (24 pages) ,
- Installation and care manual (24 pages)

Related Manuals for Hunter Douglas Silhouette


Summary of Contents for Hunter Douglas Silhouette
- Page 1 Installation Operation Care • • Silhouette and Nantucket ™ ® Window Shadings SoftTouch Motorization ™...
-
Page 2: Table Of Contents
Troubleshooting ....................18 Care: Removing the Shading...................24 Cleaning Procedures .....................24 Warranty ....................Back Cover Questions? Call Hunter Douglas Consumer Support at 1-888-501-8364. © 2018 Hunter Douglas. All rights reserved. All trademarks used herein are the property of Hunter Douglas or their respective owners. -
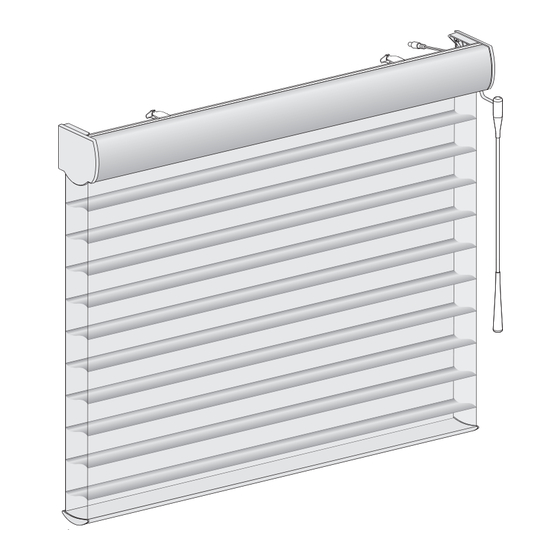
Page 3: Getting Started
GETTING STARTED Product View Battery Wand Battery Wand Clips Power Cable Installation Brackets Activation Limit Stops Wand Magnetic Hold-Down Brackets Weight (Optional) Bottom Rail Clip Balance Weight Weight Clip... -
Page 4: Tools And Fasteners Needed
(Not Provided) Extension Bracket) Importance of Limit Stops on Silhouette and Nantucket Window Shadings Limit stops serve as the upper travel limit for the bottom rail, preventing it from rotating around the fabric roll. Limit stops are located 6" from the ends of the headrail or are centered on shadings less than 36"... -
Page 5: Installation
INSTALLATION Installation Overview To install your shading, you will need to perform the following three steps: STEP 1: Mount the Installation Brackets STEP 2: Mount the Battery Wand and Connect the Power Cable, If Applicable STEP 3: Install the Shading STEP 4: Connect the Power Source, If Applicable STEP 1 —... -
Page 6: Inside Mount
INSTALLATION Mount the Installation Brackets — Inside Mount Prepare the Installation Brackets The purpose of the back cover bracket is to provide an attachment for the optional back cover. The top tab ensures that there is clearance for the battery wand. If using the optional back cover: ■... - Page 7 INSTALLATION Mark the location of the screw holes. ■ The minimum depth required for mounting is 2" ➤ with a battery wand and a back cover. Minimum depth is 1 with a satellite battery " ➤ pack or 18V DC power supply and back cover. Minimum The depth required for fully recessed mounting ➤...
-
Page 8: Outside Mount
INSTALLATION Mount the Installation Brackets — Outside Mount Mount the Installation Brackets Center the headrail over the window opening at the desired height. Use a pencil to lightly ■ mark each end of the headrail. Alternatively, measure the width of the headrail and use that width to mark the headrail ➤... - Page 9 INSTALLATION Center the installation brackets or extension brackets on your marks and mark where to drill ■ the screw holes. A minimum 1 " flat vertical surface is required for the installation brackets. Extension ➤ brackets require 1 ". The tops of the installation brackets or extension brackets should be at the desired ➤...
- Page 10 INSTALLATION If using spacer blocks, attach the spacer block(s) and ■ installation bracket to a flat vertical mounting surface with #6 screws long enough for a secure installation. Longer IMPORTANT: Do not add more than 1 " of Spacer Screw Blocks clearance using spacer blocks. IMPORTANT: The tops of the installation brackets must be level with the front edges aligned.
-
Page 11: End Mount
Back Cover Bracket INSTALLATION Top Tab Mount the Installation Brackets — End Mount Back Cover Slots Bottom Tab End mount the headrail when conventional mounting techniques will not work — for example, in an arched window opening. If you ordered a back cover, attach the back cover ■... -
Page 12: Step 2 - Mount The Battery Wand And Connect The Power Cable, If Applicable
INSTALLATION STEP 2 — Mount the Battery Wand and Connect the Power Cable, If Applicable For an optional satellite battery pack, 18V DC power supply, 18V DC power supply with daisy- chain connections, C-size satellite battery wand, or large DC power supply, the power source will be connected after the shading is installed. -
Page 13: Step 3 - Install The Shading
INSTALLATION STEP 3 — Install the Shading Install the Optional Back Cover (If Applicable) The optional back cover is used on inside mounts only. Install the back cover into the back cover brackets on the rear of the installation brackets, as ■... - Page 14 INSTALLATION If You Have an Optional Dust Cover (For Outside Mount Shadings)... The dust cover is used to protect the top of the headrail from exposure on outside mounted shadings. Cut the dust cover to desired width. ■ Remove Paper Remove the paper backing on one side of the hook and loop ■...
-
Page 15: Step 4: Connect The Power Source, If Applicable
INSTALLATION STEP 4: Connect the Power Source, If Applicable If you have attached the battery wand in step 2, proceed to “Unpack the Wand and Attach to ■ Activation Arm” on page 15. NOTE: When power is connected to the motor, a green LED inside the control side end cap will flash to indicate the shading is ready for operation. - Page 16 INSTALLATION Plug the power cable from the shading into ■ the extension cable. Battery Wand Cover Plug the other end of the extension cable ■ Extension Cable into the socket in the battery wand. Power Cable from Shading Proceed to “Unpack the Wand and Attach to Activation Arm” on page 15. 18V DC Power Supply Connect the Power Supply Plug the power cable from the shading...
-
Page 17: Unpack The Wand And Attach To Activation Arm
INSTALLATION 18V DC Power Supply with Daisy-Chain Connections The daisy-chain feature allows up to three PowerView shadings to be powered by a single 18V ® DC power supply. However, each shading can operate independently. The daisy-chain feature is only available with the 18V DC power supply option. Route the power cables from each shading to the connector, using an extension cable, ■... -
Page 18: Attach Magnetic Hold-Down Brackets (Optional)
INSTALLATION Attach Magnetic Hold-Down Brackets (Optional) Lower the shading, keeping the vanes closed. ■ Place the magnetic hold-down brackets onto the bottom rail just inside ■ the end caps, oriented as shown. Bottom Hold the brackets while opening and closing the vanes. (It may be ■... -
Page 19: Operation
OPERATION Basic Operation To Open the Shading Push the wand up and release to move the shading in ■ the up/open direction. The shading will move to the fully open position. ■ To Close the Shading Pull the wand down and release to move the shading in ■... -
Page 20: Troubleshooting
Latch Press the cap on until it latches. NOTE: Hunter Douglas recommends AA alkaline batteries for use with our battery- powered shadings. These will provide more than one year of operation, depending on usage. Lithium and rechargeable batteries are not recommended. - Page 21 OPERATION Problem The shading does not operate when pushing up or pulling down the wand. Solution Unplug the power cable from the motor and lift the wand to discharge any residual power, then plug the power cable back in. A green LED should flash to indicate the motor has power.
- Page 22 OPERATION Problem The shading raises or lowers unevenly, the fabric rubs against one end of the headrail, or the bottom rail is uneven when fully raised. Solution Check that the window is square by measuring the diagonals. Check that the installation brackets are level. Shim to level, if necessary. Adjust the Bottom Rail Weight: Release the weight clips by inserting ■...
- Page 23 OPERATION Problem The shading is hard to raise or lower, or will not raise or lower. Solution Shadings cannot be forced into tight inside mount window openings. If an inside mount, check that the headrail is installed correctly. Make sure there is clearance between the ends of the shading and the window casement.
- Page 24 OPERATION Problem The shading limits need to be adjusted. Solution Adjust the Upper Limit. NOTE: Programming mode timeout is 20 seconds. If there is no action within 20 seconds, programming mode exits. Move the shading to the fully open position (shading is completely inside the ■...
- Page 25 OPERATION Problem The shading limits need to be adjusted. Solution Adjust the Vanes Open and Vanes Closed Limits. Both limits must be set in sequential order when in programming mode. The mechanical limit is when the shading is at the maximum fully closed (down) position and the vanes have moved to the open position.
-
Page 26: Care
Carefully pull the headrail to completely ■ remove the shading from the brackets. Cleaning Procedures Silhouette and Nantucket Window Shadings are made of 100% polyester, which means they ® ™ are inherently durable and resilient. However, care must be taken to avoid wrinkling the fabric, particularly where the vanes meet the facings. - Page 27 These may stain or destroy the finish. A Note About Silhouette and Nantucket Fabrics As with all textiles, Silhouette and Nantucket fabrics are subject to some variations. Slight wrinkling, puckering, or bowing is inherent to this textile product and should be considered normal, acceptable quality.
-
Page 28: Warranty
2. Visit hunterdouglas.com for additional warranty information, frequently asked questions and access to service locations. 3. Contact Hunter Douglas at (888) 501-8364 for technical support, certain parts free of charge, for assistance in obtaining warranty service or for further explanation of our warranty.
Need help?
Do you have a question about the Silhouette and is the answer not in the manual?
Questions and answers