Hunter Douglas Silhouette Installation Operation And Care
Window shadings
Hide thumbs
Also See for Silhouette:
- Installation operation care (28 pages) ,
- Installation and care manual (24 pages) ,
- Installation and care (20 pages)

Related Manuals for Hunter Douglas Silhouette


Summary of Contents for Hunter Douglas Silhouette
- Page 1 Installation Operation Care • • Silhouette and Nantucket ™ ® Window Shadings EasyRise , LiteRise , UltraGlide 2 Click and ™ ® ® Walk Away , and UltraGlide Lifting Systems ™...
-
Page 2: Table Of Contents
Cleaning Procedures ............... 19 Safety: Warning ................. 21 Cord Loop Shadings ..............21 Questions? Call the Hunter Douglas Customer Information Center at 1-888-501-8364. © 2014 Hunter Douglas. All rights reserved. All trademarks used herein are the property of Hunter Douglas. -
Page 3: Getting Started
GETTING STARTED Product View Back/Dust Cover (Optional) Installation Bracket Headrail Top Limits Headrail End Cap Cord Loop Tensioner Magnetic Hold-Down Brackets (Optional) Handle Tassel Not Shown: UltraGlide (Nantucket Only) ™ Two-On-One Headrail Shading Installation Bracket Top Limit Headrail Headrail End Cap Cord Loop Cord Loop Not Shown: LiteRise Two-On-One Headrail... -
Page 4: Tools And Fasteners Needed
GETTING STARTED Thank you for purchasing Hunter Douglas Silhouette or Nantucket window shadings. ® ™ With proper installation, operation, and care, your new shadings will provide years of beauty and performance. Please thoroughly review this instruction booklet before beginning the installation. If your shading has a protective plastic cover on the fabric-covered headrail, keep the plastic in place until the shading is installed. -
Page 5: Installation
INSTALLATION Installation Overview Your order will include the correct number of installation brackets for your shading width, as ■ shown in the table below. Panel Width Brackets Required 12" – 36" " – 79" Installation " – 96" Bracket " – 120" Two-On-One Headrail Shadings. -
Page 6: Mount The Installation Brackets - Inside Mount
INSTALLATION Mount the Installation Brackets — Inside Mount Mark 2" – 3" from each jamb for bracket location. ■ If more than two installation brackets came with your order, space additional bracket(s) ➤ evenly between the two end brackets and mark their location. Mount into wood Lever whenever possible. -
Page 7: Mount The Installation Brackets - Outside Mount
INSTALLATION Use a level to check that the mounting surface is level. Shim the brackets, if necessary (use ■ the top tab that was removed from the brackets). Use a " drill bit to drill holes for the mounting screws. ■... - Page 8 INSTALLATION Use pliers to break off both top and bottom removable tabs from the ■ Lever installation brackets. Center each installation bracket on your marks and mark the location ■ of the screw holes. Bottom CautIon: The rear of the spacer blocks/brackets must be flush against a flat mounting surface.
-
Page 9: Mount The Installation Brackets - End Mount
INSTALLATION Mount the Installation Brackets — End Mount End mount the headrail when conventional mounting techniques will not work — for example, in an arched window opening. Extension Bracket Mount the extension brackets on a surface at least ■ " wide. "... -
Page 10: Install The Shading
INSTALLATION Install the Shading Lever Headrail Peel back the protective ■ covering from the top of the fabric-covered headrail. Leave Installation the rest of the protective Bracket Slide the Headrail covering on the front of the Between the Lever and the Bracket. headrail. -
Page 11: Final Adjustments
INSTALLATION Final Adjustments Adjust the Cord Length for UltraGlide 2 Click and Walk Away (Silhouette ® ® ™ and UltraGlide (Nantucket ) Only ™ Adjusting the tassel to eye level will decrease the amount of pulls needed to raise and lower the shading. - Page 12 INSTALLATION Attach the Magnetic Hold-Down Brackets (Optional) Lower the shading, keeping the vanes closed. ■ Place the magnetic hold-down bracket onto the bottom rail just inside ■ the end cap, oriented as shown. Bottom Hold the bracket while opening and closing the vanes (it may be ■...
- Page 13 INSTALLATION Attach the Dust Cover (Optional for Outside Mounts and End Mounts) The dust cover is used to protect the top of the headrail from exposure on outside mounted shadings. Cut the dust cover to desired width. ■ Remove Paper Remove the paper backing on one side of the hook and loop ■...
-
Page 14: Operation
OPERATION Operate the Shading To Lower and Open the Vanes of the Shading EasyRise Shadings ™ To Lower the Shading and Open the Vanes Pull the rear cord of the ■ cord loop down to lower the shading. With the shading fully ■... - Page 15 OPERATION UltraGlide 2 Click and Walk Away Shadings (Silhouette Only) ® ® To Lower the Shading and Open the Vanes Pull the cord toward the center of the ■ shading. Listen for a “click” and then release the cord. Lower...
- Page 16 OPERATION UltraGlide Shadings (Nantucket Only) ® To Lower the Shading and Open the Vanes Pull the cord down toward the center of the ■ shading with long strokes. Lower Allow the cord to retract completely into the and Open ■ Vanes by headrail after each downward stroke.
- Page 17 OPERATION LiteRise Shadings ® To Lower Slowly and steadily pull down on the ■ bottom rail handle to lower. To Open With your thumb on the front of the ■ handle and fingers on the back, gently pull the back of handle down and away from the shading to open the vanes.
-
Page 18: Troubleshooting
OPERATION Troubleshooting Problem Vanes do not align on side-by-side shadings. Solution Vane alignment is only guaranteed within " when shadings are ordered at the same time, at the same height, with the same color and fabric, and when specified on the order form. Check that the windows are square and the same height. - Page 19 OPERATION Problem The shading raises or lowers unevenly or the bottom rail is uneven when fully raised. Solution Check that the window is square by measuring the diagonals. Check that the installation brackets are level. Shim to level, if necessary. Adjust the bottom rail weight (not applicable for LiteRise shadings).
- Page 20 OPERATION Problem EasyRise Shadings Only: The universal cord tensioner grabs onto the cord upon operation. Solution Check that the universal cord tensioner is mounted properly. Reinstall, if necessary. Problem. LiteRise Shadings Only: Vanes will not open. ® Solution With your thumb on the front of the handle and fingers on the back, gently pull the back of handle down and away from the shading to open.
-
Page 21: Care
Carefully pull the shading to remove it from the brackets. ■ Cleaning Procedures Silhouette and Nantucket window shadings are made of 100% polyester, which means they ® ™ are inherently durable and resilient. However, care must be taken to avoid wrinkling the fabric, particularly where the vanes meet the facings. - Page 22 These may stain or destroy the finish. A Note About Silhouette and Nantucket Fabrics As with all textiles, Silhouette and Nantucket fabrics are subject to some variations. Slight wrinkling, puckering, or bowing is inherent to this textile product and should be considered normal, acceptable quality.
-
Page 23: Warning
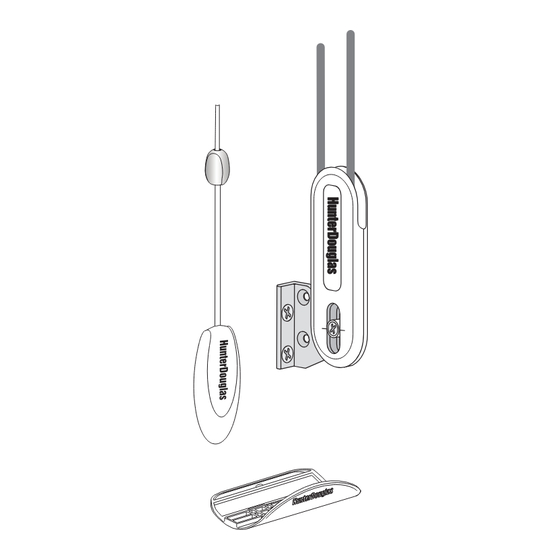
See Attach the Universal Cord Tensioner (UCT) on page 8. This can prevent children from pulling cord loops around their necks. Hunter Douglas provides a cord tensioner installation kit with ■ instructions for attaching the cord tensioner. For the shading to operate properly, the cord tensioner must be correctly mounted and secured. - Page 24 2. Visit hunterdouglas.com for additional warranty information, frequently asked questions and access to service locations. 3. Contact Hunter Douglas at (888) 501-8364 for technical support, certain parts free of charge, for assistance in obtaining warranty service or for further explanation of our warranty.
Need help?
Do you have a question about the Silhouette and is the answer not in the manual?
Questions and answers